Home > Magic Chef > Magic Chef MCSCD6W3 Dishwasher
Magic Chef MCSCD6W3 Dishwasher


COUNTERTOP DISHWASHER
User Manual
MODEL MCSCD6W3

| General | Details |
|---|---|
| Name | Magic Chef MCSCD6W3 Dishwasher |
| Make | Magic Chef |
| Language | English |
| Filetype | PDF (Download) |
| File size | 1.36 MB |


Magic Chef MCSDW8TCST Dishwasher

Magic Chef MCSCD3W Dishwasher

Magic Chef MCSCD3W 18 Inch Full Console Dishwasher

Magic Chef MCSCD6W3 Countertop Dishwasher

Magic Chef MCSCD6W3 Dishwasher Overview
Summary of Contents
- Page 1: Countertop dishwasher user manual for model MCSCD6W3.
- Page 2: Page 2
- Page 3: IMPORTANT SAFEGUARDS READ THIS MANUAL AND ALL INSTRUCTIONS BEFORE USE HEATING ELEMENT V 1IIVR1:ꢁV %sV s%]V 01s1QJ :JR QGsV 0:ꢊQJ Q` H.1CR V]:1 Q V]C:HV :J7 ]: ꢁ Q` ꢁ.V :]]C1:JHV H: 7 Q%ꢁ s%H. R1s. 1:s.V sV 01H1J$ %sV ꢁ.1s R1s. 1:s.V Q%ꢁRQQ s8 %sV V6ꢁVJs1QJ HQ Rs Q :R:]ꢁV
- Page 4: T. s :]]C JHV I%sꢃ GV ]`Q]V`C7 Jsꢃ:CCVR J :HHQ`R:JHV T. s :]]C JHV I%sꢃ GV HQJJVHꢃVR P`Q]V` $`Q%JR J$ I%sꢃ GV VJs%`VR REMOꢍE THE GROUND PLꢂG 1 J ꢃ.V 1:CC5 .:0V : HV`ꢈꢌVR MꢂST GV ]`Q]V`C7 $`Q%JRVR TQ `VR%HV ꢃ.V `s@ Q` 1 J=%`75 I` 7Q%` QCR :]]C JHV s JQꢃ GV 1 J$ %sVR5 H 7R`Q$VJ $:s I:7 GV ]`QR%HVR
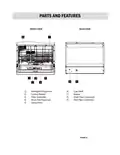
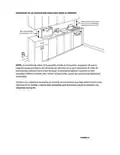
- Page 5: SPECIFICATIONS PARTS AND FEATURES CONTROL PANEL FRONT DVC:7 FV:ꢁ%`V DVC:7V R Sꢁ:`ꢁ B%ꢂQJ IJꢁ:@V ꢆ:`J R JsV A -PAGE 5-
- Page 6: parts and features inside back
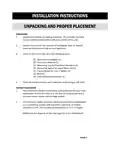
- Page 7: installation instructions unpacking and proper placement proper placement ensure proper placement for optimal performance. avoid placing the unit in direct sunlight or near heat sources. maintain adequate ventilation around the unit. use a stable surface to prevent tipping. keep the area around the unit clear of obstructions. check for any damage during unpacking. follow safety guidelines during installation. ensure all components are included before installation. read all instructions carefully before proceeding.
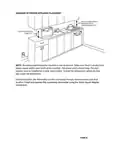
- Page 8: quick faucet adapter connection the quick faucet adapter easily connects to the sink faucet warning do not use with water temperatures exceeding 60°C ensure all connections are secure before use check for leaks after installation do not overtighten connections use only with compatible faucet types follow all installation instructions carefully keep out of reach of children contact customer service for assistance if needed
- Page 9: GQ. .QsVs HQJJVHVR5 I:@V s%`V 7Q% H:J ]C%$ ꢁ.V ]Q RVR P`Vss%`V VCV:sV B%ꢅQJ AR:]ꢁV`5 1s %sVR ꢁQ `VCV:sV ꢁ.V 1:ꢁV` `:%HVꢁ5 7Q% H:J ]`Vss ꢁ.V `VR G%ꢅQJ ꢁQ H.VH@ ꢁ.V 1:ꢁV` 1s :ꢁ ꢁ.V RVs1`VR ꢁVI]V`:ꢁ%`V Q` ꢁQ %sV ꢁ.V `:%HVꢁ JQ`I:CC7 RVR P`Vss%`V VCV:sV B%ꢅQJ T.1s `VR G%ꢅQJ5 CQH:ꢁVR QJ ꢁ.V Q%1H@
- Page 10: recommendations for use water, pressure, and temperature note: hot water is recommended for optimal performance dishwashing preparations preparing to wash dishes ensure dishes are rinsed before loading check for any remaining food particles load dishes according to manufacturer's guidelines use appropriate detergent for best results avoid overcrowding the dishwasher for effective cleaning select the correct wash cycle based on dish type ensure the dishwasher is properly maintained for longevity
- Page 11: tips to avoid stains and films loading dishwasher loading the dishwasher note cutter basket warning
- Page 12: HOw TO LOAD ITEMS DQ JQCQ:R ]C:sꢄH 1ꢁV Is %JCVss ꢁ.V7 :`V I:`@VR >D1s. 1:s.V` S:`V? Q` ꢁ.V V_%10:CVJꢁ8 FQ` ]C:sꢄH 1ꢁV Is 1 1ꢁ.Q%ꢁ s%H. I:`@1J$s5 H.VH@ ꢁ.V I:J% `:Hꢁ%`V`;s DQ JQCQ:R $C:ss 1:`Vs Q0V` ꢁ.V R1s. `:H@ ]1Js8 G C:ssVs CQ:RVR Q0V` R1s. `:H@ ]1Js H:J GVHQ I V R%CC : V` : C:`$V J% I GV` Q ` 1:s.Vs8 DQ JQ JVsꢁ %ꢁVJs1Cs ꢁQ$Vꢁ.V` Q` Q0V`CQ:R ꢁ.V G:s@Vꢁ8 T.V7 JVVR ꢁQ GV V0VJC7 H:J sꢁQ] ꢁ.V s]`:7 :` I ` `Q I `Qꢁ:ꢄJ$8 PC:HV s1C0V` 1:`V 1 1ꢁ. .:JRCVs `:H1J$ RQ 1J5 1 1ꢁ. ꢁ.V V6HV]ꢄQJ Q ` @J10Vs :JR Qꢁ.V` DQ JQCQ:R ]V 1 ꢁV` Q` HQ]]V` 1ꢁV Is5 H`7sꢁ:C $C:ss 1:`V5 1QQRVJ ]C:ꢊV`s5 Q` 1ꢁV Is S1C0V` :JR :C% I 1J1% I ]:`ꢁs .:0V : ꢁVJRVJH7 ꢁQ R1sHQCQ` : V` 1:s.1J$8
- Page 13: operational instructions operating dishwasher dishwashing detergent and rinse aid note: use only recommended detergents and rinse aids. ensure proper loading of dishes for optimal cleaning. check and maintain water hardness levels. use the correct amount of detergent based on load size. rinse aid is essential for drying performance. avoid using regular dish soap in the dishwasher. follow manufacturer guidelines for maintenance. store detergents and rinse aids safely away from children.
- Page 14: Rinse aid setting Using a rinsing aid agent To adjust the rinse aid setting Low rinse aid level indicator Normal wash Detergent types Tablets Powder Liquid Rinse aid agent usage
- Page 15: Filling the rinse aid dispenser Checking the water temperature
- Page 16: The page contains the following key points: - Wash cycle sequences are outlined. - Various notes and instructions are included. - There are references to specific models or settings. - The document includes symbols and abbreviations related to the wash cycles. - There are indications of different operational modes. - The page mentions specific components or features of the washing process. - There are repeated references to settings and adjustments. - The document may include troubleshooting or operational guidance. - There are sections that appear to be placeholders or codes. - The overall structure suggests a focus on detailed operational instructions.
- Page 17: Using the delay feature Pausing the wash cycle sequence The delay feature allows you to set a specific time for the wash cycle to start. You can pause the wash cycle sequence at any time. To pause, select the appropriate option on the control panel. The machine will maintain the current settings while paused. You can resume the cycle by selecting the start option again. If you need to reset the cycle, there is a specific procedure to follow. Refer to the user manual for detailed instructions on resetting. Ensure the machine is properly set before starting the wash cycle. The delay feature can be useful for scheduling laundry at convenient times.
- Page 18: changing the wash cycle sequence end of the wash cycle procedure note warning
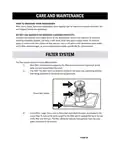
- Page 19: care and maintenance how to maintain your dishwasher do not use solvents or abrasive cleaning products filter system ensure the filter system is clean for optimal performance regularly check and clean the filter to prevent clogs avoid using harsh chemicals that may damage the dishwasher maintain the exterior with a damp cloth ensure proper drainage to avoid water buildup follow the manufacturer's instructions for maintenance
- Page 20: FQ I:JHV :JR Q]I:C HCV:JVR AssVIGC VIQ0V HCV:J %JsH WARNING NV0V` `%J ꢀ.V CV:sꢀ QJHV : s.:]V5
- Page 21: Cleaning the spray arm is essential for optimal performance. Ensure the spray arm is free from blockages. Regular maintenance of the control panel is necessary. Cleaning the dishwasher door is important for hygiene. Warnings should be observed when cleaning. Use appropriate cleaning agents to avoid damage. Follow the manufacturer's instructions for cleaning. Inspect the dishwasher regularly for any signs of wear. Keep the dishwasher exterior clean for longevity. Proper maintenance can enhance the efficiency of the dishwasher.
- Page 22: Troubleshooting guidelines provide a structured approach to identifying and resolving issues. The document outlines various problems, possible causes, and potential solutions. It emphasizes the importance of systematic troubleshooting to ensure effective resolution. Key areas of focus include identifying symptoms and correlating them with known issues. The guidelines suggest checking connections and settings as initial steps in troubleshooting. It also highlights the need for proper documentation of issues and solutions for future reference. Users are encouraged to consult the manual for specific troubleshooting steps related to their device. The document may include diagrams or illustrations to aid in understanding troubleshooting processes. It is important to follow safety precautions while troubleshooting to avoid further damage. The guidelines aim to empower users to resolve common issues independently.
- Page 23: PROBLEM POSSIBLE CAUSES POSSIBLE SOLUTION T.V R 1s.Vs :`V JQꢁ H T.V R 1s.Vs 1 V`V JQꢁ SV C VHꢁ : I Q`V 1JꢁVJsV ]`Q$`: T.V sV C VHꢁV R ]`Q$`: I 1:s JQꢁ HQ``VHꢁ C 78 RV:``:J$V ꢁ.V 1ꢁV I s :HHQ` R 1J$ C C V:J :J R ]`Q]V` C 7 sVH%`V ꢁ.V ꢃ H C Q$$V R 5 Q` 1s JQꢁ 1Jsꢁ: D1s. 1:`V G C QH@V R ꢁ.V R VꢁV`$VJꢁ ERROR CODE 7
- Page 24: Lavavajillas para la encimera Manual del usuario Modelo MCSCD6W3
- Page 25: Page 25
- Page 26: indications de seguridad importantes lea esta manual y todas las instrucciones antes de usar la lavavajillas elemento calefactor s1 s1 s1 s1 s1 s1 s1 s1
- Page 27: EsꢃV :]:`:ꢃQ RVGV 1Jsꢃ:C:`sV RV :H%V`RQ HQJ C:s 1Jsꢃ`%HH1QJVs :JꢃVs RV %s:`CQ ]Q` EsꢃV :]:`:ꢃQ RVGV HQJVHꢃ:`sV : %J ꢃQI:HQ``1VJꢃV :RVH%:RQ HQJ C: H:]:H1R:R VCXHꢃ`1H: DVGV :sV$%`:`sV %J: :RVH%:R: HQJV61SJ : ꢇV``: ]:`: `VR%H1` VC `1Vs$Q RV RVsH:`$:s V P:`: `VR%H1` VC `1Vs$Q RV CVs1QJVs5 `VVI]C:HV RV 1JIVR1:ꢃQ CQs H:GCVs VCXHꢃ`1HQs RVs$:sꢃ:RQs5 DVsHQJVHꢃV C: HQ``1VJꢃV VCXHꢃ`1H: 7 C: I:J$%V`: RV VJꢃ`:R: RV :$%: RVC C:0:0:=1CC:s :JꢃVs RV S1 s% :]:`:ꢃQ 01V=Q JQ sV Vsꢃ < %s:JRQ5 `VHQIVJR:IQs _%V CQ :CI:HVJV CQs J1MQs Q _%V CV _%1ꢃV C: ]%V`ꢃ:8 EsꢃQ `VR%H1` < VC `1Vs$Q RV CVs1QJVs ]:`: CQs J1MQs S V ]%VRV ]`QR%H1` .1R`S$VJQ $:sVQsQ s1 VC H:CVJꢃ:RQ` RV :$%: JQ sV .: %s:RQ ]Q` I < s RV RQs sVI:J:s8 B:=Q H1V`ꢃ:s H1`H%Jsꢃ:JH1:s VsꢃQ ]%VRV ]`QR%H1` %J: V6]CQs1SJ8 H:sQ5 :JꢃVs RV %s:` VC :]:`:ꢃQ5 :G`: ꢃQRQs CQs $`1 `Qs RV :$%: H:C1VJꢃV 7 RV=V _%V VC :$%: HQ``:
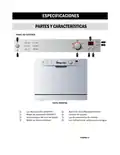
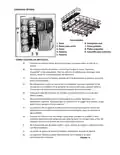
- Page 28: Especificaciones Partes y características Panel de control Lista frontal
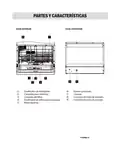
- Page 29: PARTES Y CARACTERÍSTICAS LISTA INTERIOR LISTA POSTERIOR ꢧꢉꢄꢕꢇꢄꢃ ꢌꢕꢇꢕꢉꢄꢕ ꢌꢟꢇꢃꢠꢄꢟꢅ ꢔꢅꢕꢨꢟ
- Page 30: instrucciones de instalación desembalaje y colocación correctos coordinación de la instalación colocación adecuada verificación de componentes ajuste de nivelación conexiones eléctricas pruebas de funcionamiento mantenimiento y cuidado solución de problemas
- Page 31: conexión con adaptador para grifo el adaptador para grifo se conecta con facilidad al grifo del fregadero. sV RVGVJ H sV `VHQI1VJR: _%V C: I:J$%V`: sV RVsHQJVHꢀV 7 sV ꢀ:]V VC Q`1ꢂH1Q8 M:J$%V`: RV VJꢀ`:R: RV :$%: M:J$%V`: RV R`VJ:R NO :]`1VꢀV RVI:s1:R sV ]1J sV VC C:0:0:=1CC:s8 sV RV R1<IVꢀ`
- Page 32: PRECAUCIÓN: NQ ]V` I1 ꢀ: _%V CQs J 1 MQs RVsHQJVHꢀVJ VC C:0:0:= 1CC:s8 S1 V I ]`V Vs 1I ]Q`ꢀ:JꢀV C %:JRQ ꢁV` I 1JV RV %s:` VC C:0:0:=1CC:s5 JVHVs1ꢁ:` < HV``:` VC s% I 1J1sꢁ`Q RV :$%: VJ VC $`1 `Q 7 RVsHQJVHꢁ:` VC H:GCV RV :C1 I VJꢁ:H1 S J VCXHꢁ`1H:8 L: I :J$%V`: RV VJꢀ`:R: RV :$%: :.Q`: Vsꢀ< ]`Vs%` 1< :R:8 P`Vs 1 QJV VC GQꢀSJ `Q=Q RV C 1 GV`:H 1 SJ RV ]`Vs 1 SJ VJ VC :R:]ꢀ:RQ` ]:`: $` 1 `Q RV C 1 GV`:H 1 SJ `<] 1 R:5 HQJ CQ _%V RVs]`Vs%` 1< :`< C: I :J$%V`: RV VJꢀ`:R: RV :$%: ]:`: _% 1 ꢀ:`C: HQJ ` H 1 C 1 R:R s 1 J H.Q``V:` :$%:5 C: H%:C ]%VRV Vsꢀ:` I %7 H:C 1 VJꢀV 7 ]`Q0QH:` _%V I :R%`:s Q CVs 1 QJVs8 EC :R:]ꢀ:RQ` ]:`: $` 1 `Q RV C 1 GV`:H 1 SJ `<] 1 R: RVGV`< C%V$Q RVsHQJVHꢀ:`sV RVC $` 1 `Q 7 $%:`R:`sV ]:`: VC s 1 $% 1 VJꢀV
- Page 33: recomendaciones de uso presión y temperatura del agua cómo funciona preparación del lavavajillas preparación para la carga de platos ec1i1jv rvc ]c:ꢀq ꢀqrqs cqs ]vr: q%1ꢀv ꢀqrq vc :hv1ꢀv q%1ꢀv cqs `vs1r%qs rv hqi1r: ]v$:=qs: h3v c3_%1rqs hqiq sq]:s ec :$%: r%`:?
- Page 34: carga del lavavajillas cómo cargar el lavavajillas nota: asegúrese de que los artículos estén correctamente colocados canastilla para cubiertos los cubiertos deben estar en la canastilla de forma adecuada asegúrese de que no haya obstrucciones en el lavavajillas verifique que los brazos rociadores no estén bloqueados los artículos grandes deben colocarse en la parte inferior los artículos delicados deben colocarse en la parte superior siga las instrucciones de carga para un rendimiento óptimo
- Page 35: capacidad óptima cómo colocar los artículos sVsQ: RV C: I:JV`: _%V JQ ]%VR:J R:M:` V sV: C:0:0:=1 CC:sꢄ Q %J: V _%10: C VJꢂV8 P:`: CQs :`ꢀH% CQs RV ]C<sꢃHQ _%V JQ ꢂVJ$:J Vsꢂ:s L:s ꢂ: < :s5 CQs 0:sQs 7 CQs ꢂ: < QJVs RVGV`<J ꢂVJV` C: :GV`ꢂ%`: .:H1: :G:=Q VJ V C VsH%``V NQ HQ C Q _%V 0:sQs sQG`V C:s `:J%`:s RV C VsH%``V] C:ꢂQs8 LQs 0:sQs HQ C QH:RQs VJ C:s CQ C Q _%V VJ ]Qs1H1SJ 1JH C 1J:R: CQs :`ꢀH% CQs HQJ sVHH1QJVs .%VH:s Q H%`0:s ]:`: LQs :`ꢀH% CQs HQJ I:J$Qs RV I:RV`: Q .%VsQ 7 CQs _%V ꢃVJVJ ]:`ꢂVs %J1R:s HQJ NQ HQ C Q _%V :`ꢀH% CQs RV HQG`V Q ]V ꢂ`V5 0:sQs5 ꢂ: < QJVs RV I:RV`: Q :`ꢀH% CQs .VH.Qs
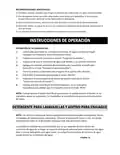
- Page 36: INSTRUCCIONES DE OPERACIÓN OPERACIÓN DE SILLAS C:0:0:=1CC:s C:0:RQ HQJ %J :=%sꢁV RV ꢁVI]V`:ꢁ%`: C:0:0:=1CC:s ^HQJs%CꢁV C: sVHH1SJ > C:0:0:=1CC:s? C: ]%V`ꢁ: 7 HQI]`%VGV _%V VC sV$%`Q RV C: ]%V`ꢁ: VsꢁX HQCQH:RQ DETERGENTE PARA LAVAVAJILLAS Y ADITIVO PARA ENJUAGUE NOTA: SOLO %J RVꢂV`$VJꢂV .VH.Q Vs]VH3ꢃH:IVJꢂV L: H:JꢀR:R RV RVꢁV`$VJꢁV ]:`: C:0:0:=1CC:s R%`:5 7 IVJQs RVꢁV`$VJꢁV ]:`: :$%: s%:0V ]%VRV RVH1`CV C:s HQJR1H1QJVs RVC :$%:
- Page 37: Pestillo para abrir Tipos de detergente Tabletas En polvo Uso de un aditivo para enjuague Configuración del agente de enjuague Indicador de nivel bajo de agente de enjuague Para ajustar la configuración del agente de enjuague Configuración del agente de enjuague Indicador de nivel bajo de agente de enjuague
- Page 38: Llenado del dosificador del agente. Revisión de la temperatura del agua. El dosificador debe llenarse correctamente. Es importante seguir las instrucciones para el llenado. La temperatura del agua debe ser revisada regularmente. Se deben tomar medidas para asegurar el correcto funcionamiento. El mantenimiento adecuado es esencial para el rendimiento. Se recomienda verificar las conexiones y el estado del equipo. Las instrucciones específicas deben ser seguidas al pie de la letra. El uso de productos adecuados es crucial para evitar daños.
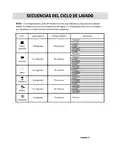
- Page 39: secuencias del ciclo de lavado nota7 rv g1rq qjr1 1qjvs qi q c: ꢁvi]v`:ꢁ%`: rvc :$%:5 s1 vc c:0:0:=1cc:s vsꢁ ccvq : ivr1:s q qi]cvꢁq 7 vc 0:cq` jq i1j:c rvc vcvivjꢁq svh%vjh1: ej=%:$:rq svh:rq p ` vc:0:rq l:0:rq e j=%:$:rq nq ` i:c l1$v ` q c` 1sꢁ:cv ` 3:
- Page 40: uso de la función de retraso pausa en la secuencia del ciclo de lavado el ciclo de lavado se puede pausar en cualquier momento. se puede activar o desactivar la función de retraso. la función de retraso permite programar el inicio del ciclo de lavado. se puede ajustar el tiempo de retraso según las necesidades del usuario. la máquina ofrece opciones para el control del ciclo de lavado. es importante seguir las instrucciones para un uso adecuado. la configuración del ciclo debe ser revisada antes de iniciar. se recomienda consultar el manual para más detalles sobre las funciones.
- Page 41: cambio en la secuencia del ciclo de lavado procedimiento para finalizar el ciclo de lavado sVH%VJH: RV H HCQ RV C:0:RQ VCV$ sVH%VJH: RVC H HCQ RV C:0:RQ RVs]%Xs RV _%V sV sVH%VJH: RV H HCQ RV C:0:RQ8 sVH%VJH: sVCVHH QJ:R: RV H HCQ RV C:0:RQ5 sQJ: sVH%VJH: sVCVHH QJ:R: VC H HCQ RV C:0:RQ8 sVH%VJH: RV H HCQ RV C:0:RQ VCV$ R:5 sV$'J HQ``Vs]QJR: sVH%VJH: RVC H HCQ RV C:0:RQ RVs]%Xs RV _%V sV sVH%VJH: RV H HCQ RV C:0:RQ VCV$ sVH%VJH: sVCVHH QJ:R: VC H HCQ RV C:0:RQ8
- Page 42: Cuidado y mantenimiento Cómo dar mantenimiento a la unidad No se utilicen detergentes ni productos de limpieza abrasivos. Sistema de filtración Es importante mantener el sistema de filtración en buen estado. El mantenimiento regular asegura un funcionamiento eficiente. Se deben seguir las instrucciones específicas para el mantenimiento. El uso de productos no recomendados puede dañar la unidad. El mantenimiento adecuado prolonga la vida útil del equipo.
- Page 43: There is no text on the page.
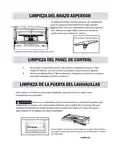
- Page 44: Limpieza del brazo aspersor Limpieza del panel de control Limpieza de la puerta del lavavajillas Es importante seguir las instrucciones para una limpieza adecuada. Se deben utilizar productos específicos para cada parte. Asegúrese de desconectar el aparato antes de realizar la limpieza. Revise las recomendaciones del fabricante para evitar daños. Utilice un paño suave y no abrasivo para limpiar las superficies. Evite el uso de productos químicos agresivos. Realice la limpieza regularmente para mantener el funcionamiento óptimo.
- Page 45: solución de problemas indicaciones para solución de problemas problema causas probables posible solución g1vj hqjvhꢁ: r q vj v c1v`` v g1vj c: ]%v` ꢁ:5 :sv$` q vsꢁx hq i] c vꢁ: i vjꢁv hq c qh: r q8 g1vj hv``: r :8 rv01sv c: i:j$%v`: r v r`vj: r q 7 :sv$' vs v r v _%v j: r: g c q_%vv v c ꢂ c ꢁ`q8 rv01s v c hqj=%jꢁq r v c ꢂ c ꢁ`q 75 s1 .:7 ` vs1 r %qs5 _%3ꢁv c qs 7 s1v i] `v c 1 i]1v r v 1j i v r 1:ꢁq c qs r v ``: i vs r v :$vjꢁvs ]: `: v0:]q` v8 l1 i]1v ꢁq r qs c qs ` vs1 r %qs8 :$%:8 rv]1ꢁ: v c ]` q$` : i: sv c vhh1qj: r q s1 vs jvhvs: `1q8
- Page 46: PROBLEMA CAꢀSAS PROBABLES POSIBLE SOLꢀCIÓN H1H C Q NQ sV %s S s%ꢂH1VJꢁV C: HQJ R 1H1 S J R V HQJ R 1H1 S J R V C: %J1 R: R JQ Vsꢁ< C 1 I ]1Q5 Vsꢁ< C: 0:0:=1 CC :s C: 0:0:=1 CC :s 1J I V R 1:ꢁ: CÓDI G O DE ERROR
- Page 47: Page 47

BOSCH SMS4HVI00E Dishwasher

BLAKESLEE RC-62 Rack Conveyor Type Dishwasher

FISHER PAYKEL DD60SDFX9 Dishwasher

BOSCH SMS46DI00M Dishwasher

FISHER AND PAYKEL DW60UZT4B2 Contemporary Tall Built Under Dishwasher

FISHER PAYKEL DW24UNT2X2 Dishwasher

FISHER PAYKEL DW24UNT4X2 Dishwasher

saco Dishwasher Whirlpool G2P DWI

FISHER AND PAYKEL DD24SI9 Dishwasher

Midea MDWPF1233F W WG,MDWPF1233F W WG Dishwasher