BOSCH SMS46DI00M Dishwasher


en
fr
Installation Instructions
Notice d’installation
es
Instrucciones de instalación
Customer Service:
1-800-944-2904
These instuctions are intended
for use by qualified installers only

| General | Details |
|---|---|
| Name | BOSCH SMS46DI00M Dishwasher |
| Make | Bosch |
| Language | English |
| Filetype | PDF (Download) |
| File size | 0.73 MB |


BOSCH SMV6ZCX49E-39 Dishwasher

BOSCH SMI4HVS33E Dishwasher

BOSCH SRV2HKX39G Dishwasher

BOSCH SGH4HVX32G Dishwasher

BOSCH SGS4HAW40G Dishwasher

BOSCH SMS4ECI26E Dishwasher

BOSCH SMS6EDI02G Free-Standing Dishwasher

BOSCH SMS6EDW02G Free-Standing Dishwasher

BOSCH SMV4HTX27G Dishwasher

BOSCH SMV4HCX48E Dishwasher

BOSCH SMS46DI00M Dishwasher Overview
Summary of Contents
- Page 1: Installation instructions are intended for use by qualified installers only.
- Page 2: Page 2
- Page 3: Important safety instructions should be read and saved. To avoid injury or property damage, observe all warnings and cautions. These instructions are intended for use by qualified installers only. The dishwasher must be installed by a qualified service technician or installer. The dishwasher drain hose must be installed at least 33″ (84 cm) off the cabinet floor. This dishwasher is intended for indoor residential use only. The dishwasher is designed to be enclosed on the top and both sides by cabinetry. Ensure all connections are properly made before moving the dishwasher into place for new installations. Check existing dishwasher connections for compatibility when replacing another dishwasher. This appliance complies with CAN/CSA-C22.2 No. 167/UL 749.
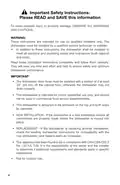
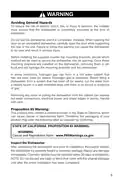
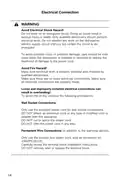
- Page 4: Avoiding general hazards is crucial to reduce the risk of electric shock, fire, or injury. The installer must ensure that the dishwasher is completely enclosed at the time of installation. Do not use the dishwasher until it is completely installed. Carefully open the door while supporting the rear of the unit on an uninstalled dishwasher. Hydrogen gas can form in a hot water system that has not been used for weeks and is explosive. Run the water from a nearby faucet in a well-ventilated area before filling a dishwasher from a system that has been off for weeks. Removing any cover or pulling the dishwasher from the cabinet can expose hot water connections, electrical power, and sharp edges. This product may contain a chemical known to the State of California, which can cause cancer or reproductive harm. Inspect the dishwasher for possible freight or cosmetic damage after unpacking and prior to installation. Report any damage immediately, and do not discard any bags or items that come with the original package until installation is complete.
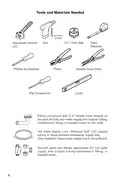
- Page 5: Tools and materials needed include a 2½” hole saw, tape measure, drill, adjustable wrench, pliers, Phillips screwdriver, needle nose pliers, level, and flat screwdriver. An elbow connection with 3/4” female hose threads is required for the water supply line. The hot water supply line must have a minimum of 3/8″ O.D. copper tubing or a metal braided dishwasher supply line. A shut-off valve and fittings appropriate for the hot water supply line are also necessary.
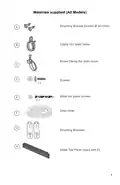
- Page 6: Materials supplied (All models) Mounting bracket screws Ø 4x13mm Clamp (for drain hose) Screw clamp (for drain hose) Screws Metal toe panel screws Drain hose Mounting brackets Metal toe panel (used with drain hose)
- Page 7: Materials supplied are model dependent and apply to fully integrated dishwashers only. An installation guide for fully integrated door panels is included.
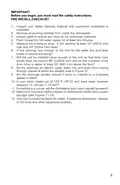
- Page 8: Important safety instructions must be read before beginning installation. Unpack the unit and retain packing material until installation is complete. Remove all packing material from inside the dishwasher. Inspect parts to ensure all necessary materials are available. Flush the household hot water supply for at least two minutes. Measure the enclosure area to ensure it meets the required dimensions. Check that the opening is near enough to the sink for water line and drain hose access. Ensure the drain hose length does not exceed the specified limit and is raised appropriately. Verify that openings for electric cable, water line, and drain hose routing fit within the designated area. Confirm that the water heater is set to the correct temperature and water pressure is within the specified range.
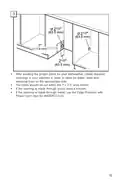
- Page 9: After locating the proper place for your dishwasher, create required openings in your cabinets in order to allow for water, drain and electrical lines on the appropriate side. The holes should be cut within the 7 x 2.5 area shown. If the opening is made through wood, sand it smooth. If the opening is made through metal, use the Edge Protector with Power Cord clips Kit SMZEPCC1UC.
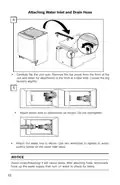
- Page 10: Attaching water inlet and drain hose Carefully flip the unit over. Remove the toe panel from the front of the unit and retain for attachment to the front at a later time. Loosen the leg levelers slightly. Attach elbow joint to dishwasher as shown. Do not overtighten. Attach hot water line to elbow. Use two wrenches to tighten to avoid putting stress on the water inlet valve. Avoid cross-threading! It will cause leaks. After attaching hose, temporarily hook up the water supply then turn on water to check for leaks.
- Page 11: Flip the unit back upright, ensuring the waterline is not pinched. Orient the drain hose toward the direction of the sink. Route the hose toward the sink prior to connection. Attach the drain hose elbow to the back of the unit using pliers to install the spring clamp. Pre-level the unit before positioning it under the counter by adjusting the feet. The maximum height the unit can be raised with feet fully extended is 34.5 inches. Position the unit under the counter to verify that it is level. If adjustment is needed, remove the unit and adjust as necessary. Insert the leg leveler locking screw in the back foot once the unit is at a satisfactory height. Step 10 will complete the leveling process.
- Page 12: Electrical connection Avoid electrical shock hazard. Do not work on an energized circuit. Only qualified electricians should perform electrical work. Care should be exercised when installing or removing the dishwasher to reduce damage to the power cord. Avoid fire hazard. Make sure electrical work is properly installed and checked by qualified electricians. Loose and improperly installed electrical connections can result in overheating. Only use the provided power cord for wall socket connections. Do not attach an extension cord or any type of modified cord or adapter with this appliance. Only use the junction box power cord, sold as Accessory kit #SMZPCJB1UC.
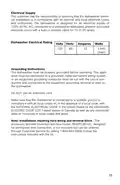
- Page 13: Electrical supply requirements must comply with national and local codes. The dishwasher operates on a supply of 120V, 60 Hz, AC. It should be connected to a dedicated, properly grounded electrical circuit. The circuit must have a fuse or breaker rated for 15 or 20 amps. The dishwasher must be properly grounded before use. It should connect to a grounded metal permanent wiring system or an equipment grounding conductor. Do not use an extension cord for the dishwasher. Ensure compliance with local codes or the National Electrical Code in the U.S. The accessory terminal block for hard wiring is not included but can be ordered. Follow the instructions included with the terminal block kit.
- Page 14: Plug the end of the supply cord securely into the back of the dishwasher, looping it through the hooks on the base. The outlet for the power supply cord should be located in a cabinet or wall adjacent to the dishwasher cabinet. Do not plug the dishwasher in until all the steps of installation are complete. Only use the included power cord. If the cord is missing, order kit SMZPC002UC through Customer Service. If clips are required for the power cord, use the Edge Protector with Power Cord clips Kit SMZEPCC1UC.
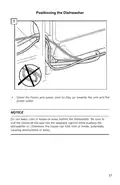
- Page 15: Positioning the dishwasher involves orienting the hoses and power cord towards the sink and power outlet. It is important not to leave coils of hoses or wires behind the dishwasher. Ensure that the hoses are pulled all the way into the adjacent cabinet while pushing the dishwasher in to prevent folding, kinking, or breaking, which can cause obstructions or leaks.
- Page 16: Level the dishwasher horizontally by turning feet clockwise to raise or counter-clockwise to lower the front of the unit. Once level, insert leg leveler locking screws and tighten.
- Page 17: Installation of mounting brackets Avoid tip over hazard. Do not use the dishwasher until it is completely installed. Carefully open the door while supporting the rear of the unit. Failure to follow this warning can result in serious injury. Decide which method of securing the dishwasher into its enclosure before installing the mounting brackets. Removing the mounting brackets after installation is difficult and will damage them and the dishwasher. If you have a fully integrated panel, do not attach mounting brackets until after attaching the panel to the door. Mount brackets on the top if your countertop is wood or other material that can easily be drilled into. Mount brackets on the sides if your countertop is stone or any very hard material that cannot be easily drilled into.
- Page 18: Attach mounting brackets to the frame with included screws.
- Page 19: Drive the mounting screws through the holes in the mounting brackets as shown for Top or Side Mount. Remove upper rack before inserting screws on the sides.
- Page 20: Water inlet connection Warning: Scalding hazard. Do not perform any work on a pressured hot water line. Only qualified plumbers should perform plumbing work. Do not attempt any work on the dishwasher hot water supply plumbing until you are certain the hot water supply is shut off. Notice: Temperatures required for soldering and sweating will damage the dishwasher. The hot water heater should be set to deliver approximately 120° F (49° C) water to the dishwasher. The hot water supply pressure must be between 15 - 145 psi (1 - 10 bar). If using a solder joint instead of a compression fitting, complete all solder connections before connecting the water supply line. Always use appropriate seals when making plumbing connections. Before connecting the water supply line to the dishwasher, flush the incoming water line for approximately 5 minutes. Check local plumbing codes for approved plumbing procedures and accessories.
- Page 21: Connect the dishwasher water supply line to the water shut off valve. If one isn’t already in the supply line, install one (not provided). You will need to use an approved dishwasher water supply line with the correct fittings for this connection. After all connections are made, turn on the hot water and check for leaks.
- Page 22: Drain connection Important notes about your drain connection: If local ordinance requires an air gap, install it according to the manufacturer’s instructions. If the dishwasher drain hose is to be connected to a disposer dishwasher drain connection, remove the plug from the disposer’s dishwasher drain connection. The dishwasher drain hose must have one place along its length that is securely attached 33″ (84 cm) above the floor. The drain hose length can be extended if necessary. Use kit #SGZ1010UC. The maximum length of the drain hose, including the hose leading to the air gap, is 150″ (380 cm). Place hose clamp (C) around end of drain hose before connecting to the plumbing. The dishwasher drain hose may be connected to the drain plumbing using an air gap in one of two ways: connect to the under sink dishwasher drain connection or connect to a disposer dishwasher drain connection.
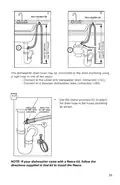
- Page 23: The dishwasher drain hose may be connected to the drain plumbing using a high loop in one of two ways. Connect to the under sink dishwasher drain connection. Connect to a disposer dishwasher drain connection. Use the clamp provided to attach the drain hose to the house plumbing as shown. If your dishwasher came with a fleece kit, follow the directions supplied in that kit to install the fleece.
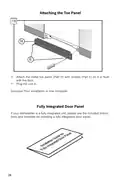
- Page 24: Attach the metal toe panel with screws so it is flush with the floor. Plug the unit in. Your installation is now complete. If your dishwasher is a fully integrated unit, see the included instructions and template for installing a fully integrated door panel.
- Page 25: Customer service information is provided for your dishwasher. Refer to the Care and Maintenance section for proper care. Consult the Troubleshooting section before calling for service. Contact your dealer or authorized service center for repairs. Unauthorized repairs may void the warranty. Follow specific steps if you are unsatisfied with service. Keep a copy of your invoice with the manual for warranty verification. Provide model number, serial number, and purchase dates when contacting support. Certified residential dishwashers are not for licensed food establishments. The dishwasher is made in the USA from US and imported parts.

hermitlux HMX-DW03 Tabletop Dishwasher

Hotpoint H8I HP42 Fully Integrated Dishwasher

BOSCH SPI2HKS08E Dishwasher

KitchenAid KDTF924PPS Flush Cabinet Dishwasher

Midea MDF18A1AWW Dishwasher

LG Electronics LDPH7972D Dishwasher

BOSCH SPV4EMX25G Dishwasher

INALTO DW42CS 45cm Compact Dishwasher

BOSCH SHP88PZ55N Fully Integrated Dishwasher

FISHER and PAYKEL DD60D4HNB9 Dishwasher