Bosch 041203 Active Water Dishwasher


| General | Details |
|---|---|
| Name | Bosch 041203 Active Water Dishwasher |
| Make | Bosch |
| Language | English |
| Filetype | PDF (Download) |
| File size | 0.39 MB |


BOSCH SMV6ZCX49E-39 Dishwasher

BOSCH SMI4HVS33E Dishwasher

BOSCH SRV2HKX39G Dishwasher

BOSCH SGS4HAW40G Dishwasher

BOSCH SGH4HVX32G Dishwasher

BOSCH SMS4ECI26E Dishwasher

BOSCH SMS6EDI02G Free-Standing Dishwasher

BOSCH SMS6EDW02G Free-Standing Dishwasher

BOSCH SMV4HTX27G Dishwasher

BOSCH SMV4HCX48E Dishwasher

Bosch 041203 Active Water Dishwasher Overview
Summary of Contents
- Page 1: Installation instructions
- Page 2: Page 2
- Page 3: Page 3
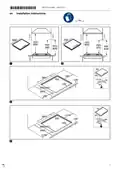
- Page 4: Do not connect the appliance to an exhaust gas system for combustion products. Never install the appliance in boats or in vehicles. The warranty applies only when using the appliance as intended. Follow these safety instructions when installing the appliance. Before installing the appliance, check that the local conditions of the supplier are compatible with the appliance settings specified on the rating plate. Secure the power cord to the cabinet to prevent it from touching hot parts of the oven or hob. Before any work is carried out on the appliance, switch off the power supply and the gas supply. Connect the appliance to the power supply using the earth. The appliance can only be used safely if it is correctly installed according to the safety instructions. All installation, connection, regulating and conversion work to a different gas type must be carried out by an authorised professional.
- Page 5: The appliance must only be installed on an oven with forced ventilation. Connect the appliance to a fixed gas pipe or a flexible metal pipe. The flexible metal pipe must not come into contact with the moving parts of the unit. If you install an oven underneath the hob, take note of the information in the oven installation instructions. If you install an exhaust air fan or an extractor hood, refer to the installation instructions for these. Make a cut-out in the worktop with the required dimensions. Seal the cut surfaces of wooden work surfaces with a special glue seal to protect them from moisture. This appliance is type Y: The connection cable must only be replaced by technical customer service. Do not use extension cables or multiple socket strips. If the country's regulations allow, this appliance can be adapted to other types of gas.
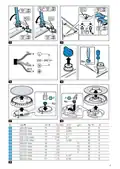
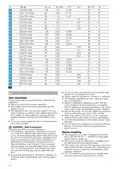
- Page 6: Mini-wok multi-crown burner Adjusting the taps Set the control elements to the minimum power level and pull them out. Never remove the sealing ring. Sealing rings prevent liquids and dirt from finding their way into the appliance. When adjusting the bypass screws, refer to the table. Replacing the nozzles Remove all pan supports, burner caps and distributors. Ensure that the nozzle does not become detached during removal or fastening. Reinstalling the appliance Install the appliance components in reverse order. Checking if equipment is working Check that turning the rotary knob does not cause the burner to go out or result in backfire. Documenting the gas type conversion Attach the sticker showing the new gas type near to the rating plate.

BOSCH 12022522 Dishwasher

little tikes 663741 First Dishwasher

SIEMENS SN45ZS07CE Dishwasher
BOSCH SHE4AEM2N Dishwasher

BOSCH SMS46KW02E Dishwasher

Haier HDW15V3S1 Dishwasher

Miele PFD 103 SCi XXL XXL Dishwasher

BOSCH SHX53CM5N 300 Series Dishwasher

seasons SDW2FCMB Front Dishwasher

FISHER PAYKEL DD60ST4ZB9 Built Under Dishwasher