BOSCH SMS6ZDI48E Dishwasher


Dishwasher
SMS6ZDI48E
[en]
Information for Use

| General | Details |
|---|---|
| Name | BOSCH SMS6ZDI48E Dishwasher |
| Make | Bosch |
| Language | English |
| Filetype | PDF (Download) |
| File size | 2.02 MB |


BOSCH SMV6ZCX49E-39 Dishwasher

BOSCH SMI4HVS33E Dishwasher

BOSCH SRV2HKX39G Dishwasher

BOSCH SGS4HAW40G Dishwasher

BOSCH SGH4HVX32G Dishwasher

BOSCH SMS4ECI26E Dishwasher

BOSCH SMS6EDI02G Free-Standing Dishwasher

BOSCH SMS6EDW02G Free-Standing Dishwasher

BOSCH SMV4HTX27G Dishwasher

BOSCH SMV4HCX48E Dishwasher

BOSCH SMS6ZDI48E Dishwasher Overview
Summary of Contents
- Page 1: Page 1
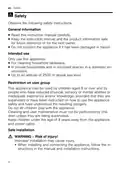
- Page 2: Safety General information Intended use Restriction on user group Safe installation Safe use Damaged appliance Risk to children Environmental protection and saving energy Familiarising yourself with your appliance
- Page 3: Customer service Product number (E-Nr.), production number (FD) and consecutive numbering (Z-Nr.) Starting the program Activating button lock Deactivate button lock Interrupting program Terminate program Switching off appliance Overview of basic settings Cleaning and servicing
- Page 4: Safety instructions should be observed. Read the instruction manual carefully. Keep the instruction manual and product information safe for future reference. Do not connect the appliance if it has been damaged in transit. Only use this appliance for cleaning household tableware. This appliance may be used by children aged 8 or over under supervision. Do not let children play with the appliance. Cleaning and user maintenance must not be performed by children unless supervised. Keep children under the age of 8 years away from the appliance and power cable. Improper installation may cause injury.
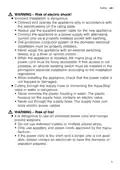
- Page 5: Safety Warning - Risk of electric shock. Incorrect installation is dangerous. Connect and operate the appliance only in accordance with the specifications on the rating plate. Always use the supplied power cable for the new appliance. Connect the appliance to a power supply with alternating current only via a properly installed socket with earthing. The protective conductor system of the domestic electrical installation must be properly installed. Never equip the appliance with an external switching device, e.g. a timer or remote control. When the appliance is installed, the mains plug of the power cord must be freely accessible. Cutting through the supply hose or immersing the Aqua-Stop valve in water is dangerous. It is dangerous to use an extended power cord and non-approved adapters.
- Page 6: Safety Contact between the appliance and installation lines may lead to a defect in these lines, e.g. gas pipes and power lines. Check that there is a distance of at least 5 cm between the appliance and installation lines. Risk of burns! If the appliance is not installed properly, this may result in burns. With free-standing appliances, ensure that they are installed with the back panel against a wall. Risk of serious harm to health! Failure to comply with safety instructions and directions for use on packagings of detergent and rinse aid products may cause serious harm to health. Follow the safety instructions and directions for use on the packagings of detergent and rinse aid products. Risk of explosion! Adding solvents to the interior of the appliance may cause explosions. Never add solvents to the interior of the appliance. Highly caustic alkaline or highly acidic cleaning agents in conjunction with aluminium parts in the interior of the appliance may cause explosions. Never use highly caustic alkaline or highly acidic cleaning agents in conjunction with aluminium parts.
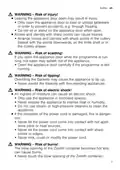
- Page 7: Safety Warning - Risk of injury! Leaving the appliance door open may result in injury. Only open the appliance door to load or unload tableware to prevent accidents. Do not sit or stand on the appliance door when open. Knives and utensils with sharp points can cause injuries. Arrange knives and utensils with sharp points in the cutlery basket with the points downwards. Warning - Risk of scalding! If you open the appliance door while the programme is running, hot water may splash out. Open the appliance door carefully if the programme is still running. Warning - Risk of tipping! Overfilling the baskets may cause the appliance to tip up. Never overfill the baskets with free-standing appliances. Warning - Risk of electric shock! An ingress of moisture can cause an electric shock. Only use the appliance in enclosed spaces. Never expose the appliance to intense heat or humidity. Do not use steam- or high-pressure cleaners to clean the appliance. If the insulation of the power cord is damaged, this is dangerous. Never let the power cord come into contact with hot appliance parts or heat sources. Warning - Risk of burns! The blow opening of the Zeolith container becomes hot and can cause burns. Never touch the blow opening of the Zeolith container.
- Page 8: Safety Damaged appliance Warning - Risk of electric shock! If the appliance or the power cord is damaged, this is dangerous. Never operate a damaged appliance. Never operate an appliance with a cracked or fractured surface. If the appliance or the power cord is damaged, immediately unplug the power cord or switch off the fuse in the fuse box and turn off the water tap. Incorrect repairs are dangerous. Repairs to the appliance should only be carried out by trained specialist staff. Risk to children Warning - Risk of suffocation! Keep packaging material away from children.
- Page 9: Safety Warning - Risk of harm to health. Children can lock themselves in the appliance, thereby putting their lives at risk. With redundant appliances, unplug the power cord. Then cut through the cord and damage the lock on the appliance door beyond repair. Warning - Risk of crushing. With higher-level appliances, children can become crushed between the appliance door and cabinet doors underneath. Keep an eye on children when opening and closing the appliance door. Warning - Risk of chemical burns. Rinse aid and detergent may cause chemical burns to the mouth, throat, and eyes. Keep children away from detergent and rinse aid products. Keep children away from the appliance when open. The water in the interior of the dishwasher is not drinking water. Warning - Risk of injury. Children may get their fingers caught in the slots of the tablet collecting tray and injure themselves. Keep children away from the appliance when open.
- Page 10: Preventing material damage Modified or damaged water hoses may result in material damage and damage to the appliance. Never kink, crush, modify or cut through water hoses. Improper installation of the appliance may cause damage. Only use the water hoses supplied with the appliance or genuine spare hoses. If the water pressure is too high or too low, the appliance may not be able to operate properly. Make sure that the water pressure in the water supply system is min. 50 kPa (0.5 bar) and max. 1000 kPa (10 bar). Escaping water vapour can damage fitted units. Special salt for dishwashers can damage the tub due to corrosion. Check that there is a distance of at least 5 cm between the appliance and the water pipe.
- Page 11: Environmental protection and saving energy Unsuitable cleaning agents may damage the appliance. Zeolith drying automatically helps to save energy. Do not use a steam cleaner. Zeolith drying lets you save energy. Zeolite is a mineral that can store moisture and heat energy. During dishwashing, heat energy is used to heat up the washing water and dry the mineral. Zeolith drying therefore saves a great deal of energy. The packaging materials are environmentally compatible and can be recycled. The Eco 50 ° programme is energy-efficient and environmentally friendly. The AquaSensor is an optical measuring device that measures the turbidity of the rinsing water.
- Page 12: Installation and connection To ensure proper operation, connect the appliance to the power and water supply correctly. Observe the specified criteria and the installation instructions. Sensors The sensors adjust the programme sequence and strength in the automatic programmes depending on the level and type of soiling. The sensor has different sensitivity settings that can be changed in the basic settings. Scope of supply After unpacking all parts, check for any damage in transit and completeness of the delivery. The delivery consists of the following: dishwasher, operating instructions, installation instructions, further information documents, installation material, salt filling aid funnel, mains cable, quick reference guide. Sensor setting description SE:00 - Optimum setting for a mixed load and heavily soiled tableware. Saves both energy and water. SE:01 - Adjusts the programme strength for effective removal of food remnants even with low soiling levels. Energy and water consumption are adjusted accordingly. SE:02 - Adjusts the programme strength for difficult conditions of use, e.g. stubborn dried-on food remnants. Recommended setting when using organic or ecological detergents containing low levels of active agents. Energy and water consumption are adjusted accordingly. Installing and connecting the appliance You can position your built-under or integrable appliance in a fitted kitchen between wooden and plastic walls. If you subsequently install your dishwasher as a free-standing appliance, you must stop it from tipping over.
- Page 13: Installation and connection Connect your appliance to a drinking water connection. Follow the safety instructions. Check the scope of supply and the condition of the appliance. Consult the installation instructions for the installation dimensions required. If you are replacing the appliance, you must use a new water supply hose. Make the appliance level using the height-adjustable feet. Connect the appliance to the power supply. Connect your appliance to drainage connection so dirty water is discharged via the wash cycle. Connect the wastewater hose to the outlet connection of the siphon using the enclosed parts. Check that the mains plug is inserted properly.
- Page 14: Familiarising yourself with your appliance Detergent is added to the detergent dispenser. Add special salt to the dispenser for special salt. The lower spray arm washes the tableware in the bottom basket. If the tableware has not been washed properly, clean the spray arms. During the wash cycle, tablets automatically fall out of the detergent dispenser into the tablet collecting tray. The upper spray arm washes the tableware in the top basket. The intake opening is required for Zeolith drying. The blow opening is required for Zeolith drying. Add rinse aid to the dispenser for rinse aid. You can use the control panel to configure all functions of your appliance and to obtain information about the operating status.
- Page 15: Familiarising yourself with your appliance Switching on the appliance Switching off the appliance Terminating the programme Programme sequence display shows the current cycle of the appliance. The display shows information about progress of the programme. You can change the basic settings via the display and the setting buttons. Timer programming and setting buttons Remote Start Programme buttons and additional functions
- Page 16: Familiarising yourself with your appliance Rinse aid refill indicator Rinse aid system Water supply display Display for water supply Special salt refill indicator Water softening system Open the appliance door Door handle Depending on the appliance specifications
- Page 17: You can find an overview of the programmes that can be selected here. Different programmes are available depending on the appliance configuration. The running time may vary depending on the programme selected. The consumption values can be found in the quick reference guide. Programme: Intensive is for washing pots and pans and cleaning non-fragile tableware and cutlery. Sensor-controlled programme optimizes cleaning based on the soiling of the rinsing water. Eco programme is the most economical for cleaning mixed tableware and cutlery. The level of soiling affects the choice of programme and its effectiveness. Consumption values relate to normal conditions and a water hardness of 16 - 20 °E. Different influencing factors may result in deviations from the expected running time.
- Page 18: Programmes Programme sequence Additional functions Tableware: Reduced noise: Pre-Rinse Cleaning 50 °C Final rinse 35 °C Dry Cleaning mixed tableware and cutlery.
- Page 19: Additional functions Information for test institutes Test institutes are provided with information for comparability tests, e.g. according to EN60436. These are the conditions for conducting the tests, however they are not the results or consumption values. The product number (E-Nr.) and the production number (FD) are required here. You can save a combination of a programme and an additional function. Different additional functions are available depending on the appliance configuration. The pre-rinse program is suitable for all types of tableware. The run time is shortened by 15% to 75% depending on the SpeedPerfect+ rinse programme. The additional function can be activated before the start of the programme and at any time when the programme is running. Energy and water consumption are increased.
- Page 20: Features Use the top basket to arrange cups, glasses, and small items of tableware. Switch on with mixed loads containing tableware with different soil levels. The spray pressure in the bottom basket is increased for intensive cleaning. The maximum programme temperature is held longer to enhance cleaning. For better drying results, the final rinse temperature is increased. The drying phase is extended, especially suitable for drying plastic parts. You can adjust the height of the top basket for larger items of tableware. To wash large items, adjust the shelf position of the top basket. An overview of the possible features of your appliance is provided. Features depend on the model of your appliance.
- Page 21: Features Raise or lower the basket evenly to the right level. Check that the basket is level on both sides. Arrange cutlery in the cutlery basket, always without sorting it and with the sharp points downwards. The basket clicks into position. Slide the basket back in. Arrange pans and plates in the bottom basket. Large plates up to a diameter of 28.5 cm can be arranged in the bottom basket as shown.
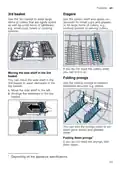
- Page 22: Features Use the 3rd basket to wash large items of cutlery that are lightly soiled as well as small items of tableware, e.g. small cups, bowls or cooking spoons. Use the cutlery shelf and space underneath for small cups and glasses or for large items of cutlery, e.g. cooking spoons or serving cutlery. If you do not need the cutlery shelf, you can fold it up. You can move the side shelf in the 3rd basket to wash stemware in the top basket. Use the folding prongs to position tableware securely, e.g. plates. You can fold the prongs down to position pans, bowls and glasses better. If you do not need the prongs, fold them down.
- Page 23: Features Use the Extra Clean Zone in the top basket to clean soiled tableware thoroughly, e.g. muesli bowls. To use the prongs again, fold them back up. The prongs audibly click into position. Consumption will increase if you operate your appliance with the Extra Clean Zone switched on. Use the shelf for knives and long items of cutlery. Pull out the top basket. Set the slider to ON or OFF. Always operate the appliance with the Extra Clean Zone fitted. Limescale and soiling from the dishwashing water can block the nozzles.
- Page 24: Before using for the first time Pull the tab on the Extra Clean Zone up and forwards. Place the Extra Clean Zone in the top basket and lock in place. Check that the mounts are in the correct position. Set the slider to ON. Clean under running water. The Extra Clean Zone audibly clicks into position. Set the baskets at the right height. The appliance has been installed and connected. Add special salt. Add rinse aid.
- Page 25: Water softening system To remove any marks from water or other residues, operate the appliance without tableware before using it for the first time. Hard water leaves limescale on the tableware, and parts of the appliance may become blocked. To ensure good dishwashing results, treat the water with special salt and the water softening system. Water with a hardness above 9 °E must be softened to avoid damage to the appliance. You can find an overview of the water hardness values that can be selected. You can find out how hard your water is from your local water company or by using a water hardness tester. Set the water hardness determined on your appliance. With a water hardness of 0 - 8 °E, you can dispense with special salt for dishwashers and switch off the water softening system. Determine the water hardness and the appropriate setting value.
- Page 26: Water softening system Only use special salt for dishwashers. Do not use salt tablets or table salt. The value H:04 is set at the factory. Add the special salt to the dispenser. You can use special salt to soften water. The consumption of special salt depends on the water hardness. Detergent may damage the water softening system. Only fill the dispenser of the water softening system with special dishwasher salt. To avoid damage to the appliance, only switch off the water softening system in specific cases. Combined detergents with salt replacement substances can generally only be used up to a water hardness of 26 °E without adding special salt.
- Page 27: Rinse aid system The water hardness is 0 - 8 °E. You do not need to use special salt. For optimum drying results, use rinse aid. Only use rinse aid for domestic dishwashers. If the rinse aid refill indicator lights up, top up with rinse aid. The appliance performs regeneration of the water softening system at regular intervals. Regeneration takes place before the end of the main rinse cycle in all programmes. It will increase the run time and consumption values, e.g. water and electricity. Here you can find an overview of the maximum additional run time and consumption values during regeneration.
- Page 28: Detergent Add rinse aid up to the max mark. To save the settings, press for 3 seconds. If you find the rinse aid refill indicator irritating, you can switch the rinse aid system off. The function of rinse aid is limited with combined detergents. You will generally get better results using rinse aid. If rinse aid spills out, remove it from the tub. Spilled rinse aid can cause excessive frothing during the wash cycle. Only use detergents that are suitable for dishwashers. Both separate and combined detergents are suitable. For optimum washing and drying results, use separate detergent, adding special salt and rinse aid separately. Modern, powerful detergents mainly use a low-alkaline formulation with enzymes. A low setting adds less rinse aid during the wash cycle and reduces streaking on tableware. A higher setting adds more rinse aid during the wash cycle, reduces water marks, and improves the drying result.
- Page 29: Detergent is used to starch and remove protein. Oxygen-based bleaching agents are used to remove colored marks. Follow the manufacturer's instructions for each detergent. Separate detergents do not contain components other than detergent. The dosage can be adjusted to the level of soiling of the tableware. For better washing and drying results, use special salt and rinse aid. Tabs are suitable for all cleaning functions and do not need to be measured out. Combined detergents contain detergent, rinse aid, and salt replacement substances. Powder detergent is recommended for shorter programmes and the dosage can be adjusted. Liquid detergent works faster and is recommended for shorter programmes without PreRinse.
- Page 30: Detergent function is enhanced with rinse aid for better results. Use tablets with special drying performance. Avoid detergents that could damage the appliance or pose health risks. Hand washing-up liquid can cause excessive frothing and damage. Open the detergent dispenser by pressing the locking latch. Detergents marked as organic or ecological may have reduced cleaning effectiveness. Adjust the rinse aid and water softening system according to the detergent used. Combined detergents with salt replacement are limited by water hardness. For normal soiling, 20 ml to 25 ml of detergent is sufficient. Handle detergents in water-soluble pouches with dry hands to prevent sticking.
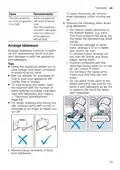
- Page 31: Tableware Only put glasses and china in the dishwasher if it is marked as dishwasher-safe by the manufacturer. Avoid damage to glass and tableware. The following tableware is not dishwasher-safe: items of cutlery and tableware made from wood, decorated glassware, antique and hand-crafted tableware, plastic parts not resistant to heat, tableware made from copper or tin, tableware soiled with ash, wax, lubricating grease or paint, and very small items of tableware. Use a detergent marked by the manufacturer as gentle on tableware. Only clean tableware that is suitable for dishwashers. Decorated glassware and parts made of aluminium or silver may fade or discolour with dishwashing. Delicate types of glass may turn cloudy after a few washing cycles. If you are using highly caustic alkaline or highly acidic cleaning agents, do not put aluminium parts in the dishwasher interior.
- Page 32: Tableware To save resources, do not pre-rinse tableware under running water. Select a programme with lower temperature. Observe the following when arranging tableware. After the programme has ended, take glassware and cutlery out of the appliance without delay. Put heavily soiled tableware in the bottom basket, e.g., pans. Arrange cutlery with the points and sharp edges facing down. Position containers with the openings facing down so no water can collect in them. Do not block the spray arms - make sure that they can turn freely. Using the appliance allows you to save energy and water compared to washing-up by hand. Remove large remnants of food from tableware.
- Page 33: Basic operation Removing tableware Setting a programme To adjust the wash cycle to the soil level of the tableware, select a suitable programme. Risk of injury! Hot tableware can cause burns to the skin. When the programme has ended, do not empty the appliance until the tableware has cooled down for a while. Press the right programme button. The remaining running time of the programme appears on the display. You can set additional functions to complete the washing programme selected. The additional functions which can be used depend on the programme selected. The Eco 50° programme is set by default. It is the most efficient programme for the combination of energy/water consumption for this type of tableware.
- Page 34: Basic operation Starting the programme The programme has ended when the display shows 00h:00m. If you want to add more tableware while the appliance is running, do not use the tablet collecting tray as a handle for the top basket. Terminate programme To end a programme early or to switch from a programme that has already started, you will need to cancel it first. The appliance switches off automatically 1 minute after the end of the programme to save energy. Activating button lock The button lock prevents the appliance from being operated accidentally or incorrectly while running. The button lock is activated and will be automatically deactivated at the end of the programme. Interrupting programme When you open the appliance door once the appliance has heated up, leave the door slightly ajar.
- Page 35: You can configure the basic settings for your appliance to meet your needs. The basic settings depend on the features of your appliance. Set the water softening system to your water hardness. Level H:00 switches the water softening system off. Set the amount of rinse aid to be dispensed. Switch the rinse aid system off with level r:00. Set the water sensor for identifying soiling. The temperature is increased during the final rinse, which improves the drying result. Switch Extra Dry on d:01 or off d:00. Set cold water or hot water connection.
- Page 36: Basic settings Set a default programme for when the appliance is switched on. With the setting SP:00, the last programme selected is set by default when the appliance is switched on. With the setting SP:01, the Eco 50° programme is set by default when the appliance is switched on. Adjustment of tone volume. Level SL:00 switches the signal tone off. Set the button volume during operation. Level bL:00 switches the button tones off. Switch the wireless network connection on or off. The basic setting Wi-Fi is only available once the appliance is connected to the Home Connect app. Activate or deactivate Remote Start.
- Page 37: Home Connect Basic setting Factory setting The Home Connect app guides you through the entire login process. Changing basic settings Press to open the basic settings. The display shows H:xx. Please consult the documents supplied by Home Connect. You can change several settings. To save the settings, press for 3 seconds. Connect your appliance to a mobile device quickly and easily.
- Page 38: Home Connect Connecting the appliance to WLAN Activating Remote Start Requirements for Home Connect app installation and Wi-Fi activation. The appliance door must be closed for connection. Remote Diagnostics allows customer service access if the appliance is connected to the Home Connect server. Adapt Home Connect settings based on your needs. You can start the appliance remotely using the Home Connect app. Software updates can be performed through the Home Connect app for optimization and troubleshooting.
- Page 39: Cleaning and servicing To keep your appliance working efficiently for a long time, it is important to clean and maintain it carefully. The first time your appliance is registered on a home network connected to the Internet, your appliance will transmit certain types of data to the Home Connect server. Never use detergents containing chlorine. Remove any coarse soiling in the interior with a damp cloth. Add detergent to the detergent dispenser. Select the programme with the highest temperature. This initial registration prepares the Home Connect functions for use. Only use suitable cleaning products to clean your appliance. Follow the tips on appliance care to make sure your appliance functions properly at all times. Wipe the door seals to ensure the parts of the appliance remain clean and hygienic.
- Page 40: Cleaning and servicing To avoid faults and reduce odours, we recommend cleaning your appliance at regular intervals. Machine Care combined with machine care products and machine cleaners is the right programme for the care of your appliance. Machine Care is a programme which removes various deposits in one washing cycle. Cleaning takes place in two phases: removal of grease and limescale, and food remnants and deposits. Run Machine Care without tableware if the indicator for Machine Care lights up on the control panel. We recommend performing Machine Care every 2 months. Only use machine care products and machine cleaners specially designed for dishwashers. Make sure that there are no aluminium parts in the interior of the appliance. For optimum cleaning performance, ensure the correct placement of cleaners. Follow the safety instructions given on the packagings of the machine care products and machine cleaners.
- Page 41: Cleaning and servicing Remove any coarse soiling in the interior with a damp cloth. Clean the filters. After each wash check the filters for residue. Turn the coarse filter anticlockwise and remove the filter system. Place the machine care product in the appliance interior. Check that no foreign objects fall into the sump. Only use machine care products specially designed for dishwashers. Pour the machine cleaner into the detergent dispenser until it is filled completely. Press the button to run the machine care program. The filter system removes coarse soiling from the dishwashing cycle.
- Page 42: Cleaning and servicing Clean the filter elements under running water. Carefully clean the rim of dirt between the coarse and the fine filter. Re-assemble the filter system. Make sure that the locking catches on the coarse filter click into position. Insert the filter system into the appliance and turn the coarse filter clockwise. Check the outlet nozzles on the spray arms for blockages under running water. Insert the lower spray arm. The spray arm clicks into position. Insert the upper spray arm and screw it firmly in place. Clean the spray arms regularly.
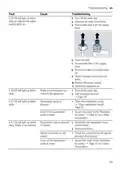
- Page 43: Troubleshooting information can help you rectify minor faults on your appliance yourself. Repairs should only be carried out by trained specialist staff. Only use genuine spare parts when repairing the appliance. If the power cord is damaged, it must be replaced with a special connection cable. Error code E:20-60 indicates a specified heating element issue; descale the appliance and operate it with the water softening system. Error code E:21-30 suggests the intake opening of the Zeolith container is obstructed; rearrange the tableware. Error code E:30-00 indicates the water protection system is activated; turn off the water tap and call customer service. Error code E:31-00 also indicates the water protection system is activated; turn off the water tap and call customer service. Error code E:32-00 suggests the supply hose is kinked; install the supply hose without kinks and ensure the water tap is turned on. The flow rate must be at least 10 l/min when the water supply is open.
- Page 44: Troubleshooting E:32-00 will light up alternately or indicator for water supply lights up. Turn off the water tap. Unscrew the water connection. Remove the filter from the supply hose. Clean the filter. Re-insert the filter in the supply hose. Check the water connection for leaks. E:34-00 will light up alternately. Water is continuously running into the appliance. Call Customer Service. E:61-02 will light up alternately. Wastewater pump is blocked. Clean the wastewater pump. E:61-03 will light up alternately. Wastewater hose is blocked or kinked. Reposition the wastewater hose without kinks. Check the connection to the siphon and open if necessary.
- Page 45: Troubleshooting E:90-01 will light up alternately. This is not a fault on the appliance. Contact an electrician to check the mains voltage and electrical installation. E:92-40 will light up alternately. Clean the filters. A different error code appears in the display window. A technical fault is present. Unplug the appliance or switch off the fuse, wait at least 2 minutes, then switch the appliance on again. If the problem occurs again, contact customer service and provide the error code. Tableware is not dry. No rinse aid used or dosage set too low. Add rinse aid and set the amount to be dispensed. Programme or programme option has no drying phase, or the drying phase is too brief. Select a programme with drying, such as intensive, strong, or ECO programme. Some option buttons decrease the drying result, e.g. varioSpeed.
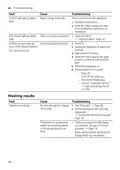
- Page 46: Troubleshooting Tableware is not dry. Water collects in recesses of the tableware or cutlery. Use rinse aid to improve drying performance. Activate Extra Dry to improve drying performance. Tableware removed too early or drying process not yet ended. Wait until the programme ends. Rinse aid used has a limited drying performance. Eco products may have limited effectiveness. Plastic tableware is not dry. Cutlery not arranged properly in the cutlery basket or cutlery drawer. Appliance interior still wet after wash cycle.
- Page 47: Troubleshooting Food remnants are left on tableware in the top basket. Arrange tableware with sufficient space in between. Position large items of tableware at an angle, e.g., pans and ovenproof dishes. Activate the Extra Clean Zone function in the top basket. Remnants of food on tableware are due to items being placed too close together or the basket being overfilled. The spray jets must reach the surfaces of the tableware. Spray arm rotation may be blocked; arrange tableware to avoid obstruction. Clean the spray arms if the nozzles are blocked. Soiled filters can affect performance; clean the filters regularly. Ensure filters are inserted correctly and engaged. Select a more intensive washing programme if the current one is too weak.
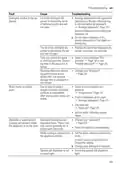
- Page 48: Troubleshooting Detergent residue in the appliance The lid of the detergent dispenser is blocked by items of tableware. Arrange tableware in the top basket so the tab collecting tray is not obstructed by tableware. Do not place tableware or fragrance dispensers in the tablet collecting tray. Select a more intensive programme or use powder detergent. Washing effect and dissolving performance are reduced after a prolonged storage time or detergent is very lumpy. Change your detergent. Water marks on plastic parts Droplet formation on plastic surfaces is unavoidable. Select a more intensive programme. Position tableware at an angle. Use rinse aid. Set the water softening system higher. Wipeable or water-soluble coatings are present inside the appliance or on the door. Change your detergent if required. Clean the appliance mechanically. White coating is deposited in the appliance interior. Set the water softening system correctly. Screw the special salt dispenser tight.
- Page 49: Troubleshooting Stubborn white coatings are present on tableware, inside the appliance or the door. Change your detergent. Clean the appliance mechanically. The hardness range is set incorrectly or the water hardness is greater than 62 °E. Set the water softening system to the water hardness or add special salt. 3in1/organic/eco detergent is not effective enough. Increase the amount of detergent used. Select a more intensive washing programme. Tea residue or lipstick marks on tableware may be due to washing temperature being too low. Clean the appliance to remove coloured coatings that are difficult or impossible to remove.
- Page 50: Troubleshooting Coloured coatings that are difficult or impossible to remove are present inside the appliance or on stainless steel tableware. You can remove deposits with mechanical cleaning or a machine cleaning product. Coloured deposits that are easy to remove are present inside the appliance. The formation of films is due to ingredients of food remnants and tap water. Check the setting of the water softening system. Add special salt. If you are using combined detergents, activate the water softening system. Discolouration of plastic parts inside the appliance may occur during the life of the dishwasher. Washing temperature may be too low. Adjust the sensitivity of the sensors to improve cleaning performance.
- Page 51: Troubleshooting Removable streaks are caused by tableware being pre-cleaned too intensely. Only remove large remnants of food and do not prerinse tableware. Irreversible clouding of glassware can occur if glasses are not dishwasher-proof. Use dishwasher-proof glasses and avoid a lengthy steam phase. Rust spots on cutlery may result from using cutlery that is not sufficiently rust-resistant. Use rust-resistant tableware and do not wash rusting items. High salt content in washing water can lead to issues. Remove any spilled special salt from the tub and ensure the cap of the special salt dispenser is tight. Detergent residue may be present if spray arms are blocked. Check that the spray arms can rotate freely. Excessive formation of foam can occur if hand washing-up liquid is present in the rinse aid dispenser. Immediately add rinse aid to the dispenser. Rinse aid spills should be removed with a cloth.
- Page 52: Troubleshooting Excessive formation of foam occurs. Change the brand of detergent. Home Connect problem Connection to home network is not established. Check the wireless network connection of your router. WLAN display is flashing. Connection to home network is not available. Activate the wireless network connection on your router. Home Connect cannot be implemented correctly. Please consult the documents supplied for Home Connect. Special salt refill indicator lights up. Add Special salt. Refill indicator for rinse aid lights up. Add Rinse aid. Water is left in the appliance at the end of the programme. Clean the Filters. Clean the Wastewater pump.
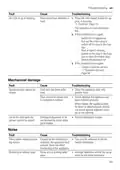
- Page 53: Troubleshooting Water is left in the appliance at the end of the programme. Appliance cannot be switched on or operated. Software update is taking place. Appliance functions have failed. Appliance does not start. The mains fuse has tripped. Mains cable is not inserted. Appliance door is not closed properly. Programme starts automatically. Appliance stops during the programme or cuts out.
- Page 54: Troubleshooting All LEDs lit up or flashing indicates a fault detected by the electronics. To reset the appliance, press the main switch button for approximately 4 seconds. If the problem occurs again, switch off the appliance and wait at least 2 minutes before turning it back on. If the issue persists, contact customer service. The appliance door cannot be closed if the door lock has been activated. To close the appliance door, apply greater force if necessary. Check the installation method if the door cannot be closed properly. The lid on the detergent dispenser cannot be closed due to sticky detergent residue. Remove any detergent residue to resolve the issue. Filling valves making knocking noises are caused by domestic installation and do not indicate an appliance fault.
- Page 55: Troubleshooting Knocking or rattling noise. With a small load the water jets directly strike against the tub. Distribute the tableware evenly. Load the appliance with more tableware. Light items of tableware move about during the wash cycle. Position light items of tableware securely.
- Page 56: Transportation, storage and disposal Insert the pump cover down and press clean wastewater pump. Large remnants of food or foreign bodies can block the wastewater pump. As soon as the rinsing water no longer drains properly, the wastewater pump must be cleaned. Risk of injury! Sharp and pointed objects or fragments of glass may block the wastewater pump and cause injury. Remove any foreign bodies carefully. Disconnect the appliance from the power supply. Install the filter system. Scoop out any water. Use a sponge if necessary. If there is a risk of frost where the appliance will be standing, empty the appliance completely. Remove any remnants of food and foreign bodies in the area of the impeller.
- Page 57: Customer service Unplug the appliance from the mains. Cut through the power cord. Dispose of the appliance in an environmentally friendly manner. To avoid damage to the appliance, empty it before transporting. Always transport the dishwasher upright to prevent residual water getting into the machine's controls. Information about current disposal methods are available from your specialist dealer or local authority. This appliance is labelled in accordance with European Directive 2012/19/EU concerning used electrical and electronic appliances. Function-relevant genuine spare parts can be obtained from Customer Service for a period of at least 10 years. Under the terms of the manufacturer's warranty, the use of Customer Service is free of charge. Risk of harm to health! Children can lock themselves in the appliance, thereby putting their lives at risk.
- Page 58: Technical specifications The contact details for customer service can be found in the enclosed customer service directory or on our website. If your appliance is fitted with Aqua-Stop, you can leave your appliance unattended during operation with the tap turned on. The product number (E-Nr.), production number (FD), and consecutive numbering (Z-Nr.) can be found on the appliance's rating plate located inside the appliance door. Make a note of your appliance's details and the customer service telephone number for quick reference. Aqua-Stop guarantee offers compensation for water damage caused by a defective Aqua-Stop system for private users. The liability guarantee is valid for the service life of the appliance. A claim can only be made under the guarantee if the appliance has been correctly installed and connected with Aqua-Stop according to instructions. Water pressure must be a minimum of 50 kPa (0.5 bar) and a maximum of 1000 kPa (10 bar). The inlet rate for water is a minimum of 10 l/min for cold water, with hot water maximum at 60 °C. The capacity of the appliance is 13 place settings.
- Page 59: Declaration of Conformity BSH Hausgeräte GmbH hereby declares that the appliance with Home Connect functionality conforms to the basic requirements and other relevant provisions of Directive 2014/53/EU. A detailed RED Declaration of Conformity can be found online at www.bosch-home.com among the additional documents on the product page for your appliance. This product includes software components that are licensed by the copyright holders as free or open source software. The applicable licence information is stored on your home appliance. You can also access the applicable licence information via your Home Connect app: Profile -> Legal information -> Licence Information. The source code will be made available to you on request. The cost of performing your request will be charged to you. This offer is valid for three years from the date of purchase or at least as long as we offer support and spare parts for the relevant appliance. 5 GHz WLAN (Wi-Fi): For indoor use only.
- Page 60: Declaration of Conformity 5 GHz WLAN (Wi-Fi): For indoor use only.
- Page 61: Thank you for buying a Bosch home appliance. Register your new device on MyBosch now and profit directly from expert tips and tricks for your appliance, warranty extension options, discounts for accessories and spare parts, digital manual and all appliance data at hand, and easy access to Bosch Home Appliances Service. Free and easy registration – also on mobile phones. Looking for help? You'll find it here. Expert advice for your Bosch home appliances, help with problems or a repair from Bosch experts. Find out everything about the many ways Bosch can support you.

FISHER and PAYKEL DD60SCTW9 Dishwasher

FISHER AND PAYKEL DD60DCX9 7 Contemporary Dishwasher

Samsung DW60 7 Series Dishwasher

FISHER PAYKEL DD60DAW9 Dishwasher

BOSCH SMS6ZCI12E Dishwasher

ARDESTO DWMF-V608SMHDS Dishwasher

BOSCH SMS4EAI28E Free Standing Dishwasher

JOCEL JLLI023124 Dishwasher

BOSCH SBH4ECX10E Dishwasher

BOSCH SHP88CL5N Custom Panel Dishwasher