Home > Electrolux > Electrolux ESZ69300SX UltimateCare 700 Dishwasher
Electrolux ESZ69300SX UltimateCare 700 Dishwasher


ESZ69300SX
EN
Dishwasher
User Manual

| General | Details |
|---|---|
| Name | Electrolux ESZ69300SX UltimateCare 700 Dishwasher |
| Make | Electrolux |
| Language | English |
| Filetype | PDF (Download) |
| File size | 1.12 MB |


Electrolux ESS87300UX Dishwasher

Electrolux EES48401L Dishwasher

Electrolux EFF9392SXA Dishwasher

Electrolux ESZ89400UX 800 SprayZone Dishwasher

Electrolux ESL2500RO Dishwasher

Electrolux KECA7400W Builtin Dishwasher

Electrolux TAPPAN Dishwasher

Electrolux KESC7320L Dishwasher

Electrolux EEC87400W Sliding Door Dishwasher

Electrolux EFC3862MS UltimateCare 300 Compact Dishwasher

Electrolux ESZ69300SX UltimateCare 700 Dishwasher Overview
Summary of Contents
- Page 1: Dishwasher user manual.
- Page 2: Safety information Safety instructions Product description Control panel Programmes Options Settings Before first use Daily use Hints and tips
- Page 3: safety information Before the installation and use of the appliance, carefully read the supplied instructions. The manufacturer is not responsible for any injuries or damage that are the result of incorrect installation or usage. Always keep the instructions in a safe and accessible location for future reference. children and vulnerable people safety This appliance can be used by children aged from 8 years and above and persons with reduced physical, sensory or mental capabilities if they have been given supervision or instruction. Children between 3 and 8 years of age and persons with very extensive and complex disabilities shall be kept away from the appliance unless continuously supervised. Children of less than 3 years of age should be kept away from the appliance unless continuously supervised. Children should be supervised to ensure that they do not play with the appliance. Keep detergents away from children. general safety This appliance is for cleaning household-type dishes and tableware only. This appliance is designed for single household domestic use in an indoor environment.
- Page 4: - The appliance is intended for domestic use in houses and similar accommodations. - Do not change the specification of this appliance. - The operating water pressure must be between 0.5 and 10 bar. - Follow the maximum number of 15 place settings. - If the supply cord is damaged, it must be replaced by qualified personnel. - Knives and utensils with sharp points must be loaded with points down. - Do not leave the appliance with the open door unattended. - Before maintenance, deactivate the appliance and disconnect from the mains. - Do not use high pressure water sprays or steam to clean the appliance. - The appliance must be connected to the water mains using new hose sets.
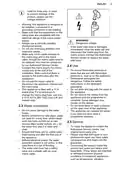
- Page 5: Valid for India only: In order to prevent damage of the product, please use the voltage stabilizer. Warning: this appliance is designed to be installed/connected to a grounding connection in the building. Make sure that the parameters on the rating plate are compatible with the electrical ratings of the mains power supply. Always use a correctly installed shockproof socket. If the water inlet hose is damaged, immediately close the water tap and disconnect the mains plug from the mains socket. Do not use multi-plug adapters and extension cables. Do not put flammable products or items that are wet with flammable products in, near or on the appliance. This appliance is fitted with a 13 A mains plug. Do not drink and play with the water in the appliance. To repair the appliance contact the Authorised Service Centre.
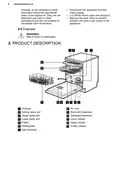
- Page 6: Disconnect the appliance from the mains supply. Cut off the mains cable and discard it. Remove the door catch to prevent children and pets from getting closed in the appliance. Information about the operational status of the appliance is provided. They are not intended to be used in other applications and are not suitable for household room illumination. Risk of injury or suffocation is present. Product description includes various components such as worktop, air vent, and spray arms. The appliance features a rating plate, salt container, rinse aid dispenser, and detergent dispenser. It includes lower and upper baskets as well as a cutlery drawer. Disposal instructions emphasize safety precautions.
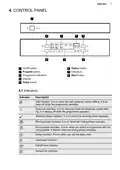
- Page 7: Control panel includes various buttons and indicators for operation. The on/off button is used to power the device. The program button allows selection of different washing programs. Programme indicators provide information about the current status of the wash cycle. The display shows relevant information during operation. The option button enables additional features for the selected program. The start button initiates the washing program. The delay button sets a delayed start for the washing cycle. Indicators include salt, rinse aid, washing phase, rinsing phase, drying phase, delay, GlassCare, ExtraPower, and SprayZone. The salt indicator signals when the salt container needs refilling.
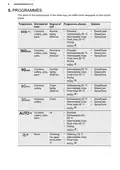
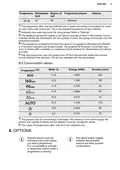
- Page 8: Programmes The order of the programmes in the table may not reflect their sequence on the control panel. Dishwashing programmes include options for different types of loads and soil levels. Crockery, cutlery, and pots can be washed using various temperature settings. Options such as ExtraPower, GlassCare, and SprayZone enhance the washing process. Prewash and drying phases are included in the programme structure. Cleaning the appliance interior is also a part of the programme options. Different degrees of programme phases are specified for effective cleaning. The document outlines specific temperatures for each dishwashing programme. AirDry is an option available for certain programmes. The programmes cater to lightly and heavily soiled items.
- Page 9: Programme dishwasher degree of programme phases This programme offers the most efficient use of water and energy consumption for crockery and cutlery with normal soil. The appliance senses the degree of soil and the quantity of items in the baskets. This programme is designed to clean the inside of the appliance effectively and efficiently. It removes limescale and grease buildup. With this programme, you can quickly rinse off food remains from dishes and prevent odours forming in the appliance. Consumption values: Water (l) and Energy (kWh) are provided for various programmes. The pressure and the temperature of the water, the variations of the mains supply, the options, the quantity of dishes and the degree of soil can change the values. Desired options must be activated every time before you start a programme. It is not possible to activate or deactivate options while a programme is running.
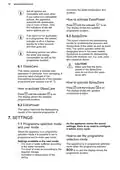
- Page 10: How to activate ExtraPower automatically deactivates one or more of them. SprayZone improves the dishwashing results by increasing the pressure and temperature of the water as well as wash time. SprayZone is suitable for dishwashing items with stubborn soil, e.g. pots, pans and casserole dishes. GlassCare protects a delicate load, glassware in particular, from damaging. GlassCare reduces the dishwashing temperature of the selected programme to 45 °C. As the appliance stores the saved settings, there is no need to configure it before every cycle. When the appliance is in programme selection mode it is possible to set a programme and to enter user mode. The appliance is in programme selection mode when the programme indicator is on and the display shows the programme duration. Settings available in the user mode include the level of water softener according to the water hardness. Activation or deactivation of the AirDry is available in user mode.
- Page 11: After activation, the appliance is in programme selection mode by default. The water softener should be adjusted according to the hardness of the water in your area. Water hardness is measured in equivalent scales. The water softener removes minerals from the water supply, which would have a negative effect on the washing results and on the appliance. Set the right level of the water softener to assure good washing results. The higher the content of these minerals, the harder your water is. The higher the level of water softener, the higher the consumption and the longer the duration. Make sure the appliance is in programme selection mode to enter user mode. Regardless of the type of detergent used, set the proper water hardness level to keep the salt refill indicator active. Multi-tabs containing salt are not effective enough to soften hard water.
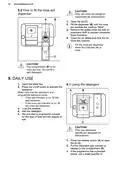
- Page 12: AirDry improves the drying results with less energy consumption. The appliance door opens automatically during the drying phase and remains ajar. The rinse aid helps to dry the dishes without streaks and stains. It is automatically released during the hot rinse phase. You can set the released quantity of rinse aid between level 1 (minimum quantity) and level 6 (maximum quantity). When the rinse aid chamber is empty, the rinse aid indicator is on, notifying to refill rinse aid. For the best drying performance, always use rinse aid and keep the rinse aid indicator active. Do not try to close the appliance door within 2 minutes after automatic opening. This can cause damage to the appliance. If children have access to the appliance, we advise deactivating AirDry. To deactivate the rinse aid dispenser and indicator, set the level of rinse aid to 0. Make sure the appliance is in user mode before making adjustments. Press the on/off button to confirm the setting after making changes.
- Page 13: The remaining indicators are off. The display shows the current setting. Press to change the setting. Press the on/off button to confirm the setting. AirDry is deactivated. AirDry is activated. Make sure that the current level of the water softener agrees with the hardness of the water supply. Fill the salt container. Fill the rinse aid dispenser. Start a programme to remove any processing residuals that can still be inside the appliance.
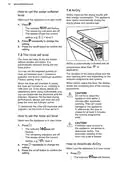
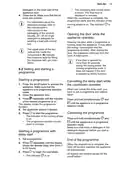
- Page 14: How to fill the rinse aid Only use rinse aid designed specifically for dishwashers. Fill the dispenser until the rinse aid reaches the marking MAX. Remove the spilled rinse aid with an absorbent cloth to prevent excessive foam formation. Close the lid and ensure it locks into position. Fill the rinse aid dispenser when the indicator is clear. The compartment is for rinse aid only; do not fill it with detergent. Daily use Open the water tap. Press the on/off button to activate the appliance. Make sure the appliance is in programme selection mode. If the salt indicator is on, fill the salt container. If the rinse aid indicator is on, fill the rinse aid dispenser. Load the baskets and add the detergent. Set and start a programme suitable for the type of load and the degree of soil. Only use detergent specifically designed for dishwashers. Put the detergent in the compartment. If the programme has a prewash phase, put a small quantity of detergent in.
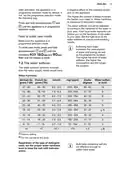
- Page 15: - Close the lid and ensure it locks into position before starting the programme. - The remaining time counts down in hours, with the final hour displayed in minutes. - For detergent dosage, refer to the manufacturer's instructions on the packaging. - Usually, 20 - 25 ml of gel detergent is adequate for washing a load with normal soil. - Opening the door while a programme is running stops the appliance and may affect energy consumption and duration. - The maximum level for filling the dispenser with gel is indicated by the upper ends of the vertical ribs inside the compartment. - If the door is opened for more than 30 seconds during the drying phase, the running programme ends. - To start a programme, press the on/off button and ensure the appliance is in programme selection mode. - The Auto Off function switches the appliance off automatically when the programme is complete. - Set a programme and options, then press to start the programme.
- Page 16: Close the water tap. The Auto Off function decreases energy consumption by deactivating the appliance when it is not operating. Make sure that the current level of the water softener agrees with the hardness of the water supply. Washing dishes in the dishwasher usually consumes less water and energy than washing dishes by hand. Load the dishwasher to its full capacity to save water and energy. Do not pre-rinse dishes by hand as it increases water and energy consumption. Select a programme according to the type of load and the degree of soil for efficient water and energy use. Only use salt, rinse aid, and detergent designed for dishwashers to avoid damage. Always use the correct quantity of detergent and rinse aid to ensure optimal cleaning and drying results. Refill the salt container whenever necessary to prevent limescale buildup inside the appliance.
- Page 17: Put cutlery and small items in the cutlery drawer. Move the upper basket upwards to accommodate large items in the lower basket. Make sure that the spray arms can move freely before you start a programme. Set the highest level of the water softener. Make sure that the salt and rinse aid containers are full. Start the shortest programme with a rinsing phase. Before you start the selected programme, make sure that the filters are clean and correctly installed. Always use the whole space of the baskets. Let the tableware cool down before you remove it from the appliance. Before maintenance, deactivate the appliance and disconnect the mains plug from the main socket.
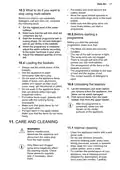
- Page 18: Follow the instructions on the packaging of the product. Use the automatic cleaning programme for optimal cleaning results. Using short-duration programmes regularly can cause grease and limescale buildup inside the appliance. Run long-duration programmes at least twice a month to prevent the buildup. Clean the appliance with a moist soft cloth. Only use neutral detergents. Do not use abrasive products, abrasive cleaning pads or solvents. The filter system is made of 3 parts. Make sure that there are no residues of food or soil in or around the edge of the sump. Reassemble the filters.
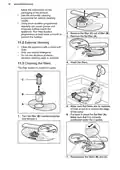
- Page 19: Put back the filter in the flat filter. Turn it clockwise until it locks. To reduce the frequency of cleaning, install an external water filter. An incorrect position of the filters can cause bad washing results and damage to the appliance. We recommend cleaning the lower spray arm regularly to prevent soil from clogging the holes. Clogged holes can cause unsatisfactory washing results. To remove the lower spray arm, pull it upwards. Wash the spray arm under running water. Use a thin pointed tool to remove particles of soil from the holes. Clean the filter of the inlet hose. Close the water tap.
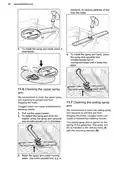
- Page 20: To install the spray arm back, press it downwards. To install the spray arm back, press the spray arm upwards and simultaneously turn it counterclockwise until it locks into place. We recommend to clean the upper spray arm regularly to prevent soil from clogging the holes. Clogged holes can cause unsatisfactory washing results. We recommend to clean the ceiling spray arm regularly to prevent soil from clogging the holes. To detach the spray arm from the basket, press the spray arm upwards and simultaneously turn it clockwise. The ceiling spray arm is placed on the ceiling of the appliance. The spray arm is installed in the delivery tube with the mounting element. Wash the spray arm under running water. Use a thin pointed tool, e.g. a toothpick, to remove particles of soil from the holes.
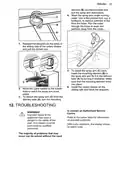
- Page 21: Wash the spray arm under running water. Use a thin pointed tool to remove particles of soil from the holes. Run the water through the holes to wash soil particles away from the inside. Release the stoppers on the sides of the sliding rails of the cutlery drawer and pull the drawer out. To install the spray arm back, insert the mounting element in the spray arm and fix it in the delivery tube by turning it clockwise. Make sure that the mounting element locks into place. Install the cutlery drawer on the sliding rails and block the stoppers. Move the upper basket to the lowest level to reach the spray arm more easily. Improper repair of the appliance may pose a danger to the safety of the user. Refer to the below table for information on possible problems.
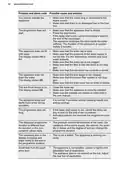
- Page 22: Problem and alarm code You cannot activate the appliance. Make sure that the mains plug is connected to the mains socket. Make sure that there is no damaged fuse in the fuse box. The programme does not start. Make sure that the appliance door is closed. Press the start button. If the delay start is set, cancel the setting or wait for the end of the countdown. The appliance does not fill with water. Make sure that the water tap is open. Make sure that the pressure of the water supply is not too low. The appliance does not drain the water. Make sure that the sink spigot is not clogged. Make sure that the interior filter system is not clogged. The appliance stops and starts more times during operation. It is normal. It provides optimal cleaning results and energy savings. The programme lasts too long. If the delay start option is set, cancel the delay setting or wait for the end of the countdown. The displayed programme duration is different than the duration in the consumption values table. The pressure and the temperature of the water can change the programme duration. The remaining time in the display increases and skips nearly to the end of the programme duration. This is not a defect. The appliance is working correctly. Small leak from the appliance door. The appliance is not levelled. Adjust the rear foot if applicable.
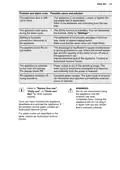
- Page 23: Problem and alarm code Possible cause and solution The appliance door is difficult to close. The appliance is not levelled. Loosen or tighten the adjustable feet. Parts of the tableware are protruding from the baskets. The appliance door opens during the wash cycle. The AirDry function is activated. Rattling or knocking sounds from the inside of the appliance. The tableware is not properly arranged in the baskets. The appliance trips the circuit-breaker. The amperage is insufficient to supply all the appliances in use. The appliance is switched on but does not operate. Power supply is out of the operating range. The appliance switches off during operation. Complete power outage. We do not recommend using the appliance until the problem has been completely fixed. For alarm codes not described in the table, contact an Authorised Service Centre.
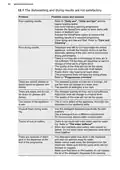
- Page 24: The dishwashing and drying results are not satisfactory. Poor washing results may be due to improper loading or insufficient washing program. Use a more intensive washing program or activate the SprayZone option for stubborn soil. Activate the ExtraPower option to improve washing results. Clean spray arm jets and filter for better performance. Poor drying results can occur if tableware is left too long in the closed appliance. Activate the AirDry function to enhance drying performance. Ensure there is sufficient rinse aid and adjust the dosage if necessary. Whitish streaks or bluish layers on dishes may indicate incorrect rinse aid dosage. Traces of rust on cutlery can result from too much salt in the washing water.
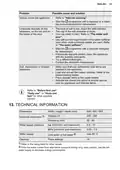
- Page 25: Odours inside the appliance. Refer to Internal cleaning. Start the programme with a descaler or a cleaning product designed for dishwashers. Limescale deposits on the tableware, on the tub and on the inside of the door. The level of salt is low, check the refill indicator. Your tap water is hard. Refer to The water softener. Dull, discoloured or chipped tableware. Make sure that only dishwasher-safe items are washed in the appliance. Activate the GlassCare option to ensure special care for glassware and delicate items. Technical information. Dimensions: Width / height / depth (mm) 598 / 850 / 603. Water supply pressure: 0.5 - 10 bar.
- Page 26: Environmental concerns Appliances marked with the symbol should not be disposed of with household waste. Return the product to your local recycling facility or contact your municipal office. Recycle materials with the symbol. Put the packaging in relevant containers to recycle it. Help protect the environment and human health by recycling waste of electrical and electronic appliances. Do not dispose of.
- Page 27: Page 27

BOSCH SPV2HKX1DR Dishwasher

Magic Chef MCSDW8TCST Dishwasher

BOSCH SMS4HMI06E Dishwasher

KINGFISHER KF500 Undercounter Glass and Dishwasher

Haier HDW15V3S1 Dishwasher

BOSCH SMS6HVI00I Free-Standing Dishwasher

Miele 852-01 Dishwasher

Omega ODW300XN Slimline Dishwasher

BOSCH SHP78DM5N Pocket Handle Dishwasher

LG LDT779 Dishwasher