Home > Electrolux > Electrolux LSV48400L Dishwasher
Electrolux LSV48400L Dishwasher


LSV48400L
EN
ES
Dishwasher
Lavavajillas
User Manual
Manual de instrucciones
2
27

| General | Details |
|---|---|
| Name | Electrolux LSV48400L Dishwasher |
| Make | Electrolux |
| Language | English |
| Filetype | PDF (Download) |
| File size | 1.81 MB |


Electrolux ESS87300UX Dishwasher

Electrolux EES48401L Dishwasher

Electrolux EFF9392SXA Dishwasher

Electrolux ESZ89400UX 800 SprayZone Dishwasher

Electrolux ESL2500RO Dishwasher

Electrolux KECA7400W Builtin Dishwasher

Electrolux TAPPAN Dishwasher

Electrolux KESC7320L Dishwasher

Electrolux EEC87400W Sliding Door Dishwasher

Electrolux EFC3862MS UltimateCare 300 Compact Dishwasher
Electrolux LSV48400L Dishwasher Overview
Summary of Contents
- Page 1: Dishwasher User manual
- Page 2: SAFETY INFORMATION Before the installation and use of the appliance, carefully read the supplied instructions. SAFETY INSTRUCTIONS Important guidelines to ensure safe usage of the appliance. PRODUCT DESCRIPTION Overview of the appliance features and specifications. CONTROL PANEL Details on the layout and functions of the control panel. PROGRAMME SELECTION Instructions on how to select different programmes for use. BASIC SETTINGS Information on configuring initial settings for optimal performance. BEFORE FIRST USE Steps to prepare the appliance before its first operation. DAILY USE Guidelines for the regular operation of the appliance. HINTS AND TIPS Useful advice for enhancing the user experience and appliance efficiency. CARE AND CLEANING Recommendations for maintaining and cleaning the appliance.
- Page 3: responsible for any injuries or damage that are the result of incorrect installation or usage. Always keep the instructions in a safe and accessible location for future reference. This appliance can be used by children aged from 8 years and above and persons with reduced physical, sensory or mental capabilities or lack of experience and knowledge if they have been given supervision or instruction concerning the use of the appliance in a safe way and understand the hazards involved. Children between 3 and 8 years of age and persons with very extensive and complex disabilities shall be kept away from the appliance unless continuously supervised. Children of less than 3 years of age should be kept away from the appliance unless continuously supervised. Children should be supervised to ensure that they do not play with the appliance. Keep detergents away from children. Keep children and pets away from the appliance when the door is open. This appliance is for cleaning household-type dishes and tableware only. This appliance is designed for single household domestic use in an indoor environment. This appliance may be used in offices, hotel guest rooms, bed & breakfast guest rooms, farm guest houses and other similar accommodation where such use does not exceed (average) domestic usage levels.
- Page 4: Make sure that the parameters on the rating plate are compatible with the electrical ratings of the mains power supply. If the water inlet hose is damaged, immediately close the water tap and disconnect the mains plug from the mains socket. Always use a correctly installed shockproof socket. Do not use multi-plug adapters and extension cables. Do not put flammable products or items that are wet with flammable products in, near or on the appliance. Dishwasher detergents are dangerous. Follow the safety instructions on the detergent packaging. Do not drink and play with the water in the appliance. To repair the appliance contact the Authorised Service Centre. Use original spare parts only. Ensure that there are no visible water leaks during and after the first use of the appliance. The water inlet hose has a safety valve and a sheath with an inner mains cable.
- Page 5: Disposal Risk of injury or suffocation. Disconnect the appliance from the mains supply. Cut off the mains cable and discard it. Remove the door catch to prevent children and pets from getting closed in the appliance. Product description The graphic is a general overview. For more details, refer to other chapters or documents provided with the appliance. When the programme starts, a red light comes on and stays on for the duration of the programme. Beam-on-Floor is a light displayed on the floor below the appliance door.
- Page 6: When the programme is completed, a green light comes on. When AirDry is activated during the drying phase, the projection on the floor may not be completely visible. When the appliance has a malfunction, the red light flashes. Beam-on-Floor is off when the appliance is deactivated. ECO programme indicator indicates the most environmentally friendly programme selection for a normally soiled load. Rinse aid indicator is on when the rinse aid dispenser needs refilling. Salt indicator is on when the salt container needs refilling. Machine Care indicator is on when the appliance needs internal cleaning with the Machine Care programme. Drying phase indicator is on when you select a programme with the drying phase. MY TIME selection bar allows selecting a suitable dishwashing cycle based on programme duration.
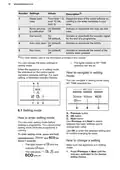
- Page 7: This is the standard programme for test institutes. The AUTO Sense programme automatically adjusts the dishwashing cycle to the type of load. The appliance senses the degree of soil and the amount of dishes in the baskets. It adjusts the temperature and quantity of water as well as the wash duration. 30min is the shortest programme suitable for dishwashing a load with fresh and light soil. Pre-rinse (15min) is a programme for rinsing off food remains from the dishes. 90min is a programme suitable for dishwashing and drying normally soiled items. ECO is the longest programme offering the most efficient use of energy and water consumption for crockery and cutlery with normal soil. ExtraPower improves the dishwashing results of the selected programme. This programme is used to assess compliance with the Ecodesign Commission Regulation (EU) 2019/2022.
- Page 8: Programme dishwasher options include AUTO Sense for various load types. The dishwashing phases consist of prewash, dishwashing at 50-60 °C, intermediate rinse, final rinse at 60 °C, and drying. AirDry is an automatic door opening feature during the drying phase. Consumption values vary based on water pressure, temperature, mains supply, options, quantity of dishes, and degree of soil. The ECO programme has indicative values for water, energy, and duration. For performance tests, contact the relevant email for necessary information. Refer to the service book for additional questions regarding the dishwasher. Basic settings can be configured to meet user needs.
- Page 9: Water hardness can be adjusted from level 1 to level 10, with the default set at level 5. The rinse aid indicator can be activated or deactivated. The end sound can be turned on or off, with off being the default setting. The auto door open feature can be activated or deactivated, with on being the default. Key tones can be activated or deactivated, with on being the default setting. You can change the basic settings in setting mode. The lights related to the MY TIME selection bar indicate available settings. To navigate in setting mode, use the MY TIME selection bar. You can enter setting mode before starting a programme, but not while it is running. Press and hold the Previous and Next buttons simultaneously to enter setting mode.
- Page 10: Press and hold simultaneously to indicate the current setting value. For settings with two values, the light is either on (setting is on) or off (setting is off). For settings with multiple values, the light flashes to indicate the current setting value. The saved settings remain valid until changed again. The water softener removes minerals from the water supply that negatively affect washing results and the appliance. Water hardness is measured in equivalent scales. The water softener should be adjusted according to the hardness of the water in your area. Set the right level of the water softener to assure good washing results. Regardless of the type of detergent used, set the proper water hardness level to keep the salt refill indicator active. Multi-tabs containing salt are not effective enough to soften hard water.
- Page 11: Regeneration process Each performed softener rinse may prolong the programme duration by another 5 minutes. The resin of the softener device needs to be regenerated regularly. A new regeneration process will be initiated between the final rinse and the programme end. All consumption values are determined in line with the currently applicable standard. The pressure and temperature of water can change the values. The rinse aid empty notification The rinse aid helps to dry the dishes without streaks and stains. When the rinse aid chamber is empty, the rinse aid indicator turns on. For best drying performance, always use rinse aid. End sound You can activate an acoustic signal that sounds when the programme is completed. The rinsing of the water softener may begin in the same cycle or at the beginning of the next programme.
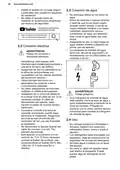
- Page 12: AirDry improves the drying results. The appliance door opens automatically during the drying phase and remains ajar. If children have access to the appliance, it is advised to deactivate AirDry. The duration of the drying phase and the door opening time vary depending on the selected programme and options. Do not try to close the appliance door within 2 minutes after automatic opening. Make sure that the current level of the water softener agrees with the hardness of the water supply. Use rough salt designed for dishwashers only. Fine salt increases the risk of corrosion. Fill the salt container and the rinse aid dispenser before first use. Start the programme for 30 minutes to remove any residuals from the manufacturing process. The salt is used to recharge the resin in the water softener and to assure good washing results. How to fill the salt container: Turn the cap counterclockwise, add water, and fill with salt.
- Page 13: The compartment is for rinse aid only. Do not fill it with detergent. Only use rinse aid designed specifically for dishwashers. Press the release button to open the lid. Pour the rinse aid in the dispenser until the liquid reaches the fill level 'max'. Remove the spilled rinse aid with an absorbent cloth to prevent excessive foam formation. You can turn the selector of the released quantity between position 1 and position 4 or 6. Water and salt can come out of the salt container when you fill it. After you fill the salt container, immediately start a programme to prevent corrosion. Open the water tap. Press and hold until the appliance is activated.
- Page 14: Fill the salt container if it is empty. Fill the rinse aid dispenser if it is empty. Activate ExtraPower if desired. Close the appliance door to start the programme. Load the baskets. Add the detergent. Select and start a programme. To select Pre-rinse, press and hold for 3 seconds. ExtraPower is not a permanent option and must be activated every time before you start a programme. The appliance senses the type of load and adjusts a suitable wash cycle and its duration.
- Page 15: The appliance continues from the point of interruption after closing the door. During the countdown, it is not possible to change the programme selection. If the door is opened for more than 30 seconds during the drying phase, the running programme ends. The Auto Off function saves energy by switching the appliance off when it is not operating. The function comes into operation automatically when the programme is completed or after 5 minutes if a programme was not started. When the programme is complete, the Auto Off function switches the appliance off automatically. Opening the door while a programme is running stops the appliance. Do not pre-rinse dishes by hand as it increases water and energy consumption. Washing dishes in the dishwasher usually consumes less water and energy than washing dishes by hand. For best cleaning results, arrange items in the baskets as instructed in the user manual.
- Page 16: Make sure that items in the baskets do not touch or cover each other. Only then can the water completely reach and wash the dishes. You can use dishwasher detergent, rinse aid, and salt separately or you can use the multi-tablets. Always use the correct quantity of rinse aid. Insufficient dosage of rinse aid decreases the drying results. Select a programme according to the type of load and the degree of soil. ECO offers the most efficient use of water and energy consumption. Before you start using separately detergent, salt, and rinse aid, complete the necessary steps. Only use salt, rinse aid, and detergent designed for dishwasher. Other products can cause damage to the appliance. Before you start the selected programme, make sure that the filters are clean and correctly installed. The arrangement of the items in the baskets is correct. Always use the correct quantity of detergent. Insufficient dosage of detergent can result in poor cleaning results. Use the appliance to wash dishwasher-safe items only.
- Page 17: Removal of foreign objects Check the filters and the sump after each use of the dishwasher. Foreign objects decrease the cleaning performance and can cause damage to the drain pump. If unable to remove the foreign objects, contact an Authorised Service Centre. Disassemble the filters system as instructed in this chapter. Remove any foreign objects manually. Reassemble the filters as instructed in this chapter. Clean the appliance with a moist soft cloth. Only use neutral detergents. Do not use abrasive products, abrasive cleaning pads or solvents. The filter system is made of 3 parts. Make sure that there are no residues of food or soil in or around the edge of the sump.
- Page 18: Wash the spray arm under running water. Use a thin pointed tool, e.g. a toothpick, to remove particles of soil from the holes. Reassemble the filters (B) and (C). Put back the filter (B) in the flat filter (A). Turn it clockwise until it locks. An incorrect position of the filters can cause bad washing results and damage to the appliance. We recommend to clean the lower spray arm regularly to prevent soil from clogging the holes. Clogged holes can cause unsatisfactory washing results. To remove the lower spray arm, pull it upwards. Do not remove the upper spray arm. If the openings in the spray arm are clogged, remove the remaining particles of soil with a thin pointed object, e.g. a toothpick.
- Page 19: Move the upper basket to the lowest level to reach the spray arm more easily. To detach the spray arm from the delivery tube, turn the mounting element counterclockwise and pull the spray arm downwards. Wash the spray arm under running water. Use a thin pointed tool to remove particles of soil from the holes. We recommend cleaning the ceiling spray arm regularly to prevent soil from clogging the holes. The ceiling spray arm is placed on the ceiling of the appliance. To install the spray arm back, insert the mounting element in the spray arm and fix it in the delivery tube by turning it clockwise. Improper repair of the appliance may pose a danger to the safety of the user. Any repairs must be performed by qualified personnel. Refer to the below table for information on possible problems. The majority of problems that may occur can be solved without the need.
- Page 20: Problem and alarm code Possible cause and solution You cannot activate the appliance. Make sure that the mains plug is connected to the mains socket. Make sure that there is no damaged fuse in the fuse box. The programme does not start. Make sure that the appliance door is closed. If the delay start is set, cancel the setting or wait for the end of the countdown. The appliance does not fill with water. Make sure that the water tap is open. Make sure that the pressure of the water supply is not too low. The appliance does not drain the water. Make sure that the sink spigot is not clogged.
- Page 21: Problem and alarm code Possible cause and solution Malfunction of the wash pump or the drain pump. Switch the appliance off and on. The lights related to MY TIME selection bar flash 5 times intermittently. An acoustic signal sounds intermittently. The temperature of the water inside the appliance is too high or malfunction of the temperature sensor occurred. Make sure that the temperature of the inlet water does not exceed 60°C. Switch the appliance off and on. Technical malfunction of the appliance. The lights related to MY TIME selection bar flash 12 times intermittently. An acoustic signal sounds intermittently. The level of water inside the appliance is too high. Make sure that the filters are clean. The lights related to MY TIME selection bar flash 15 times intermittently. Make sure that the outlet hose is installed at the right height above the floor. The appliance stops and starts more times during operation. It is normal. It provides optimal cleaning results and energy savings. The programme lasts too long. If the delay start option is set, cancel the delay setting or wait for the end of the countdown. Activating ExtraPower increases the programme duration. Small leak from the appliance door. The appliance is not levelled. The appliance door is not centred on the tub.
- Page 22: Problem and alarm code The appliance door is difficult to close. The appliance is not levelled. Loosen or tighten the adjustable feet. Parts of the tableware are protruding from the baskets. The appliance door opens during the wash cycle. The AirDry function is activated. You can deactivate the function. Rattling or knocking sounds from the inside of the appliance. The tableware is not properly arranged in the baskets. The appliance trips the circuit-breaker. The amperage is insufficient to supply simultaneously all the appliances in use. For alarm codes not described in the table, contact an Authorised Service Centre. The dishwashing and drying results are not satisfactory. Poor washing results may require using a more intensive washing programme. Activate the ExtraPower option to improve the washing results. Clean spray arm jets and filter. Poor drying results may occur if tableware was left for too long inside the closed appliance. Activate the function AirDry to improve the drying performance. There is no rinse aid or the dosage of rinse aid is not sufficient. Always use rinse aid, even with multi-tablets.
- Page 23: Problem Possible cause and solution There are whitish streaks or bluish layers on glasses and dishes. The released quantity of rinse aid is too high. Adjust the rinse aid dosage to a lower level. The quantity of detergent is too high. There are stains and dry water drops on glasses and dishes. The released quantity of rinse aid is not sufficient. Adjust the rinse aid dosage to a higher level. The quality of the rinse aid can be the cause. The interior of the appliance is wet. This is not a defect of the appliance. Humidity condensates on the appliance walls. Unusual foam during washing. Use the detergent designed specifically for dishwashers. Traces of rust on cutlery. There is too much salt in the water used for washing. Silver and stainless steel cutlery were placed together. Do not place silver and stainless steel items close together. There are residues of detergent in the dispenser at the end of the programme. The detergent tablet was stuck in the dispenser and was not washed away by water. Make sure that the spray arms are not blocked or clogged. Odours inside the appliance. Start the Machine Care programme with a descaler or a cleaning product designed for dishwashers. Limescale deposits on the tableware, on the tub and on the inside of the door. The level of salt is low, check the refill indicator. Your tap water is hard. Use salt and set regeneration of the water softener even when multi-functional tablets are used. Dull, discoloured or chipped tableware. Make sure that only dishwasher-safe items are washed in the appliance.
- Page 24: Refer to Before first use, Daily use, or Hints and tips for other possible causes. Technical information includes dimensions, voltage, electrical connection, frequency, water supply pressure, and capacity. Dimensions are 596 mm width, 818 - 898 mm height, and 550 mm depth. Voltage is 220 - 240 V with a frequency of 50 Hz. Water supply pressure ranges from 0.5 to 10 bar. The appliance has a capacity of 14 place settings. Refer to the rating plate for other values. Use hot water supply from alternative energy sources to decrease energy consumption. The QR code on the energy label provides a link to the EU EPREL database. Recycle the product and packaging to protect the environment and human health.
- Page 25: Información sobre seguridad Instrucciones de seguridad Descripción del producto Panel de control Selección de programas Ajustes básicos Antes del primer uso Uso diario Consejos Mantenimiento y limpieza
- Page 26: Información sobre seguridad Antes de instalar y utilizar el aparato, lea atentamente las instrucciones facilitadas. El fabricante no se hace responsable de lesiones o daños producidos como resultado de una instalación o un uso incorrectos. Conserve siempre estas instrucciones en lugar seguro y accesible para futuras consultas. Seguridad de niños y personas vulnerables Este aparato puede ser utilizado por niños de 8 años en adelante y personas cuyas capacidades físicas, sensoriales o mentales estén disminuidas, siempre que cuenten con las instrucciones o la supervisión sobre el uso del electrodoméstico de forma segura. Es necesario mantener alejados del aparato a los niños de entre 3 y 8 años, así como a las personas con minusvalías importantes y complejas, salvo que estén bajo supervisión continua. Es necesario mantener alejados del aparato a los niños de menos de 3 años salvo que estén bajo supervisión continua. Es necesario vigilar a los niños para que no jueguen con el aparato. Mantenga los detergentes fuera del alcance de los niños. La limpieza y mantenimiento de usuario del producto no podrán ser realizados por niños sin supervisión. Instrucciones generales de seguridad Este electrodoméstico está diseñado únicamente para limpiar vajilla y utensilios domésticos.
- Page 27: Este aparato está diseñado para uso doméstico en interiores. Este aparato se puede utilizar en oficinas, habitaciones de hotel, habitaciones de Bed&Breakfast, casas de campo y otros alojamientos similares donde dicho uso no exceda (en promedio) los niveles de uso doméstico. No cambie las especificaciones de este aparato. La presión del suministro de agua para el funcionamiento del aparato debe estar entre 0.5 / 10 bares. Coloque el máximo número de 14 cubiertos. Si el cable de alimentación sufre algún daño, el fabricante o un profesional tendrán que cambiarlo para evitar riesgos. ADVERTENCIA: Los cuchillos y otros utensilios con puntas afiladas deben colocarse en el cesto con las puntas hacia abajo o en posición horizontal. No deje la puerta del lavavajillas abierta ya que se podría tropezar con ella. Antes de realizar tareas de mantenimiento, apague el aparato y desenchúfelo de la toma de corriente. No utilice agua pulverizada a alta presión ni vapor para limpiar el aparato.
- Page 28: Instale el aparato en un lugar seguro y adecuado que cumpla los requisitos de instalación. No provoque daños en los tubos de agua. No utilice el aparato antes de instalarlo en la estructura empotrada por motivos de seguridad. Asegúrese de que no haya fugas de agua visibles durante y después del primer uso del aparato. Este aparato está diseñado para instalarse/conectarse a una toma de tierra del edificio. Utilice siempre una toma con aislamiento de conexión a tierra correctamente instalada. No utilice adaptadores de enchufes múltiples ni cables prolongadores. Si la manguera de entrada de agua está dañada, cierre la llave de agua y quite inmediatamente el enchufe de la toma de corriente. No coloque productos inflamables o artículos mojados con productos inflamables dentro, cerca o sobre el aparato. Los detergentes para lavavajillas son peligrosos. Siga las instrucciones de seguridad del envase del detergente.
- Page 29: No guarde los artículos ni ejerza presión sobre la puerta abierta del aparato. El aparato puede liberar vapor caliente si abre la puerta mientras está en marcha un programa. Para reparar el aparato, póngase en contacto con el centro de servicio autorizado. Utilice solamente piezas de recambio originales. La autorreparación o la reparación no profesional puede tener consecuencias de seguridad y podría anular la garantía. Las siguientes piezas de repuesto estarán disponibles durante 7 años después de que el modelo se haya retirado: motor, bomba de circulación y desagüe, calentadores y elementos de calentamiento. Tenga en cuenta que algunas de estas piezas de recambio solo están disponibles para reparadores profesionales. Desconecte el aparato de la red. Corte el cable de conexión a la red y deséchelo. Retire el pestillo de la puerta para evitar que los niños y las mascotas queden encerrados en el aparato.
- Page 30: Descripción del producto Brazo aspersor de techo Brazo aspersor intermedio Brazo aspersor inferior Filtros Placa de características técnicas Depósito de sal Ventilación Dosificador de abrillantador Dosificador de detergente Cesto inferior Cesto superior Cajón de cubiertos El gráfico es una descripción general. Para obtener más información, consulte otros capítulos o documentos proporcionados con el aparato. Beam-on-Floor es una luz que aparece en el suelo bajo la puerta del aparato. Cuando AirDry está activado durante la fase de secado, es posible que la proyección en el suelo no esté visible completamente. Cuando empieza el programa, la luz roja se enciende y permanece encendida la duración del programa. Una vez completado el programa, se enciende una luz verde. Cuando el aparato presenta un fallo, la luz roja parpadea. Beam-on-Floor desaparece cuando se desactiva el aparato.
- Page 31: Panel de control Botón de encendido/apagado / Botón de reinicio Tecla Delay Start Indicadores Barra de selección MY TIME Tecla ExtraPower Tecla AUTO Sense Indicador de programa ECO. Indica la selección de programa más respetuosa con el medio ambiente para una carga con suciedad normal. Indicador de abrillantador. Se enciende cuando hay que rellenar el dosificador de abrillantador. Indicador de sal. Se enciende cuando hay que rellenar el depósito de sal. Selección de programas La barra de selección MY TIME permite elegir un ciclo de lavado adecuado en función de la duración del programa.
- Page 32: AUTO Sense ajusta automáticamente el ciclo de lavado según el tipo de carga. ExtraPower mejora los resultados de lavado del programa seleccionado. El aparato detecta el tipo de suciedad y la cantidad de platos que hay en los cestos. Resumen de los programas incluye información sobre carga, grado de suciedad y fases del programa. El programa estándar para institutos de pruebas es mencionado. Opciones permiten ajustar la selección de programas a las necesidades del usuario. El programa de 30 minutos es para vajilla y cubertería con suciedad fresca. El programa de 90 minutos es para vajilla, cubiertos, ollas y sartenes con suciedad normal. El programa ECO es para vajilla, cubiertos, ollas y sartenes con suciedad ligeramente seca. Este programa se utiliza para evaluar el cumplimiento del Reglamento de la Comisión sobre ecodiseño.
- Page 33: Programa de carga del lavavajillas. Fases del programa: prelavado, aclarado intermedio, aclarado final, secado. Limpieza del interior del aparato. Apertura automática de la puerta durante la fase de secado. Valores de consumo: agua, energía, duración. La presión y temperatura del agua pueden alterar los valores. Los valores de los programas distintos de ECO son solo indicativos. Información para institutos de pruebas. Consulte el manual de servicio para preguntas relacionadas con el lavavajillas. Puede configurar el dispositivo cambiando la configuración básica.
- Page 34: Dureza agua: Ajustar el nivel del descalcificador de agua según la dureza del agua de su zona. Notificación del abrillantador: Activar o desactivar la notificación del abrillantador. Sonido de fin: Activar o desactivar la señal acústica de fin de programa. Apertura automática de la puerta: Activar o desactivar AirDry. Tonos de botones: Activar o desactivar el sonido de los botones cuando se pulsan. Puede cambiar los ajustes básicos en el modo de ajuste. Cuando el aparato está en el modo de ajuste, los indicadores del panel de mandos representan los ajustes disponibles. Para acceder al modo de ajuste, pulse y mantenga pulsado durante 3 segundos. Puede navegar en el modo de configuración utilizando la barra de selección MY TIME.
- Page 35: Pulse OK para introducir el ajuste. El indicador correspondiente al ajuste está encendido. La luz correspondiente muestra el ajuste actual. Pulse Anterior o Siguiente para cambiar el valor. Pulse OK para confirmar el ajuste. El nuevo ajuste se guarda. Utilice Anterior y Siguiente para cambiar entre los ajustes básicos. El descalcificador elimina minerales del suministro de agua. La dureza del agua se mide en escalas equivalentes. Ajuste el nivel adecuado del descalcificador para asegurar buenos resultados de lavado.
- Page 36: Ajustes de fábrica. No utilice sal en este nivel. Ajuste el nivel de dureza de agua adecuado para mantener activo el indicador de rellenado de sal. Las tabletas múltiples que contienen sal no son suficientemente efectivas para ablandar el agua dura. Para el correcto funcionamiento del descalcificador de agua, la resina del dispositivo debe regenerarse regularmente. El inicio de la regeneración no tiene ningún impacto en la duración del ciclo. La regeneración prolonga la duración total de un programa en 5 minutos adicionales. Cuando la cantidad de agua prescrita se ha utilizado, se iniciará un nuevo proceso de regeneración. El aclarado del descalcificador termina con un drenaje completo. Este proceso es automático y forma parte del funcionamiento normal del lavavajillas.
- Page 37: Cada aclarado del descalcificador puede prolongar la duración del programa en otros 5 minutos. AirDry mejora el resultado de secado abriendo automáticamente la puerta durante la fase de secado. Todos los valores de consumo se determinan en condiciones de laboratorio con una dureza del agua de 2,5 mmol/l. AirDry se activa automáticamente con todos los programas excepto Preaclarado. El abrillantador permite que la vajilla se seque sin rayas ni franjas y se libera automáticamente durante el aclarado final. No intente cerrar la puerta del aparato durante 2 minutos después de la apertura automática. El indicador de abrillantador se enciende cuando el depósito está vacío. Para obtener el mejor secado, utilice siempre abrillantador. Puede activar una señal acústica que suena al finalizar el programa. Los botones del panel de mandos emiten un sonido clic al presionarlos, que puede desactivarse.
- Page 38: Antes del primer uso Asegúrese de que el nivel actual del descalcificador coincide con la dureza de su suministro de agua. Llene el depósito de sal. Llene el dosificador de abrillantador. Abra la llave de paso. Elimine los restos de sal que puedan haber quedado en la entrada del depósito. Inicie el programa 30min para eliminar los residuos del proceso de fabricación. Gire la tapa del depósito de sal hacia la derecha para cerrar el depósito de sal. Utilice solo sal gruesa diseñada para lavavajillas. El compartimento es solo para abrillantador. No lo llene con detergente.
- Page 39: Pulse la tecla de apertura para abrir la tapa. Puede girar el selector de la cantidad entre la posición 1 y la posición 4 o 6. Vierta el abrillantador en el dosificador hasta que el líquido alcance el nivel max. Limpie el abrillantador con un paño absorbente para evitar que se forme demasiada espuma. Cierre la tapa y asegúrese de que el botón de apertura se bloquea en su posición. Abra la llave de paso. Llene el depósito de sal si está vacío. Seleccione e inicie un programa. Cierre la llave del agua cuando termine el programa. Pulse el botón del programa que desee seleccionar.
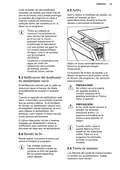
- Page 40: Cómo activar ExtraPower Seleccione un programa usando la barra de selección MY TIME. Pulse y mantenga pulsado durante 3 segundos. ExtraPower no es una opción permanente y cada vez que inicie un programa debe activarla. Si cancela el inicio diferido, debe volver a seleccionar el programa. La activación de ExtraPower suele afectar al consumo de agua y energía y a la duración del programa. Cómo iniciar el programa AUTO Sense Pulse. La luz correspondiente al botón está encendida. Apertura de la puerta mientras está funcionando el aparato Si abre la puerta mientras se realiza un programa, el aparato se detiene. Cuando cierre la puerta, el aparato continuará a partir del punto de interrupción. Cómo retrasar el inicio de un programa Es posible retrasar el inicio del programa seleccionado hasta 3 horas. Durante la cuenta atrás, no es posible cambiar la selección de programa. La función Auto Off Esta función ahorra energía al apagar el aparato cuando no está en funcionamiento.
- Page 41: Tras 5 minutos si el programa no se ha iniciado, todos los botones están inactivos, excepto el botón de encendido/apagado. Cuando el programa ha terminado, la función Auto Off apaga el aparato automáticamente. Para prevenir la acumulación de cal dentro del aparato, siga estos consejos para obtener un resultado de limpieza de secado óptimo. Rellene el depósito de sal siempre que sea necesario. Use la dosis recomendada de detergente y abrillantador. Asegúrese de que el nivel actual del descalcificador coincide con la dureza de su suministro de agua. Lavar los platos en el lavavajillas suele consumir menos agua y energía que lavar los platos a mano. Utilice únicamente sal, abrillantador y detergente diseñados para lavavajillas. Quite los residuos más grandes de comida de los platos y vacíe las tazas y vasos antes de ponerlos dentro del aparato. Ajuste la cantidad de detergente en función de la dureza del agua.
- Page 42: Mantenimiento y limpieza Limpieza del interior Antes de proceder con cualquier mantenimiento que no sea realizar el programa Machine Care, apague el aparato y desconecte el enchufe de la red. Limpie el interior del aparato con un paño suave humedecido. No utilice productos abrasivos, estropajos abrasivos o duros, utensilios afilados, productos químicos agresivos ni disolventes. Los filtros sucios y los brazos aspersores obstruidos afectan negativamente a la calidad del lavado. Para mantener el funcionamiento óptimo del aparato, utilice un producto específico de limpieza para lavavajillas al menos cada dos meses. Machine Care es un programa diseñado para limpiar el interior del aparato con resultados óptimos. Revise los filtros y el sumidero después de cada uso del lavavajillas. Los cuerpos extraños disminuyen el rendimiento de la limpieza y pueden causar daños en la bomba de desagüe. Limpie el aparato con un paño suave humedecido.
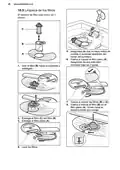
- Page 43: Limpieza de los filtros El sistema de filtro está hecho de 3 piezas. Asegúrese de que no haya restos de comida ni suciedad alrededor del borde del sumidero. Vuelva a colocar el filtro plano (A). Asegúrese de que esté bien colocado bajo las 2 guías. Gire el filtro (B) hacia la izquierda y extráigalo. Vuelva a montar los filtros (B) y (C). Vuelva a colocar el filtro (B) en el filtro plano (A). Gírelo hacia la derecha hasta que encaje. Extraiga el filtro (C) del filtro (B). Extraiga el filtro plano (A). Lave los filtros.
- Page 44: Precaución: una posición incorrecta de los filtros puede dañar el aparato y provocar resultados de lavado no satisfactorios. Recomendamos limpiar periódicamente el brazo aspersor inferior para que la suciedad no obstruya los orificios. No retire el brazo superior del aspersor. Si los orificios del brazo aspersor están obstruidos, quite los restos de suciedad con un objeto fino y afilado. Unos orificios obstruidos pueden provocar resultados de lavado insatisfactorios. Recomendamos limpiar periódicamente el brazo aspersor techo para que la suciedad no obstruya los orificios. Si los orificios están taponados, la calidad del lavado puede deteriorarse. El brazo aspersor techo está en el techo del aparato. Lave el brazo aspersor bajo el agua corriente. Retire las partículas de suciedad de los orificios mediante un objeto afilado. Libere los topes en los lados de los rieles deslizantes del cajón de cubiertos y saque el cajón. Para instalar el brazo aspersor de vuelta, presiónelo hacia abajo.
- Page 45: Mueva el cesto superior al nivel más bajo para alcanzar el brazo aspersor con más facilidad. Para instalar el brazo aspersor, inserte el elemento de montaje en el brazo aspersor y fíjelo en el tubo de descarga, girándolo en sentido de las manecillas del reloj. Para separar el brazo aspersor del tubo de descarga, gire el elemento de montaje en sentido contrario a las manecillas del reloj y jale el brazo aspersor hacia abajo. Lávelo con agua corriente. Retire las partículas de suciedad de los orificios mediante un objeto afilado, como un palillo. Instale el cajón de cubiertos en los rieles deslizantes y bloquee los topes. Advertencia: una reparación inadecuada del aparato puede suponer un riesgo para la seguridad del usuario. Si tiene alguna duda, consulte la tabla siguiente. Con algunos problemas, las luces relacionadas con la barra de selección parpadean intermitentemente para indicar un fallo de funcionamiento y el código de la alarma. La mayoría de los problemas que pueden surgir se resuelven sin necesidad de ponerse en contacto con el Centro de servicio técnico. Asegúrese de que el enchufe está conectado a la toma de corriente.
- Page 46: Problema y código de alarma El programa no se inicia. Asegúrese de que la puerta del aparato esté cerrada. Si se ha ajustado el inicio diferido, cancele dicho ajuste o espere hasta el final de la cuenta atrás. El aparato recarga la resina dentro del descalcificador de agua. La duración del proceso es de aproximadamente 5 minutos. El aparato no carga agua. Compruebe que el grifo esté abierto. Asegúrese de que la presión del suministro de agua no es demasiado baja. Compruebe que el grifo no está obstruido. Asegúrese de que el filtro de la manguera de entrada no está obstruido. Asegúrese de que la manguera de entrada no esté doblada ni retorcida. El aparato no desagua. Asegúrese de que el desagüe no está obstruido. Compruebe que el filtro de desagüe no está obstruido. Asegúrese de que la manguera de desagüe no esté doblada ni retorcida. El dispositivo contra inundación se ha activado. Cierre el grifo. Asegúrese de que el aparato está instalado correctamente. Fallo de funcionamiento del sensor de detección del nivel de agua. Asegúrese de que los filtros están limpios. Apague y encienda el aparato.
- Page 47: Problema y código de alarma Posible causa y solución Fallo de funcionamiento de la bomba de lavado o de la bomba de desagüe. Asegúrese de que la temperatura del agua de entrada no exceda los 60 °C. Fallo técnico del aparato. Asegúrese de que los filtros están limpios. Asegúrese de que la manguera de salida esté instalada a la altura correcta sobre el suelo. El aparato se detiene y se pone en marcha más veces durante el funcionamiento. Es normal. Proporciona resultados de limpieza óptimos y ahorra energía. Las luces correspondientes a MY TIME la barra de selección parpadean 5 veces intermitentemente. Sonará una señal acústica intermitentemente.
- Page 48: Problema y código de alarma Posible causa y solución El programa dura demasiado. Si se ha ajustado la opción de inicio diferido, cancele dicho ajuste o espere hasta el final de la cuenta atrás. Activar ExtraPower aumenta la duración del programa. Pequeña fuga de la puerta del aparato. El aparato no está nivelado. Afloje o apriete las patas ajustables. Es difícil cerrar la puerta del aparato. La AirDry función está activada. Puede desactivar la función. Sonidos de traqueteo o golpeteo dentro del aparato. El aparato dispara el disyuntor.
- Page 49: Los resultados del lavado y el secado no son satisfactorios. Mal resultado de lavado. Consulte Uso diario, Consejos y el folleto sobre cómo cargar el cesto. Active la opción ExtraPower para mejorar el resultado de lavado del programa seleccionado. Limpie las boquillas del brazo aspersor y el filtro. Malos resultados de secado. Active la función AirDry para ajustar la apertura automática de la puerta. No hay abrillantador o la dosificación del abrillantador es insuficiente. Utilice siempre abrillantador, incluso con pastillas multiusos. La dosificación del abrillantador es demasiado alta. Reduzca la dosificación de abrillantador. La cantidad de abrillantador es insuficiente. Aumente la dosificación de abrillantador. Esto no es un defecto del aparato. La humedad se condensa en las paredes del aparato.
- Page 50: Problema Quedan restos de detergente en el dosificador al final del programa. La pastilla de detergente se ha quedado pegada en el dosificador y no se ha disuelto en el agua. El agua no puede lavar el detergente del dosificador. Compruebe que los brazos aspersores no estén bloqueados o atascados. Asegúrese de que los objetos de los cestos no impiden que se abra la tapa del dosificador de detergente. Olores en el interior del aparato. Active el programa Machine Care con un descalcificador o producto de limpieza diseñado para lavavajillas. Depósitos calcáreos en la vajilla, la cuba y el interior de la puerta. El nivel de sal es bajo, consulte el indicador de rellenado. La tapa del depósito de sal está suelta. Asegúrese de lavar en el aparato únicamente elementos aptos para lavavajillas.
- Page 51: Capacidad Coloque los cubiertos. Consulte la placa de datos técnicos para otros valores. Si el agua caliente procede de una fuente de energía alternativa, utilice la toma de agua caliente para reducir el consumo de energía. El código QR de la etiqueta energética proporciona un enlace web para el registro de este aparato en la base de datos de la UE EPREL. Guarde la etiqueta de energía como referencia junto con el manual de usuario. Para obtener información más detallada sobre la etiqueta energética, visite www.theenergylabel.eu. Recicle los materiales con el símbolo. Coloque el material de embalaje en los contenedores adecuados para su reciclaje. Lleve el producto a su centro de reciclaje local o póngase en contacto con su oficina municipal.
- Page 52: Page 52

BOSCH SMV4HTX27G-55 Dishwasher

Monsher MD 6003 Dishwasher

LG LDTH797 Series Smart Dishwasher

FISHER AND PAYKEL DD60D2NX9 Double Dishwasher

Fisher and Paykel DW60FC6X1 Dishwasher

FISHER PAYKEL DD60SI9 Sanitise Integrated Single DishDrawer Dishwasher

FISHER PAYKEL DD60SCTW9 Tall Dishwasher

FISHER AND PAYKEL DD60DI9 Dishwasher

BOSCH SMV4HVX00G Dishwasher

CMA DISHMACHINES CMA-180 Rack Straight Dishwasher