Home > FISHER and PAYKEL > FISHER and PAYKEL DD60DCHX9, DD60DDFHB9 Dishwasher
FISHER and PAYKEL DD60DCHX9, DD60DDFHB9 Dishwasher


DOUBLE DISHDRAWER™ DISHWASHER
CONTEMPORARY
DD60DCHX9, DD60DDFHB9
INSTALLATION GUIDE
EU

| General | Details |
|---|---|
| Name | FISHER and PAYKEL DD60DCHX9, DD60DDFHB9 Dishwasher |
| Make | FISHER and PAYKEL |
| Language | English |
| Filetype | PDF (Download) |
| File size | 0.43 MB |


FISHER and PAYKEL DD60SCTX9 Dishwasher

FISHER and PAYKEL DD60DDFHX9 Dishwasher

FISHER and PAYKEL DD24SCTB9 N Dishwasher

FISHER and PAYKEL DD60SCTW9 Dishwasher

FISHER and PAYKEL DD60SDFTX9 Dishwasher

Fisher and Paykel DW24UT2I2 Dishwasher

FISHER AND PAYKEL DD24SHTI9N Dishwasher

FISHER AND PAYKEL DD60SDFHTX9 Tall Dishwasher

FISHER AND PAYKEL DD24DTI9 N Dishwasher

FISHER AND PAYKEL DD24STI9 Dishwasher

FISHER and PAYKEL DD60DCHX9, DD60DDFHB9 Dishwasher Overview
Summary of Contents
- Page 1: Double Dishdrawer™ dishwasher Contemporary Installation guide
- Page 2: Safety and warnings Electric shock hazard Tip hazard Failure to follow this advice may result in electrical shock or death. Failure to follow this advice may result in injury or product damage. Before installing the DishDrawer, remove the house fuse or open the circuit breaker. This appliance must be earthed. If drawers are pulled open while the product is not secured to cabinetry, the product may tip. Cut hazard Failure to use caution could result in injury. The plug must be plugged into an appropriate outlet that is installed and earthed in accordance with all local codes and ordinances.
- Page 3: Safety and warnings Ensure the product is not plugged in when fitting custom panels. To reduce the risk of fire, injury to persons or damage when using the appliance, follow the important safety instructions listed below. Installation of custom panels requires basic mechanical and electrical skills. Installation must comply with your local building and electricity regulations. Failure to install the custom panels correctly could invalidate any warranty or liability claims. Do not repair or replace any part of the appliance unless specifically recommended in this guide. The dishwasher must be installed to allow for future removal from the enclosure if service is required. Ensure all water connections are turned off. This dishwasher is manufactured for indoor use only. Do not use an extension cord or a portable electrical outlet device to connect the dishwasher to the power supply.
- Page 4: Tools and components Parts supplied Tools required Keep all packing materials until the unit has been inspected. Inspect the product to ensure there is no shipping damage. Fisher & Paykel is not responsible for shipping damage. This video provides an overview of what is needed to install a DishDrawer™ Dishwasher. Installation should be undertaken by a Fisher & Paykel trained and supported service technician or qualified person. To access installation videos, scan the QR code with your smartphone or watch online.
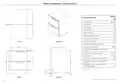
- Page 5: Product dimensions – DD60DC models Overall height Overall width Overall depth Height of chassis Depth of chassis Height of upper door panel Height of lower door panel Depth of door panel Ventilation gap between door panels Depth of toe kick recess
- Page 6: Product dimensions – DD60DD models Overall height: 820–880 mm Overall width: 599 mm, 573 mm, 811 mm Overall depth: Not specified Height of chassis: Not specified Depth of chassis: 553 mm, 398 mm, 312 mm Height of upper door panel: Not specified Height of lower door panel: Not specified Depth of door panel: Not specified Ventilation gap between door panels: Not specified Minimum clearance between toe kick panel and floor: 12 mm Actual product dimensions may vary by 2 mm
- Page 7: Cabinetry dimensions and clearances are essential for proper installation. Connections can be located in an adjacent cabinet on either side of the DishDrawer. Minimum inside height is specified as 820 mm. Inside width ranges from 600 mm to 610 mm. Minimum clearance to adjacent cupboard door is 2 mm. Minimum clearance to corner cupboard is 13 mm. Minimum inside depth is indicated. Recommended height of adjacent cabinetry is 720 mm. Height of toe kick area is between 100 mm and 160 mm. Refer to 'Plumbing & electrical considerations' and 'Cabinetry preparation' for more information on service requirements.
- Page 8: Plumbing and electrical considerations are essential for installation. Services can be installed on either the left-hand or right-hand side of the product. Drain hoses can be extended using a Fisher & Paykel drain hose extension kit. Recommended water temperature is cold, with a maximum of 60°C. Water connection must comply with local plumbing regulations. Water pressure requirements vary for water softener and non-water softener models. Electrical requirements specify 220-240 V AC with a minimum of 9.5 A. Drains must be separated to meet kosher requirements. It is advisable to confirm kosher installation acceptability with a local rabbi. Dimensions for service access and hose lengths are provided for proper installation.
- Page 9: Cabinetry preparation Service access Moisture protection We recommend locating the service holes on either side of the DishDrawer. Ensure the edges are smooth and rounded if the holes are created through wood. Ensure an edge protector is fitted if the holes are created through metal. Align the supplied moisture protection tape to the cabinetry as illustrated. Ensure this area is free of debris before applying the tape to the surface. Select cabinetry securing method: Secure to cabinetry via brackets or secure via drawer removal. Recommended method for securing is via drawer removal.
- Page 10: Secure all four side brackets to the DishDrawer™ Dishwasher, aligning bracket A with slot A and bracket B with slot B. Partially open one of the drawers and remove the first screw cover from the trim moulding. Ensure the ends of the brackets are not pushed into the chassis. Optionally, fit the two top brackets for additional stability. Pre-drilling a pilot hole may be required depending on the cabinetry material. Level the DishDrawer™ Dishwasher by carefully tipping it onto a protected surface. Rotate each leg anticlockwise to increase the height, and clockwise to decrease. Replace the trim cover and repeat for the remaining brackets. Minor adjustments can be made by lightly tilting the product and rotating each leg as desired. Push the product into the cavity, pulling the hoses through as you push to avoid crushing or twisting them.
- Page 11: Secure to cabinetry via drawer removal (method B). Level the DishDrawer™ Dishwasher as required using a hex socket and screwdriver. Rotate clockwise to increase the height of each leg and anticlockwise to lower. Fit the two top brackets optionally, ensuring they are not pushed into the chassis. Loosen each foot by 1/2 a turn to assist the adjustment process. Push the product into the cavity while pulling the hoses through to avoid crushing or twisting. Secure to cabinetry via all four fixing locations in the chassis. Ensure sound insulation is replaced correctly. Open the lower drawer and press both locking tabs back to release. Refit the drawer to the runners and clip into place via both locking tabs.
- Page 12: Install toe kick. Measure toe kick height. The toe kick meets the bottom of the tub is the recommended cut-off point. Carefully score toe kick at desired height. Snap excess and smooth edges. Snap both end tabs. Slide toe kick onto the mounting rails and secure. Do not over tighten the screws.
- Page 13: Plumbing & electrical connection Sink trap/waste tee installation Install the drain hose support to the back wall, as close to the underside of the countertop as possible. Ensure the drain hose does not extend into water retained in the trap; an air gap is required to prevent waste water from siphoning back into the tub. Unplug or drill out the waste tee before securing joiner to sink trap or waste tee. Ensure the supplied rubber washer is fitted to the coupling before connecting the inlet hose to tap. Using a spanner or pliers, turn a further 180° to secure, avoiding over-tightening. Do not turn water supply on. The DishDrawer™ Dishwasher must be powered on for the flood protection feature to be enabled. Plug product in.
- Page 14: Installer checklist to be completed by the installer includes key installation steps. Check all parts are installed correctly and secure. Ensure all electrical tests have been conducted in accordance with local regulations. Ensure all clearance gaps have been maintained. Test operation by ensuring the DishDrawer™ Dishwasher is securely fastened and opens and closes freely. Turn on the power and water supplies, then open the drawer to hear a beep and see a program indicator light. Ensure any packaging or tape securing the racks and spray arm is removed. Check the spray arm is in place, mounted correctly, and rotates freely. Ensure any knock-outs or plugs in the drain connection have been drilled out and the connection has been made. Ensure the inlet hose has a supplied rubber washer fitted and tightened.
- Page 15: Troubleshooting No program indicator lights up when the drawer is opened. Ensure power is connected and is switched on. Auto power-on may need to be activated. Water supply fault. Ensure the water supply is turned on. Press once to stop the beeping, then again to clear the fault. Ensure nothing is obstructing the drawer from closing such as hoses or drawer latches. Check hoses, connections, and existing plumbing for leaks. Check rubber washer and hose clamp are correctly fitted. Ensure the product is secured to the cabinetry. Open the drawer and check the spray arm. If the spray arm has loosened or come off its mounting, re-fit it. Check that the cabinetry is square. Check and relevel the product. If a problem occurs that is not listed, refer to your user guide for additional troubleshooting.

FISHER PAYKEL DW60U2I2 Integrated Dishwasher

GE Monogram UDT165SIVII 18 Inch Dishwasher

FISHER and PAYKEL DD24DTX6HI1 Tall DishDrawe Dishwasher
AEG Electrolux FFB73727PM Dishwasher

BOSCH SHE41CM2N Recessed Handle Dishwasher

Miele PFD 101 ProfiLine Dishwasher

AIRMSEN AE-TDQR03 Complete Dishwasher

Haier HDW15F1S1 Dishwasher

FISHER PAYKEL DD24SCTX9N Dishwasher

FISHER AND PAYKEL DD24STX6PX1 Dish Drawer Dishwasher