HAVA TDQR01 Compact Dishwasher


Compact Countertop Dishwasher
Model: TDQR01
Email: support@havalab.com
User Manual
MADE IN CHINA

| General | Details |
|---|---|
| Name | HAVA TDQR01 Compact Dishwasher |
| Make | HAVA |
| Language | English |
| Filetype | PDF (Download) |
| File size | 1.18 MB |


HAVA R01 Compact Dishwasher

HAVA TDQR01 Compact Dishwasher Overview
Summary of Contents
- Page 1: Compact countertop dishwasher model TDQR01 user manual.
- Page 2: Important safety instructions Important safeguards Grounding instructions Electrical requirements Electrical connection Getting to know your dishwasher Installation Technical specifications Operating instructions Cleaning & maintenance
- Page 3: Before using this compact dishwasher, please read this user manual carefully. This manual is for the HAVA Compact Countertop Dishwasher (Model: TDQR01). Important safety instructions include following basic precautions. To reduce the risk of injury, the user should read and understand this user manual before using this dishwasher. Only use the dishwasher for its intended purpose and recommended detergents. Do not operate this appliance if parts are missing or broken. Unplug from the outlet when not in use or before cleaning. Do not wash plastic items unless they are marked “dishwasher safe.” Hydrogen gas may be produced in a hot water system that has not been used for two or more weeks. Do not open the door while the appliance is running to avoid personal injury. Save these instructions for future reference.
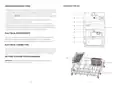
- Page 4: Water tank Upper spray arm Control panel LED lamp Lower spray arm Filter system Suitable for washing baby bottles, oily and grimy tableware, or pet products. A shorter wash for lightly soiled loads. For normal soiled loads such as dishes, glasses, and other tableware. The LED lamp allows you to clearly check the working status of the dishwasher.
- Page 5: Connecting the drain hose to a sewer involves three options: sink, sink drainpipe, and drainage pipe. For options B and C, drilling a hole on or under the counter is required. The drain hose must be properly fitted to its containment source to avoid water leaks and should not be kinked or impeded. The machine supports two water supply modes: faucet mode and water tank mode. In faucet mode, remove the silica gel plug from the water inlet and attach the water inlet hose to the machine and faucet. If the included water inlet hose does not fit your faucet, a 3/4 GHT threaded faucet adapter may be needed. The dishwasher drain hose must be installed correctly to drain water effectively. Connect the drain hose to the water outlet on the back of the machine and tighten the hose collar screw. Turn on the dishwasher and select a wash cycle to start the operation. The panel will display an indicator showing the faucet is properly connected and turned on.
- Page 6: - In the case of a water shortage, pressing the Start/Pause button 5 times will enter standby mode if there is still no adequate water supply. - A red flashing water shortage indicator means the machine is not connected to a faucet, the faucet is not turned on, or the water tank is not full. - If the machine is used for the first time or has not been used in a long time, trapped air may cause insufficient water flow. - To ensure smooth water flow, shake the machine 5-6 times to exhaust trapped air. - Open the water tank lid and fill with about 1.3 gallons (5 L) of water; beeps will indicate when the tank is full. - If the water tank is not full when starting a wash cycle, a red flashing water shortage indicator will display. - The machine will automatically switch to water tank mode if it detects that the water tank is full before starting any wash cycle. - To drain the water tank by hand, pause the wash cycle and press and hold both the Dry button and Power button for 3 seconds. - Remove large, hard food scraps before loading tableware into the dishwasher. - The system will automatically check all water supplies, and if the red water shortage indicator appears, fill the water tank or turn on the faucet.
- Page 7: For the best cleaning performance, follow these loading guidelines: Scrape off any large food particles. Soften and/or soak remnants of burnt food in pans. It is not necessary to rinse all dishes under running water. Load hollow items such as cups, glasses, pans etc. with the opening facing downwards. Knives and other utensils with sharp points should be loaded in the storage rack or cutlery basket with their points down. Very small items should not be washed in the dishwasher, as they could fall out. Dishes and cutlery should not lie inside, be stacked with, or lie against each other. To avoid damage to glasses, ensure they are not touching each other. Do not overload the dishwasher. Position the dishes and cookware such that they will not be moved by the water spray. Improper placement of tableware and cutlery may block the spray arm, which may affect the cleaning.
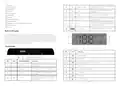
- Page 8: Detergent use includes pods, liquid, or powder detergent added to the dispenser. The table outlines modes for cleaning jobs and the corresponding detergent amounts. Only use detergent specifically made for dishwashers and keep it away from children. The Baby Care mode is suitable for washing bottles and oily dishes. Do not add detergent when using the Fruit mode. Using normal washing mode with low alkaline concentrated detergents reduces pollution. Detergent must be refilled before each wash cycle, with generally one tablespoon needed. Always add detergent just before starting the dishwasher to ensure proper dissolution. For washing tableware in water tank mode, use water below 104 °F (40 °C). The Dry mode can be used with any washing mode except Fruit mode.
- Page 9: Press and hold the Power button for 3 seconds to turn on the appliance. The Dry mode can be used to keep your dishes clean and dry for long periods. Hot air drying and automatic ventilation can also prevent bacteria and odors. When this mode is selected, it will provide an extra 60 minutes of hot air drying to the dishes. The Dry mode can be used with any washing mode other than Fruit mode. To combine with a wash cycle, add an extra air-drying time by pressing the Dry button. The Dry mode cannot be paused or canceled during operation of air-drying. If needed, press the Dry button to add an extra 60 minutes of air-drying and 72 hours of intermittent ventilation. Load the dishwasher and add detergent before starting a wash cycle. The power supply is 120 V/60 Hz.
- Page 10: When the wash cycle is completed, there may be a few droplets on the dishwasher’s interior or on the tableware. This is normal. The wash cycle cannot be changed during washing. Press the Start/Pause button to pause the wash cycle. Never run the dishwasher without the filters in place. The entire filter system should be cleaned once a week. It is dangerous to open the door when the wash cycle has commenced as the hot water may scald you. When the cleaning cycle is completed, the machine will drain out the water for 1 minute, and 6 beeps will be heard. If the Dry mode is turned on, the machine will begin the Dry mode after the wash cycle is completed. Turn off the water supply, if connected. Unplug the appliance from the power source.
- Page 11: Remove the main filter by pulling upwards. Fine filter: This filter catches soil and food residue in the cylindrical base and prevents the soil from being redeposited on the dishes during wash cycle. Main filter: Food and soil particles trapped by this filter are broken down by a special jet on the spray arm and flushed down the drain. To remove the filter system, turn the fine filter counterclockwise to remove it from the machine. To clean the filter system, rinse the filter system under running water. Use a soft cleaning brush to clean the coarse filter and the fine filter. To reinstall the filter system, position the main filter on its seat and push downwards, align the tabs on the bottom of the coarse filter with the corresponding hole of the fine filter, and then insert the coarse filter into the fine filter. Place the fine filter into its seat and rotate clockwise to tighten. Push the tabs at the bottom center of the fine filter to separate the coarse filter from the fine filter.
- Page 12: Spray arms can be easily removed for cleaning to prevent clogging. The control panel and exterior should be cleaned with a lightly damp cloth and dried thoroughly. Use a cloth dampened with water and vinegar to remove spots from the interior surface. Regularly clean the door seals with a damp sponge to prevent odors. Never use a spray cleaner on the door panel to avoid damaging the door lock and electrical components. Take frost protection measures during winter by turning off the dishwasher and water supply. Drain the water from the inlet hose and inlet port after every wash cycle. Always remove the plug before cleaning or performing maintenance. Leave the door slightly ajar after every wash to prevent moisture and odors from being trapped inside.
- Page 13: If the dishwasher will not be used for an extended period of time, it is recommended to run a wash cycle with the dishwasher empty, then power off the dishwasher, remove the plug from the socket, turn off the water supply, force drain the water tank, and leave the appliance door slightly open. Error codes include a buzzer sound and various solutions for issues such as water shortage. If the appliance must be moved, try to keep it in a vertical position and do not transport the unit on its side or upside down. The water connection requires a 3/4 GHT female connector that matches with faucets having a 3/4 GHT male connector. Check the drain hose to ensure it is not kinked or obstructed. The drain hose must be properly fitted to avoid water leaks, and if the sink is higher than the dishwasher, excess water should be drained into a lower bucket. If the error code persists after troubleshooting, please contact the support team. Tilt the machine backwards to a 30-45 degree angle for at least 2 minutes to allow water to flow out. If you need a drain hose extension, use a similar hose that is no longer than 12 feet long to maintain cleaning effectiveness. Various error codes indicate different issues, such as thermistor errors and internal communication errors.
- Page 14: Troubleshooting Stained tub interior may result from using detergent with colorant. Do not use detergents with colorants. Discoloration of plastic tableware can occur if the washing temperature is too high. Select a wash cycle with lower temperatures. If the dishwasher doesn't start, ensure the power supply is turned on and the door is securely closed. Rust stains on cutlery indicate that affected items are not corrosion resistant. Avoid washing items that are not corrosion resistant in the dishwasher. Knocking noise inside the tub while running may be caused by the spray arm knocking against an item in the basket. Rearrange items obstructing the spray arms. Rattling noise inside the tub can occur if items are not securely placed in the basket. Secure the items in the basket. Water may not be pumped from the dishwasher due to on-site installation issues or piping cross-section. Contact a qualified plumber if unsure. Dishes may not be loaded properly, affecting washing results. Refer to the loading instructions for the dishwasher basket. Suds in the tub can result from using the wrong detergent. Only use special detergents for dishwashers. If the filter system is not clean or correctly installed, clean and fit the filter system properly.
- Page 15: Environmental protection is important for proper dishwasher use. Use more detergent or change detergent type if not enough is dispensed. Waste electrical products should not be disposed of with household waste; recycle where facilities exist. Use less detergent if you have soft water and select Speed cycle for glassware. Check that dishes are loaded properly to avoid detergent dispenser blockage. HAVA offers a limited 45-day refund policy and a 12-month warranty on the dishwasher. The warranty does not apply to damage caused by normal wear and tear or improper use. Select an appropriate wash cycle to ensure effective cleaning and drying. Dry tableware by hand if poor drying effects occur with plastic or wooden items. Water drainage may be difficult with certain types of cutlery and dishware.

BOSCH SMV4EAX23E 60 cm Dishwasher

seasons 224FPC2MAWB Dishwasher

FISHER PAYKEL DW24UT2I2 Tall Dishwasher

FISHER PAYKEL DD24SAX9N Dishwasher

FISHER AND PAYKEL DD24SI9 N Dish Drawer Dishwasher

omega ODWIS6015X Semi Integrated Dishwasher

FISHER and PAYKEL DD24DHTI9N Tall Drawer Dishwasher

BOSCH SMS6ECI93E Free-Standing Dishwasher

Hotpoint H2I HD526 UK Dishwasher

Whirlpool WDFS3L5PBSSG 15 Place Setting Free Standing Dishwasher