Whirlpool WDFS3L5PBSSG 15 Place Setting Free Standing Dishwasher


WDFS3L5PBSSG
INSTALLATION GUIDE, SAFETY INSTRUCTIONS
AND DAILY REFERENCE GUIDE

| General | Details |
|---|---|
| Name | Whirlpool WDFS3L5PBSSG 15 Place Setting Free Standing Dishwasher |
| Make | Whirlpool |
| Language | English |
| Filetype | PDF (Download) |
| File size | 7.21 MB |
 (1 votes, average: 5.00 out of 5)

Whirlpool 2B19 Dishwasher

Whirlpool WFO3O33PLAUS Standard Dishwasher

Whirlpool W11323304G Dishwasher

Whirlpool WH7IPC15BM60 Dishwasher

Whirlpool FINPUTSAD Dishwasher

Whirlpool W7U HS31 X Dishwasher

Whirlpool Thron Dishwasher

Whirlpool WDF332PAMS 24 Front Tall Tub Dishwasher

Whirlpool WRF540CWHZ Dishwasher

Whirlpool WDF130PAHB Dishwasher

Whirlpool WDFS3L5PBSSG 15 Place Setting Free Standing Dishwasher Overview
Summary of Contents
- Page 1: Installation guide, safety instructions, and daily reference guide.
- Page 2: Installation guide Safety instructions Daily reference guide Control panel First time use Daily use Advice and tips Programs table Options and functions Care and maintenance
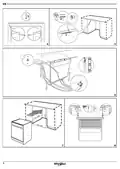
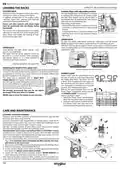
- Page 3: Installation guide Minimum pressure: 0.05 MPa / 0.5 Bar Maximum pressure: 1 MPa / 10 Bar Minimum distance: 10 mm Minimum height: 25 mm Dimensions: ~1300 mm Dimensions: ~1500 mm
- Page 4: Page 4
- Page 5: Safety instructions should be read and observed. Use only detergent and rinse additives designed for an automatic dishwasher. Store detergent, rinse aid, and salt out of reach of children. Shut off the water supply and disconnect power before servicing. Very young children should be kept away from the appliance. Installation must be handled by two or more persons. Connect the dishwasher to the water mains using only new hose sets. Installation and repairs must be carried out by a qualified technician. The appliance is intended for household use only. Dishwasher detergents are strongly alkaline and can be dangerous if swallowed.
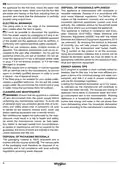
- Page 6: Disposal of household appliances This appliance is manufactured with recyclable or reusable materials. Dispose of it in accordance with local waste disposal regulations. Electrical warnings The rating plate is on the edge of the dishwasher door. It must be possible to disconnect the appliance from the power supply. Energy saving tips ECO program is suitable to clean normally soiled tableware. Loading the household dishwasher up to the capacity indicated by the manufacturer will contribute to energy and water savings. Cleaning and maintenance Ensure that the appliance is switched off and disconnected from the power supply before performing any maintenance operation. Non-professional repairs not authorized by the manufacturer could result in a risk to health and safety. Disposal of packaging materials The packaging material is 100% recyclable and is marked with the recycle symbol. The various parts of the packaging must therefore be disposed of responsibly.
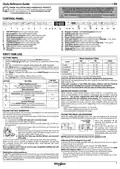
- Page 7: Daily Reference Guide Thank you for buying a Whirlpool product. Before using the appliance, carefully read Safety and Installation Instructions. After installation, please remember to remove all transport protection parts from the dishwasher. Control Panel includes various buttons for different functions and indicators. First Time Use involves switching on the appliance and adjusting settings. Water Hardness Table provides information on different levels of water hardness. Use of salt is recommended with any type of dishwasher detergent. The salt reservoir is located in the lower part of the dishwasher. Rinse aid makes dish drying easier and should be filled when the Rinse Aid Refill indicator light is lit. To adjust the dosage of rinse aid, follow instructions in the section “Setting Menu.”
- Page 8: The detergent dispenser automatically opens at the right time according to the program. Usage of detergent not designed for dishwashers may cause malfunction or damage to the appliance. To open the detergent dispenser, use the opening device. Introduce the detergent into the dry dispenser only. Check that the dishwasher is connected to the water supply and that the tap is open. If a wrong program was selected, it is possible to change it, provided that it has only just begun. Start the wash cycle by closing the door and pressing the start/pause button. The end of the wash cycle is indicated by sound and the display shows END. Before loading the baskets, remove all food residues from the crockery. Manual pre-rinsing of tableware items leads to increased water and energy consumption and is not recommended. If the appliance is placed in surroundings exposed to the risk of frost, it must be drained completely.
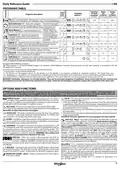
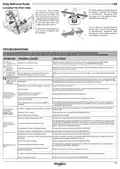
- Page 9: Daily Reference Guide Programs table Eco 50° - Environmentally friendly wash cycle with low energy consumption level. Standard cycle suitable to wash normally soiled load. Auto Intensive 65° - Automatic program for heavily soiled crockery, especially for pots and saucepans. Auto Mixed 55° - Automatic program for mixed soiled dishes with dried food residues. Rapid 45° - Program to be used for lightly soiled dishes with no dried food residues. Does not include the drying phase. Self-Clean 65° - Program to perform maintenance of the dishwasher, to be carried out only when the dishwasher is empty. Warning: Dishwasher detergents are strongly alkaline. They can be extremely dangerous if swallowed. Options can be selected/deselected after choosing the program. Power Clean® - Provides a more intensive and powerful wash in the lower rack. Descale alarm - Limescale accumulation was detected on internal components of the appliance. Sani rinse - This option can be used to sanitize washed dishes.
- Page 10: Capacity: 15 standard place-settings The third rack was designed to house the cutlery. A separate arrangement of the cutlery makes collection easier after washing and improves washing and drying performance. The lower rack has tip-up supports which can be used in a vertical position when arranging plates or in a horizontal position to load pans and salad bowls easily. Load delicate and light dishes: glasses, cups, saucers, low salad bowls. The height of the upper rack can be adjusted to create more space upwards and avoid collision with items loaded into the lower rack. Power Clean® uses special water jets to wash highly dirty items more intensively. Regularly clean the filter assembly so that the filters do not clog and that the waste water flows away correctly. The filter assembly consists of three filters which remove food residues from the washing water and then recirculate the water. Inspect the trap and remove any food residues.
- Page 11: Daily Reference Guide Cleaning the spray arms The lower spray arm may be removed by pulling it upwards and rotating it anti-clockwise. Food residue may become encrusted onto the spray arms and block the holes used to spray the water. It is recommended to check the arms from time to time and clean them with a small non-metallic brush. Troubleshooting In case your dishwasher doesn’t work properly, check if the problem can be solved by going through the following list. Refill the reservoir with salt if the salt indicator is lit or blinking. Using the appliance without salt may cause damage to its internal components. Refill the rinse aid dispenser if the rinse aid indicator is lit or blinking. Descale the appliance immediately if the descale indicator is lit or blinking. The dishwasher won’t start or does not respond to commands if the door is not closed properly. Clean the filter and descale the appliance if the dishwasher won’t drain. Position the crockery correctly to avoid excessive noise during operation. Make sure the cap of the rinse aid dispenser is closed to ensure clean dishes.
- Page 12: No water in the water supply or the tap is closed. Make sure there is water in the water supply and the water tap is open. The dishwasher does not fill the water. The water inlet hose is kinked. Check the inlet hose. The screen in the water inlet hose is clogged; it is necessary to clean it. Check and clean the screen in the water inlet hose. The filter is clogged with food residues or limescale. Clean the filter and descale the appliance. The dishwasher finishes the cycle prematurely. Check if the end of the drain hose is placed at the correct height. The detergent has not been measured out correctly or it is not suitable for use in dishwashers. An excessive amount of foam is present. Rinse aid is not present or the dosage is too low. Make sure the rinse aid dispenser is filled. The dishes are not dried well. Make sure the cycle has ended before starting to unload the dishes. The selected cycle does not have the drying phase. A cycle without the drying phase may not deliver desired drying efficiency. The salt reservoir is empty. Refill the reservoir with salt as soon as possible.

baridi DH224A Mini Tabletop Dishwasher

FISHER and PAYKEL DD24DI9 N Saitize Dishwasher

ALHAFIDH DW141WW Free Standing Dishwasher

FISHER PAYKEL DD24SCTB9_N Dishwasher

BOSCH SMS4ETW14E Dishwasher

ARDESTO DWMF-V608STW Dishwasher

BOSCH SBD6YCX02E-46 Fully Integrated Dishwasher

smeg LSPU8643WH Dishwasher

FISHER and PAYKEL DW60UZ6B Built Under Dishwasher

smeg LVS344PM 60 cm Free Standing Dishwasher