kogan KAM15PDWFSA 15 Place Dishwasher


15 PLACE DISHWASHER
KAM15PDWFSA & KAM15PDWFSB

| General | Details |
|---|---|
| Name | kogan KAM15PDWFSA 15 Place Dishwasher |
| Make | Kogan |
| Language | English |
| Filetype | PDF (Download) |
| File size | 0.7 MB |


kogan KABNCHTPDWA Benchtop Dishwasher

kogan KAGDWS15CTC Dishwasher

kogan KAM15PDWFSA 15 Place Dishwasher Overview
Summary of Contents
- Page 1: Page 1
- Page 2: Safety & warnings Overview Installation Before first use Operation Cleaning & care Troubleshooting Specifications
- Page 3: Earthing instructions This appliance must be earthed to reduce the risk of electric shock. The plug must be plugged into an appropriate outlet that is installed and earthed. Improper connection of the equipment-earthing conductor can result in electric shock. Check with a qualified electrician if you are in doubt about proper grounding. Do not modify the plug if it does not fit the outlet. Do not operate the dishwasher unless all enclosure panels are properly in place. Open the door carefully if the dishwasher is operating to avoid water squirting out. Place sharp items so that they do not damage the door seal. Some dishwasher detergents are strongly alkaline and can be dangerous if swallowed. Use only detergent and rinse agents recommended for automatic dishwashers.
- Page 4: The appliance needs to be connected to the main water valve using new hose sets. Old sets should not be reused. To save energy, in standby mode, the appliance will switch off automatically while there is any operation in 30 minutes. This marking indicates that this appliance should not be disposed with other household wastes. To prevent possible harm to the environment or human health from uncontrolled waste disposal, recycle it responsibly to promote the sustainable reuse of material resources.
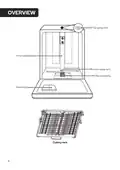
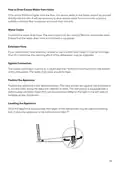
- Page 5: Overview Top spray arm Inner pipe Lower spray arm Filter assembly Dispenser Cutlery rack
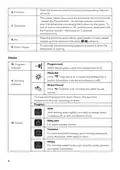
- Page 6: Upper spray arm Upper basket Cup rack Lower basket Control panel Press this button to turn on your dishwasher, the screen lights up. To choose auto wash program. For washing baby bottles. Program forward Press the “+” button to add the delay time or press the “-” button to decrease the delay time, maximum 24 hours delay can be defined.
- Page 7: Press the button to select a function, corresponding indicator will be lit. This option allows you to lock the buttons on the control panel - except the Power button - so children cannot accidentally start the dishwasher. To lock or unlock the buttons on the control panel, press and hold the Function button + Alt button for 3 seconds simultaneously. Press the button to select either upper basket or lower basket loaded, and the response indicators will be lit. To start the selected washing program or pause it when the dishwasher is working. When the program is end, the indicator will be lit. If the rinse aid indicator is lit, it means the dishwasher is low on rinse aid and requires a refill. If the water faucet indicator is lit, it means the water faucet is closed. Auto sensing wash, lightly, normally or heavily soiled crockery, with or without dried-on food. For washing baby bottles.
- Page 8: ECO is suitable for normally soiled tableware and is the most efficient program for energy and water consumption. Glass is designed for lightly soiled crockery and glass. 90 min is for normally soiled loads that need a quick wash. Rapid is a shorter wash for lightly soiled loads that do not need drying. Soak is used to rinse dishes that you plan to wash later that day. Upper activates only the upper rack spray-arm. Lower activates only the lower rack spray-arm. Extra cleaning is for very dirty, hard to clean dishes and can be used with specific programs. Extra drying indicator is for drying dishes more completely and can be used with specific programs. Express provides the same washing effect in a shorter time but requires more power and water.
- Page 9: Installation Warning Electrical shock hazard: Disconnect electrical power before installing the dishwasher. The installation of the pipes and electrical equipment should be done by professionals. About power connection For personal safety: Do not use an extension cord or an adapter plug with this appliance. Do not cut or remove the earthing connection from the power cord. Pay attention to the rating label to know the rating voltage and connect the dishwasher to the appropriate power supply. Ensure the voltage and frequency of the power supply corresponds to those on the rating plate. Only insert the plug into an electrical socket which is earthed properly. Replace the socket if it is not appropriate for the plug, rather than using an adaptor. Ensure that proper earthing exists before use.
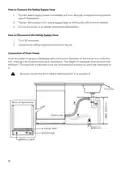
- Page 10: Water supply and drain Cold water connection Connect the cold-water supply hose to a threaded 3/4-inch connector and ensure that it is fastened tightly in place. If the water pipes are new or have not been used for an extended period, let the water run to make sure that the water is clear. This precaution is needed to avoid the risk of the water inlet blocking and damaging the appliance. The safety supply hose consists of double walls. The hose's system guarantees its intervention by blocking the flow of water in case of the supply hose breaking. A hose that attaches to a sink spray can burst if it is installed on the same water line as the dishwasher. If your sink has one, it is recommended that the hose be disconnected and the hole plugged.
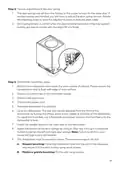
- Page 11: How to connect the safety supply hose Pull the safety supply hoses completely out from the storage compartment located at the rear of the dishwasher. Tighten the screws of the safety supply hose to the faucet with 3/4-inch thread. Ensure the water is on before starting the dishwasher. How to disconnect the safety supply hose Turn off the water. Unscrew the safety supply hose from the faucet. Connection of drain hoses Insert the drain hose into a drainpipe with a minimum diameter of 4cm or let it run into the sink, making sure to avoid bending or crimping it. The height of the drainpipe must be less than 1000mm. The free end of the hose must not be immersed in water to avoid the back flow of it. Securely attach the drain hose in either position A or position B.
- Page 12: How to drain excess water from hoses If the sink is 1000mm higher from the floor, the excess water in the hoses cannot be drained directly into the sink. It will be necessary to drain excess water from hoses into a bowl or suitable container that is external and lower than the sink. Connect the water drain hose. The drain hose must be correctly fitted to avoid water leaks. Ensure that the water drain hose is not kinked or squashed. If you need a drain hose extension, ensure to use a similar drain hose. The waste connection must be at a height less than 1000mm from the bottom of the dishwasher. Position the appliance in the desired location. The back should rest against the wall behind it, and the sides, along the adjacent cabinets or walls. Once the appliance is positioned, the height of the dishwasher may be adjusted rotating feet. Ensure the appliance is not inclined more than 2°.
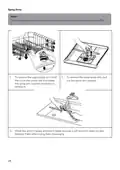
- Page 13: Free standing installation Fitting between existing cabinets The height of the dishwasher (845 mm) has been designed to allow the machine to be fitted between existing cabinets of the same height. The feet can be adjusted so that correct height is reached. The laminated top of the machine does not require any particular care since it is heatproof, scratchproof and stainproof. Underneath existing work top In most kitchens, there is only one single work top under which cabinets and electrical appliances are fitted. Remove the top of the dishwasher by unscrewing the screws under the rear edge of the top. The height can then be reduced to 815 mm, as scheduled by the International Regulations (ISO). After removing the top, the screws must be screwed again under the rear edge of the top.
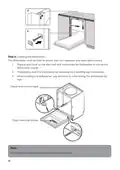
- Page 14: Built-in installation (for the integrated model) Selecting the best location for the dishwasher. The installation position of the dishwasher should be near the existing inlet and drain hoses and power cord. Ensure there is a gap of no more than 5mm between the top surface of the dishwasher and the underside of the kitchen cabinet. If the dishwasher is installed at the corner of the cabinet, there must be adequate space to allow the door to open. Minimum space of 50mm is required for the door of the dishwasher. Depending on where your electrical outlet is, you may need to cut a hole in the opposite cabinet side.
- Page 15: Aesthetic panel installation ensures that the wooden panel aligns with the surrounding cabinets, creating an appealing and seamless appearance while maintaining efficient dishwasher operation. For the semi-integrated model, apply adhesive tape to the wooden panel and attach the felted side to the outer door of the dishwasher. Once the wooden panel is correctly positioned, securely fasten it to the dishwasher's outer door using screws and bolts. For the fully-integrated model, install the handle onto the wooden panel and attach the back of the hook into the slots in the outer door of the dishwasher. After positioning the panel, attach it onto the outer door using screws and bolts.
- Page 16: Tension adjustment of the door spring involves adjusting the door spring tension if wooden panels are installed. The correct tension is when the door remains horizontal when fully opened and can close with a slight lift. For dishwasher installation, attach the condensation strip under the work surface and ensure it is flush with the edge. Connect the inlet hose to the cold-water supply and the drain hose. Connect the power cord and place the dishwasher into position. Level the dishwasher by adjusting the rear foot from the front and the front feet with a flat blade screwdriver. Install the wooden panel to the outer door and adjust the door spring tension using an Allen key. The dishwasher must be secured in place using installation hooks or screws depending on the benchtop material.
- Page 17: Levelling the dishwasher is essential for proper dish rack operation and wash performance. Use a spirit level on the door and rack track inside the dishwasher to check if it is level. Adjust the three levelling legs individually if necessary. Be cautious to avoid tipping the dishwasher over while levelling. Check the level from front to back and side to side. The maximum adjustment height of the feet is 50 mm.
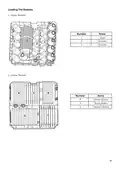
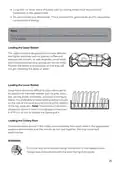
- Page 18: Loading the baskets involves two sections: the upper basket and the lower basket. In the upper basket, items include cups and saucers. The lower basket contains dinner plates, soup plates, and dessert dishes.
- Page 19: Cutlery basket includes forks, soup spoons, dessert spoons, teaspoons, and knives. Capacity is 15 place settings. Position of the upper basket is in the lower position. Program used is ECO. Rinse aid setting is 6. Detergent amounts are 5g for pre-wash and 27.5g for main wash. The door is open at the end of the drying cycle for the drying performance test for the last 40 minutes. Door position during the test is open 50 mm.
- Page 20: Adjusting cutlery tray. Lift the right rack up. Both racks are flat. Move the right rack from right to left. The two racks are overlapping. Remove the right rack from the cutlery tray, leaving only the left rack.
- Page 21: Before first use Adjusting the upper basket The height of the upper basket can be easily adjusted to accommodate taller dishes in either the upper or lower baskets. To adjust the height of the upper rack, follow the steps below. Type 1: Pull out the upper basket, remove it, re-attach it to the upper or lower rollers, and push it in. Type 2: To raise the upper basket, lift it at the center of each side until it locks into place. To lower it, lift the adjuster handles on each side to release and lower the basket.
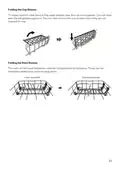
- Page 22: Folding the cup shelves allows for taller items in the upper basket. You can lean tall glasses against the raised cup rack. The cup shelves can be removed when not in use. The racks on the lower basket hold plates and platters. These racks can be lowered for larger items. The racks can also be raised upwards or folded backwards.
- Page 23: Operation Select a program with the lowest possible temperature, depending on your load. The following items are not suitable: - Cutlery with wooden, china or mother-of-pearl handles - Plastic items that are not heat resistant - Older cutlery with glued parts that are not temperature resistant - Bonded cutlery items or dishes - Pewter or copper items - Crystal glass - Steel items subject to rusting - Wooden platters - Items made from synthetic fibres The following items are of limited suitability: - Certain types of glasses can become dull after many washes - Silver and aluminium parts tend to discolour during washing - Glazed patterns may fade if machine washed frequently When loading the dishwasher, scrape off large amounts of leftover food. It is not necessary to rinse the dishes under running water. Place objects in the dishwasher in the following way: - Curved items or ones with recesses should be loaded aslant so that water can run off. - All utensils are stacked securely and cannot tip over. - Load hollow items such as cups, glasses, pans etc. with the opening facing downwards. - Dishes and items of cutlery must not lie inside one another or cover each other. - To avoid damage, glasses should not touch one another. - The upper basket is designed to hold more delicate and lighter dishware such as glasses, coffee and teacups. - Long bladed knives stored in an upright position are a potential hazard.
- Page 24: Long and/or sharp items of cutlery such as carving knives must be positioned horizontally in the upper basket. Do not overload your dishwasher. This is important for good results and for reasonable consumption of energy. Very small items should not be washed in the dishwasher as they could easily fall out of the basket. The upper basket is designed to hold more delicate and lighter dishware such as glasses, coffee and teacups and saucers, as well as plates, small bowls and shallow pans. Position the dishes and cookware so that they will not get moved by the spray of water. Large items and more difficult to clean items are to be placed into the lower basket: such as pots, pans, lids, serving dishes and bowls. It is preferable to place serving dishes and lids on the side of the racks to avoid blocking the rotation of the top spray arm. The maximum diameter advised for plates in front of the detergent dispenser is of 19 cm, as not to hamper the opening of it. Cutlery should be placed in the cutlery rack separately from each other in the appropriate positions. Do not let any items extend through the bottom of the baskets/racks. Always load sharp utensils with the point facing downwards.
- Page 25: Removing the dishes should be done by emptying the lower basket first, followed by the upper basket to prevent water dripping. Items will be hot after the program ends; do not take glass and cutlery out for around 15 minutes. The rinse aid is released during the final rinse to prevent water droplets on dishes and improve drying. Only use branded rinse aid for the dishwasher; never fill the dispenser with other substances. The frequency of refilling the rinse aid dispenser depends on washing frequency and rinse aid setting. The Low Rinse Aid indicator will be lit when more rinse aid is needed. Do not overfill the rinse aid dispenser. Detergent is necessary to remove dirt from the dishwasher. Most commercial quality detergents are suitable for use in the dishwasher.
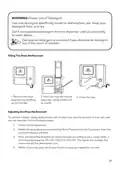
- Page 26: Warning: Proper use of detergent is essential. Use only detergent specifically made for dishwashers. Keep your detergent fresh and dry. Don't put powdered detergent into the dispenser until you are ready to wash dishes. Dishwasher detergent is corrosive; keep it out of the reach of children. Filling the rinse aid reservoir involves removing the cap, pouring in the rinse aid, and closing the cap. The amount of rinse aid used can be adjusted for better drying performance. To adjust the rinse aid reservoir, switch on the appliance and press and hold the Start/Pause button. Select the rinse aid level according to your usage habits. Press the Power button to save your selection and exit.
- Page 27: Filling the detergent dispenser involves sliding to the right and pressing down. Add detergent into the larger cavity for the main wash cycle. For better cleaning results, especially with very dirty items, pour a small amount of detergent onto the smaller door. The additional detergent will activate during the pre-wash phase. Choose an open way according to the actual situation. Method 1: Open the cap by sliding the release catch to the right. Method 2: Open the cap by pressing down the release catch. Close the flap by sliding it to the front and then pressing it down.
- Page 28: Be aware that depending on the soiling of water, setting may be different. Observe the manufacturer's recommendations on the detergent packaging. The table below shows which programs are best for the levels of food residue on them and how much detergent is needed. Running description of cycle includes detergent, energy, water, rinse aid, and time. Auto wash (45-55°C) requires 5/28.75g of detergent and has a cycle time of 11-15 minutes. Baby care program includes pre-wash, wash, rinse, and drying with a total cycle time of 180 minutes. Heavy ECO program includes pre-wash, wash, rinse, and drying with a total cycle time of 195 minutes. Glass program requires 5/28.75g of detergent. Rinse aid is needed for certain programs as indicated. Energy and water consumption varies by program.
- Page 29: Wash (65°C) Rinse (65°C) Drying Starting a cycle wash Load the dishes and push the baskets back in place. Pour in the detergent. Ensure the dishwasher is plugged into an electrical outlet and turned on. Close the door, press the Power button, to switch on the machine. Press the Start/Pause button, the dishwasher will start its cycle. Changing the program mid-cycle
- Page 30: Adding a dish mid-cycle is possible before the detergent dispenser opens. To add a forgotten dish, pause the cycle by pressing the Start/Pause button. Wait 5 seconds before opening the door. Add the forgotten dishes and close the door. Press the Start/Pause button after 10 seconds to resume the cycle. Caution is advised when opening the door mid-cycle due to hot steam.
- Page 31: Cleaning & care Before cleaning or performing maintenance, always remove the plug from the socket. Door and door seal: Clean the door seals regularly with a soft damp cloth to remove food deposits. Control panel: If cleaning is required, the control panel should be wiped with a soft damp cloth only. Warning: To avoid penetration of water into the door lock and electrical components, do not use a spray cleaner of any kind. Never use abrasive cleaners or scouring pads on the outer surfaces because they may scratch the finish. The filtering system in the base of the wash cabinet retains coarse debris from the washing cycle. Check the condition of the filters regularly and clean them if necessary, under running water. Follow the steps below to clean the filters in the wash cabinet.
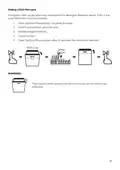
- Page 32: The images below are for illustrative purposes only. Actual components may differ. Hold the coarse filter and rotate it anticlockwise to unlock the filter. The fine filter can be pulled off the bottom of the filter assembly. Larger food remnants can be cleaned by rinsing the filter under running water. Reassemble the filters in the reverse order of the disassembly. Do not overtighten the filters. Put the filters back in sequence securely; otherwise, debris could get into the system and cause a blockage. Never operate the dishwasher without the filters installed. Improper replacement of filters may reduce performance and damage the appliance.
- Page 33: Spray arms The images below are for illustrative purposes only. Actual components may differ. To remove the upper spray arm, hold the nut in the center still and rotate the spray arm counter-clockwise to remove it. To remove the lower spray arm, pull out the spray arm upward. Wash the arms in soapy and warm water and use a soft brush to clean the jets. Replace them after rinsing them thoroughly.
- Page 34: Frost precaution Take frost protection measures on the dishwasher during winter. After every wash Turn off the water supply to the appliance and leave the door slightly open. No solvents or abrasive cleaning Do not use solvents or abrasive cleaning products on the dishwasher. When not in use for a long time Run a wash cycle with the dishwasher empty, then unplug and turn off the water supply. Moving the appliance Keep the appliance in the vertical position when moving. Seals Periodic cleaning of seals with a damp sponge will prevent odors.
- Page 35: To clean the interior, use a damp sponge with dishwasher detergent and wear rubber gloves. Never use any other cleaner than dishwasher detergent; otherwise, it may cause foaming or suds. Hard water minerals can cause white film on the inside surface. Items that are not corrosion resistant should be hand washed. A spray arm may knock against an item in a basket. Interrupt the program and rearrange the items which are obstructing the spray arm. Rattling noise in the dishwasher may be caused by items of crockery that are loose. This has no influence on the dishwasher function. The dishes were not loaded correctly; refer to the “Operation” section. Use more detergent or change your detergent if not enough was dispensed. Cloudiness on glassware may require using less detergent if you have soft water.
- Page 36: Load the dishwasher as suggested in the directions. Improper loading can affect performance. Increase the amount of rinse-aid or refill the rinse-aid dispenser. Open the door slightly after washing to allow steam to escape. Unload the lower basket first to prevent water from the upper basket. Choose a program with a long washing time for better cleaning performance. Some cutlery or dishes are not suitable for washing in the dishwasher. The dishwasher will display an error code in case of a malfunction. Possible causes for error codes include water intake issues and heating element malfunctions. If overflow occurs, turn off the main water supply before calling for service.
- Page 37: Specifications include standard place settings, energy efficiency class, and water consumption class. The standard cleaning cycle has a duration of 195 minutes. Energy consumption for the standard cleaning cycle is 0.641 kWh. Water consumption for the standard cleaning cycle is 11.8 litres. The noise level is 47 dB(A) re 1 Pw. The unit is free standing and suitable for built-in configuration. Rated voltage is AC 220-240V/50Hz. Water pressure ranges from 0.04-1.0MPa (0.4-10 bar). Dimensions include a height of 845mm, width of 598mm, and depth of 600mm with the door closed. The depth with the door opened 90° is 1175mm.
- Page 38: We hope that this user guide has given you the assistance needed for a simple set-up. For the most up-to-date guide for your product, as well as any additional assistance you may require, head online to help.kogan.com.

AEG FSE75748P Dishwasher

Hisense HV642C65UK Dishwasher

FISHER AND PAYKEL DD24SHTI9 N Tall Dish Drawer Dishwasher

hermitlux HMX-DW04 Dishwasher

SIEMENS SN23EC03AE Free Standing Dishwasher

FISHER PAYKEL DD24STI9 N Tall Dishwasher

INDESIT W11667630 B Dishwasher

BOSCH SPS4EMI61E Dishwasher

BOSCH SMI4ECS21E Dishwasher

Electrolux EEC87400W Sliding Door Dishwasher