Rasonic RDW-ZW39 Table Top Dishwasher


RDW-ZW39
座檯式洗碗碟機 Table Top Dishwasher
僅適用於家庭使用
For household use only
使用說明書
OPERATION MANUAL
在使用本產品前,請仔細閱讀本說明書,並妥善保存本說明書以備用戶日後查詢。
Please read the operation manual carefully before using and well keep it in a safe place for future
reference.
本說明書中的圖示可能有與實物不同的地方,僅供參考。
Some figures in this manual may not match with the real object, just for reference only.
1

| General | Details |
|---|---|
| Name | Rasonic RDW-ZW39 Table Top Dishwasher |
| Make | Rasonic |
| Language | English |
| Filetype | PDF (Download) |
| File size | 0.87 MB |


Rasonic RDW-ZW39 Table Top Dishwasher Overview
Summary of Contents
- Page 1: Table top dishwasher For household use only Operation manual Please read the operation manual carefully before using and well keep it in a safe place for future reference. Some figures in this manual may not match with the real object, just for reference only.
- Page 2: Page 2
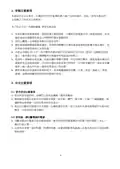
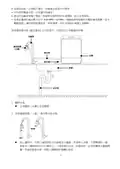
- Page 3: 安裝進水喉 將入水喉(帶彎頭的一端)旋緊至機背的進水口。 安裝完成後,水龍頭模式將會啟動,水龍頭指示燈會亮起。 安裝排水喉 將排水管(帶彎頭一端)套入機背的出水口位置,並用卡箍固定。 清潔及保養 定期檢查及保養可以避免機器故障。 檢查噴水臂及產品內腔是否積聚油脂及水垢沉積物。 定期以濕布清潔機門的密封膠邊。 切勿使用蒸氣清潔機清潔。 定期以濕布清潔產品的機門及控制面板。 切勿使用粗糙潔具或含腐蝕性的清潔劑進行抹拭。
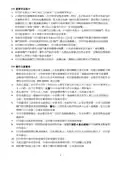
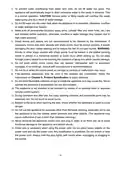
- Page 4: 過濾系統包括粗過濾網、幼過濾網及平面過濾網。過濾系統是為了阻隔較大的食物殘渣進入產品的水泵循環系統中,必須定期清理,否則殘渣可能會造成堵塞,影響本產品操作。 水垢及食物殘渣有可能阻塞噴水臂,用戶必須時刻檢查,必要時可將噴水臂取出清潔。 無法被過濾而留在排水台的食物殘渣有可能堵塞排水泵,令水無法排走而造成堵塞或滿溢。 產品於機頂及機背位置均設置進水口,為客戶提供手動進水或連接進水管兩個渠道為產品提供水源。 烤焗、蒸蛋或蒸肉後,若出現燒焦痕跡或蛋白黏附於器皿上,必須事先浸泡及清理,否則可能無法徹底清洗。 如器皿上殘留明顯食物殘渣,必須事先清除。 切勿使用含氯清潔劑,或有損健康。 清潔前,必先關掉本產品,並拔掉電源插頭及待其冷卻。 保持產品內外表面及機門清潔,避免使用硬刷子或粗糙的潔具洗刷。
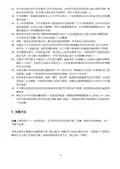
- Page 5: 控制面板及顯示屏
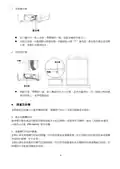
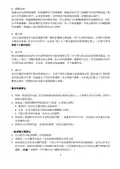
- Page 6: 顯示屏 操作說明(適用於手動注水) 注意!安裝前,確保本產品未有接駁電源。 連接排水喉至鋅盤,並利用吸盤固定出水喉,以免污水溢出。 切勿將排水喉朝上安裝以至高於機底15厘米的位置,及保持鋅盤排水口暢通,切勿浸入水中,否則污水將會倒流入機體內。 將機內配件等全部取出,按次序將平面過濾網及圓筒形過濾網順序裝入。 噴水臂安裝:用手握住噴水臂的中間位置,對準機內底座噴水孔,用力按下直至聽到“咔嚓”聲響。 先將餐具食物殘渣及醬料清理,然後將餐具按指示放到盛載籃指定位置上。 將盛載籃推入機內,將洗碗粉放入門背的洗碗粉格內,然後關上機門。 接通電源,產品進入待機狀態,利用隨機的量杯於入水口注入約2.5杯水。 注意!在任何情況下,切勿擅自拆除入水口的圓型過濾網。
- Page 7: 如用戶未能於2分鐘內完成手動注水程序,產品會返回待機狀態。用戶須長按【電源】鍵3秒重新開啟產品。 如使用固定進水安裝方法,可忽略此步驟。固定進水安裝後,水龍頭模式啟動,產品會於選定清洗功能後自動注水。 長按【電源】鍵3秒啟動產品後,選擇所需的清洗功能,按【開始/暫停】鍵確認,產品會開始運作。 洗滌完成後,建議即時清洗濾網及去除食物殘渣,以防細菌滋生。 本產品備有通風換氣功能,於洗滌完成後會自動運作,烘乾指示燈會亮起。 將所有餐具放置在上層及下層盛載籃的預定位置上,筷子及湯匙等必須放置於上層盛載籃內。 刀和其他鋒利的用具必須裝在上層盛載籃裏,並且尖端朝內水平向內放置。 為避免在操作過程中發出噪音,避免堆疊碗碟。較輕的餐具必須穩固地置於盛載籃中。 開始啟動操作前,請確保碗碟、筷子、叉等餐具已穩固地放在籃中。
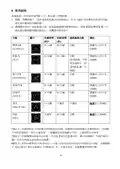
- Page 8: 使用說明 接通電源,所有指示燈閃動一次,產品進入待機狀態。 開機:待機狀態下,長按電源鍵3秒啟動產品。如2分鐘內沒有選取任何清洗功能,產品會自動返回待機狀態。 選擇應用程式:在啟動產品後,按功能鍵選擇所需應用程式,再按開始/暫停鍵一次,產品會自動啟動有關功能程式。 洗滌時間並不包括進水時間和排水時間,故實際完成時間會比洗滌時間長。 如需選擇特強洗功能,可長按強力洗鍵3秒,顯示屏會顯示“1:38”,即表示特強洗清洗模式已選擇。 針對標準洗、強力洗及特強洗功能,水龍頭模式會比水箱模式多一次過水程序,但整體運作時間不變。
- Page 9: 暫停功能:運作過程中,如用戶需要暫停操作,可按開始/暫停鍵一次暫停運作。 通風換氣模式:完成清洗功能後,產品會自動啟動通風換氣模式,以確保機內及餐具乾爽,防止產生異味。 特長通風換氣功能:按實際需要,可啟動特長通風換氣功能,運作時間為7天。 預約功能:選擇所需應用程式後,長按烘乾鍵5秒進入預約功能設置。 關機:使用後,應將插頭拔除。 故障排除:使用時,如顯示屏出現故障代碼,請先對照下表進行檢查。 內腔、上層載物籃及平面過濾網下仍有殘留水,此乃正常現象。 餐具是否擺放不良?按需求增加洗碗粉用量。 過濾網是否堵塞?定期清洗過濾網。 是否選用不正確清洗程序?按器皿的骯髒程度選擇合適的清洗程序。
- Page 10: 按鍵後沒有反應 機門是否未關妥? 機門感應器異常 請將機門關好後再選擇功能。 機內出現大量泡沫 是否添加洗碗粉以外的清潔劑? 請使用洗碗機專用的洗碗粉清洗器具。 缺水指示燈亮起 水箱是否仍未加水? 進水管異常
- Page 11: 特別聲明 本資料上所有內容經過核對,如有任何印刷及內容上的誤解,本公司將保留解釋權。 本產品若有技術改進,會編進新版說明書中,恕不另行通知。 如本資料之中英文版本有差異時,應以中文版為準。 售後服務 由購買收據日期起之一年保修期內,經信興電器服務中心有限公司之服務人員證實產品故障屬正常使用下發生者,本公司將提供免費維修或更換零件服務。 保修範圍不包括修理或更換損耗性零件╱配件。 如不當使用,或作為(半)商業用途,或未依照說明書使用,保修服務將無效。 用戶必須於維修時出示購買╱換購單據及產品保修記錄卡。
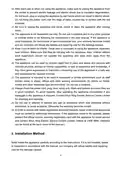
- Page 12: Installing the connection (three-way) ball valve involves connecting it to the faucet by rotating anti-clockwise. The inlet hose should be connected to the ball valve to complete the installation. To detach the ball valve, close the faucet and disconnect the inlet hose, then rotate the ball valve clockwise. The other end of the inlet hose should be connected to the water inlet at the back of the appliance. After installation, faucet mode will be activated. The faucet indicator will be switched on when cleaning mode is selected. Water inflow from the faucet goes directly to the appliance.
- Page 13: Connect the drain hose to the water outlet at the back of the appliance and secure it with a clamp. Place the other end of the drain hose into the sink by fixing the sucker. Regular inspection and maintenance will help to prevent malfunction. Check the overall condition of the spray arm for grease and lime scale deposits. Clean the door and door seal with a damp cloth regularly. Never use a steam cleaner to clean the dishwasher. The filtration system consists of a coarse filter, a microfilter, and a flat fine filter. Clean the filtration system regularly to avoid affecting the performance of the appliance. Check the outlet nozzles on the spray arms regularly and clean them under running water. Large food remnants may block the waste water pump, preventing rinsing water from being pumped out. Switch off and disconnect the appliance from the power supply if the waste water pump is blocked.
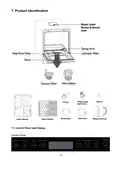
- Page 14: Product identification Control panel and display Control panel
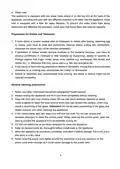
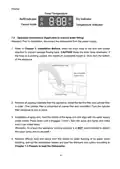
- Page 15: Operation instructions for manual water filling are provided. Prior to installation, disconnect the dishwasher from the power supply. Direct the drain hose to the sink with a sucker attached to prevent sewage flowing back. Keep the drain hose downward; if pointing upward, the maximum acceptable height is 15cm from the bottom of the appliance. Remove all packing materials from the appliance and install the flat fine filter and cylinder filter in order. Turn the cylinder filter clockwise to lock it in place. Hold the middle of the spray arm and align it with the water supply outlet nozzle, pressing down until it engages. Spin the spray arm lightly to ensure it can rotate freely. It is not recommended to detach the upper spray arm by yourself. Remove leftover food and sauce from the dishes before loading them into the dishwasher.
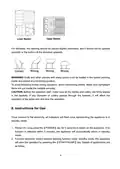
- Page 16: Push the basket into the washing chamber and put a moderated amount of dishwasher powder detergent in the powder grid of the door. Connect the power supply; the appliance will enter standby mode. Fill approximately 2.5 cups of the measuring cup supplied to the water tank until a sound indicates that the tank is fully filled. Do not disassemble the round filter from the water tank opening. If the water tank cannot be fully filled within 2 minutes, the appliance will return to standby mode automatically. Long press the power key for 3 seconds to start the operation and select the desired washing mode. User is suggested to rinse the filters under running water after use immediately to prevent bacterial growth. The appliance is equipped with a ventilation function that activates automatically when the washing program finishes. Items should be loaded with soiled surfaces downward and in an upside sloping position to the spray. Chopsticks and spoons should be placed on the upper basket, with sharp items pointed inside to avoid injury.
- Page 17: For dishware, the opening should be placed slightly downward, and it should not be opened upwards or the bottom of the dishware upwards. Knife and other utensils with sharp points must be loaded in the basket pointing inside and placed in a horizontal position. To avoid thumping noises during operation, avoid overlapping dishes. Make sure lightweight items are put inside the baskets securely. Before the operation starts, make sure all the dishes and cutlery are firmly placed in the baskets. If any dishware or cutlery passes through the baskets, it will affect the operation of the spray arm and stop the operation. Once connected to the electricity, all indicators will flash once representing the appliance is in standby mode. Long press the power key for 3 seconds to switch on the appliance. If no function is selected within 2 minutes, the appliance will automatically return to standby mode. Select desired washing function under standby mode, the appliance will start the operation by pressing the start/pause key.
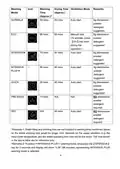
- Page 18: Washing time varies by mode, with options including normal, intensive, and quick. Drying time is also specified for each washing mode. Auto start is available for most washing modes. 8g dishwasher powder detergent is suggested for optimal performance. The entire washing time may be longer due to water filling and draining times. The operating time can vary based on usage conditions, such as input water temperature. To activate the dry function, press the dry key once during operation. Selecting the intensive plus mode requires a long press of the intensive key for 3 seconds. The times provided are for reference only and may not reflect actual usage. No dishwasher powder detergent is required for pre-wash and dry modes.
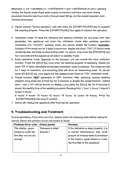
- Page 19: Remarks on washing modes indicate differences in rinsing procedures between faucet and hand box modes. The pause function allows users to suspend and resume the washing program using the START/PAUSE key. Ventilation mode activates after washing to keep dishware and the washing chamber dry, lasting up to 3 days. Extra ventilation mode can be enabled during operation, lasting a maximum of 7 days. The preset function allows users to set a delayed start time for the washing program, ranging from 1 to 24 hours. To switch off the appliance, unplug it after the operation is complete. Troubleshooting section advises checking common errors before seeking service. Residual water in the appliance after drying is considered a normal phenomenon.
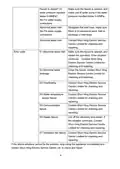
- Page 20: Dishware is not dried. Dishware is not loaded completely properly. Refer to Chapter 7.3 Prepare to load the Dishwasher to load the basket. Dishware is not clean due to not enough powder detergent. Add sufficient dishwasher powder detergent. Filters are blocked by residue. Refer to Chapter 4. Cleaning and Maintenance to clean the filters regularly. Incorrect washing program selected depends on the situation. Pause the operation and check the loading condition of the dishware if there is abnormal noise. Make sure to fill sufficient water before selecting the washing program if the refill indicator is ON.
- Page 21: Make sure the faucet is opened and water pressure inputted. Use a water pump if the water pressure is below 0.04MPa. Straighten the inlet hose and ensure there is no excessive bend, fold, or blockage. Error code E1 indicates abnormal water inlet; restart operation and contact service if it continues. Error code E2 indicates abnormal drainage; close the faucet and contact service. Error code E3 indicates overflowing; contact service for checking and repairing. Error code E4 indicates water temperature sensor failure; contact service. Error code E5 indicates communication failure; contact service. Error code E6 indicates heater failure; cut off electricity and restart. If problems persist, stop using the appliance and contact service for repair.
- Page 22: Special avowal The content in the manual has been checked. Our company reserves the hermeneutic power to any printing errors or misunderstanding on the content. If there are technical improvements on the appliance, the operation manual will be updated in new version without prior notice. In case there is any inconsistency or conflict between the English versions and Chinese versions of the terms, the Chinese versions shall prevail. After sales service For any defect, in the judgment of technician from Shun Hing Electric Service Centre Limited, caused under normal use, our company is responsible for repairing or replacing any parts of the said electrical appliance free of charge within one year guarantee period. Warranty service does not cover the repair or replacement of consumable parts such as power cord, inlet hose, drain hose, clamp, ball valve, sucker, measuring cup, door, upper/lower spray arms, upper/lower baskets, flat fine filter, coarse filter/microfilter and enclosure. If the appliance is used improperly, for commercial or semi-commercial use, or not following the instructions in the operation manual, the warranty becomes invalid. User must present the official invoice/redemption voucher and the product warranty card for maintenance.
- Page 23: Page 23
- Page 24: Page 24

BLAUPUNKT 5VS401AU Dishwasher

Hisense HSCE14FS Dishwasher

Miele 852-01 Dishwasher

FISHER AND PAYKEL DD60ST4NX9 Single DishDrawer Dishwasher

Scandomestic DWB1442WC Dishwasher

LG LD-2130-1-W-S-M-H Dishwasher

PC Richard SW 10 Dishwasher

Bauknecht Dishwasher

AEG FSK76748P Dishwasher

BOSCH 9000706944 Dishwasher