SIEMENS SR25YW04ME Dishwasher


SR25YW 04ME
Dishwasher
Siemens Home Appliances

| General | Details |
|---|---|
| Name | SIEMENS SR25YW04ME Dishwasher |
| Make | SIEMENS |
| Language | English |
| Filetype | PDF (Download) |
| File size | 1.64 MB |


SIEMENS SN73HX15VE Dishwasher

SIEMENS SN85TX00CE Dishwasher

SIEMENS iQ500 Dishwasher

SIEMENS SR93EX24MG Dishwasher

SIEMENS SN95Z802CE Dishwasher

SIEMENS SN55HS01MI Dishwasher

SIEMENS SN13EW78CS Dishwasher

SIEMENS SN15ZS80CS Dishwasher

SIEMENS SN67ZX86DM Dishwasher

SIEMENS SN13ES79CS Undercounter Dishwasher

SIEMENS SR25YW04ME Dishwasher Overview
Summary of Contents
- Page 1: Dishwasher user manual Siemens home appliances
- Page 2: Refer to the Digital User's Guide for more information. Table of contents Safety General instructions Destination of the device Restriction of Users Secure Installation Safe use Damaged device Dangers for children Before first use Avoiding Property Damage Environmental protection and saving energy Set up and connection Getting to know your device Programs
- Page 3: Crockery Damage to glass and crockery Transporting, storing and disposal Loading crockery Unloading crockery Essentials of the operation Switching on the device Set program After-sales service Technical data
- Page 4: Safety instructions should be observed carefully. Keep the operating instructions and product information for future reference. Do not connect the device if there is transport damage. The device is intended for washing dishes only. It is for domestic use in enclosed spaces within the home. The device can be used up to an altitude of 2000 m above sea level. Children aged 8 and above can operate the appliance if supervised or instructed. Children must not play with the appliance, and cleaning must be supervised. Ensure that children under 8 cannot reach the device or the connection cable. Improper installations can cause injury; follow setup instructions carefully.
- Page 5: Safety warnings regarding electric shock and fire risks are crucial. Improper installations can be dangerous. Only connect and operate the device according to the rating plate information. Always use the power cord supplied with the new device. Connect the device to an alternating current mains via a properly installed socket with earthing contact. The protective earthing system must comply with electrotechnical regulations. Never power the device through external switching devices like timers or remote controls. Ensure the mains plug is accessible or install a disconnection device if access is not possible. Avoid pinching or damaging the mains cable during setup. Do not use extension cords or unauthorized adapters.
- Page 6: Contact between the device and installation pipes can lead to failure of the installation pipes, for example gas pipes and power pipes. Make sure that there is a distance of at least 5 cm between the device and the installation pipes. Improper installation can lead to burns. For free-standing appliances, make sure that the back of the appliances is against a wall. Non-compliance with the safety instructions and instructions for use on the packaging of dishwasher detergents and rinse aids can lead to serious health damage. Observe the safety instructions and instructions for use on the detergent and rinse aid packaging. Solvents in the rinsing chamber of the device can lead to explosions. Never put solvents in the washing area of the appliance. Never use strongly corrosive alkaline or strongly acidic cleaning agents in combination with aluminum objects in the dishwasher. This includes cleaning agents for professional or industrial use.
- Page 7: Safety warnings regarding the appliance include risks of injury, burns, tipping over, and electric shock. An open appliance door can lead to injuries; only open it to load and unload dishes. Do not sit or stand on the open appliance door, as sharp objects can cause injuries. Place knives and sharp objects with points down in designated areas. Opening the appliance door during operation can result in hot water splashing out. Avoid overloading crockery baskets to prevent the appliance from tipping over. Use the device only in closed rooms to prevent electric shock from moisture. Keep the power cord away from hot parts and sharp edges to avoid damage. Never use a steam cleaner or high-pressure cleaner on the appliance. The blowout of the zeolite reservoir can become hot; avoid touching it.
- Page 8: Damaged device A damaged device or power cord is dangerous. Never use a damaged device. Never use a device with a cracked or broken surface. If the appliance or the power cord is damaged, immediately unplug the power cord or switch off the fuse. Only trained specialist personnel may carry out repairs on the device. Only original spare parts may be used for repairing the device. Dangers for children Children can pull packaging material over their heads and become entangled and suffocated. Keep packaging material away from children. Do not let children play with small parts.
- Page 9: Never allow children to play with or operate the device. Children can lock themselves in the appliance and endanger their lives. In the case of discarded appliances, unplug the mains cable, then cut the mains cable and damage the appliance door lock. Children can become trapped between the appliance door and the cabinet doors below with high-mounted appliances. Watch out for children when opening and closing the appliance door. Dishwasher and rinse aids can cause burns to the mouth, throat, and eyes. Keep children away from detergents and rinse aids. The water in the wash cabinet is not drinking water. Residues of detergent and rinse aid may still be present. Children can get their little fingers caught in the slots of the tablet tray and injure themselves.
- Page 10: Contact between the unit and water pipes can lead to corrosion and leaks. Make sure there is a distance of at least 5 cm between the appliance and the water pipe. Improper installation of the device can lead to damage. Never kink, pinch, alter or cut water hoses. Only use the supplied water hoses or original replacement hoses. A water pressure that is too low or too high can hinder the function of the device. Ensure that the water pressure at the water supply installation is at least 50 kPa (0.5 bar) and at most 1000 kPa (10 bar). Escaping water vapor can damage built-in furniture. Do not install the dishwasher under a hob. Allow the appliance to cool down briefly before opening the appliance door.
- Page 11: Environmental protection and saving The softening salt must be filled into the softening salt container immediately before the program starts. If you follow these instructions, your appliance will use less electricity and water. Dishwasher detergent can damage the water softener. Use the Eco 50° programme. Only fill the water softener tank with softening salt for dishwashers. The Eco 50° program is energy-saving and environmentally friendly. The device is equipped with a zeolite reservoir. Energy can be saved by means of zeolite drying. Zeolite is a mineral that can store and release moisture and heat energy. The packaging materials are environmentally friendly and can be reused.
- Page 12: Set up and connect The appliance door opens automatically during the drying phase, achieving particularly economical drying. For optimum drying results, it is advisable to wait for the end of the program before removing the dishes. You can install your substructure or built-in appliance in the kitchen unit between wooden and plastic walls. If the automatic door opening is deactivated, the energy consumption increases and the drying phase is usually shortened. For correct use, connect the device to electricity and water in a professional manner. After unpacking, check all parts for transport damage and completeness of the delivery. Level the appliance using the adjustable feet for a firm stand. Install the drain water connection. Install the drinking water connection. Connect the device to the power.
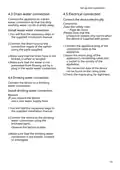
- Page 13: Set up and connect Drain water connection Connect the appliance to a drain water connection so that the dirty washing water can be drained away. Connect the device electrically. Take the safety rules in mind. You will find the necessary steps in the supplied installation manual. Connect the drain hose to the connection nipple of the siphon using the parts supplied. Make sure that the drain hose is not kinked, crushed or tangled. Connect the appliance plug of the connection cable to the appliance. Connect the device to a drinking water connection. If you replace the device, use a new water supply hose.
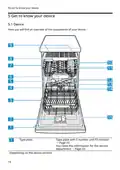
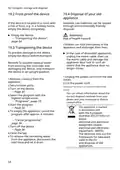
- Page 14: Get to know your device Detergent dispenser: Pour the detergent into the detergent dispenser. Lower crockery basket: Sieve system. Reservoir for softener: Add softening salt to the water softener salt reservoir. Tablet tray: During the wash cycle, tabs automatically fall from the detergent compartment into the tablet compartment where the tabs can dissolve optimally. Upper crockery basket: The upper spray arms clean the dishes in the upper basket. If the dishes are not cleaned optimally, clean the spray arms. Suction opening of the zeolite reservoir: The suction opening is used for drying with zeolite. Blow-out opening of the zeolite reservoir: The outlet opening is used for drying with zeolite. Lower spray arm: The lower spray arm cleans the dishes in the lower basket. If the dishes are not cleaned optimally, clean the spray arms. Reservoir for gloss: Pour rinse aid into the rinse aid reservoir.
- Page 15: Get to know your device Controls You can use the control panel to set all the functions of your device and obtain information about the operating status. Some keys perform various functions. ON/OFF key Switch on device Switch off device Cancel program Information about the remaining time or basic settings is shown in the display. You can change the basic settings via the display and the adjustment buttons. WLAN indication Softening indicator Add salt to fill softening system Program keys and extra functions Additional functions
- Page 16: Get to know your device. Start key. Test. Start program. If you press the button for approx. 3 seconds, it opens the basic settings. Select start time. Top up rinse aid indicator. Open the appliance door. Symbols on the display show various indicators based on the device version. When the refill water softener salt indicator lights up, fill in the water softener salt reservoir immediately before the program starts.
- Page 17: Get to know your device. If you have activated the key lock, the symbol lights up in the display. If a fault occurs in the water supply or water drainage, the symbol lights up or flashes on the display.
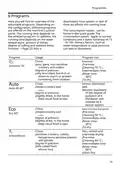
- Page 18: Programs overview includes adjustable programs based on configuration. The running time varies with the selected program, water temperature, and amount of dishes. Consumption values are provided in the quick guide and apply to normal conditions with specific water hardness. Factors like water temperature and pipe pressure can cause deviations in consumption values. Different programs include: - Intensive program for pots, pans, and non-sensitive crockery at 70°C for heavily soiled items. - Sensor optimized program adjusts based on the degree of pollution for mixed crockery at 45-65°C. - Eco program for slightly dried items at 50°C, focusing on energy efficiency. - BrilliantShine program for sensitive items at 40°C, ensuring careful cleaning and improved drying.
- Page 19: Program usage includes options like cleaning at 60 °C and machine cleaning at 70 °C. The Eco 50° program has a longer running time due to extended soaking and drying times for optimal consumption values. The Pre-rinse program is suitable for all types of crockery and pre-cleans dishes by cold rinsing. Users can download additional programs via the Home Connect app and store them under a specific button. Test institutes receive instructions for comparison tests according to EN60436, focusing on testing conditions rather than results. To save a favorite program, users must press the program button and the desired additional function, then hold for 3 seconds. The selected program and additional function will flash to indicate they have been saved. The program and additional function can be combined and saved on the device or via the Home Connect app. The product number and production number are required for inquiries related to the appliance. Instructions for saving programs are dependent on the device version.
- Page 20: To reset the program to the pre-wash program saved at the factory, you can use the Home Connect app or reset the device to factory settings.
- Page 21: Additional functions provide an overview of adjustable features on the machine's control panel. The configuration allows for various additional functions based on the selected program. Intensive Zone increases spray pressure and maintains maximum program temperature longer, affecting running time and energy consumption. Gloss Dry improves drying by increasing water amount and extending the drying phase, which also raises energy consumption. Using rinse aid is recommended with Gloss Dry. VarioSpeedPlus can shorten running time by 15% to 75% depending on the dishwashing program. This function can be activated before or during the program run, but increases water and energy consumption. Selecting VarioSpeedPlus deactivates automatic door opening in the setting o02. Equipment overview varies based on device variant and usage.
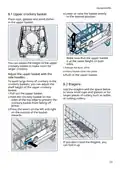
- Page 22: Lower or raise the basket evenly. Place cups, glasses and small dishes in the upper basket. Make sure that the upper basket is at the same height on both sides. You can adjust the height of the upper crockery basket to make room for larger crockery. The crockery basket clicks into place. Adjust the upper basket with the side handles. To wash large items of crockery in the crockery baskets, you can adjust the shelf height of the upper crockery basket. Use the etagère and the space below to store small cups and glasses or for larger pieces of cutlery. If you don't need the étagère, you can fold it up.
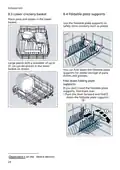
- Page 23: Lower crockery basket Use the foldable plate supports to safely store crockery such as plates. Large plates with a diameter of up to 31 cm can be placed in the lower basket. You can fold down the foldable plate supports for better storage of pans, dishes, and glasses. If you don't need the foldable plate supports, fold them over. Push the lever forward and fold down the foldable plate supports.
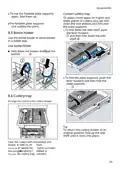
- Page 24: To use the foldable plate supports again, fold them up. To obtain more space for higher and wider pieces of cutlery, you can fold down the side shelves and fold over the plate supports. The foldable plate supports click audibly into place. To fold down the side shelf, push the lever forward. Use the bottle holder to store bottles in a stable way. Fold down the holder and load the bottles. To fold the plate supports, push the lever forward and then fold the plate supports. Arrange the cutlery in the cutlery drawer. To return the cutlery drawer to its original position, fold up the side shelf until it clicks into place. Clear the cutlery with the pointed and sharp side to avoid injury.
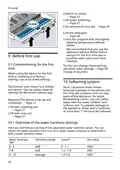
- Page 25: Switch on device. Set water softening. Set amount of rinse aid. Fill the detergent. Start the program with the highest cleaning temperature without dishes. We recommend that you use the appliance without dishes before using it for the first time due to possible water stains and other residues. When using the device for the first time or resetting it to factory settings, you must make settings. Hard, calcareous water leaves limescale residues on the dishes and can clog parts of the appliance. To prevent damage to the appliance, water with a hardness of more than 7 °dH must be softened. You can obtain the water hardness from your local water supply company or determine it with a water hardness tester.
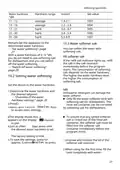
- Page 26: Softening system Set the appliance to the determined water hardness. You can soften the water with softening salt. With a water hardness of 0 - 6 °dH, you do not need to use softening salt for dishwashers. If the refill salt indicator lights up, refill the salt in the salt reservoir immediately before the program starts. The consumption of softening salt depends on the water hardness. Set the device to the water hardness. Dishwasher detergent can damage the water softener. Only fill the water softener tank with softening salt for dishwashers. The factory setting is H04. When using for the first time, fill the tank completely with water.
- Page 27: Softening system Only use softening salt for dishwashers. The water hardness is 0 - 6 °dH. You do not need to use water softener salt. Put the softening salt in the softening salt tank. To maintain trouble-free operation of the water softener, the device regularly regenerates the water softener. If the salt refill indicator bothers you, you can switch off the softener salt indicator. The softening system is regenerated in all programs before the end of the main wash cycle. To prevent damage to the appliance, only switch off the water softener in specific cases. Overview of the consumption values when regenerating the softening system. The water hardness is max. 21 °dH and you use a combined detergent with salt replacement. Here you will find an overview of the maximum additional running time and consumption values when regenerating the softening system.
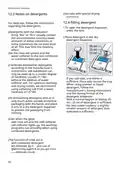
- Page 28: Final rinse system Press and lift the lip on the lid of the rinse aid dispenser. Regenerating the softening system after x wash cycles. The consumption values stated are laboratory measured values. Top up the rinse aid up to the max mark. For optimum drying results, you should use the best rinse aid. If rinse aid has overflowed, it must be removed from the rinse aid container. Fill rinse aid if the rinse aid refill indicator lights up. Overflowing rinse aid can lead to excessive foaming during the wash cycle. Close the lid of the rinse aid reservoir. If streaks or water stains remain on the dishes, adjust the amount of rinse aid.
- Page 29: Dishwasher detergent The rinse aid system is deactivated when switched on, and the rinse aid refill indicator is deactivated. At a low setting, less rinse aid is added during the wash cycle, which reduces streaks on the dishes. At a higher setting, more rinse aid is added during the wash cycle, reducing water stains and improving drying results. Only use detergents that are suitable for dishwashers. For optimal washing and drying results, use a non-combined detergent in combination with separate water softener salt and rinse aid. Modern, powerful dishwasher detergents usually have a low alkaline recipe with enzymes that break down starch and dissolve proteins. Oxygen-based bleaching agents are usually used to remove colored stains. The function of the rinse aid is limited in combined detergents; better results are usually achieved by using rinse aid. Follow the manufacturer's instructions for any detergent.
- Page 30: Dishwasher detergent Tabs are suitable for all dishwashing tasks and do not need to be dosed. With shortened programs, tabs may not dissolve completely, leaving detergent residue. Combined dishwasher detergents contain rinse aid and salt substitutes. Powder detergent is recommended for shortened programmes. The dosage can be adjusted according to the degree of soiling. Combined detergents generally only function at water hardnesses of 21 °dH. Liquid detergents work faster and are recommended for shortened programs without a pre-rinse phase. Non-combined detergents do not contain any other components apart from the actual detergent. Hand dishwashing liquid can lead to increased foaming and damage the appliance. Chlorine residues on crockery can endanger your health.
- Page 31: Close the lid of the detergent dispenser. Only wash glass and porcelain that are marked as dishwasher safe by the manufacturer. Prevent damage to glass and crockery. The detergent dispenser opens automatically at the optimum time for the program. The powder or liquid detergent is spread and dissolved in the rinse aid container. Tabs fall into the tablet tray and are dissolved in doses. Do not place any objects in the tablet tray to allow the tab to dissolve evenly. Only wash dishwasher-safe dishes in the appliance. Glazed crockery and objects made of aluminum and silver may discolour or fade when washed. Sensitive glass can become dull after a few wash cycles.
- Page 32: For better washing and drying results, place crockery with curves or cavities at an angle so that the water can run off. If you use highly caustic alkaline or strong acidic dishwasher detergent, the dishwasher means used may not be suitable for aluminum objects. Remove coarse food residues from the crockery before loading. Choose a program with an appropriate temperature to run. To save natural resources, do not pre-rinse the dishes under running water. Load heavily soiled crockery such as pans in the lower basket for better washing results. Arrange the dishes correctly to achieve optimum washing results and to prevent damage. Load cutlery with the pointed and sharp side down to prevent injuries. To save energy and water, load the appliance to the specified number of standard place settings. Make sure that you do not block the spray arms so they can rotate freely.
- Page 33: The Eco 50° program is an environmentally friendly option suitable for normally soiled crockery. It is the most efficient program in terms of energy and water consumption for this type of tableware. The device will turn off automatically if not operated for 10 minutes. You can adjust the rinsing based on the degree of soiling by setting a suitable program. Hot crockery can cause burns and is sensitive to impact. After the program ends, let the dishes cool down before removing them. Additional functions can be set in addition to the selected rinsing program. The available additional functions depend on the program selected. To prevent water drops on the dishes, empty them from bottom to top. Check the rinse aid reservoir and accessories for contamination and clean if necessary.
- Page 34: When the device is operated, flashes on the display. In the event of a power failure, the key blocking is activated. The time setting is activated. You deactivate the time setting by pressing repeatedly until h:00 appears on the display. The program is over when the display shows 0h:00m. If you open the appliance door when the appliance is heated up, it is best to leave the appliance door ajar for a few minutes. If you want to add crockery while the appliance is already running, do not use the tablet tray as a handle for the upper basket. The appliance switches off automatically 1 minute after the end of the programme. To end a program early or to change a program that has started, you must cancel the active program. The key lock prevents the device from being operated unintentionally or improperly while it is in operation.
- Page 35: Press the button to interrupt the running program during the wash cycle. When you switch on the device, the program continues automatically.
- Page 36: Basic settings can be adjusted according to your preferences. The basic settings depend on the equipment of your device. Water hardness should be set according to the water softener. At position H00, the water softening is switched off. The amount of rinse aid can be set with positions r00 to r06. Switch off the final rinse system with position r00. Intensive drying can improve drying results but is not suitable for sensitive dishes. Set the device to cold or hot water connection based on installation suitability. Hot water connection requires a minimum temperature of 40 °C and a maximum of 60 °C. Factory settings may differ depending on device type.
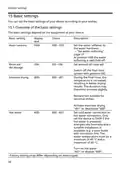
- Page 37: Basic settings EmotionLight display Interior lighting settings: - E00: The interior lighting is switched off. - E01: The interior lighting is controlled via the ON/OFF button. - E02: The interior light turns on when the appliance door is opened and switches off automatically after 10 minutes. AutoOpen Dry settings: - o00: Automatic opening of the door is deactivated in all programmes. - o01: Automatic opening of the door is activated in all programmes. - o02: Automatic opening of the door is only activated in the Eco 50°C programme.
- Page 38: Basic settings include options for display, text, choice, and description. Wi-Fi settings allow you to enable or disable the wireless network connection. At position Cn0, the wireless network connection is disabled. This setting is available only after connecting the appliance to the Home Connect app. Remote Start can be activated or deactivated with settings rc0, rc1, and rc2. With rc0, the function is permanently deactivated. With rc1, the function can be selected via the button. With rc2, the function is permanently activated. Factory setting allows you to reset changed settings to the factory condition. The settings for the first commissioning must be specified.
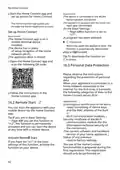
- Page 39: To use Home Connect, establish a connection to the WLAN home network and configure it with the Home Connect app. You can easily make all settings via the Home Connect app, which guides you through the registration process. Press and hold for approximately 3 seconds to access basic settings. The display shows Hxx to indicate the current settings. Take the enclosed documentation of Home Connect for reference. Observe the safety instructions in the operating manual when making settings. You can change multiple settings through the app. To save the settings, press for approximately 3 seconds. Connect your appliance to a mobile device to operate functions via the Home Connect app. The availability of Home Connect services depends on your country.
- Page 40: Start the Home Connect app and set up access for Home Connect. The device must be connected to the WLAN home network. The appliance should be equipped with the Home Connect app. The Home Connect app guides you through the registration process. When the appliance door is opened, the function is automatically deactivated. Please observe the instructions regarding the protection of personal data. The appliance transmits certain categories of data to the Home Connect server during the first registration. You can start the appliance with your mobile device via the Home Connect app. If set to rc2, the function is permanently activated for remote start. The use of Home Connect functionalities is prepared during the first registration.
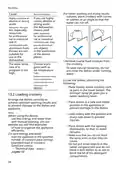
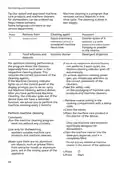
- Page 41: Cleaning and maintenance The Home Connect functionalities can only be used in combination with the Home Connect app. Use only suitable cleaning agents to clean the device. Carefully clean and maintain your device to ensure that it continues to function well for a long time. Follow the device maintenance tips to keep the device working for a long time. Never use cleaning agents containing chlorine. Deposits can lead to malfunctions in the device, e.g. due to food residues and limescale. To prevent malfunctions and the formation of nasty smells, it is recommended to clean the appliance at regular intervals. Machine cleaning is the right program for cleaning the machine in combination with machine care products and machine cleaners.
- Page 42: Cleaning and maintenance Machine cleaning is a program that removes various deposits in one rinse cycle. The cleaning is done in two stages. Phase 1: Remove grease and lime using a liquid machinery maintenance product or powdered machine cleaner. Phase 2: Remove food leftovers and deposits using a machine cleaner. For optimum cleaning performance, the program doses the cleaners separately in the respective cleaning phase. If the machine cleaning indicator lights up, carry out machine cleaning without dishes. Perform machine cleaning every 2 months if there is no reminder function. Only use machine care products specifically designed for dishwashers. Make sure there are no aluminum objects in the rinsing space of the appliance. Do not put any additional machine cleaner in the interior of the appliance.
- Page 43: Cleaning and maintenance Machine cleaning is in progress. Once the program is completed, the machine cleaning indicator goes out. The sieve system filters coarse contaminants from the flushing circuit. Make sure that no foreign objects fall into the pump reservoir. Check the sieves for food residues after each wash. Contaminants from the washing water can clog the sieves. Pull the micro sieve downwards. Press the locking pieces together and remove the coarse sieve upwards.
- Page 44: Cleaning and maintenance Clean the sieve elements under running water. Carefully clean the dirt edge between the coarse and fine sieve. Limescale and impurities in the washing water can block the nozzles and bearings of the spray arms. Clean the spray arms regularly. Check whether the locking lugs of the coarse sieve have clicked into place. Unscrew the upper spray arms and pull down. Place the sieve system in the appliance and turn the coarse sieve clockwise. Verify that the arrow marks are aligned. Check the spray arm outlets for blockages under running water and remove any foreign objects. Install the lower spray arm.
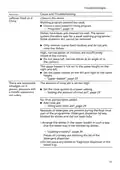
- Page 45: Troubleshooting You can rectify minor faults on the device yourself. Before contacting customer service, please refer to the troubleshooting information. Risk of electric shock! Improper repairs are dangerous. Only trained specialist personnel may carry out repairs on the device. Only original spare parts may be used for repairing the device. If the power cord of this appliance becomes damaged, it must be replaced with a special cord available from the manufacturer or its service agent. Aquastop system is activated. Close the tap. Contact the service department. Water supply hose is kinked. Turn on the tap.
- Page 46: Troubleshooting Malfunction E:32-00 lights up alternately for water supply. Remove the strainer from the inlet hose. Clean the strainer. Check the water connection for leaks. E:34-00 lights up alternately. Water flows continuously into the appliance. Close the tap. E:61-02 lights up alternately. No device error. Water drain pump is blocked or cover of water drain pump is loose. Clean the drain pump. Tighten the drain pump cover securely.
- Page 47: Troubleshooting Malfunction Cause and troubleshooting E:61-03 lights up alternately The water is not pumped out. Check the connection to the siphon and open it if necessary. Lay the drain hose without kinks. Remove any residue. No device error. Water drain pump is blocked or cover of water drain pump is loose. E:92-40 lights off. Sevenz are dirty or clogged. Rinse the seven.
- Page 48: Troubleshooting Electronics has detected an error. Press the main switch button for approx. 4 seconds to reset and restart the device. If the problem recurs, turn off the device and remove the mains plug from the socket. Wait at least 2 minutes before switching on the device again. If the problem recurs again, contact the service department. Leftover food on dishes may indicate improper loading. Dishes placed too close together can affect cleaning performance. Clean the spray arm to ensure proper operation. Check for blockages in the spray arm. Refer to the manual for cleaning instructions.
- Page 49: Troubleshooting Malfunction Cause and troubleshooting Choose a more powerful rinsing program. Only remove coarse food residues and do not pre-rinse the dishes. Do not place tall, narrow dishes at an angle or in the corners. Set the upper basket on the left and right to the same height. Set the rinse system to a lower setting. Add rinse aid. Arrange the dishes in the upper basket in such a way that the tablet tray is not blocked by dishes. Do not place any dishes or fragrance dispenser in the tablet tray.
- Page 50: Troubleshooting Malfunction Cause and troubleshooting There are removable smudges on it. Dishes have been pre-cleaned too well, causing the sensor system to opt for a weak washing programme. Only remove coarse food residues and do not pre-rinse the dishes. Rust marks on it. Cutlery is not sufficiently rust resistant, especially knife blades. Use rust-resistant cutlery. Cutlery rusts when washed together with rusty objects. Do not wash rusty objects. Salt content in the dishwater is too high. Remove spilled softener salt from the rinse aid container. Make sure the spray arms are not blocked and can rotate freely. Only put the detergent in a dry detergent dispenser. Indication water softener refill salt lights up. Water softener salt is missing. Fill softener salt.
- Page 51: Transport, storage and disposal Fit the pump cover and press down. Cleaning the drain pump is necessary when dishwater no longer drains properly. Sharp and pointed objects can block the drain pump and cause injury. Carefully remove foreign objects from the pump. Assemble the sieve system. Unplug the device from the power outlet before maintenance. Insert the lower and upper baskets after cleaning. Disassemble the device by unplugging and turning off the water tap. Loosen the drain water and drinking water connections. Carefully pull the device forward, ensuring the hose is not damaged.
- Page 52: Transport and storage instructions for the device include frost-proofing measures. It is important to empty the device completely if located in a frost-risk area. Environmentally friendly disposal allows for the reuse of valuable raw materials. Before transporting the device, ensure it is emptied to prevent damage. For discarded appliances, unplug the mains cable, cut it, and damage the door lock. Transport the device in an upright position to avoid water damage. Obtain information about disposal methods from your dealer or local council. The appliance is marked according to the European directive on waste electrical and electronic equipment. Follow specific steps to empty the appliance and prepare it for disposal. Ensure to turn off the device and close the tap before removing water from the appliance.
- Page 53: Service department Aqua-Stop guarantee In addition to the warranty claims against the seller based on the purchase agreement and our manufacturer's warranty, you will be indemnified if the following conditions are met. Original replacement parts relevant for operation can be obtained from our service department for at least 10 years. If water damage is caused by an error in the AquaStop system, we will compensate the damage for private users. To ensure the water protection system, the appliance must be connected to the electricity supply. The liability guarantee applies to the life of the device. Condition for entitlement to guarantee is that the appliance with AquaStop has been set up and connected professionally. Our guarantee does not cover defective supply lines or fittings up to the AquaStop connection on the tap. When you contact the service department, you will need the product number, production number, and serial number of the device. The product number, production number, and serial number can be found on the rating plate of the device. In principle, with AquaStop you do not have to turn off the tap after use for safety reasons.
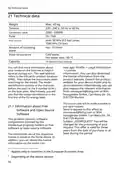
- Page 54: Technical data Weight: Max. 45 kg Tension: 220 - 240 V, 50 Hz or 60 Hz Connection value: 2000 - 2400W, 10 - 16A Fuse: Water pressure min. 50 kPa (0.5 bar), max. 1000 kPa (10 bar) Amount of incoming water: min. 10 l/min Water temperature: Cold water; Hot water max.: 60 °C Capacity: 10 standard place settings You can find more information about your model on the Internet at the official EU product database EPREL. The model identification consists of the character before the slash of the E number (E-Nr.) on the type plate. This product contains software components licensed by intellectual property holders as free software or open source software.
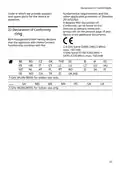
- Page 55: Declaration of Conformity BSH Hausgeräte GmbH hereby declares that the appliance with Home Connect functionality complies with the fundamental requirements and the other applicable provisions of Directive 2014/53/EU. A detailed RED Declaration of Conformity can be found on the product page of your device in the additional documents. 5 GHz WLAN (WiFi): for indoor use only.
- Page 56: Page 56

Kenmore 665.15822000 Undercounter Dishwasher

BOSCH SMH4EVX00E 01 Integrated Dishwasher

Blomberg LDV42320 Dishwasher

SIEMENS SN27ZI04CZ Dishwasher

FISHER PAYKEL DD24DTX6I1 Dishwasher

INSIGNIA NS-DWH2SS8 Dishwasher

BOSCH SBI4HCS48E Dishwasher
BOSCH SPI4ELS01D Dishwasher
BOSCH SMS4EKI06E-30 Dishwasher
FISHER and PAYKEL DD60SDFTB9 Contemporary Tall Dishwasher