
Thermador DWHD660EFP Sapphire Dishwasher













Use and care
GUIDE
Dishwasher
DWHD660EFP
THERMADOR.COM

| General | Details |
|---|---|
| Name | Thermador DWHD660EFP Sapphire Dishwasher |
| Make | Thermador |
| Language | English |
| Filetype | PDF (Download) |
| File size | 7.01 MB |
 (1 votes, average: 5.00 out of 5)
 Loading...

Thermador DWHD660EFM Dishwasher

Thermador DWHD640EFP Dishwasher

Thermador Dishwasher : for DWHD650W and More

Thermador DWHD640EFM Dishwasher

Thermador DWHD660EFP Sapphire Dishwasher Overview
Summary of Contents
- Page 1: Use and care guide Dishwasher DWHD660EFP
- Page 2: IMPORTANT SAFETY INSTRUCTIONS Safety definitions General information Intended use Restrictive use Grounding instructions Safe use Risk to children State of California Proposition 65 Warning Preventing material damage Environmental protection and energy-saving
- Page 3: IMPORTANT SAFETY INSTRUCTIONS Read all of the instructions carefully before using the appliance. This appliance is not intended for use by persons with reduced physical, sensory or mental capabilities, or lack of experience and knowledge, unless they have been given supervision or instruction. This appliance must be grounded to reduce the risk of electric shock. WARNING indicates that death or serious injuries may occur as a result of non-observance of this warning. CAUTION indicates that minor or moderate injuries may occur as a result of non-observance of this warning. Improper connection of the equipment grounding conductor can result in risk of electric shock. Read and understand all instructions before using the appliance. Do not connect the appliance if it has been damaged in transit. Use this dishwasher only for its intended function, which is the washing of household dishware and kitchenware rated as dishwasher safe. NSF/ANSI 184 Certified residential dishwashers are not intended for licensed food establishments.
- Page 4: IMPORTANT SAFETY INSTRUCTIONS Under certain conditions, hydrogen gas may be produced in a hot water system that has not been used for two weeks or more. Hydrogen gas is explosive. Follow the safety instructions and directions for use on the detergent and rinse aid product labels. Do not use harsh chemicals such as bleach-based products to clean your dishwasher. Before using a dishwasher that is connected to a hot water system that has been unused for two weeks or longer, turn on all hot water faucets and let the water flow from each for several minutes. Always use caution when opening the door during or following a wash cycle as hot water or steam may escape. To avoid risk of electric shock, only use the appliance in enclosed residential space according to the installation manual. It is highly recommended for the end user to become familiar with the procedure to shut off the incoming water supply and the procedure to shut off the incoming power supply. The outlet opening of the Zeolite container becomes hot and can cause burns. Load knives and other sharp utensils with their handles up to reduce the risk of cut-type injuries. Do not allow children to play in or on the dishwasher.
- Page 5: Important safety instructions Read and save these instructions State of California Proposition 65 This product may contain a chemical known to the State of California, which can cause cancer or reproductive harm. Therefore, the packaging of your product may bear the following label as required by California.
- Page 6: Preventing material damage Harsh chemicals such as bleach-based products can damage your dishwasher. Do not use harsh chemicals such as bleach-based products to clean your dishwasher. Do not use a steam cleaner. To avoid impairing Zeolite drying performance, do not position dishware parts directly in front of the intake opening or the outlet opening of the Zeolite container. Protect your appliance from the elements. Damage caused by freezing is not covered by the warranty. The sensors adjust the cycle sequence and strength in the Auto cycles depending on the level and type of soiling. Avoid dishwasher damage by not loading it with paper products, plastic bags, packing materials, or anything other than normal, dishwasher safe dishware and kitchenware. If you follow these instructions, your appliance will use less power and water. Zeolite drying automatically helps to save energy.
- Page 7: Familiarizing yourself with your appliance Detergent dispenser: Add detergent to the detergent dispenser. Lower spray arm: The lower spray arm washes the dishware in the lower rack. If the dishware has not been washed properly, clean the spray arms.
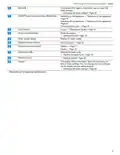
- Page 8: Familiarizing yourself with your appliance Detergent tab collecting tray: During the wash cycle, detergent tabs automatically drop out of the detergent dispenser into the tab collecting tray, where they can dissolve fully. Upper rack: The upper spray arm washes the dishware in the upper rack. If the dishware has not been washed properly, clean the spray arms. Intake opening of the Zeolite container: The intake opening is required for Zeolite drying. Outlet opening of the Zeolite container: The outlet opening is required for Zeolite drying. Filter system: Information about the filter system can be found on Page 22. Silverware basket: Details about the silverware basket are available on Page 14. Dispenser for rinse aid: Rinse aid is added to the dispenser for rinse aid. Rating plate: The rating plate contains the E number and FD number. You will need this data to contact customer service. You can use the control panel to configure all functions of your appliance and to obtain information about the operating status.
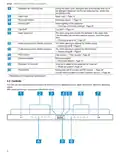
- Page 9: Familiarizing yourself with your appliance If you press for approx. 3 seconds, you can open the basic settings. Switching on the appliance Switching off the appliance Terminating the cycle Cycles Rinse aid refill indicator Rinse aid system Display for water supply The display shows information about the remaining run time or basic settings.
- Page 10: Dishwasher cycles overview The running time may vary depending on the cycle selected. The consumption values relate to normal conditions and a water hardness of 16 - 20 °E. Pots & pans cycle is for washing pots, pans, non-fragile dishware, and silverware. Auto cycle is sensor controlled and optimized depending on the soiling of the rinse water. Normal cycle is the most economical cycle for cleaning mixed dishware and silverware. Hand wash cycle is particularly gentle for delicate dishware and silverware. Quick cycle is time-optimized for cleaning delicate dishware and fresh food remnants. Favorite cycle allows users to select preferred settings for their specific needs.
- Page 11: Energy Guide label was based on the normal soil sensing cycle. The unit was tested without any rinse aid in the rinse aid dispenser. A single dose of detergent was inserted into the detergent dispenser. We recommend that dish loads have the rack position set in the highest position. With the favorite function, you can save a combination of a cycle and an option. You can save the selected cycle and option combination via the Home Connect app or on the appliance. To reset the cycle, either use the Home Connect app or reset your appliance back to factory settings. Here is an overview of the different options available on your dishwasher. Patented Zeolite technology thoroughly dries dishes and dishwasher safe plastics. The lower spray arm provides intensive cleaning for dishware in the front of the lower rack.
- Page 12: Features This intensive cleaning may increase water and energy consumption. Arrange cups, glasses, and small tableware items in the top rack. The lower spray arm provides intensive cleaning for dishware in the back of the lower rack. Place dirty, hard to clean dishware in the back of the lower rack, e.g. casserole dishes, pots and pans. Using the Home Connect® app, customize the 4 zones and the cleaning intensity level. You can adjust the height of the upper rack to make room for larger items. Adjusting upper rack with the side levers allows washing large items. Increases the temperature and cycle length to achieve sanitation. This option is ideal for cleaning items such as chopping boards and baby bottles. Only sanitizing cycles have been designed to meet the requirements for soil removal and sanitation efficacy.
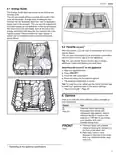
- Page 13: Features Raise or lower the rack evenly to the right level. Arrange pans and plates in the lower rack. Check that the rack is level on both sides. Release the levers. The rack clicks into position. Slide the rack in. Use the flip tines to position dishware securely, e.g. plates. Use the cup shelf and the space underneath for small cups and glasses or for large items of silverware. You can fold the tines down to arrange pans, bowls, and glasses better. If you do not need the cup shelf, you can fold it up.
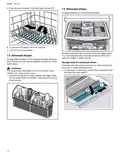
- Page 14: Features Push the lever forward and fold down the tines. Arrange silverware in the silverware drawer. To use the tines again, fold them back up. The tines click into position. Arrange silverware with the points and sharp edges down. You can reorganize the silverware drawer to make more space for longer or wider utensils. Arrange the silverware in the silverware basket, ensuring that the items are not nestled together and with the sharp points down. Fold down the side shelves and tines to make more space for longer or wider silverware items. The sharp points and edges of knives and other sharp utensils can cause serious injury. Load knives and other sharp utensils with edges down.
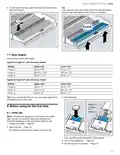
- Page 15: Before using for the first time To fold down the tines, push the lever forward and fold down the tines. If you want to return the cutlery tray to its original position, fold the side shelf upward until it clicks into position. Set the racks at the right height. Appliance height 34 with silverware basket. For optimum drying results, always use rinse aid. Only use detergents intended for dishwashers. Connect your appliance to the Home Connect® app. You can conveniently adjust the settings and download additional cycles and options with the app. Add rinse aid. Turn on the appliance.
- Page 16: Rinse aid system Start the cycle with the highest cleaning temperature. Close the lid of the dispenser for rinse aid. Operate the appliance without dishware before using it for the first time. If there are streaks or water spots on dishware, change the amount of rinse aid. For optimum drying results, use rinse aid. Only use rinse aid intended for household dishwashers. If the rinse aid refill indicator lights up, fill the dispenser with rinse aid. You can turn the rinse aid system off if you choose not to use rinse aid. Only wash dishware that is suitable for dishwashers.
- Page 17: Dishware Warning: Damage to glass and dishware Highly caustic alkaline or highly acidic cleaning agents in conjunction with aluminum parts may cause explosions. Never use highly caustic alkaline or highly acidic cleaning agents with aluminum items. Only put glasses and china in the dishwasher if they are labeled dishwasher-safe. Avoid loading the dishwasher with paper products, plastic bags, or anything other than dishwasher-safe dishware. Dishes soiled with ash, wax, grease, or paint should not be loaded. Use a detergent labeled as gentle to dishes. Arrange dishware correctly to optimize the dishwashing result and prevent damage. Remove large remnants of food from dishware; do not pre-rinse under running water. Load knives and sharp utensils with edges down to avoid injury.
- Page 18: Dishware Upper rack Removing dishware Dishes can be very hot immediately after the cycle ends. Open the door slightly and allow dishes to cool for a few minutes before unloading. To prevent water dripping onto dishware, unload it starting at the bottom and working up. Check the washing tank and accessories for soiling and clean if necessary. Loading patterns Recommended loading patterns. 12 place settings. Silverware basket.
- Page 19: Basic operation Your dishwasher has a built-in feature to help prevent unintentional operation, e.g. by children. After starting the appliance, the door has to be closed within 4 seconds, otherwise the operation will be paused. The wash cycle will resume after pressing and closing the door. Unintentional operation is activated when starting a wash cycle, setting delay time, or opening the door during operation. This feature cannot be deactivated. The cycle last selected and the option last selected will be set by default. The buttons on the appliance are touch sensitive and only require a quick, gentle touch. If you do not perform any actions on the appliance for 10 minutes, it will automatically switch off. You can delay the start of the wash cycle via the Home Connect® app. The wash cycle has ended when the display shows 00h:00m.
- Page 20: Basic settings To save energy, the appliance switches off automatically 10 minutes after the end of the wash cycle. You can configure the basic settings for your appliance to meet your needs. Tip: Connect your appliance to a mobile device. You can conveniently change all settings using the Home Connect® app. To end a cycle early or to switch from one that has already started, you will need to cancel it first. CAUTION: To avoid risk of injury, always use caution when opening the door during or following a wash cycle as hot water or steam may escape. You can change one or more settings. Tip: You can reset the changed settings back to the factory settings at any time. The basic settings depend on the features of your appliance. Set the amount of rinse aid. The temperature is increased during the final rinse, which improves the drying result.
- Page 21: Basic settings Display text EmotionLight With the setting EL:00, the interior lighting is switched off. With the setting EL:01, the interior lighting can be activated via the ON/OFF button. With the setting EL:02, the interior lighting goes on when you open the appliance door. When the appliance door is opened, the interior lighting switches off automatically after 10 minutes. infoLight® While the program is running, a spot of light is projected onto the floor below the appliance door. If the appliance door is not completely closed, the spot of light will flash. Level I:00 switches InfoLight off. Start cycle Set a default cycle for when the appliance is switched on. With the setting SP:00, the last cycle selected and the last additional function selected are set by default when the appliance is switched on.
- Page 22: Home Connect® Basic setting Activate or deactivate remote start. The following settings are possible: With the setting rc:00, the option is permanently deactivated. With the setting rc:01, the option can be selected via the button. With the setting rc:02, the option is permanently activated. The basic setting is not available until you have connected the appliance with the Home Connect® app. You can use the Home Connect® app to start the appliance with your mobile device. To keep your appliance working efficiently for a long time, it is important to clean and maintain it carefully. The Home Connect® app guides you through the entire registration process.
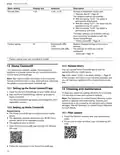
- Page 23: Cleaning and maintenance Cleaning spray arms To see how to clean the spray arms, scan the following QR code.
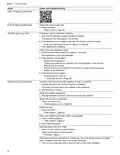
- Page 24: Troubleshooting You can eliminate minor issues on your appliance yourself. Please read the information on eliminating issues before contacting Customer Service. This may avoid unnecessary repair costs. E:20-60 lights up alternately. Appliance has detected that the heating element is calcified. Descale the appliance and operate it with the water softening system. E:21-30 lights up alternately. Rearrange the dishware in the appliance so the intake opening of the Zeolite container is no longer obstructed. Water protection system is activated. Close the water supply valve and contact customer service. E:32-00 lights up alternately or indicator for water supply lights up. Open the water supply valve, terminate the wash cycle, and start a wash cycle. If the problem occurs again, contact customer service. Inlet hose is kinked or blocked. Contact customer service. Water supply valve is jammed or clogged up. Open the water supply valve; the flow rate must be at least 10 l/min when the water supply is open. If the problem occurs again, contact customer service. E:34-00 lights up alternately. Water is continuously running into the appliance. Close the water supply valve and contact customer service.
- Page 25: Troubleshooting E:61-02 lights up alternately. Not an appliance error. The drain pump cover is loose or a foreign object is blocking the pump. Secure the cover of the drain pump so it clicks into place or clean the drain pump. E:61-03 lights up alternately. Water is not draining. Not an appliance error. Garbage disposal is still plugged or the drain hose is kinked. Check that the garbage disposal plug is removed and that the drain hose is not kinked. Not an appliance error. High loop is missing and/or debris flushed back into drain hose and blocked it. Be sure there is a high loop in the drain hose and that no debris has flushed back into the hose. E:61-60 lights up alternately. E:90-01 lights up alternately. There is a technical error. Contact customer service. Power voltage is too low. There is no problem with the appliance. Call an electrician. Have the power voltage and electrical installation checked by an electrician. E:92-10 lights up alternately. Spray arm rotation of the lower spray arm is blocked. Arrange the dishware so that it does not obstruct spray arm rotation of the lower spray arm. Lower spray arm is not correctly fitted. Fit the lower spray arm correctly.
- Page 26: Troubleshooting E:92-10 lights up alternately. E:92-40 lights up alternately. All LEDs light up or flash. Filters are soiled or blocked. Clean the filters. A software update is possibly installing. Wait until the software update has been installed. Electronics have detected a fault. Press the main switch button for approx. 4 seconds to reset. Food remnants on dishware may be due to dishware being placed too close together or the rack being overfilled. Spray arm rotation may be blocked. Arrange dishware so it does not obstruct spray arm rotation. Selected wash cycle may be too light. Select a more intensive wash program.
- Page 27: Troubleshooting Food remnants on dishware may require adjusting the sensitivity of the sensors. Tall narrow containers should not be positioned at too great an angle or in corner areas for adequate rinsing. Ensure the upper rack on the left and right is set to the same height. Removable streaks on glasses and silverware can be caused by the rinse aid setting being too high. Adding rinse aid may be necessary if none has been added. Detergent residue can occur if the detergent dispenser lid is blocked by dishware. Dishware should not be pre-rinsed too intensively to avoid lighter cycles being chosen by the sensors. Rust spots on silverware may indicate the use of non-rust-resistant items or washing with rusting items. Check that the spray arms are not blocked to ensure proper detergent rinsing. Cleaning the drain pump is essential if dishwashing water does not drain properly.
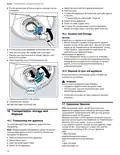
- Page 28: Transportation, storage and disposal Pry the pump cover off using a spoon and grip it by the crosspiece. Select the cycle with the highest temperature. To drain the appliance, terminate the cycle after approx. 4 minutes. Before leaving for vacation during warmer weather, turn off the water supply at the nearest point to the dishwasher. If your dishwasher will be unused for an extended period in freezing temperatures, have it winterized by a professional service. Environmentally sound disposal allows valuable raw materials to be recycled. Unplug the appliance from the power outlet before disposal. Cut the power cord and remove the door upon discarding the appliance. With any warranty repair, we will ensure your appliance is repaired by an authorized service provider using genuine replacement parts. To avoid damage to the appliance, empty it before transporting.
- Page 29: Customer service information is available for assistance with connecting to Home Connect®. Instructions for Home Connect® setup can be found online. The model number (E-Nr.), production number (FD), and consecutive numbering (Z-Nr.) are located on the appliance's rating plate. The rating plate is situated inside the appliance door. Refer to the section Familiarizing yourself with your appliance for more details. It's advisable to note your appliance's details and customer service contact information for quick reference.
- Page 30: Exclusive insider information Download owner manuals, specifications and CADS. View instructional videos for changing water filters, cleaning, adjusting settings, and beyond. Browse through cleaning, usage, and troubleshooting tips. Find the answers to all your Home Connect® related questions. Purchase filters, cleaners, accessories, and parts. View information on Thermador product warranties. Register your products today to easily manage your appliance information. Schedule a product overview to receive step-by-step guidance on using your appliance. Get the latest information on product news and events.

BOSCH SMS4ITW00X Dishwasher

BOSCH SMS4HCW19E Dishwasher

FISHER and PAYKEL DD60ST4ZB9 Dishwasher

hermitlux HMX-TDJ03 Tabletop Dishwasher

FRIGIDAIRE FDSR4501AP 24 Panel Ready Dishwasher

ARDESTO DWMF-V608SMHDS Dishwasher

ATAG VA7214LR 60 cm Dishwasher

ASKO DFI564XXL.U Dishwasher

BOSCH SMS6ZDW48G Dishwasher

FOTILE SD2F-P6 3 In 1 Sink Dishwasher