BOSCH SHXM63W Dishwasher


Dishwasher
Lave-vaiselle
SHXM63W***, SHX863W***,
SHPM65W***, SHP865W***,
SHP865Y***, SHX865Y***
en-us Operating instructions
fr-ca Notice d'utilisation

| General | Details |
|---|---|
| Name | BOSCH SHXM63W Dishwasher |
| Make | Bosch |
| Language | English |
| Filetype | PDF (Download) |
| File size | 3.43 MB |
 (1 votes, average: 5.00 out of 5)

BOSCH SMV6ZCX49E-39 Dishwasher

BOSCH SMI4HVS33E Dishwasher

BOSCH SRV2HKX39G Dishwasher

BOSCH SGS4HAW40G Dishwasher

BOSCH SGH4HVX32G Dishwasher

BOSCH SMS4ECI26E Dishwasher

BOSCH SMS6EDI02G Free-Standing Dishwasher

BOSCH SMS6EDW02G Free-Standing Dishwasher

BOSCH SMV4HTX27G Dishwasher

BOSCH SMV4HCX48E Dishwasher

BOSCH SHXM63W Dishwasher Overview
Summary of Contents
- Page 1: Dishwasher Operating instructions Notice d'utilisation
- Page 2: Page 2
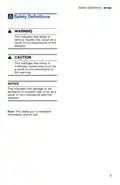
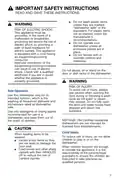
- Page 3: IMPORTANT SAFETY INSTRUCTIONS Read and save these instructions. This dishwasher is provided with installation instructions and a use and care manual. Read and understand all instructions before using the dishwasher. WARNING: Risk of electrical shock or fire! Electrical shock or fire could result if the electrical supply for the dishwasher is incorrectly installed or improperly grounded. This dishwasher is intended for use up to a maximum altitude of 13,000 ft (4,000 meters) above sea level. To reduce the risk of fire, electrical shock, or serious injury, observe the following. WARNING: Risk of injury or death! Misuse of the dishwasher can result in serious injury or death. WARNING: Health hazard! Never use harsh chemicals to clean your dishwasher. WARNING: Grounding instructions risk of injury! This appliance must be grounded to a metal, permanent wiring system. Severe injury and/or product damage could result from the use of unauthorized service technicians or non-original replacement parts.
- Page 4: IMPORTANT SAFETY INSTRUCTIONS Do not wash plastic items unless they are marked “dishwasher safe” or the equivalent. This appliance must be grounded to reduce the risk of electric shock. Improper connection of the equipment-grounding conductor can result in risk of electric shock. Do not operate your dishwasher unless all enclosure panels are in place. Do not tamper with or override controls and interlocks. Always use caution when opening the door during or following a wash cycle as hot water or steam may escape. Use this dishwasher only for its intended function, which is the washing of household dishware and kitchenware rated as dishwasher safe. Use only detergents or rinsing agents recommended for use in a dishwasher. Do not allow children to play in or on the dishwasher. Load knives and other sharp utensils with their handles up to reduce the risk of cut-type injuries.
- Page 5: IMPORTANT SAFETY INSTRUCTIONS It is highly recommended for the end user to become familiar with the procedure to shut off the incoming water supply and the procedure to shut off the incoming power supply. WARNING: RISK OF EXPLOSION! Under certain conditions, hydrogen gas may be produced in a hot water system that has not been used for two weeks or more. Before using a dishwasher that is connected to a hot water system that has been unused for two weeks or longer, turn on all hot water faucets and let the water flow from each for several minutes. This product can expose you to chemicals including vinyl chloride, which is known to the State of California to cause cancer and birth defects or other reproductive harm. Remove the dishwasher door to the washing compartment when removing an old dishwasher for service or discarding. To avoid floor damage and possible mold growth, do not allow wet areas to remain around or under the dishwasher. To avoid dishwasher damage, do not allow water to remain in your dishwasher systems through extended periods of freezing temperatures.
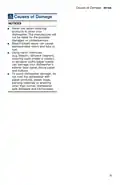
- Page 6: Causes of damage Never use steam cleaning products to clean your dishwasher. The manufacturer will not be liable for the possible damages or consequences. Bleach-based wipes can cause stainless-steel doors and tubs to rust. Using harsh chemicals, abrasive cleaners, scouring pads, or abrasive cloths/paper towels can damage your dishwasher’s exterior door panel, fascia panel, and buttons. To avoid dishwasher damage, do not load the dishwasher with paper products, plastic bags, packing materials, or anything other than normal, dishwasher safe dishware and kitchenware.
- Page 7: Getting started Appliance overview
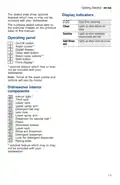
- Page 8: Getting started The dotted lines show optional features which may or may not be included with your dishwasher. Cycle time remaining Clean lights up when dishes are clean. Sanitize lights up when sanitation requirements are met. Add rinse lights up when rinse aid is low. Some of the wash cycles and options will vary by model. Dishwasher interior components include the interior light, third rack, upper rack, and lower rack. Detergent tab tray and rinse aid dispenser are part of the dishwasher's features. Optional features may or may not be included with your dishwasher.
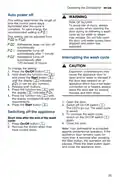
- Page 9: Getting started Use the function keys to change the settings. The dishwasher has been preset with certain settings for your convenience. You can change these factory settings. Amount of rinse aid affects drying. Improved drying for glasses and plasticware. Signal sounds when wash cycle is complete. Dishwasher switches off automatically after wash cycle is complete.
- Page 10: Rinse aid is essential for proper drying. Always use a liquid rinse aid, even if your detergent contains one. The dishwasher indicates low rinse aid with a light on the Rinse Aid indicator. Refill the rinse aid dispenser when the indicator lights up. Close the lid of the rinse aid dispenser until it clicks to seal. Wipe up any excess rinse aid after filling the dispenser. The indicator light will turn off shortly after closing the dishwasher door. Avoid oversudsing or clogging by not overfilling the rinse aid dispenser. Do not fill the rinse aid dispenser with detergent, as it will damage the dishwasher. For easier pouring, remove the lid from the rinse aid bottle.
- Page 11: Rinse aid can be set from the lowest to the highest amount. The factory setting is at a medium level. Adjust the setting if streaks remain on dishes or if they are not drying properly. Using no rinse aid may lead to longer cycle times and increased energy and water consumption. Higher temperatures and longer cycles can damage fine china or glassware. To set the rinse aid amount, press the On/Off button and hold the function key while pressing the Start button. Release both buttons when the display indicates a number. Select the desired setting and press the Start button to save it.
- Page 12: Loading the dishwasher Before using your dishwasher for the first time, check the information in this section. Some items are not dishwasher-safe and should be hand washed; others require special loading. Acrylic may develop crazing or small cracks. Adhesives that join materials such as plastic, wood, bone, steel, copper, and tin may loosen. Iron will rust. Hand wash and dry immediately. Colored anodized aluminum may fade over time. These items will tarnish: pewter, brass, and bronze. Hand wash and dry immediately. Some hand-painted utensils may discolor or fade. Position fragile glassware so that it will not topple over or come in contact with other utensils during the wash cycle. Wooden bowls and utensils can crack, warp, and lose their finish. Make sure the plasticware is dishwasher-safe.
- Page 13: Loading the dishwasher involves specific guidelines for optimal results. Ensure items do not protrude through the bottom of the racks and block the spray arms. Do not pre-wash items with loosely attached food soil. Remove all food particles, bones, toothpicks, and excessive grease. Load dishes so the insides of bowls, pots, and pans are facing the spray arms. Place large items in the lower rack and load pots, pans, and bowls upside down. Avoid nesting and contact points between dishes. Only wash household dishware and kitchenware rated as dishwasher-safe. Refer to the dishware materials section for more information about dishware suitability. To avoid dishwasher damage, do not load with paper products or anything other than normal, dishwasher-safe dishware and kitchenware.
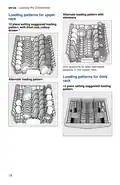
- Page 14: Loading the dishwasher involves specific patterns for optimal results. For large items like pots and pans, an alternate loading pattern is recommended. The lower rack should accommodate loading patterns for 12 place settings. It is best to load large items face down in the lower rack.
- Page 15: Loading the dishwasher Alternate loading pattern with stemware Loading patterns for upper rack 12 place setting suggested loading pattern, with third rack cutlery drawer Use supports to load stemware glasses in the upper rack Loading patterns for third rack Alternate loading pattern 12 place setting suggested loading pattern 18
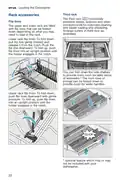
- Page 16: Loading the dishwasher The Double Flex silverware basket This basket splits along its length, resulting in two halves that may be placed in a variety of positions in the lower rack, greatly increasing the lower rack’s loading versatility. Place knives and sharp utensils with their handles up and forks and spoons with their handles down. If large or oddly-shaped items are loaded in the silverware basket, be sure they do not nest together. WARNING: Risk of injury! The sharp points and edges of knives and other sharp utensils can cause serious injury. Load knives and other sharp utensils with edges down. Do not allow children to handle or play near knives and sharp utensils. The silverware basket lid may also be folded downward in order to leave the basket open. To assemble the Double Flex silverware basket, hold the two halves side by side or back to back, so that the tab on one basket can slip into the notch on the other basket.
- Page 17: Loading the dishwasher The silverware basket lid may also be folded downward in order to leave the basket open. Unloading the dishwasher Dishes can be very hot immediately after cycle ends. Open the door slightly and allow dishes to cool for a few minutes before unloading. Dishes are more likely to chip when unloading before cooling. To prevent water from dripping onto dry dishes, unload the lower rack first. Next, unload the silverware basket followed by the upper rack, and then the third rack (if equipped).
- Page 18: Loading the dishwasher Adjusting the height of the rack can create more space for taller utensils. The height of the upper rack can be adjusted in 3 steps. To lower the rack, push the RackMatic® lever inward. To raise the rack, hold the basket on the sides of the upper rack and lift it up. Check spray arm for clearance after adjustment. Arrange large plates up to a diameter of 13.4 in (34 cm) in the lower basket.
- Page 19: Loading the dishwasher involves using the third rack for oversized tools. The third rack positions knives, spatulas, and other items for improved cleaning and easier loading. Cutlery should be arranged in the third rack as illustrated. The upper and lower racks are equipped with flip tines that can be adjusted based on loading needs. To fold down lower rack flip tines, pull gently forward and release from the notch. To fold up lower rack flip tines, push them into an upright position until they engage in the notch. Side shelves can be folded down for taller items of silverware. The front rows of prongs can be folded down for wider handles. Upper rack flip tines can be folded down with gentle pressure. Upper rack flip tines can be folded up until the holder engages in the notch.
- Page 20: Loading the dishwasher Cup shelves and the space underneath them can be used for small cups or for larger serving utensils. They also serve as stemware supports. Light-weight plastic accessories can be held securely by the plastic item clips. Press the plastic item clip against the upper rack until it clicks. Optional feature which may or may not be included with your dishwasher.
- Page 21: Loading the dishwasher involves removing the upper rack if an item is too tall for the lower rack. To remove the upper rack, pull it out until it stops, then lift it up and away from the dishwasher. After removing the upper rack, push the roller guides back into the dishwasher. Insert the extra tall item sprinkler into the upper rack spray outlet and turn it clockwise to lock it in position. Keep the vent hole on the tub’s left side clear by placing tall items on the lower rack’s right side or center. To avoid dishwasher damage, do not reinstall the upper rack without removing the extra tall item sprinkler. The extra tall item sprinkler is an optional feature that may or may not be included with your dishwasher.
- Page 22: Loading the dishwasher Installing third rack Removing/Installing third rack Pull out third rack rails all the way. Insert third rack at an angle. Make sure that the stopper hooks of both rails slide in between the holding hooks and the lower rollers of the third rack. Slide third rack in and lift the upper rollers over the front stopper hooks of both rails. Push in third rack. Removing third rack Pull out third rack all the way.
- Page 23: Loading the dishwasher Installing upper rack Removing/Installing upper rack with Rackmatic Pull out upper rack rails all the way. Insert upper rack at an angle. Make sure that the stopper hooks of both rails slide in between the upper and lower rollers. Slide upper rack in and lift the upper rollers over the front stopper hooks. Push in upper rack. Lift front rollers over the stopper hook of the rail. Pull out upper rack forwards and upwards.
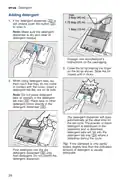
- Page 24: This dishwasher uses less water than most, therefore, less detergent is required. Use only detergent specifically designed for dishwashers. 1 tablespoon (15 ml) of detergent will clean most loads. The detergent dispenser cup has lines that measure detergent to 1 tablespoon (15 ml) and 1.75 tablespoons (25 ml). 3 tablespoons (45 ml) of detergent will completely fill the detergent dispenser. If you do not know the hardness of your water supply, use 15 ml of detergent. Do not use hand dishwashing products in your dishwasher. Using too much detergent with soft water may cause etching in glassware and fine china. To best protect glassware, use a wash cycle with low temperatures or a specific glass-care cycle. Use the measuring lines in the detergent dispenser cup as a guide to measure the amount of detergent recommended.
- Page 25: Adding detergent If the detergent dispenser is still closed, push the button to open it. Make sure the detergent dispenser is dry and clear of detergent residue. Dosage: see manufacturer’s instructions on the packaging. When using detergent tabs, lay them such that they do not come in contact with the cover. Close the lid by placing the finger on the lid as shown. Slide the lid closed until it clicks. Do not place detergent tabs or utensils in the detergent tab tray. The detergent dispenser will open automatically at the ideal time for the set cycle. If the dishware is only lightly soiled, slightly less than the indicated amount of detergent is usually adequate. Pour detergent into the dry detergent dispenser only. Add detergent. Do not overfill the detergent dispenser.
- Page 26: Dishwasher cycles include various options tailored for different cleaning needs. Heavy cycle is best for cleaning items with baked-on food or grease, typically requiring soaking or hand scouring. Auto cycle features flexible soil sensing, ideal for mixed dishware and food soils. Normal cycle is recommended for daily use to wash a full load of normally soiled dishes. Speed60® and Clean30® cycles reduce wash time while maintaining cleaning effectiveness. Rinse cycle is designed for freshly soiled dishes, allowing for easy removal of soils. Extra Dry cycle reduces overall wash time and is suitable for lightly soiled dishes, such as glasses and dessert dishware. Delay option allows for pre-rinsing dishes to avoid odors, using less water than hand rinsing. The Energy Guide label is based on the Normal soil sensing cycle without rinse aid. Dish loads for energy certification tests should have the rack position set in the highest position.
- Page 27: Dishwasher cycle options include various settings for optimal cleaning. Sanitize increases temperatures and retains them for an extended time to achieve disinfecting performance. This function is ideal for cleaning items like chopping boards and baby bottles. Delay allows you to postpone the start time of your dishwasher for up to 24 hours. ExtraScrub increases pressure and temperature in the lower rack for intensive cleaning. Using the Sanitize option may improve drying but slightly increases energy consumption. Half Load reduces water consumption when washing small, lightly soiled loads. Extra Dry ensures better drying for plastic parts with increased temperature during the final rinse. Delicate is best for lightly soiled items and reduces the likelihood of cloudy glasses. Rinse aid is recommended for high gloss drying, even with combination detergents.
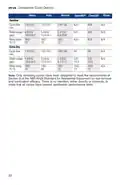
- Page 28: Dishwasher Cycle Options Cycle time and water usage can adjust intermittently. Wash cycle times are based on 120°F (49°C) water supply. EcoSense automatically adjusts cycle length, temperature, and water changes based on food soil and incoming water temperature. Smart Control options include Speed60, Clean30, Heavy, Auto, Normal, and Rinse. Wash temperatures range from 113°F to 160°F (45°C to 71°C). Rinse temperatures range from 126°F to 162°F (52°C to 72°C). Half Load cycle time is 90-114 minutes with varying water usage. Delicate cycle time is 100-120 minutes with specific water usage. Extra Scrub cycle time is 120-150 minutes with specific water usage. Water usage varies by cycle, from 1.1 to 6.4 gallons.
- Page 29: Dishwasher cycle options include Speed60, Clean30, Heavy, Auto, Normal, Rinse, and Sanitize. Cycle times vary, with Speed60 taking 130-155 minutes and Clean30 taking 125-150 minutes. Water usage ranges from 2.4-6.4 gallons, depending on the cycle selected. Rinse temperatures are typically set at 162°F for most cycles. Extra Dry cycle time is 84 minutes with a water usage of 3.8 gallons. Only sanitizing cycles are designed to meet NSF/ANSI standards for soil removal and sanitization efficacy. Not all cycles have passed sanitization performance tests.
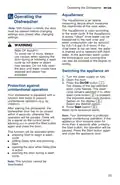
- Page 30: Operating the dishwasher The AquaSensor is an optical measuring device which measures the cleanliness of the rinse water. The AquaSensor is used according to the wash cycle. If the AquaSensor is active, clean rinse water can be transferred to the next rinse and water consumption can be reduced. If the rinse water is not yet clear, the water is drained and replaced with fresh water. In the automatic wash cycles, the temperature and running time can also be adjusted to the degree of soiling. To avoid risk of injury, always use caution when opening the door during or following a wash cycle as hot water or steam may escape. Turn the water supply on fully. Press the On/Off button. Your dishwasher is equipped with a function that helps to prevent unintentional operation. If the appliance door remains open for more than 4 seconds after pressing the Start button, the operation will be paused.
- Page 31: Operating the dishwasher involves understanding the time display and wash cycle end indicators. The remaining wash cycle time is shown on the display when a wash cycle is selected. The wash cycle ends when the display reads ‹:‹‹. A buzzer indicates the wash cycle end if the signal tone has been set. Wash cycle time varies based on water temperature, amount of dishes, and degree of soiling. Delay start allows you to postpone the cycle in one-hour increments up to 24 hours. To set delay start, open the door, press the On/Off button, and select a cycle. Press the Delay button until the displayed time meets your requirements. To cancel delay start, press the Delay button until œ:‹‹ is indicated on the display. The dishwasher is protected against unintentional operation if the door remains open for more than 4 seconds after pressing the Start button.
- Page 32: Operating the dishwasher involves several key steps. To terminate the wash cycle, press and hold the Start button for approximately 3 seconds until the display changes. After terminating, wait about 1 minute for the dishwasher to drain before powering it back on. Changing the wash cycle requires terminating the current cycle first. The intensive drying feature uses a higher temperature for improved drying results, but caution is advised for delicate utensils. The InfoLight feature indicates when the wash cycle is running by shining a light on the floor under the appliance door. Do not open the appliance door until the light is no longer visible. If the appliance door is not completely closed, the light will flash. In darkened rooms, some light scattering from the InfoLight may be visible, which is normal. You can switch the InfoLight on or off through the settings.
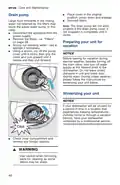
- Page 33: Care and maintenance The filter system is designed to minimize maintenance while providing premium cleaning performance and minimum energy consumption. The Bosch filter system is designed to prevent the need to pre-rinse normally attached food soils from your dishes. Simply scrape leftover food soils off of dishware before loading to conserve time, water, and energy. Depending on use habits and water hardness, the filter system will require some maintenance to sustain premium cleaning performance. Your dishwasher filter system is designed to filter 100% of the water entering the spray arms to provide a continuous supply of clean water. Your filter system may need to be cleaned when you notice food soils remaining on the filter system or a drop in cleaning performance. The filter system consists of three parts. Clean the filter system after washing loads with large amounts of food soils or heavy starch content to maintain optimal performance. The Large Object Trap prevents objects that should not be placed in your dishwasher from damaging the pump system. The Flat Fine Filter prevents food particles from entering the wash chamber and directs particles toward the micro filter.
- Page 34: Care and maintenance To check or clean the filter system: Unscrew the Large Object Trap and remove the entire filter system. Check spray arms for grease and limescale deposits. Fill detergent dispenser with detergent and start the appliance without utensils in the cycle with the highest rinsing temperature. Clean the appliance with detergents/appliance cleaners suitable for use with dishwashers. Unscrew the upper spray arm and pull off the lower spray arm. Inspect for deposits. Remove the microfilter from the fine filter for easier cleaning. Rinse the filters under running water and use a soft brush to clean. Do not use abrasive brushes or steel wool, as they may damage the filter. Reinstall the filter system in reverse sequence and lock into place by screwing the Large Object Trap until the marking arrows align.
- Page 35: Care and maintenance Place cover in the original position, press down and engage. Reinstall filters. Large food remnants in the rinsing water not retained by the filters may block the waste water pump. The drain pump will not work properly if the drain pump cover is not snapped in completely until it clicks. Disconnect the appliance from the power supply. Scoop out standing water - use a sponge if necessary. Before leaving for vacation during warmer weather, turn off the main valve and water supply at the nearest point to the dishwasher. Do not leave soiled dishware in the unit and leave the door slightly open. If your dishwasher will be unused for a period of time in freezing temperatures, have it winterized by a professional service. Use caution when removing parts for cleaning as some debris may be sharp.
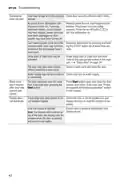
- Page 36: Troubleshooting information may help with a dishwasher problem without involving a repair professional. Dishwashers may occasionally exhibit problems that are unrelated to a malfunction of the dishwasher itself. Error codes indicate specific issues that may need attention. Common causes include a kinked supply hose, water supply turned off, or a clogged water supply line. Actions to resolve issues include installing the supply hose without kinks, turning on the water supply, and unclogging the water line. If the error code indicates dirty or blocked sump filters, clean the filters. A clogged drain line may require unclogging, while a kinked or blocked drain hose may need replacement. If the drain pump impeller is clogged, remove the drain pump cover, clean around the pump impeller, and replace the cover. For low supply voltage, check the electrical installation as it may not be a dishwasher fault. In case of a technical fault indicated by a different error code, switch off the dishwasher and restart it after a short time.
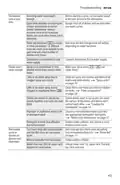
- Page 37: Troubleshooting Door may be ajar or not properly latched. Close door securely until door latch clicks. No power to the dishwasher. Replace blown fuse or reset tripped circuit breaker. Press the on/off button to turn the dishwasher on. Can’t select a wash cycle since the previous wash cycle may not have finished. Reset the dishwasher by pressing and holding the START button for at least three seconds. Delay start or Child lock may be activated. Select a wash cycle and close the door. Water supply may not be turned on or connected. Check and turn on water supply. Press Start button again and close the dishwasher door within 4 seconds. A fuse may have been blown or circuit breaker tripped. Check the fuse or circuit breaker box.
- Page 38: Troubleshooting Dishwasher runs a long time. Incoming water is not warm enough. Before starting a cycle, run hot water faucet at the sink closest to the dishwasher. Cycle time depends on wash cycle chosen and amount of soil on dishes. Rinse aid dispenser is empty. Add rinse aid and change rinse aid setting or rinse aid setting = 0. Without rinse aid, wash cycle defaults to longest time with most number of washes and rinses. Dishwasher is connected to cold water supply. Connect dishwasher to hot water supply. Dishes aren’t clean enough. Spray arms are blocked or misaligned. Make sure spray arms can rotate freely. Little or no water spray due to clogged spray arm nozzle. Clean out spray arm nozzles and filters of all debris and obstructions. Dishes are nested or placed too closely together and racks are overfilled. Space dishes apart so spray jets can reach the surface of the dishes. Improper or ineffective wash cycle or detergent used. Choose a more intensive wash cycle and use appropriate dishwasher detergents. Detergent is made less effective due to hard water. Install a water softener and choose a more intensive wash cycle. Too much rinse aid causes streaks and too little rinse aid can cause spots. Add rinse aid and check rinse aid setting. Mineral deposits from hard water. Install a water softener.
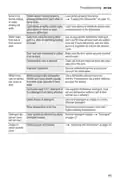
- Page 39: Troubleshooting Dishes not dry. Add rinse aid or adjust setting. Extra Dry heat option not chosen. Activate Extra Dry heat option. Water collected in depressions on dishes. Arrange dishes in upper rack to slope. Door was opened or dishes removed before wash cycle was completed. Wait until wash cycle ends before opening door. Plastics don’t absorb heat like cutlery or china. Use more intensive wash cycles or activate Extra Dry heat option. Silverware not arranged properly. Arrange silverware properly and separate them. Odor Clean sump filters, sump and door seal as needed. Food debris left on dishes too long. Run dishwasher more frequently. Dishwasher isn’t filling with water. Install new supply hose (without kinks). Water supply line is clogged. Unclog water line and turn on water supply.
- Page 40: Troubleshooting Load dishes properly into racks. Noise from dishes rattling can occur if dishes weren't loaded properly. Light dishes or lightly loaded racks allow dishes to move or water sprays to strike tubs. Water leaks from the tub or around the door may indicate issues. Use an appropriate dishwasher detergent to avoid suds from using the wrong detergent. Make sure the door seal is securely inserted into its track. Condensation vent blockage can cause issues; clean out the vent. White residue coats the dishwasher from lime scale deposits in hard water. Use a dishwasher cleaner every few months to maintain the appliance. Select more intensive wash cycles with higher washing temperatures if rinse temperature is too low.
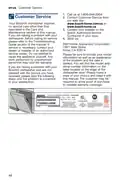
- Page 41: Customer service information is available through various channels. Your Bosch dishwasher requires no special care other than that described in the Care and Maintenance section of this manual. If you are having a problem with your dishwasher, refer to the Troubleshooting Guide section of the manual before calling for service. Contact your dealer, installer, or an authorized service center for necessary repairs. Do not attempt to repair the appliance yourself, as unauthorized work may void the warranty. Include model information and an explanation of the problem when contacting customer service. Keep a copy of your invoice with the manual for warranty validation. Model and serial number information can be found on the label located on the edge of the dishwasher door. If dissatisfied with service received, follow steps to ensure the problem is corrected to your satisfaction.
- Page 42: Statement of Limited Product Warranty How long the warranty lasts BSH warrants that the product is free from defects in materials and workmanship for a period of three hundred sixty five (365) days from the date of purchase. What this warranty covers This product is also warranted to be free from cosmetic defects in material and workmanship for a period of thirty (30) days from the date of purchase or closing date for new construction. The limited warranty applies only to Bosch® dishwashers sold to the first using purchaser. The product must be purchased new at retail and not for resale or commercial use. The warranties apply only to the first purchaser of the product and are not transferable. The cosmetic warranty excludes slight color variations due to inherent differences in painted and porcelain parts. This cosmetic warranty specifically excludes any display, floor, “As Is”, or “B” stock appliances. It is recommended to return the registration card for warranty coverage notifications.
- Page 43: Statement of Limited Product Warranty BSH’s sole liability and responsibility is to repair manufacturer-defective products only. BSH highly recommends not attempting to repair the product yourself or using an unauthorized servicer. If you choose to have someone other than an authorized service provider work on your product, this warranty will automatically become null and void. Authorized service providers are specially trained on BSH products and possess a superior reputation for customer service and technical ability. BSH offers a 5-year limited warranty on electronics, covering defects in materials or workmanship. BSH provides a 5-year limited warranty on dish racks, excluding rack components. There is a lifetime warranty against stainless steel rust through for the dishwasher's inner liner and door. BSH will not incur liability for products located in remote or hazardous areas. During the warranty period, BSH will repair the product without charge if it proves to have been manufactured with a defect. If reasonable attempts to repair the product are unsuccessful, BSH will replace the product at their discretion.

Hisense HV642C65UK Dishwasher
BOSCH SMV6HVX00I Fully- Dishwasher

kogan com KABNCTPDW8B Benchtop Dishwasher

IKEA 004.754.23 PROFFSIG Dishwasher

FISHER PAYKEL DD24DCTX9 N Double Dishwasher

EUHOMY DW-01 Mini Dishwasher

Miele PFD 104 SCVi EP1 Commercial Dishwasher

BOSCH SPI2HKS08E Dishwasher

FISHER AND PAYKEL DW24U6I1 Dishwasher

FISHER PAYKEL DD24DV2T9N Sanitize Dishwasher