Domain DW60ET Dishwasher


Premium Domain
Dishwasher
Models: DW60ET
PLEASEREADTHEUSERMANUALCAREFULLYBEFOREUSE
PARTⅠ:Generic Version

| General | Details |
|---|---|
| Name | Domain DW60ET Dishwasher |
| Make | Domain |
| Language | English |
| Filetype | PDF (Download) |
| File size | 4.98 MB |
 (1 votes, average: 5.00 out of 5)

Domain DW60ET Dishwasher Overview
Summary of Contents
- Page 1: Premium domain Dishwasher Models: DW60ET Please read the user manual carefully before use Part I: Generic version
- Page 2: Safety information Product overview Using your dishwasher Maintenance and cleaning Installation instruction Troubleshooting tips Loading the baskets according to AS/NZS 2007.1 Reviewing the section on troubleshooting tips will help you solve some common problems by yourself. If you cannot solve the problems by yourself, please ask for help from a professional technician. The manufacturer may make modifications without giving prior notice.
- Page 3: safety information When using your dishwasher, follow the precautions listed below. Installation and repair can only be carried out by a qualified technician. This appliance is intended to be used in household and similar applications. This appliance can be used by children aged from 8 years and above with supervision. Children shall not play with the appliance. Cleaning and user maintenance shall not be done by children without supervision.
- Page 4: This appliance is for indoor household use only. To protect against the risk of electrical shock, do not immerse the unit, cord or plug in water or other liquid. Please unplug before cleaning and performing maintenance on the appliance. Use a soft cloth moistened with mild soap, and then use a dry cloth to wipe it again. This appliance must be earthed. In the event of a malfunction or breakdown, earthing will reduce the risk of an electric shock. The appliance is equipped with an earthing conductor plug. The plug must be plugged into an appropriate outlet that is installed and earthed in accordance with all local codes and ordinances. Improper connection of the equipment-earthing conductor can result in the risk of an electric shock. Check with a qualified electrician or service representative if you are in doubt whether the appliance is properly grounded.
- Page 5: Do not modify the plug provided with the appliance. Have a proper outlet installed by a qualified electrician. Do not abuse, sit on, or stand on the door or dish rack of the dishwasher. Do not operate your dishwasher unless all enclosure panels are properly in place. Open the door very carefully if the dishwasher is operating. Do not place any heavy objects on or stand on the door when it is open. Locate sharp items so that they are not likely to damage the door seal. Knives and other utensils with sharp points must be loaded with their points facing down. Some dishwasher detergents are strongly alkaline and can be extremely dangerous if swallowed. Avoid contact with the skin and eyes and keep children away from the dishwasher when the door is open.
- Page 6: Do not wash plastic items unless they are marked dishwasher safe or the equivalent. Check the manufacturer's recommendations for unmarked plastic items. Use only detergent and rinse agents recommended for use in an automatic dishwasher. Never use soap, laundry detergent, or hand washing detergent in your dishwasher. The door should not be left open, since this could increase the risk of tripping. If the supply cord is damaged, it must be replaced by the manufacturer or a similarly qualified person. During installation, the power supply must not be excessively or dangerously bent or flattened. Do not tamper with controls. The appliance needs to be connected to the main water valve using new hose sets. To save energy, the appliance will switch off automatically in standby mode after 30 minutes of inactivity.
- Page 7: Disposal For disposing of the package and the appliance, please go to a recycling center. Cut off the power supply cable and make the door closing device unusable. Cardboard packaging is manufactured from recycled paper and should be disposed of in the waste paper collection for recycling. By ensuring this product is disposed of correctly, you will help prevent potential negative consequences for the environment and human health. For more detailed information about recycling of this product, please contact your local city office and your household waste disposal service. Do not dispose of this product as unsorted municipal waste. Collection of such waste separately for special treatment is necessary.
- Page 8: Product overview To get the best performance from your dishwasher, read all operating instructions before using it for the first time. Top spray arm Inner pipe Lower spray arm Filter assembly Dispenser Upper spray arm Cup rack Cutlery rack Upper basket Lower basket Pictures are only for reference, different models may be different. Please prevail in kind.
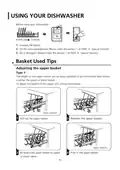
- Page 9: Using your dishwasher Before using your dishwasher Loading the basket Fill the rinse aid dispenser Fill in detergent Adjusting the upper basket The height of the upper basket can be easily adjusted to accommodate taller dishes. To adjust the height of the upper rack, follow these steps. Remove the upper basket. Re-attach the upper basket to upper or lower rollers.
- Page 10: To raise the upper basket, lift it at the center of each side until it locks into place. It is not necessary to lift the adjuster handle to raise the upper basket. To lower the upper basket, lift the adjust handles on each side to release it. Folding back the cup shelves allows for taller items in the upper basket. You can lean tall glasses against the raised cup rack or remove it when not needed. The spikes of the lower basket hold plates and a platter. They can be lowered to create more room for large items. The upper basket can be adjusted without using the adjuster handle. The cup rack can be folded back for additional space. The lower basket spikes can be manipulated for larger items.
- Page 11: Maintenance and cleaning External care Clean the door seals regularly with a soft damp cloth to remove food deposits. Food and drink residues may drip onto the sides of the dishwasher door. These surfaces are outside the wash cabinet and are not accessed by water from the spray arms. The control panel should be wiped with a soft damp cloth only. To avoid penetration of water into the door lock and electrical components, do not use a spray cleaner of any kind. Never use abrasive cleaners or scouring pads on the outer surfaces. The filtering system in the base of the wash cabinet retains coarse debris from the washing cycle. Check the condition of the filters regularly and clean them if necessary under running water. Pictures are only for reference; different models of the filtering system and spray arms may be different.
- Page 12: Coarse filter Main filter Fine filter Hold the coarse filter and rotate it anticlockwise to unlock the filter. Lift the filter upwards and out of the dishwasher. The fine filter can be pulled off the bottom of the filter assembly. Larger food remnants can be cleaned by rinsing the filter under running water. Reassemble the filters in the reverse order of the disassembly. For a more thorough clean, use a soft cleaning brush. Do not over tighten the filters. Never use the dishwasher without filters in place. Improper replacement of the filter may reduce the performance level of the appliance.
- Page 13: Spray arms need to be cleaned regularly to prevent clogging from hard water chemicals. To clean the spray arms, follow specific instructions. To remove the upper spray arm, hold the center nut still and rotate the spray arm counterclockwise. To remove the lower spray arm, pull it upward. Wash the arms in soapy warm water and use a soft brush to clean the jets. Replace the spray arms after rinsing them thoroughly.
- Page 14: Caring for the dishwasher involves taking frost protection measures in winter. After washing cycles, cut off the electrical power and turn off the water supply. Drain the water from the inlet pipe and water valve, and remove the filter at the bottom of the tub. After every wash, turn off the water supply and leave the door slightly open to prevent moisture and odors. Always remove the plug from the socket before cleaning or performing maintenance. Do not use solvents or abrasive cleaning products; clean with a cloth and warm soapy water. For interior stains, use a cloth dampened with water and vinegar or a dishwasher-specific cleaning product. When not in use for a long time, run a wash cycle empty, then unplug, turn off the water supply, and leave the door slightly open. If moving the appliance, keep it in a vertical position if possible. Periodic cleaning of seals with a damp sponge will help prevent odors from forming.
- Page 15: Installation instruction Electrical shock hazard Disconnect electrical power before installing dishwasher. The installation of the pipes and electrical equipment should be done by professionals. Do not use an extension cord or an adapter plug with this appliance. Do not cut or remove the earthing connection from the power cord. Please look at the rating label to know the rating voltage and connect the dishwasher to the appropriate power supply. Use the required fuse 10A/13A/16A, time delay fuse or circuit breaker recommended. Ensure the voltage and frequency of the power being corresponds to those on the rating plate. Only insert the plug into an electrical socket which is earthed properly.
- Page 16: Water supply and drain Cold water connection Connect the cold water supply hose to a threaded 3/4 inch connector and make sure that it is fastened tightly in place. If the water pipes are new or have not been used for an extended period of time, let the water run to make sure that the water is clear. This precaution is needed to avoid the risk of the water inlet being blocked and damaging the appliance. About the safety supply hose The safety supply hose consists of double walls, guaranteeing intervention by blocking the flow of water in case of a supply hose break. A hose that attaches to a sink spray can burst if it is installed on the same water line as the dishwasher. How to connect the safety supply hose Pull the safety supply hoses completely out from the storage compartment located at the rear of the dishwasher. Turn water fully on before starting the dishwasher. How to disconnect the safety supply hose Turn off the water.
- Page 17: Connection of drain hoses requires inserting the hose into a drain pipe with a minimum diameter of 4 cm or into the sink. The height of the drain pipe must be less than 1000mm. The free end of the hose must not be immersed in water to avoid backflow. Securely fix the drain hose in either position A or position B. If the sink is 1000mm higher from the floor, excess water in hoses cannot be drained directly into the sink. Drain excess water from hoses into a bowl or suitable container that is held outside and lower than the sink. Ensure that the water drain hose is correctly fitted to avoid leaks and is not kinked or squashed. If an extension hose is needed, use a similar drain hose that is no longer than 4 meters. The waste connection must be at a height less than 100 cm from the bottom of the dish. The water drain hose should be fixed properly.
- Page 18: Position the appliance in the desired location with the back against the wall and sides along adjacent cabinets or walls. The dishwasher is equipped with water supply and drain hoses that can be positioned to the right or left sides for proper installation. The height of the dishwasher may be altered by adjusting the screwing level of the feet. The appliance should not be inclined more than 2°. The height of the dishwasher, 845 mm, allows it to be fitted between existing cabinets of the same height in modern kitchens. The feet can be adjusted to reach the correct height. The laminated top of the machine is heatproof, scratchproof, and stainproof.
- Page 19: When fitting beneath a work top, in most modern fitted kitchens there is only one single work top under which cabinets and electrical appliances are fitted. Remove the work top of the dishwasher by unscrewing the screws under the rear edge of the top. After removing the work top, the screws must be screwed again under the rear edge of the top. The height will then be reduced to 815 mm, as scheduled by the International Regulations (ISO). The dishwasher will fit perfectly under the kitchen working top.
- Page 20: Troubleshooting tips can save you from calling for service. If the dishwasher doesn't start, check if the fuse is blown or the circuit breaker is tripped. Ensure the power supply is turned on and the dishwasher is securely closed. Low water pressure may indicate the water supply is not connected properly. Make sure the door of the dishwasher is properly closed and latched. A twisted or trapped drain hose can prevent water from being pumped from the dishwasher. Check the filter for clogs if water is not pumped from the dishwasher. A clogged kitchen sink may require a plumber if it is not draining well. Use only special dishwasher detergent to avoid suds. If suds occur, let them evaporate and follow the necessary steps to clear them.
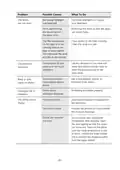
- Page 21: Problem Possible causes What to do Spilled rinse-aid. Always wipe up rinse-aid spills immediately. Stained tub interior Detergent with colourant may have been used. Make sure that the detergent has no colourant. White film on inside surface Hard water minerals. To clean the interior, use a damp sponge with dishwasher detergent and wear rubber gloves. There are rust stains on cutlery The affected items are not corrosion resistant. The items should be corrosion resistant. A spray arm is knocking against an item in a basket Interrupt the program and rearrange the items which are obstructing the spray arm. Rattling noise in the dishwasher Items of crockery are loose in the dishwasher. Interrupt the program and rearrange the items of crockery. Knocking noise in the water pipes This may be caused by on-site installation or the cross-section of the piping. This has no influence on the dishwasher function. If in doubt, contact a qualified plumber. The dishes are not clean The dishes were not loaded correctly. See notes in “Loading & unloading your dishwasher”. The program was not powerful enough. Select a more intensive program.
- Page 22: Problem: The dishes are not clean. Possible causes include not enough detergent dispensed, items blocking the movement of the spray arms, and a dirty or incorrectly fitted filter combination. To resolve these issues, use more detergent or change your detergent, rearrange items for spray arm movement, and clean or fit the filter correctly. Cloudiness on glassware may be caused by a combination of soft water and too much detergent. Use less detergent with soft water and select a shorter cycle for glassware. Black or grey marks on dishes can occur from aluminium utensils rubbing against them. Use a mild abrasive cleaner to eliminate those marks. Improper loading can lead to dishes not drying. Increase the amount of rinse-aid or refill the rinse-aid dispenser. Dishes should not be removed too soon; allow steam to escape and unload the lower basket first.
- Page 23: The dishes aren't drying. Wrong program has been selected. With a short program, the washing temperature is lower, decreasing cleaning performance. Choose a program with a long washing time. Use of cutlery with a low-quality coating. Water drainage is more difficult with these items. Cutlery or dishes of this type are not suitable for washing in the dishwasher.
- Page 24: Loading the baskets according to AS/NZS 2007.1. Upper basket includes cups, saucers, and glasses. Lower basket includes dinner plates, soup plates, and dessert dishes.
- Page 25: Cutlery basket Capacity: 15 place settings Position of the upper basket: lower position Program: ECO Rinse aid setting: 6 Detergent (Pre/main): 5g/28.75g Door is open at the end of the drying cycle for the drying performance test Door position: Open 50 mm
- Page 26: Cutlery rack used tips. Lift the right basket up; both left and right baskets are flat. Move the right basket from right to left; two baskets are overlapping. Remove the right basket from the tray; only the left basket remains.
- Page 27: Premium domain Dishwasher Models: DW60ET Please read the user manual carefully before use Part II: Special version
- Page 28: Using your dishwasher Control panel Preparing and loading dishes Function of the rinse aid and detergent Filling the rinse aid reservoir Filling the detergent dispenser Programming the dishwasher Wash cycle table Starting a cycle wash Error codes
- Page 29: Quick user guide Please read the corresponding content on the instruction manual for detailed operating method. Install the dishwasher. Loading the baskets. Removing the larger residue on the cutlery. Filling the dispenser. Selecting a program and running the dishwasher.
- Page 30: Using your dishwasher Control panel Power button turns on the dishwasher and lights up the screen. Program button selects the appropriate washing program. Function button cancels or selects the automatic door opening. Auto open can be used with specific washing programs. Basket selection allows you to choose between upper or lower basket. Delay button increases the delay start time up to 24 hours. Child lock option prevents accidental operation by children. Start/Pause button initiates or pauses the selected washing program.
- Page 31: Rinse aid indicates the dishwasher is low on rinse aid and requires a refill. The warning icon will be lit when the program ends. The water faucet icon means the water faucet is closed. Auto sensing wash is for lightly or heavily soiled crockery, with or without dried-on food. Intensive is for the heaviest soiled crockery, such as pots and pans. Heavy is for heavily soiled loads, including pots, plates, and glasses. ECO is a standard program suitable for normally soiled loads. Glass is for normally soiled loads that need a quick wash. 90 min is for lightly soiled plates and pans that need a quick wash. Rapid is a shorter wash for lightly soiled loads that do not need drying.
- Page 32: Power wash is for very dirty and hard to clean dishes. It can only be used with Intensive, Heavy, ECO, Glass, and 90 min programs. Express reduces the program time and can only be used with Intensive, Heavy, ECO, Glass, and 90 min programs. Selecting Upper activates only the upper rack nozzle, while the lower nozzle will not work. Selecting Lower activates only the lower rack nozzle, while the upper nozzle will not work.
- Page 33: Preparing and loading dishes Consider buying utensils which are identified as dishwasher-proof. For particular items, select a program with the lowest possible temperature. To prevent damage, do not take glass and cutlery out of the dishwasher immediately after the program has ended. Cutlery with wooden, horn china or mother-of-pearl handles are not suitable. Plastic items that are not heat resistant are not suitable. Some types of glasses can become dull after a large number of washes. Recommendations for loading the dishwasher include scraping off any large amounts of leftover food. For best performance of the dishwasher, follow specific loading guidelines. All utensils should be placed in a way that the spray arms can rotate freely during washing.
- Page 34: Load hollow items such as cups and glasses with the opening facing downwards to prevent water collection. Dishes and items of cutlery must not lie inside one another or cover each other. To avoid damage, glasses should not touch one another. The upper basket is designed for more delicate and lighter dishware. Long bladed knives stored upright are a potential hazard. Long and sharp items of cutlery must be positioned horizontally in the upper basket. Do not overload your dishwasher for good results and reasonable energy consumption. Very small items should not be washed in the dishwasher as they could fall out of the basket. To prevent water dripping, empty the lower basket first, followed by the upper basket. Items will be hot; do not take glass and cutlery out for around 15 minutes after the program has ended.
- Page 35: Loading the upper basket is designed for delicate and lighter dishware such as glasses, coffee and tea cups, and saucers. Position dishes and cookware to avoid movement by the spray of water. Loading the lower basket is recommended for large items and difficult-to-clean items like pots, pans, lids, and serving dishes. Place serving dishes and lids on the side of the racks to avoid blocking the top spray arm. The maximum diameter for plates in front of the detergent dispenser is 19 cm to ensure it can open properly. Cutlery should be placed separately in the cutlery rack to avoid nesting, which may cause poor performance. Do not let any item extend through the bottom and always load sharp utensils with the sharp point down. For the best washing effect, refer to standard loading options in the last section of the manual.
- Page 36: Function of the rinse aid and detergent The rinse aid is released during the final rinse to prevent water from forming droplets on your dishes, which can leave spots and streaks. It also improves drying by allowing water to roll off the dishes. Your dishwasher is designed to use liquid rinse aids. Only use branded rinse aid for dishwasher. Never fill the rinse aid dispenser with any other substances. The regularity of the dispenser needing to be refilled depends on how often dishes are washed. The Low Rinse Aid indicator will be lit when more rinse aid is needed. The chemical ingredients that compose the detergent are necessary to remove, crush and dispense all dirt out of the dishwasher. Use only detergent specifically made for dishwashers use. Dishwasher detergent is corrosive.
- Page 37: Filling the rinse aid reservoir involves removing the cap and pouring the rinse aid into the dispenser without overfilling. After filling, close the cap securely. To adjust the rinse aid reservoir for better drying performance, switch on the appliance and press the Program button within 60 seconds. The rinse aid indication will blink at a frequency of 1Hz. Press the Program button again to select the appropriate setting based on usage habits. The settings change in the sequence: d3, d4, d5, d1, d2, and back to d3. A higher number indicates more rinse aid consumption by the dishwasher. Complete the setup by either not operating for 5 seconds or pressing the Power button.
- Page 38: Filling the detergent dispenser involves sliding it to the right and pressing down. Add detergent into the larger cavity for the main wash cycle. For better cleaning results, especially with very dirty items, pour a small amount of detergent onto the door. The additional detergent will activate during the pre-wash phase. Open the cap by sliding the release catch or by pressing down the release catch. Close the flap by sliding it to the front and then pressing it down. Be aware that settings may differ depending on the soiling of water. Please observe the manufacturer's recommendations on the detergent packaging.
- Page 39: Programming the dishwasher Wash cycle table The table shows which programs are best for the levels of food residue and how much detergent is needed. Description of cycle includes energy consumption, water usage, running time, and detergent requirements. Pre-wash, autowash, rinse, and drying are key components of the wash cycles. Different programs are available based on the type of wash needed, such as intensive or glass. Detergent amounts are specified for each cycle, typically 5/28.75 g for one piece. Energy consumption varies by program, ranging from 0.612 to 1.4 kWh. Water usage for cycles can range from 11 to 195 liters. Running times for the cycles vary, with some programs taking as little as 90 minutes. Rinse-aid dispenser needs to be filled for certain programs. Temperature settings for wash cycles range from 40°C to 70°C.
- Page 40: Description of cycle includes energy consumption, water usage, and running time for various programs. Starting a cycle wash involves loading dishes into the baskets, pouring in detergent, and ensuring the water supply is on. The power button must be pressed to switch on the machine after closing the door. Choosing a program activates the response light, and the Start/Pause button initiates the cycle. Changing the program mid-cycle is only possible if the wash has been running for a short time. If the detergent has been released, the dishwasher must be reset and the detergent dispenser refilled. To reset the dishwasher, pause the wash, cancel the program, select a new program, and restart. The test cycle information is provided for comparability testing in accordance with AS/NZS 2007.1. It is recommended to load the lower basket first, followed by the upper basket. Ensure the power supply and water supply are properly set before starting the cycle.
- Page 41: Forget to add a dish can be addressed before the detergent dispenser opens. To add a forgotten dish, pause the washing by pressing the Start/Pause button. Wait 5 seconds before opening the door to add the forgotten dishes. Close the door and press the Start/Pause button after 10 seconds to restart the dishwasher. It is dangerous to open the door mid-cycle due to hot steam. After washing, the door will open automatically for better drying. The dishwasher door must not be blocked when set to open automatically. Blocking the door can disrupt the door lock functionality.
- Page 42: Error codes indicate malfunctions in the dishwasher. E1 signifies that the faucet is not opened, water intake is restricted, or water pressure is too low. E3 indicates that the dishwasher is not reaching the required temperature due to a malfunction of the heating element. E4 points to an overflow caused by a leak in some element of the dishwasher. E8 suggests a failure of orientation of the distributary valve. E9 indicates touch button adhesion or a failure of communication between the main circuit board and the display circuit board. Ed refers to a failure in the washing control system, which may involve the circuit board or motor. Ec signifies a failure in the communication wiring. If overflow occurs, turn off the main water supply before calling for service. Water in the base pan due to overfill or a small leak should be removed before restarting the dishwasher.
- Page 43: Height (H) is 845mm. Width (W) is 598mm. Depth (D1) is 600mm with the door closed. Depth (D2) is 1175mm with the door opened 90°.
- Page 44: Product fiche Manufacturer Domain Type / Description Standard place settings Energy efficiency class Water consumption class Noise level Power consumption Rated voltage / frequency

Whirlpool WIE 2B19 Dishwasher

FISHER PAYKEL Dishwasher

BOSCH SPS4HMW61E Dishwasher

SUMMIT DW185SSADA Dishwasher

SIEMENS SX63HX60AE Fully Integrated Dishwasher

SIEMENS SMS6HAW00X Dishwasher

AEG FFE83800PM Built-Under Dishwasher

BOSCH SHP9PCL5N Custom Panel Dishwasher

BOSCH SHX5AEM4N 24 Dishwasher

BOSCH SMS24AI01A Free Standing Dishwasher