GE Triton XL Dishwasher


G
E
A
p
p
l
i
a
n
c
e
s
.
c
o
m
O
w
n
e
r
’
s
M
a
n
u
a
l
EDW4000
EDW4060
GSD6200
GSD6300
GSD6600
GSD6660
GSD6700
Safety Instructions . . . . . . . 2, 3
Consumer Support
Consumer Support . . .Back Cover
Product Registration . . . . .13, 14
Warranty . . . . . . . . . . . . . . . . . 15
Operating Instructions
Care and Cleaning . . . . . . . . . 10
Control Panel and Settings . . 4–6
Loading Place Settings . . . . . . . 9
Loading the Racks . . . . . . . . . . 8
Optional Accessories . . . . . . . . .9
Using the Dishwasher . . . . . .6, 7
Troubleshooting Tips . . . 11, 12
W
r
i
t
e
t
h
e
m
o
d
e
l
a
n
d
s
e
r
i
a
l
n
u
m
b
e
r
s
h
e
r
e
:
M
o
d
e
l
#
_
_
_
_
_
_
_
_
_
_
_
_
_
_
_
_
_
_
_
S
e
r
i
a
l
#
_
_
_
_
_
_
_
_
_
_
_
_
_
_
_
_
_
You can find them on the tub wall
just inside the door.
1
6
5
D
4
7
0
0
P
2
3
3
4
9
-
5
9
0
7
-
1
0
9
-
0
1
J
R

| General | Details |
|---|---|
| Name | GE Triton XL Dishwasher |
| Make | GE |
| Language | English |
| Filetype | PDF (Download) |
| File size | 0.75 MB |


GE CGP6030 30 Inch Gas Cooktop with Dishwasher

GE JGP3036 36 Inch Gas Cooktop with Dishwasher
GE PDP755SYV Profile UltraFresh System Dishwasher

GE PDT755SYV Profile UltraFresh System Dishwasher
GE EDW4000 Triton XL Dishwasher

GE GDF510PGR Plastic Interior Dishwasher
GE Triton XL Dishwasher Overview
Summary of Contents
- Page 1: Safety instructions Consumer support Product registration Warranty Operating instructions Care and cleaning Control panel and settings Loading place settings Loading the racks Troubleshooting tips
- Page 2: Important safety information. Read all instructions before using. For your safety, the information in this manual must be followed to minimize the risk of fire or explosion, electric shock, or to prevent property damage, personal injury, or death. Hydrogen gas may be produced in a water heater that has not been used for two weeks or more. If the hot water has not been used for two weeks or more, turn on all hot water faucets and allow them to run for several minutes before using any electrical appliance connected to the hot water system. Use this appliance only for its intended purpose as described in this owner's manual. Proper installation and maintenance are crucial. Improper connection of the equipment-grounding conductor can result in a risk of electric shock. To minimize the possibility of electric shock, disconnect this appliance from the power supply before attempting any maintenance. Do not tamper with controls. Do not allow children to play around the dishwasher when opening or closing the door due to the possibility of small fingers being pinched.
- Page 3: Risk of child entrapment. Junked or abandoned dishwashers are dangerous. Take off the door of the washing compartment or remove the door latch keeper before disposal. Do not wash non-dishware items in your dishwasher. Contents washed in the anti-bacteria cycle may be hot to the touch. Use only recommended detergents and keep them out of reach of children. Do not touch the heating element during or immediately after use. Do not operate your dishwasher unless all enclosure panels are properly in place. Close supervision is necessary if the appliance is used by or near children. Load sharp knives with the handles up to reduce the risk of cut-type injuries.
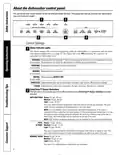
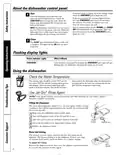
- Page 4: about the dishwasher control panel. you can locate your model number on the tub wall just inside the door. throughout this manual, features and appearance may vary from your model. the status display tells you what’s happening while the dishwasher is in operation and may flash, indicating a malfunction. the lights will come on to indicate the sequence of operation the dishwasher is in. the light remains on until the door is opened. the clean light will remain on until the door is opened. the extra clean sensor selection has been selected. this cycle may not remove burned-on foods. everyday dishes are safe to be used in this cycle.
- Page 5: This cycle is for everyday dishes and glassware. This cycle is for heavily soiled china and crystal. This cycle is for lightly soiled china and crystal. Do not use detergent with this cycle. This washer is equipped with an extra clean sensor with automatic temperature control; therefore cycle length and time may vary depending on soil and temperature conditions. Only the anti-bacteria cycle has been designed to meet the requirements of Section 6, NSF 184 for soil removal and sanitization efficacy. This option must be selected prior to starting the cycle. This option adds 16 minutes to the cycle time. You can delay the start of a wash cycle for up to 8 hours. If you forget to fully close the door, a reminder signal will be emitted until you do so.
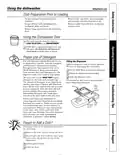
- Page 6: About the dishwasher control panel. Touch the pad to begin the cycle. Close the dishwasher door and select the cycle and desired enhancements. The dishwasher remembers your last cycles so you don’t have to reprogram each time. The clean light is illuminated when a wash cycle is complete. Check the water temperature; it should be at least 120°F and not more than 150°F. Use Jet-Dry rinse agent to remove spots and prevent new film buildup. The rinse agent dispenser holds 3.5 oz. of rinse agent. The amount of rinse agent released into the final wash can be adjusted. If there are rings of calcium spots on dishes, try a higher rinse agent setting.
- Page 7: Using the dishwasher No pre-rinsing of normal food soil is required. Remove leafy vegetables, meat trimmings, and excessive amounts of grease or oil. Scrape off hard soils, including bones, toothpicks, skins, and seeds. Remove acidic food soils that can discolor stainless steel. The door must be closed to select a load selection or an enhancement. If the door is opened during a cycle and left open, the dishwasher will be on cease every minute until the door is closed. Use only detergent specifically made for use in dishwashers. Fill the main wash section with detergent and fill the pre-wash section if needed. It is normal for the cover to open partially when dispensing detergent. A forgotten dish can be added any time before the main wash.
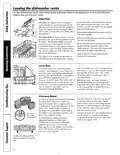
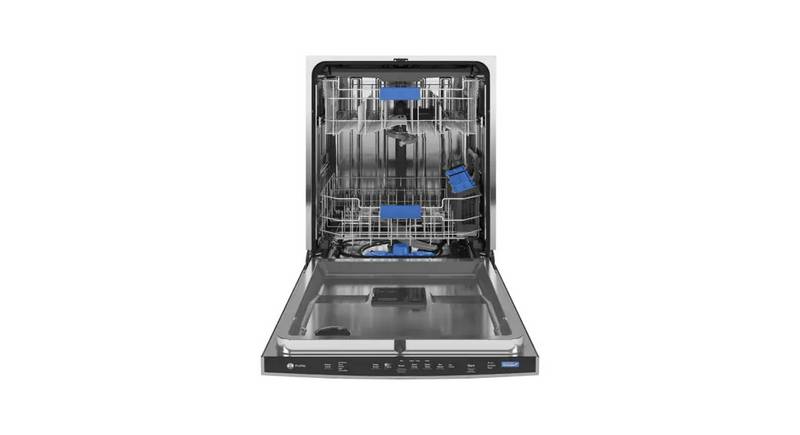
- Page 8: Loading the dishwasher racks is essential for best dishwashing results. Follow the loading guidelines provided. Upper rack items should be placed face down, with flexibility for extra-large items. The upper rack is suitable for glasses, cups, and saucers, but pots and pans can also be effectively cleaned here. Cups and glasses fit best along the sides, and it is a secure place for dishwasher-safe plastics. The utility shelf may be adjusted for added flexibility. The lower rack is best for plates, saucers, and cookware, with large items placed along the left-hand side. The soiled side of items should face the center of the rack to ensure effective cleaning. Fold-down tines provide flexibility for loading oversized items in the lower rack. The silverware basket is designed to fit on the right side of the lower rack, with removable ends for loading flexibility. To load flatware, place knife handles up and mix utensils to prevent nesting.
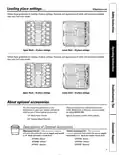
- Page 9: Follow these guidelines for loading 10 places settings. Features and appearance of racks and silverware baskets may vary from your model. Upper rack — 10 places settings. Lower rack — 10 places settings. Follow these guidelines for loading 12 places settings. Features and appearance of racks and silverware baskets may vary from your model. Trupper rack — 12 places settings. Lower rack — 12 places settings. About optional accessories. Specify accessory number when ordering. This accessory contains a 1/4 thick decorative wood door. This accessory is for you to supply trim and install a 3/4 thick decorative wood door.
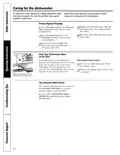
- Page 10: Caring for the dishwasher. To prevent freezing, drain water from the water inlet line and water valve. If your dishwasher is left in an unheated place during the winter, ask a service technician to reconnect the water inlet line to the water valve. Cut off electrical power to the dishwasher. Turn off the water supply and disconnect the water inlet line from the water valve. An air gap protects your dishwasher against water backing up into it if a drain clogs. The air gap is easy to clean. Check the air gap anytime your dishwasher isn't draining well. The stainless steel panels can be cleaned with a similar product using a clean, soft cloth. You can order stainless steel magic through GE Parts.
- Page 11: Before you call for service, review the charts on the following pages, or visit GEAppliances.com. You may not need to call for service. Troubleshooting tips save time and money. Time too long between each pad must be touched within 30 seconds of the others. Some of the sounds you’ll hear are normal. A small amount of clean water around the outlet on the tub bottom at the back of the tub keeps the water seal lubricated. If you do not use your dishwasher often, set it to fill and pump out once every week. Use only automatic dishwasher detergents to avoid sudsing. Always wipe up rinse agent spills immediately. Some detergents contain colorant that will discolor the tub interior with extended use. Make sure inlet water temperature is correct.
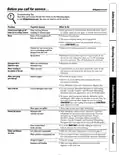
- Page 12: Before you call for service… Problem possible causes What to do Extremely hard water Use Jet-Dry rinse agent to remove spots and prevent new film buildup. Low inlet water temperature Make sure inlet water temperature is correct. Overloading the dishwasher Improper loading can cause issues. To remove stubborn spots and pre-existing film from glassware: 1. Remove all metal utensils from the dishwasher. 2. Do not add detergent. 4. Start the dishwasher and allow to run for 18 to 22 minutes. 5. Open the door and pour 2 cups of white vinegar into the bottom of the dishwasher. 6. Close the door and allow to complete the cycle. Combination of soft water and too much detergent Use less detergent if you have soft water. An overall yellow or brown film can be caused by iron deposits in water. A special filter in the water supply line is the only way to correct this problem. To clean the interior, apply dishwasher detergent to a damp sponge. Wear rubber gloves. Dishwasher won't run Replace fuse or reset circuit breaker. Try resetting the START/RESET pad. Steam is normal Steam comes through the vent by the door latch during drying and when water is being pumped out.
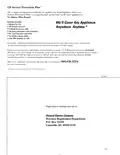
- Page 13: GE offers Service Protection Plus, comprehensive protection on all appliances, regardless of brand. Benefits include unlimited service calls, all parts and labor costs included, and no out-of-pocket expenses. There are no hidden deductibles and one 800 number to call for service. You will be completely satisfied with the service protection or may request your money back on the remaining value of your contract. Protection covers various appliances like refrigerators, dishwashers, washers, dryers, and more. Emergency service is included at no extra charge, and low monthly financing is available. Coverage includes icemaker protection and food spoilage protection. All brands are covered, up to 20 years old, in the continental U.S. Place your confidence in GE for appliance protection. For more information, call the toll-free number provided.
- Page 14: Consumer Product Ownership Registration Thank you for purchasing our product and placing your confidence in us. Follow these three steps to protect your new appliance investment. Complete and mail your Consumer Product Ownership Registration today. Store this document in a safe place. It contains information you will need should you require service. Read your Owner’s Manual carefully. It will help you operate your new appliance properly. Have the peace of mind of knowing we can contact you in the unlikely event of a safety modification. If you did not get a registration card with your product, detach and return the form below to ensure that your product is registered.
- Page 15: Warranty information for the dishwasher is provided. GE will replace any part of the dishwasher that fails due to a defect in materials or workmanship within one year. During this warranty period, you will be responsible for any labor or in-home service costs. A five-year limited warranty covers specific components, with similar conditions regarding defects. GE will also provide free labor and in-home service to replace defective parts. The warranty does not cover service trips to teach users how to operate the product. Damage caused by accidents, improper installation, or misuse is not covered. Cleaning or servicing of the air gap device in the drain line is excluded from coverage. The warranty does not include the cost of shipping or service calls. Consult your local consumer affairs office or attorney general for additional rights.
- Page 16: Have a question or need assistance with your appliance? Try the GE Appliances Website 24 hours a day, any day of the year. Expert GE repair service is only one step away from your door. GE supports the Universal Design concept—products, services and environments that can be used by people of all ages, sizes and capabilities. Purchase a GE extended warranty and learn about special discounts that are available while your warranty is still in effect. Individuals qualified to service their own appliances can have parts or accessories sent directly to their homes. Instructions contained in this manual cover procedures to be performed by any user. Caution must be exercised, since improper servicing may cause unsafe operation. If you are not satisfied with the service you receive from GE, contact us on our Website with all the details. Register your new appliance on-line—at your convenience! Timely product registration will allow for enhanced communication and prompt service under the terms of your warranty.

Whirlpool W2I HD526 Dishwasher

SUB ZERO DW2450 Dishwasher

Electrolux ESM48311SX Free Standing Dishwasher

BOSCH SMV4HTX03E Dishwasher

Miele M.-Nr. 12 506 420 Dishwasher

BOSS W11706919 Bult In Dishwasher

FISHER AND PAYKEL DD24SDFTX9 N Tall Dish Drawer Dishwasher

Fisher and Paykel DW60UD6X Built-Under Dishwasher

kogan KABNCHTPDWA Benchtop Dishwasher

FISHER and PAYKEL DD60STX6I1 Tall Dishwasher