
Hoover 32901787 Dishwasher












User Manual
Dishwasher
EU


| General | Details |
|---|---|
| Name | Hoover 32901787 Dishwasher |
| Make | Hoover |
| Language | English |
| Filetype | PDF (Download) |
| File size | 3.63 MB |
 (1 votes, average: 5.00 out of 5)
 Loading...

HOOVER HI 3E9E0S Dishwasher

HOOVER HV-D13SS 13 Place Dishwasher

HOOVER HI 4E7L0S-80 Semi Integrated Dishwasher

Hoover 32901787 Dishwasher Overview
Summary of Contents
- Page 1: Page 1
- Page 2: Safety and warnings Product description Control panel Programme First use Loading suggestions Setting a wash Delayed start Keylock Daily use
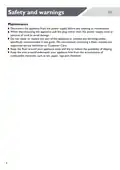
- Page 3: Safety and warnings The appliance is designed for domestic use inside the house or in similar applications. It is not intended for commercial or industrial use. Changes or modifications to the device are not allowed. This product meets the requirements of all applicable EC directives. Follow basic precautions to minimize the risk of fire or explosion. Use the Dishwasher only for its intended function as described in this guide. Use only detergents or rinse aid recommended for use in a domestic dishwasher. When loading items, locate sharp items to avoid damage and reduce the risk of cut injuries. Do not touch the filter plate in the Dishwasher base during or immediately after use. Do not operate your Dishwasher unless all enclosure panels are properly in place.
- Page 4: Safety and warnings The foldaway cup racks are designed to support cups, glasses, and kitchen utensils. Do not lean on or use the foldaway cup racks to support your body weight. To reduce the risk of injury, do not allow children to play in or on the Dishwasher. Hydrogen gas may be produced in a hot water heater system that has not been used for two weeks or more. Remove the door to the washing compartment when removing an old Dishwasher from service or discarding it. Some dishwasher detergents are strongly alkaline and can be extremely dangerous if swallowed. The Dishwasher must be used with the filter plate, filter, and spray arms in place. Household appliances are not intended to be used by children. If a dishwasher cleaner is used, we recommend running a wash program with detergent immediately afterward. The Dishwasher is designed for washing normal household utensils.
- Page 5: Safety and warnings This dishwasher must be installed and located in accordance with the installation instructions before it is used. Installation and service must be performed by a Haier trained and supported service technician. If the power supply cord is damaged, it must be replaced by a qualified trades person to avoid a hazard. Ensure the dishwasher is secured to adjacent cabinetry using the brackets provided. Do not operate this appliance if it is damaged, malfunctioning, partially disassembled or has missing or broken parts. Do not store or use petrol or other flammable vapours and liquids in the vicinity of the dishwasher. Connect to a properly rated, protected and sized power supply circuit to avoid electrical overload. This appliance must be grounded to reduce the risk of electric shock. Do not modify the plug provided with the appliance; if it will not fit the outlet, contact a qualified electrician. If the dishwasher is installed as a permanently connected appliance, it must be connected to a grounded metal, permanent wiring system.
- Page 6: Safety and warnings Disconnect the appliance from the power supply before any cleaning or maintenance. When disconnecting the appliance, pull the plug rather than the power supply cord. Do not repair or replace any part of the appliance unless specifically recommended in this guide. We recommend contacting a Haier trained and supported service technician or Customer Care. Keep the floor around your appliance clean and dry to reduce the possibility of slipping. Keep the area around and underneath your appliance free from the accumulation of combustible materials.
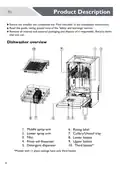
- Page 7: Product description Ensure the installer has completed the ‘Final checklist’ in the Installation instructions. Read this guide, taking special note of the 'Safety and warnings' section. Remove all internal and external packaging and dispose of it responsibly. Recycle items that you can. Dishwasher overview Middle spray arm Lower spray arm Filter Rating label Cutlery/Utensil tray Lower basket Rinse aid dispenser Detergent dispenser Upper basket Third basket* *Models with 11 place settings have only third basket.
- Page 8: Control panel features include various icons such as ON/OFF, WiFi indicator, and START/RESET. The time and info display shows relevant information during selection, including programme cycle time and error codes. After starting an operation, the display shows remaining time without flashing. Remaining time for delayed programme starts is displayed in hours. The remaining programme cycle time is shown in hours and minutes. The displayed time may vary based on local conditions and daily working load.
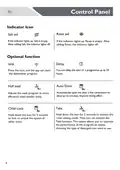
- Page 9: Control panel Indicator icon Rinse aid If the indicator lights up: Salt is empty. After adding salt, the indicator lights off. If the indicator lights up: Rinse is empty. You can delay the start of a programme up to 24 hours. Automatically open the door a few centimeters to allow air to circulate. Hold down the icon for 5 seconds to activate the user setting mode. This option allows you to optimize the performance of the program by simply choosing the type of detergent you want to use.
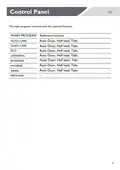
- Page 10: Control panel The main program matched with the optional function. Wash program Additional function Auto care Glass care Eco Universal Intensive Hygiene
- Page 11: Your dishwasher has a number of wash programs designed to suit your needs. Selecting the most appropriate cycle for each load will help ensure the best wash results. P1 AUTO CARE: Suitable for any type of load. The dishwasher automatically selects the optimum wash program for lightly soiled and heat sensitive crockery and glassware such as wine glasses. P2 GLASS CARE: For normally soiled dishes for optimum water and energy usage. P3 ECO: Best for dishes that are quite heavily soiled or to remove food soils that have been left to dry overnight. P4 UNIVERSAL: Designed for heavily soiled pots, pans and dishes. P5 INTENSIVE: Designed for disinfection and sterilization, suitable for all kinds of tableware. P6 HYGIENE: Use for dishes that are quite heavily soiled or food soils that have been left to dry overnight. P7 59MIN: Pre-wash prevents odours and soils from dishes. The appliance senses the type of soil and the quantity of items in the baskets. It automatically adjusts the temperature and quantity of water, energy consumption and programme duration. Use this programme to quickly rinse the dishes. This prevents the remaining food from bonding on the dishes and bad odours from coming out of the appliance. Do not use detergent with this programme.
- Page 12: First use The combination of high temperatures and dishwasher detergent may cause damage to some items. Most glassware is dishwasher safe. Crystal, very fine and antique glassware may etch and develop a cloudy appearance. Some plastics may change shape or colour with hot water. Dishwasher safe plastic should be weighed down. Most modern china patterns are dishwasher safe. Antique items may be more sensitive to machine washing. Rinse cutlery and silverware immediately after use to prevent tarnishing. Silver should not come into contact with stainless steel. Aluminium can be dulled by detergent. The degree of change depends on the quality of the detergent or aluminium. Iron and cast iron can rust and stain other items. Copper, pewter and brass tend to stain. Woodware is generally sensitive to heat and water. Regular use in the dishwasher may cause deterioration over time. Hard water can be detrimental to the performance of your dishwasher and parts can fail over time. If your home has hard water, we recommend fitting a water softener to the household water supply.
- Page 13: When loading your dishwasher, ensure items are placed so water can reach all areas. Your dishwasher can hold up to a maximum of 11 place settings. Lower and middle spray arms should rotate freely. Tall items must not obstruct the upper spray arm. Glass and other fragile items should be stable. All dish openings should face downwards. Plates should be evenly spaced. Sharp objects must be located securely to avoid injury or damage. Avoid overcrowding. Prevent any protrusions that may obstruct spray arm rotation.
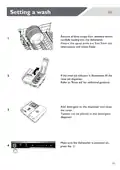
- Page 14: Setting a wash involves removing all food scraps from dishware before loading into the dishwasher. Ensure the spray arms are free from obstructions and rotate freely. If the rinse aid indicator is illuminated, fill the rinse aid dispenser. Refer to 'Rinse aid' for additional guidance. Add detergent to the dispenser and close the cover. Tablets can be placed in the detergent dispenser. Make sure the dishwasher is powered on.
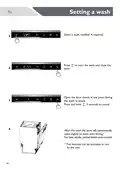
- Page 15: Setting a wash Select a wash modifier if required. Press door to start the wash and close the door. Open the door slowly at any point during the wash to pause. Press and hold for 3 seconds to cancel. After the wash, the door will automatically open slightly to assist with drying. For best results, unload dishes once cooled. This function can be activated or not by the user.
- Page 16: Delayed start allows you to set your dishwasher to start later in the day. It can be set for up to 24 hours after selecting a wash program. To set delayed start, add detergent and select a wash program and wash modifier if needed. Press to enter delayed start and increase the delay time. For 0-4 hours, the time increases or decreases by 30 minutes with each press. For 4-24 hours, the time increases or decreases by 1 hour with each press. The wash program will begin at the end of the countdown if the door is closed. Opening the door will pause the delayed start. Closing the door will continue the delayed start. To cancel delayed start, open the door and press and hold for 15 seconds.
- Page 17: Keylock Lock the dishwasher controls for cleaning or to prevent unintended use. Press and hold for 5 seconds to lock the dishwasher controls. Before locking the controls, running the program. After locking, except for the unlocking and turn off operation, other functions are not available. Press and hold for 5 seconds to unlock.
- Page 18: Preferences allow you to adjust settings prior to starting a wash cycle. You can modify the language setting according to your preference. The default language is set to English. Tablet settings can be adjusted based on your needs. Rinse aid controls the amount dispensed and further details can be found in the relevant section. The buzzer setting adjusts tone settings, with options to silence all tones except fault alerts. There is a program memory function to remember the last used program. To change settings, ensure there is no wash in progress. Press and hold a specific button for 5 seconds to enter the menu. Follow the prompts to scroll through, select, and adjust settings before saving and exiting.
- Page 19: Water softening system To ensure good washing results, the dishwasher requires soft water. Hard water can be detrimental to the performance of your dishwasher. Over time, glassware washed in hard water will become opaque and dishes will become spotted or covered in a white film. Using very hard water can cause dishwasher parts to fail over time. Salt can improve the situation. Adjusting the water softening system The amount of salt dispensed can be set in So1 and So6 stages, depending on the hardness of your water. Find out about the hardness value of your tap water. Your water utility company will help you with this. Setting can be found in the water hardness table. Identify the local water hardness.
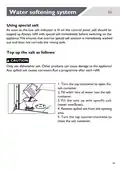
- Page 20: Water softening system Using special salt As soon as the low salt indicator is lit on the control panel, salt should be topped up. Always refill with special salt immediately before switching on the appliance. This ensures that overrun special salt solution is immediately washed out and does not corrode the rinsing tank. Only use dishwasher salt. Other products can cause damage to the appliance. Any spilled salt causes corrosion. Run a programme after each refill. Turn the cap clockwise to open the salt container. Fill with 1 litre of water into the salt container. Fill the tank up with specific salt (water overflows). Remove spilled salt from the opening area.
- Page 21: Detergent warning: Dishwasher detergents are strongly alkaline and can be extremely dangerous if swallowed. Avoid contact with skin and eyes, and keep children and infirm persons away from the dishwasher when it is open. Check the powdered detergent dispenser is empty after each wash. Unsuitable detergents include hand washing liquids, laundry detergents, soaps, and disinfectants. For powdered detergent quantities, refer to the 'Powdered detergent quantity recommendations' table and the detergent manufacturer’s guidance. Check that the main wash compartment dispenser is empty and dry before adding powdered detergent or tablets. Remove any excess detergent from the pre-wash compartment and slide the cover closed. If required, add additional detergent to the pre-wash compartment. When washing heavily soiled dishware in hard water, more detergent may be required.
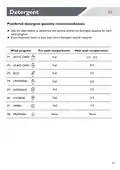
- Page 22: Detergent quantity recommendations are provided for optimal use in various wash programs. The amount of detergent needed may increase if hard water is present. Different wash programs include AUTO CARE, GLASS CARE, ECO, UNIVERSAL, INTENSIVE, HYGIENE, 59MIN, and PREWASH. Specific quantities for the pre-wash and main wash compartments are listed for each program. For AUTO CARE, the full amount is recommended for the pre-wash compartment and 2/3 for the main wash compartment. GLASS CARE suggests 2/3 for the pre-wash and 1/2 for the main wash. ECO and UNIVERSAL programs recommend full amounts for both compartments. INTENSIVE and HYGIENE programs do not require detergent for the pre-wash compartment. The 59MIN program also does not require detergent for the pre-wash compartment. The PREWASH program has specific recommendations for detergent use.
- Page 23: Rinse aid provides a streak-free finish to glass and dishware as well as preventing metal from tarnishing. We recommend using a liquid rinse aid regularly for optimal drying results. The rinse aid dispenser is located on the inside of the door next to the detergent dispenser. The amount of rinse aid dispensed in each wash may need to be adjusted to suit your water conditions. Rinse aid is not required if the tablet has it already built into it. When the rinse aid level is low, the rinse aid indicator on the control panel will light up to remind you to refill the dispenser. Do not fill past the MAX line. Any accidental spillages into the dishwasher or detergent bucket must be cleaned up immediately. Spilt rinse aid may result in excessive foaming. A service call relating to these errors will not be covered by warranty.
- Page 24: Daily use involves loading the baskets correctly. Ensure delicate glasses and porcelain are labeled dishwasher-proof. Avoid placing items made of wood, horn, aluminum, pewter, and copper in the appliance. Do not wash items that can absorb water, such as sponges and household cloths. Only use the appliance for dishwasher-safe items. Remove remaining food from items before washing. Soften burned food on items prior to washing. Position hollow items with the opening down and deep hollows at a slanted angle. Mix spoons with other cutlery to prevent bonding. Ensure cutlery and dishes have gaps between them and do not touch each other.
- Page 25: The upper basket is designed to hold items like glasses, cups, saucers, plates, small bowls, and shallow pans. Adjust the height to suit or fold out of the way to make space for other items. Use the notches to support wine glass stems. Folding and support can be achieved by flipping. Before you adjust its height, make sure the basket is empty. Remove and replace components such as end caps, rollers, and rails.
- Page 26: Daily use Cutlery basket Place cutlery with the handles down for better washing results. If long items may block the spray arms, find a horizontal positioning in the upper basket. Cutlery/utensil tray Use the tray to secure cutlery and utensils. Place cutlery into the notches to secure. Place larger utensils in the middle of the tray. Flip side sections to the middle to create more space for items below.
- Page 27: Wi-Fi connection allows your appliance to connect to your home wireless network. You can control the appliance remotely using the app. Ensure your home Wi-Fi network is turned on before starting. Step-by-step guidance is provided for both the appliance and mobile device. It may take up to 10 minutes to connect your appliance. For further guidance and troubleshooting, refer to the app. To connect to your home Wi-Fi, follow the prompts in the app. When the machine is connected with the app, remote control is automatically activated. You can control the dishwasher program through the app, including selecting, canceling, or pausing a cycle. Press the Wi-Fi button on the machine to start a program via the app each time.
- Page 28: Maintenance requires disconnecting the dishwasher from the power supply and allowing it to cool before cleaning. The dishwasher features a filter, filter plate, and lower spray arm. Cleaning surfaces should be done with a damp cloth and a lint-free cloth; avoid using abrasive or solvent cleaners. The drain filter and filter plate should be cleaned monthly or when food particles are present. Lower and middle spray arms can be shaken to remove debris and cleaned in hot water. The dishwasher must be used with the filter plate, drain filter, and spray arms correctly in place. For extended periods of disuse, turn off the power and water supply, leaving the dishwasher clean and empty with the door ajar. Before using the dishwasher after a long period, pour 3 cups of water into it to lubricate components.
- Page 29: Maintenance Removing and cleaning the filter Twist the filter anti-clockwise to release. Lift to remove. Separate the filter cap from the base by pressing the release buttons and lifting. Do not attempt to remove the filter by force as this may cause damage. Clean under hot water and rinse thoroughly. Replacing the filter Align the filter cap with the notch on the filter base. Ensure that the buckle structure is in place. Place the drain filter back into the dishwasher base. Rotate clockwise to click into place.
- Page 30: Maintenance Removing and cleaning the filter plate With the filter removed, carefully lift the filter plate up and out. Clean under hot water and rinse thoroughly. Replacing the filter plate Slot the filter plate under the locating clips at the rear of the drain and push firmly back into place. Ensure the filter plate is flush with the dishwasher base. Cleaning the top spray arm Do not remove the top spray arm for cleaning. Clean with a small, plastic-bristled brush. If heavily soiled or blocked use a dishwasher cleaner/descaler. Follow the manufacturer’s instructions. Cleaning the middle spray arm To remove the middle spray arm, turn the locking nut clockwise to release. Rinse the spray arm thoroughly under running water, then refit.
- Page 31: Maintenance Cleaning the lower spray arm To remove the lower spray arm, lift it from the base of the dishwasher. Rinse the spray arm thoroughly under running water, then refit. Ensure the arm rotates freely when refitted. Winterizing (cold climates) If the dishwasher is installed in a cold climate where temperatures fall below zero, we recommend winterizing. Turn off the water supply. Disconnect the drain hoses from the sink drain pipe and the water inlet pipe from the water valve. Drain the water from the hoses, inlet pipe, and water valve, using a bucket or pan to collect the water. Reconnect the water inlet pipe to the water valve and hoses to the sink drain pipe. Remove the drain filter and the filter plate.
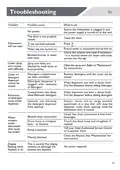
- Page 32: Troubleshooting No power. Ensure the dishwasher is plugged in and the power supply is turned on at the wall. Dishwasher will not start. The door is not properly closed. Close the door. Water tap not turned on. Ensure water is connected and turned on. Blocked strainer in water inlet hose. Check the strainer and clean if necessary. Lower spray arm rotates with difficulty. Spray arm holes are blocked by small items or food particles. Clean the spray arm. Detergent compartment has been overfilled. Remove detergent until the cover can be closed. Detergent dispenser is clogged with remnants of detergent. Wipe dispenser out with a damp cloth. Utensils are blocking the detergent dispenser from opening. Ensure there are no large utensils positioned in a way that will stop the dispenser cover from opening. Blocked drain connection. Check that drain connection is free from blockages. Pump is jammed. Clean the filter(s). See 'Maintenance' for instructions.
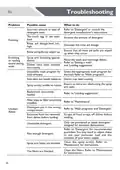
- Page 33: Troubleshooting Incorrect amount or type of detergent used. Refer to 'Detergent' or consult the detergent manufacturer’s instructions. Too much egg in the wash load. Increase the amount of detergent. Foaming may occur if rinse aid dosage level is too high. Decrease the rinse aid dosage and ensure that all rinse aid spills are wiped up. Knocking or rattling sound during wash may be caused by the spray arm knocking against dishes. Pause the wash and rearrange dishes. Unsuitable wash program for load selected. Select the appropriate wash program for the load and refer to 'Wash programs'. Dishes may need soaking if soils were too heavily baked on. Ensure no items are obstructing the spray arm path. Unclean dishes may result from excessive food not removed from dishes before loading. Scrape all food scraps off dishes before loading. Only use powdered or tablet detergent designed for domestic dishwashers. Refer to 'Detergent' for recommended quantities. Not enough detergent may lead to unclean dishes. You may need to adjust detergent quantities to suit your particular load and the hardness of your water supply. Spray arm holes may be blocked. Clean the spray arm(s) and refer to 'Maintenance' for instructions.
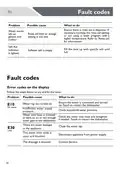
- Page 34: Troubleshooting Plastic items are discoloured (e.g. stain left by tomato sauce). Pre-rinse plastic dishes before placing in the dishwasher and/or add more detergent. The dishwasher stops suddenly during the wash. Check the power and water supplies. White stains are left on dishes; glasses have a milky appearance. Increase rinse aid dosage. Dishes and cutlery have not dried. Items removed too soon or rinse aid dispenser empty. Glasses have dull appearance. Increase rinse aid dosage. Tea stains or traces of lipstick have not been completely removed. Select a wash program for heavily soiled dishes. Traces of rust on cutlery. Cutlery is not sufficiently rustproof. Glasses clouded and discoloured; milky coating. Increase detergent quantities.
- Page 35: Fault codes Error codes on the display Follow the steps below to try and fix the issue. Water marks left on glasses and cutlery Rinse aid level or dosage setting is too low. Ensure there is rinse aid in dispenser. No water Insufficient water supply pressure. Check household water pressure. Leak The water inlet valve is open and blocked. Disconnect appliance from power supply.
- Page 36: EU standards test. The program has auto-door opening function by default. Wash programme. Powder detergent quantities. Rinse aid dosage level. Maximum number of place settings. Ensure the upper basket is in its lower most position. Height adjustment of upper basket. Recommended loading patterns. Cutlery/utensil tray.
- Page 37: - The program has an auto-door opening function by default. - Wash programme details are provided. - Powder detergent quantities are specified. - Rinse aid dosage level is indicated. - The maximum number of place settings is mentioned. - Main wash quantity is 18g. - Rinse aid dosage levels range from R1-R4, with R3 as the default. - The upper basket should be in its highest position. - Height adjustment of the upper basket is discussed. - Recommended loading patterns for both upper and lower baskets are included.

TECO TDW09WAM Dishwasher

Electrolux EEG58600LX Built Under Dishwasher

FISHER PAYKEL DD60D2HNX9 Built Under Dishwasher

FISHER PAYKEL DD24DT2NX9 Built-Under Dishwasher

Electrolux EET43200LX Dishwasher

COVE DW2451-ADA Dishwasher

Fisher Paykel DW60CSX1 FP AA Dishwasher

Centerline CDH ML-130374 Commercial Dishwasher

LG LSDT990 Dishwasher

BOSCH SMS6ZCI10G Dishwasher