HOOVER HV-D13SS 13 Place Dishwasher


13 Place Dishwasher
Stainless Steel / Dark Stainless Steel
Model Numbers: HV-D13SS / HV-D13DSS
INSTRUCTION MANUAL
AFTER SALES SUPPORT
(AU) 1300 886 649 (NZ) 0800 836 761

| General | Details |
|---|---|
| Name | HOOVER HV-D13SS 13 Place Dishwasher |
| Make | Hoover |
| Language | English |
| Filetype | PDF (Download) |
| File size | 1.42 MB |


HOOVER HI 3E9E0S Dishwasher

Hoover 32901787 Dishwasher

HOOVER HI 4E7L0S-80 Semi Integrated Dishwasher

HOOVER HV-D13SS 13 Place Dishwasher Overview
Summary of Contents
- Page 1: Place dishwasher Stainless steel / dark stainless steel Model numbers: HV-D13SS / HV-D13DSS Instruction manual After sales support
- Page 2: General safety instructions Product overview Installation Features Instructions FAQs and troubleshooting guide Other useful information After sales support
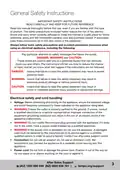
- Page 3: General safety instructions Read this manual thoroughly before first use, even if you are familiar with this type of product. The safety precautions enclosed herein reduce the risk of fire, electric shock and injury when correctly adhered to. Always follow basic safety precautions and accident prevention measures when using an electrical appliance. Pay particular attention to safety messages that follow the words: DANGER, WARNING and CAUTION. DANGER means that failure to read this safety statement may result in severe personal injury. WARNING means that failure to read this safety statement may result in extensive product damage or serious personal injury. CAUTION means that failure to read this safety statement may result in minor or moderate personal injury, property or equipment damage. Before connecting and turning on the appliance, ensure the electrical voltage and circuit frequency correspond to those indicated on the appliance rating label. Ensure the outlet is properly earthed to the ground. Do not modify the cord and plug provided with the appliance; if it does not fit the outlet, have a proper outlet installed by a qualified electrician.
- Page 4: General safety instructions Inserting/removing the plug: Before you insert or remove the plug, make sure the appliance is switched off and the power is switched off at the electrical outlet. CAUTION! To reduce the risk of electric shock, do not immerse the unit, cord or plug in water or other liquid. Auto switch off: To save energy, in standby mode the appliance will switch off automatically when there is no operation in 30 minutes. RCD: We recommend installing a residual current device for additional safety protection when using electrical appliances. Winding the cord: If winding the power cord, avoid tight bends as this could damage the cord. Installation WARNING! If this dishwasher is installed incorrectly, the warranty will be voided. Power supply cord: During installation, the power supply cord must not be excessively or dangerously bent or flattened. Safe disposal: When removing an old dishwasher from service or discarding it, remove the door to the washing compartment. Hose sets: Only use new hose sets when connecting this dishwasher to the water supply; do not reuse old hoses. Proper installation: Install the dishwasher on an even, flat and stable ground.
- Page 5: General safety instructions Children should be supervised to ensure they do not play with the appliance. Close supervision is necessary when any appliance is used by or near children. Never leave the appliance unattended while in use. Do not abuse, sit on or stand on the door or dish rack of the dishwasher. Open the door very carefully if the dishwasher is operating as there is a risk of water squirting out. Do not overload this dishwasher, it has a maximum capacity of 14 place settings. Knives and other utensils with sharp points must be loaded in the basket with their points down. Use only detergent and rinse additives designed for an automatic dishwasher. Some dishwasher detergents are strongly alkaline and can be extremely dangerous if swallowed. Unplug before cleaning and performing maintenance on the appliance.
- Page 6: Product overview Scope of delivery Dishwasher: front view, open Worktop Upper basket with racks Upper spray arm Lower basket Lower spray arm Filters Detergent and rinse-aid dispenser Cutlery basket (removable) Salt dispenser Upper basket tray latch Rating plate Control panel Please note: The colour of the dishwasher pictured above may be different to that of the dishwasher received. This picture is included for reference only.
- Page 7: Product overview Active drying unit helps provide better drying performance for your dishes. Instruction manual, quick start guide, and warranty card are included. Images and illustrations in this manual may vary slightly from the product purchased. All images in this manual are for reference purposes only. Parts are not necessarily pictured to scale. After sales support is available for assistance.
- Page 8: Product Overview Control panel Operation buttons/indicators Press this button to enter or exit the ready-to-use state. This button allows you to switch to the half-load function, and/or the tablet detergent function. Press this button repeatedly to increase the delay start time. You can delay a cycle for up to 19 hours in one-hour increments. Press this button to select the hygiene, extra rinsing or extra drying functions. The hygiene function will change the temperature and time of the program to offer a more hygienic wash. Press this button to select the appropriate washing program. Use this button to start/pause a program. These lights will indicate the stage of the program; washing, rinsing, drying and end. This light will illuminate to indicate that the machine is switched on.
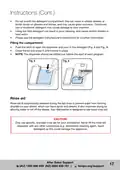
- Page 9: Installation Make sure your electrical power is disconnected before installing the dishwasher. Failure to do so can result in death or electric shock. Make sure to use new water supply and drain hoses; do not use old hoses. Read this manual to familiarize yourself with all parts and operating principles. Pay particular attention to the safety instructions. Unpack the appliance but keep all packaging materials until you have made sure your new dishwasher is undamaged and in good working order. Plastic wrapping can be a suffocation hazard for babies and young children, so ensure all packaging materials are out of their reach, and dispose of them safely. Using the loading instructions on pages 20–24 for guidance, make sure all parts in the upper and lower baskets are properly installed inside the dishwasher. This dishwasher is freestanding. It can also be recessed under a single benchtop. Position the dishwasher close to an existing water inlet and drain connection and make sure there is a power point nearby. Leave an adequate distance around the machine to allow ease of cleaning. Do not position in an area where the ambient temperature falls below 0°C.
- Page 10: Installation (Cont.) Levelling the appliance Position the dishwasher on a level and sturdy floor. If the floor is uneven, adjust the adjustable feet until it reaches a horizontal position. The appliance should not be inclined more than 2°. Correctly levelled, the appliance will be more stable and much less likely to move or cause vibrations and noise during operation. Freestanding installation The height of the dishwasher, 850 mm, has been designed to allow the machine to be fitted between existing cabinets of the same height in modern fitted kitchens. The feet can be adjusted so that the correct height is reached. If you wish to fit the machine under an existing countertop, there must be sufficient space to do so. The existing countertop must be stable, in order to prevent imbalance. If the space under the countertop is suitable for installing your machine, remove the dishwasher’s built-in worktop/top panel first.
- Page 11: Installation (Cont.) Water connection We recommend fitting a filter to your water inlet supply in order to prevent damage to your machine due to contamination from indoor plumbing. Only connect the water inlet hose to a cold water supply. WARNING! Always close the water tap after using the dishwasher. Screw the hose to an appropriate faucet with a cold water supply. WARNING! Use the new water inlet hose supplied with your machine, do not use an old machine’s hose. WARNING! Run water through the new hose before connecting it. Connect the hose directly to the water inlet tap. The pressure supplied by the tap should be a minimum of 0.03 MPa and a maximum of 1 MPa. WARNING! After the connections are made, turn the tap on fully and check for water leaks. The drain hose must be connected to the drain hose connector at the back of the dishwasher.
- Page 12: The drain hose must be correctly fitted to prevent water leaks. It should be connected at a height of no more than 1.1 m and secured with a hose clip. If the sink is higher than 1.1 m from the floor, excess water should be drained into a bowl or container held underneath the pipe. For a drain hose extension, use a similar hose that is no longer than 4 metres to maintain cleaning effectiveness.
- Page 13: Installation (Cont.) Electrical connection Make sure that the electrical voltage and circuit frequency in your home correspond to those indicated on the appliance rating label. This appliance requires a 10 A fused, copper-wired electrical supply. A suitable power outlet should be located in an adjacent cabinet. To connect the dishwasher, insert the plug into a properly earthed, easily accessible electrical socket. WARNING! Do not use an extension cord or an adaptor with this appliance. Earthing This appliance must be earthed. The plug must be plugged into an appropriate outlet that is installed and earthed in accordance with all local standards and requirements. WARNING! Ensure the outlet is properly earthed to the ground. Before first use Make sure to check the following points to ensure safe and efficient operation: Is the dishwasher level and properly installed? Is the water tap open? Are the hose connections secured tightly?
- Page 14: Features Wash programs and cycles Quick 30’ - For lightly soiled loads that need a quick wash. Delicate 40ºC - For lightly soiled delicate dishes. ECO 50º - Standard program for normally soiled dishes, with reduced energy and water consumption. Super 50’ - For normally soiled dishes that need to be washed quickly. Intensive 65ºC - For heavily soiled dishes. The ECO 50º program was used for testing to the Australian standard AS/NZS 2007.1 (with 13 place settings, rinse aid setting on 4).
- Page 15: Features (Cont.) Detergent (pre / main) Running time (min.) Energy (kWh) Water (L) The program duration may change according to the amount of dishes, water pressure, ambient temperature and any selected additional functions. Only use powder detergent in short programs. Short programs do not include a drying stage. To assist in drying, we recommend partially opening the door after the program has ended.
- Page 16: Instructions Before first use When using your dishwasher for the first time, ensure you have removed all packaging material inside the machine. Make sure the electricity and supply water specifications match the values indicated in the installation instructions for the machine. If desired, fill the rinse aid compartment. Dishwasher detergent Only use detergent specifically made for use in dishwashers. Always add detergent just before starting the dishwasher to ensure proper dissolution. Dishwasher detergent is corrosive; keep it out of reach of children. Dishwasher detergents have chemical ingredients that remove dirt, food, and germs. Using an “eco” washing program with concentrated detergent is better for the environment and effective for your dishes. Detergent tablets of different brands dissolve at different speeds; choose longer wash programs for complete removal of residues. Add the proper type and amount of detergent for the selected program to ensure the best performance.
- Page 17: Do not overfill the detergent compartment; this can result in whitish streaks or bluish layers on glasses and dishes, and may cause glass corrosion. Using too little detergent can result in poor cleaning, and cause whitish streaks in hard water. Please see the detergent manufacturer’s instructions for further information. Push the latch to open the dispenser and pour in the detergent. Close the lid and press it until it locks in place. The dispenser should be refilled just before the start of each program. Rinse aid is automatically released during the last rinse to prevent water from forming droplets on your dishes. It also improves drying by allowing water to roll off the dishes. Your dishwasher is designed to use liquid rinse aid. Only use specific, branded rinse aid for your dishwasher.
- Page 18: Filling the rinse aid and adjusting the settings To fill the rinse aid compartment, open the rinse-aid compartment cap. Fill the compartment with rinse aid to the MAX level and then close the cap. Be careful not to overfill the rinse aid compartment and wipe up any spills. Clean up any rinse aid spilled while filling with an absorbent cloth or paper towel to avoid excessive foaming during the next wash. Do not forget to replace the cap before you close the dishwasher door. Fill the rinse aid dispenser when the warning light on the control panel comes on. In order to change the rinse aid level, open the door of the machine. Turn on the machine, and press the PROGRAM button as soon as the machine is turned on. If the dishes are not drying properly or are spotted, increase the level. If blue stains form on your dishes, decrease the level.
- Page 19: Rinse aid doses are indicated by the display. Rinse aid is not dispensed when the display shows r1. 1 dose is dispensed when the display shows r2. 2 doses are dispensed when the display shows r3. 3 doses are dispensed when the display shows r4. 4 doses are dispensed when the display shows r5. If using detergent tablets with rinse aid, do not add liquid rinse aid. Ignore the rinse aid warning light if using detergent tablets with rinse aid. After sales support contact information is provided.
- Page 20: Loading the dishwasher For best performance of your dishwasher, follow the loading guidelines in this manual. It is not necessary to rinse the dishes under running water before you put them into the dishwasher. We recommend you scrape off any large amounts of leftover food and soften remnants of burnt food in pots and pans. Hollow items such as cups, glasses, pots, pans, etc. should be placed upside down so water cannot collect in the container. Curved items, or items with recesses, should be loaded at a slant so water can run off. All utensils should be stacked securely so they cannot tip over. Do not overload your dishwasher; it will hold a maximum of 14 standard place settings. Much of today’s tableware is dishwasher safe. However, not everything can be washed safely in a dishwasher. We recommend you do not wash in a dishwasher the items listed below, and take special care with items deemed of limited suitability. Not suitable for the dishwasher: cutlery with wooden, china or mother-of-pearl handles; plastic items that are not heat resistant; older cutlery with glued parts that are not temperature resistant.
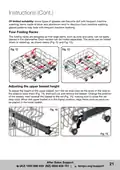
- Page 21: Of limited suitability: some types of glasses can become dull with frequent machine washing; items made of silver and aluminium tend to discolour from machine washing; glazed patterns may fade with frequent machine washing. The folding racks are designed so that large items, such as pots and pans, can be easily placed in the dishwasher. Each section can be folded separately. The racks can be folded down or raised up. To adjust the height of the upper basket, turn the rail stop clips to the sides to open them, then pull out and remove the basket. Change the position of the wheels, then reinstall the basket to the rail, making sure to close the rail stop clips. When the upper basket is in the higher position, large items such as pans can be placed in the lower basket.
- Page 22: The cutlery rack has been designed for the placement of long-stemmed utensils, as well as cutlery. The rack has four different positions. Set it to position 1 or 2 depending on the position of items in the upper basket. Position 1 allows for the placement of cutlery. Set the rack to position 3 or 4 if you do not want to use the cutlery rack.
- Page 23: To make these adjustments, follow the directions in Fig. 18, Fig. 19, and Fig. 20. After Sales Support.
- Page 24: Instructions (Cont.) Other basket positions Lower basket Upper basket Incorrect loading can result in a poor washing and drying performance. Please follow the manufacturer’s recommendations for the best results. Do not load as shown below. After sales support
- Page 25: Running the dishwasher Starting a wash program Open the door and draw out the lower basket. Load your dishes and push the basket back into place. Add dishwasher detergent according to the instructions. Make sure there is sufficient liquid rinse aid in the rinse aid dispenser. Close the dishwasher door, making sure you hear a click when it closes properly. Press the POWER button on the dishwasher control panel. Press the PROGRAM button repeatedly to select the desired wash program. Press the START/PAUSE button to start the washing program. It is dangerous to open the door mid-cycle as hot water or steam may escape and scald you. If you are washing a smaller amount of dishes, you can set the “half load” function.
- Page 26: Setting a delayed start involves pressing the DELAY button repeatedly before the program starts to set a delay time of 1-19 hours. To change the delay time, press the Start/Pause button first, then the DELAY button to select the new time. To cancel the delay, press the DELAY button until the delay time is 0h. To set an extra function, press the EXTRA button repeatedly until the corresponding indicator light illuminates. The hygiene function makes the washing process more hygienic by adjusting the washing temperature and durations. The extra rinsing function adds additional rinses to the selected program for cleaner dishes. The extra drying function extends the drying duration for drier dishes. If any extra function is used in the washing program, it will remain active in the next program unless canceled. The hygiene and extra drying functions cannot be selected at the same time as they are incompatible. To change the wash program, pause the machine using the START/PAUSE button, then select the desired program with the PROGRAM selection button. Press START/PAUSE again to start the newly selected program, which will replace the previous one.
- Page 27: Cancelling a program If you want to change the wash program, you must do so soon after the start. Press and hold the START/PAUSE button for 3 seconds. End light will flash during the cancelling process. After the “end” light has lit, press the POWER button to switch off the machine. Using the Child Lock Press the EXTRA and OPTION button simultaneously for 3 seconds to activate the Child Lock. At the end of the wash program, the machine will enter standby state. Open the door — take care when opening the door as hot steam may escape. We recommend allowing dishes to cool for around 15 minutes before removing them from the dishwasher. Do not pull out both the upper and lower basket at the same time, which may lead to the appliance tipping forward. If you are not going to use the dishwasher for a period of time, please shut off the water supply.
- Page 28: FAQs and troubleshooting guide The table lists possible causes and solutions for common problems you may encounter with the dishwasher. If you follow all the instructions but still cannot solve a problem, please contact our after sales support centre. The dishwasher does not start. Ensure the power and the dishwasher are turned on, the cord is properly plugged in, and the door is closed securely. Water is not pumped out. Check and clean the coarse filter. The kitchen sink is clogged. If the problem is the kitchen sink not draining, you may need a plumber rather than a dishwasher service technician. Some audible sounds are normal, such as sound from water spraying and the detergent dispenser opening. Interrupt the program and rearrange the items that are obstructing the spray arm. This has no influence on the dishwasher function. If in doubt, contact a suitably qualified plumber.
- Page 29: Troubleshooting guide Possible causes and solutions for common dishwasher problems include: Use only specific dishwasher detergent to avoid suds. If suds occur, open the dishwasher and let them evaporate. Always wipe up rinse aid spills immediately. A small amount of clean water around the outlet on the tub bottom is normal. To clean the interior, use a dishwasher cleaner or a damp sponge with dishwasher detergent. Cutlery must be corrosion resistant and dishwasher safe. Select a more intensive wash program if dishes are not clean. Clean and/or fit the filter assembly correctly to avoid blocked spray arm jets. Use less detergent if you have soft water and select a shorter program for glassware. Use a mild abrasive cleaner to eliminate black or grey marks on dishes. Reload the dishes properly to ensure nothing blocks the detergent cover.
- Page 30: Troubleshooting guide Improper loading can affect dishwasher performance. Increase the amount of rinse aid if there is too little. Refill the rinse aid dispenser if there is no rinse aid. Wait at least 15 minutes before unloading the dishwasher after washing. Empty the lower basket first to prevent water from dripping onto dry dishes. Dishes may not be dried if removed too soon after the program finishes. Choose a longer program with a higher rinse temperature for better drying performance. Cutlery or dishes with a lower-quality coating may not be suitable for washing in the dishwasher.
- Page 31: Error codes When there is a malfunction, some of the indicator lights on the control panel will start flickering in order to warn you that something is wrong. Make sure the water inlet tap is open and flowing. Separate the inlet hose from the tap and clean the filter of the hose. Call for service if the error continues. Close the tap and contact for service. Cancel and restart the program. Unplug the machine and close the tap. If the code indicates a malfunction, overflow or leakage, shut down the dishwasher, turn off the power and close the water supply. Make sure to remove the water before restarting the dishwasher.
- Page 32: Cleaning and maintenance are important for the dishwasher's service life. Oil and limescale may build up over time, requiring a high temperature program to clean. Use a cleaning agent designed for dishwashers if necessary. Regular cleaning of the appliance is recommended at least every month. Wipe door seals with a damp cloth to remove residue or foreign objects. Clean the filters and spray arms at least once a week. Remove food waste from the coarse and fine filters and clean thoroughly with water. Properly reassemble and replace the filters to avoid blockages. Clean filters are necessary for the proper functioning of the machine. Never use the dishwasher without the filters to prevent damage to dishes and utensils.
- Page 33: Spray arms should be checked to ensure that the holes are not clogged and free of food waste or foreign objects. If clogged, remove and clean the spray arms under running water. To remove the upper spray arm, undo the nut by turning it clockwise and pulling it downwards. Ensure the nut is properly tightened when refitting the upper spray arm. Warning: Risk of cuts when cleaning the waste water pump. Large amounts of food residue or foreign objects may block the waste water pump, causing rinsing water to rise above the filter. Always disconnect the appliance from the power supply before cleaning the drain pump. Remove the baskets and filters, scoop out any water, and check the drain pump area for foreign objects or food residue. Clean the door seals regularly with a soft damp cloth to remove food deposits. Wipe off any food and drink residues on the sides of the dishwasher door before closing it. If the control panel is dirty, clean it with a soft, damp cloth and dry thoroughly.
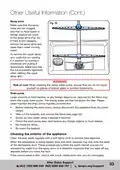
- Page 34: Other useful information Caution: To prevent penetration of water into the door lock and electrical components, do not use a spray cleaner of any kind. Never use sharp objects, harsh or abrasive cleaners or scouring pads on any dishwasher surface. Looking after your dishwasher: After every wash, turn off the water supply and leave the door slightly ajar. Before cleaning or performing maintenance, always unplug the dishwasher. No solvents or abrasive cleaning: Clean the exterior and rubber parts with a cloth and warm, soapy water. To remove spots or stains from the interior, use a cloth dampened with water and a little white vinegar. Clean the door seals periodically with a damp sponge to remove trapped food remnants. Going on holidays: Run a wash cycle with the dishwasher empty, then unplug and turn off the water supply. Moving the dishwasher: Try to keep it in a vertical position during transport.
- Page 35: Frost protection If your dishwasher is left in an unheated place during winter and temperatures are likely to drop to below zero degrees Celsius, you should take certain precautions to prevent water freezing in the pipes. Unplug the dishwasher from the electrical power supply and turn off the water supply. Service, repair and spare parts If the appliance is damaged, do not attempt to repair it yourself. If it requires repair or service, please contact our after sales support centre to arrange for a service. Our after sales support centre stocks a wide range of spare parts for the dishwasher.
- Page 36: Technical specifications Model number: HV-D13SS / HV-D13DSS Capacity: 13 place settings Rated voltage/frequency: 220–240 V~ / 50 Hz Total power: 1900 W Water supply pressure: Maximum: 1 Mpa, Minimum: 0.03 Mpa Height: 850 mm Width: 598 mm Weight: approx. 40.2 kg The RCM Mark indicates compliance with relevant guidelines for safety of electrical devices. Responsible disposal: Packaging materials are recyclable and should be disposed of responsibly.
- Page 37: After sales support
- Page 38: After sales support
- Page 39: After sales support
- Page 40: Warranty returns should include all accessories with the product. If the product does not work, contact the After Sales Support Centre for advice. For an electronic copy of the manual, reach out to the after sales support centre.

IKEA 9001774317 TORSBODA Dishwasher

BOSCH SMH4HVX31E Dishwasher
FISHER PAYKEL DD24DCTB9-N Dishwasher

FISHER AND PAYKEL DD24SHTI9N Dishwasher

Respekta GSP60IBAV Dishwasher
BOSCH SHE4AEM2N Dishwasher

BERTAZZONI DW24T3IXT Dishwasher

Whirlpool WDP370PAHB Dishwasher

BOSCH SMV4HMX65M Dishwasher

GE APPLIANCES GDT565HSYSS Energy Star Hybrid Tub Dishwasher