IGNIS IG2IE10CS8A0 Fully Dishwasher


Quick Guide
EN
PLEASE SCAN THE
QR CODE ON YOUR
APPLIANCE IN
ORDER TO HAVE
MORE DETAILED
INFORMATION
Before using the appliance carefully read Safety and Installation
Instructions.
After installation, please remember to remove all transport protection
parts from the dishwasher.
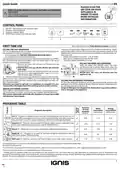
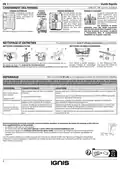
CONTROL PANEL
1. ON-OFF / Reset button with indicator light
2. Program selection button
3. Program indicator lights
4. START/Pause button with indicator light
1
2
3
4
More information in the Daily Reference Guide on website.
FIRST TIME USE
Frequency of regeneration depends on water hardness level setting - regen-
eration takes place once per 5 Eco cycles with water hardness level set to 3.
Regeneration process starts in final rinse and finishes in drying phase, be-
fore cycle ends.
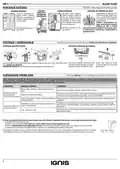
FILLING THE SALT RESERVOIR
The use of salt prevents the formation of LIMESCALE on the dishes and on
the machine’s functional components.
•
•
It is mandatory that THE SALT RESERVOIR NEVER BE EMPTY.
•
•
•
Single regeneration consumes: ~3.5L of water;
Takes up to 5 additional minutes for the cycle;
Consumes below 0.005kWh of energy.
It is important to set the water hardness.
The salt reservoir is located in the lower part of the dishwasher (see PROD-
UCT DESCRIPTION) and must be filled when the green float on the cap of
the salt reservoir is no longer visible.
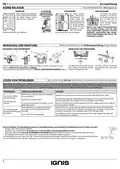
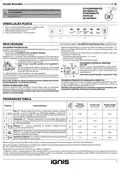
FILLING THE RINSE AID DISPENSER
1. Remove the lower rack and unscrew the reservoir cap
(anticlockwise).
2. Only the first time you do this: fill the salt reservoir
with water.
3. Position the funnel (see figure) and fill the salt reservoir
right up to its edge (approximately 1 kg); it is not unu-
sual for a little water to leak out.
Rinse aid makes dish DRYING easier. The rinse
aid dispenser A should be filled when when the
dark optical indicator on the dispenser door C be-
comes transparent.
NEVER pour the rinse aid directly into the
appliance tub.
C
E
D
A
4. Remove the funnel and wipe any salt residue away from the opening.
Make sure the cap is screwed on tightly, so that no detergent can get into
the container during the wash program (this could damage the water sof-
tener beyond repair).
Whenever you need to add salt, it is mandatory to complete the pro-
cedure before the beginning of the washing cycle to avoid corrosion.
FILLING THE DETERGENT DISPENSER
To open the detergent dispenser use the opening device D. Introduce the
detergent into the dry dispenser E only. Place the amount of detergent for
pre-washing directly inside the tub.
Usage of detergent not designed for dishwashers may cause malfunc-
tion or damage to the appliance.
WATER SOFTENING SYSTEM
Water softener automatically reduces water hardness, consequently prevent-
ing scale buildup on heater, contributing also to better cleaning efficiency.
This system regenerates itself with salt, therefore it is required to refill
salt container when empty.
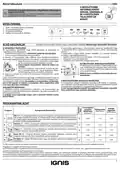
PROGRAMS TABLE
Duration
Water
Energy
of wash
program
(h:min)*)
Programs description
consumption consumption
(litres/cycle)
11.5
(kWh/cycle)
Eco 50°- Program is suitable to clean normally soiled tableware, that for this use, it is
the most efficient programme in terms of its combined energy and water consump-
tion, and that it is used to assess compliance with the EU Ecodesign legislation.
4:00
0.76
1.
Intensive 65° - Program recommended for heavily soiled crockery, especially suita-
2:30
2.25
15.5
15.0
1.50
1.35
2.
3.
ble for pans and saucepans (not to be used for delicate items).
Mixed 55° - Mixed soil. For normally soiled dishes with dried food residues.
Rapid 40’ 45° - Program to be used for half load of lightly-soiled dishes with no
0:40
1:15
8.0
0.90
0.90
4.
5.
-
dried food residues. Without drying.
Half Load 50°- Ideal for washing a half load of lightly or normally soiled crockery.
11.0
ECO program data is measured under laboratory conditions according to European Standard EN 60436:2020.
Note for Test Laboratories:
For information on comparative EN testing conditions, please send an email to the following address: dw_test_support@europeanappliances.com
Pre-treatment of the dishes is not needed before any of the programs.
*) Values given for programs other than the program Eco are indicative only. The actual time may vary depending on many factors such as temperature and
pressure of the incoming water, room temperature, amount of detergent, quantity and type of load, load balancing, additional selected options and sensor cali-
bration. The sensor calibration can increase program duration up to 20 min.
1

| General | Details |
|---|---|
| Name | IGNIS IG2IE10CS8A0 Fully Dishwasher |
| Make | ignis |
| Language | English |
| Filetype | PDF (Download) |
| File size | 21 MB |


IGNIS IG2IE10CS8A0 Fully Dishwasher Overview
Summary of Contents
- Page 1: Quick Guide Before using the appliance, carefully read safety and installation instructions. After installation, remove all transport protection parts from the dishwasher. Control panel includes ON-OFF/Reset button, program selection button, program indicator lights, and START/Pause button. Frequency of regeneration depends on water hardness level setting. Regeneration process starts in final rinse and finishes in drying phase. The use of salt prevents the formation of limescale on dishes and machine components. It is mandatory that the salt reservoir never be empty. Rinse aid makes dish drying easier and should be filled when the indicator becomes transparent. Water softener automatically reduces water hardness, preventing scale buildup and improving cleaning efficiency. Eco program is suitable for normally soiled tableware and is the most efficient in terms of energy and water consumption.
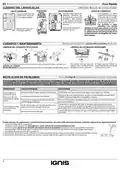
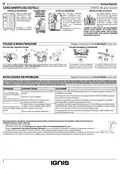
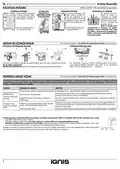
- Page 2: Quick guide Capacity: 10 standard place-settings Cutlery basket should be positioned only at the front of the lower rack. Knives and other utensils with sharp edges must be placed in the cutlery basket with the points facing downwards. Load delicate and light dishes: glasses, cups, saucers, low salad bowls. Large plates and lids should ideally be placed at the sides to avoid interferences with the spray arm. Care and maintenance Cleaning the filter assembly Cleaning the spray arms In case you find foreign objects, please remove them carefully. Never remove the wash-cycle pump protection. Troubleshooting Check if the problem can be solved by going through the following list.
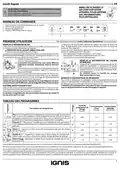
- Page 3: Stručný návod Před použitím spotřebiče si pečlivě přečtěte tento návod k použití a instalaci. Po instalaci nezapomeňte z myčky odstranit všechny přepravní ochranné díly. Zásobník na sůl nesmí nikdy zůstat prázdný. Nastavení tvrdosti vody je důležité. Použití soli vede k předcházení usazování vodního kamene na nádobí a funkčních součástech myčky. Dávkovač leštidla byste měli doplnit v případě, kdy tmavý optický indikátor na dvířkách zásobníku zprůhlední. Použití čisticího prostředku, který není určený pro myčky nádobí, může způsobit nesprávný chod nebo poškození spotřebiče. Změkčovač vody automaticky snižuje tvrdost vody a zabraňuje nahromadění vodního kamene. Úsporný program je vhodný k mytí běžně zašpiněného nádobí. Žádný z programů nevyžaduje jakékoli předchozí ošetření nádobí.
- Page 4: Stručný návod Kapacita: 10 standardních jídelních souprav Plnění košů Dolní koš je určen na hrnce, tácy, talíře, salátové mísy, příbory atd. Horní koš je vybaven horními otvory umožňujícími lepší uspořádání. Košík na příbory musí být umístěn v přední části dolního koše. Čištění a údržba Čistění sestavy filtru a ostřikovacích ramen. Pokud naleznete cizí předměty, opatrně je odstraňte. Odstraňování závad Pokuste se problém vyřešit za pomoci informací uvedených v tomto seznamu. Zkontrolujte, zda je v potrubí voda a zda je otevřený přívodní ventil. Zajistěte, aby přívodní hadice nebyla ohnutá. Zkontrolujte, je-li vypouštěcí hadice umístěna ve správné výšce.
- Page 5: Kurzanleitung Bitte scannen Sie den QR-Code auf Ihrem Gerät, um detailliertere Informationen zu erhalten. Lesen Sie vor Gebrauch des Geräts die Sicherheitshinweise aufmerksam durch. Denken Sie nach der Installation daran, sämtliche Teile zum Transportschutz aus dem Geschirrspüler zu entfernen. Der Salzbehälter darf nie leer sein. Es ist wichtig, die Wasserhärte einzustellen. Der Regenerationsprozess beginnt in der Endspülung und endet in der Trocknungsphase. Klarspüler macht das Trocknen von Geschirr einfacher. Die Verwendung von Reinigungsmitteln, die nicht für Geschirrspüler bestimmt sind, kann zu Fehlfunktionen oder Schäden am Gerät führen. Das ECO-Programm eignet sich, um normal verschmutztes Geschirr zu reinigen. Eine Vorbehandlung des Geschirrs ist vor keinem Programm erforderlich.
- Page 6: Kurzanleitung Fassungsvermögen: 10 Maßgedecke Oberkorb: Hier sortieren Sie empfindliches und leichtes Geschirr ein: Gläser, Tassen, kleine Teller, flache Schüsseln. Unterkorb: Für Töpfe, Deckel, Teller, Salatschüsseln, Besteck usw. Reinigung und Wartung Reinigung der Filtereinheit Reinigung der Sprüharme Lösen von Problemen: Falls Ihr Geschirrspüler nicht richtig funktioniert, versuchen Sie, das Problem anhand der folgenden Liste zu beheben. Mögliche Ursachen: Kein Wasser im Wassernetz oder zugedrehter Wasserhahn. Der Geschirrspüler lädt kein Wasser: Sicherstellen, dass der Zulaufschlauch nicht geknickt ist. Der Geschirrspüler beendet frühzeitig das Programm: Kontrollieren Sie die Wasserversorgung auf Lecks oder andere Probleme.
- Page 7: Guía rápida Escanee el código QR de su aparato para obtener información más detallada. Antes de usar el aparato, lea atentamente las instrucciones de seguridad e instalación. Después de la instalación, recuerde retirar todas las piezas de protección para el transporte del lavavajillas. Panel de control incluye botones de encendido, selección de programas, indicadores luminosos y botón de inicio/pausa. La frecuencia de la regeneración depende del ajuste del nivel de dureza del agua. El uso de sal evita la formación de incrustaciones de cal en la vajilla y en los componentes funcionales de la máquina. Es obligatorio que el depósito de sal no esté nunca vacío. El abrillantador facilita el secado de la vajilla. El uso de detergente no diseñado para lavavajillas puede provocar fallos de funcionamiento o daños en el aparato. El ablandador del agua reduce automáticamente la dureza del agua, evitando la acumulación de incrustaciones en el calentador.
- Page 8: Guía rápida Capacidad: 10 ajustes de servicios estándar Cesto de cubiertos Llenado del lavavajillas Sujeciones Cesto inferior Cesto superior Para ollas, tapas, platos, ensaladeras, cubertería, etc. Se recomienda colocar las bandejas y tapas grandes en los laterales para evitar interferencias con el brazo aspersor. Cargue la vajilla delicada y ligera: vasos, tazas, platos, ensaladeras bajas. Limpieza del conjunto de filtrado Limpieza de los brazos aspersores Resolución de problemas Si su lavavajillas no funciona correctamente, compruebe si el problema se puede resolver revisando la siguiente lista.
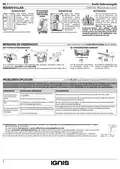
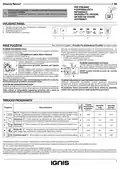
- Page 9: Guide rapide Avant d’utiliser l’appareil, il convient de lire attentivement les consignes de sécurité et d’installation. Après l’installation, rappelez-vous d’enlever toutes les pièces de protection pour le transport du lave-vaisselle. Le réservoir de sel ne doit jamais être vide. Il est important de régler la dureté de l’eau. Le liquide de rinçage permet à la vaisselle de sécher plus facilement. Ne jamais verser le liquide de rinçage directement dans la cuve. L’adoucisseur d’eau réduit automatiquement la dureté de l’eau, empêchant ainsi la formation de calcaire. Le programme Eco est adapté pour nettoyer la vaisselle normalement sale. Aucun prétraitement de la vaisselle n’est nécessaire avant l’un quelconque des programmes. Les valeurs indiquées pour des programmes différents du programme Éco sont fournies à titre indicatif uniquement.
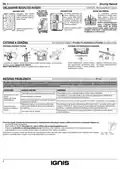
- Page 10: Guide rapide Capacité : 10 couverts standards Chargement des paniers Le panier comprend des grilles supérieures pour placer les couverts plus facilement. Le panier à couvert doit uniquement être placé à l’avant du panier inférieur. Les grands plats et les grands couvercles devraient être placés sur le côté pour éviter qu’ils n’entravent le fonctionnement des bras d’aspersion. Les couteaux et autres ustensiles avec des bords tranchants doivent être placés dans le panier à couvert avec la pointe vers le bas. Nettoyage et entretien Pour enlever le gicleur supérieur, tournez l’anneau de verrouillage dans le sens horaire. Si vous trouvez des objets étrangers, enlevez-les minutieusement. Dépannage Si votre lave-vaisselle ne fonctionne pas correctement, vérifiez si le problème peut être résolu en suivant la liste ci-après. L’alimentation d’eau est vide ou le robinet est fermé. Le tuyau d’arrivée est plié. Le lave-vaisselle termine le cycle prématurément.
- Page 11: Kratki vodič Prije upotrebe uređaja pažljivo pročitajte ove sigurnosne upute i upute za postavljanje. Nakon postavljanja nemojte zaboraviti izvaditi sve zaštitne dijelove za transport iz perilice posuđa. Upravljačka ploča uključuje gumbe za uključivanje/isključivanje, odabir programa, svjetla indikatora programa i Start/Pauza. Učestalost obnavljanja ovisi o postavci razine tvrdoće vode. Potrebna je sol za sprječavanje stvaranja kamenca na posuđu i funkcionalnim sastavnim dijelovima stroja. Spremnik za sol mora se napuniti kada zeleni plovak na poklopcu više nije vidljiv. Sredstvo za ispiranje olakšava sušenje posuđa i treba ga napuniti kada tamni optički indikator postane proziran. Deterdžent stavite samo u suhi spremnik, a količinu za pretpranje izravno u kadu. Omekšivač vode automatski smanjuje tvrdoću vode i smanjuje nakupljanje kamenca. Eko program je najučinkovitiji za uobičajeno prljavo posuđe i koristi se za procjenu usklađenosti s propisima EU.
- Page 12: Kratki vodič Kapacitet: 10 uobičajenih kompleta posuđa. Košara za pribor za jelo Punite je osjetljivim posuđem: čašama, šalicama, posudama za umake i laganim zdjelama za salatu. Noževi i ostali pribor trebaju se postaviti u košaru pribora za jelo s vrhom okrenutim prema dolje. Čišćenje i održavanje Čišćenje sklopa filtra Ako pronađete strane predmete, pažljivo ih uklonite. Nikada ne skidajte štitnik pumpe ciklusa pranja. Rješavanje problema Ako vaša perilica posuđa ne radi ispravno, provjerite može li se problem riješiti prateći popis u nastavku. Rezervni dijelovi bit će dostupni u razdoblju narednih 7 ili 10 godina. Problemi mogu uključivati nedostatak vode u dovodu ili savijeno dovodno crijevo.
- Page 13: Rövid útmutató A készülék használata előtt olvassa el figyelmesen a biztonsági és telepítési útmutatót. A beszerelést követően ne felejtse el eltávolítani a mosogatógépből a szállításhoz használt védőelemeket. A sótartály feltöltése elkerülheti a vízkő képződését az edényeken és a gép funkcionális alkatrészein. Fontos, hogy a vízkeménység be legyen állítva. A mosogatószer-adagoló nyitásához használja az eszközt. A vízlágyító rendszer automatikusan csökkenti a víz keménységét. Az energiatakarékos program a legjobban szennyezett edények tisztítására alkalmas. A programok bemutatása tartalmazza az energia- és vízfogyasztást. Az edények előkezelése egyik programnál sem szükséges. A tényleges időtartam számos tényezőtől függ, mint például a belépő víz hőmérséklete és nyomása.
- Page 14: Rövid útmutató Kapacitás: 10 standard étkészlet Evőeszközkosár A kosarak megtöltése Állítható magasságú lehajtható polcok Alsó kosár Felső kosár Ide fazekak, fedők, tányérok, salátástálak pakolhatók. A szűrőegység tisztítása A szórókarok tisztítása Hibaelhárítás
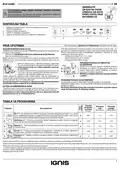
- Page 15: Guida rapida Scansionare il codice QR sul apparecchio per visualizzare informazioni più dettagliate. Prima di utilizzare l’apparecchio, legga attentamente le istruzioni di sicurezza e di installazione. Dopo l’installazione, ricordarsi di rimuovere tutte le parti di protezione per il trasporto dalla lavastoviglie. Il serbatoio del sale si trova nella parte inferiore della lavastoviglie e va rabboccato quando il galleggiante verde sul tappo del serbatoio non è più visibile. L'uso di sale previene la formazione di calcare sulla superficie dei piatti e sui componenti della macchina. Ogni rigenerazione comporta un consumo di ~3,5 litri d’acqua e un consumo di energia minore di 0,005 kWh. L’utilizzo di brillantante facilita il processo di asciugatura delle stoviglie. Per aprire il distributore detersivo utilizzare il dispositivo di apertura e versare il detersivo esclusivamente nel distributore asciutto. L’addolcitore riduce automaticamente la durezza dell’acqua, impedendo la formazione di calcare sulla serpentina. Il programma Eco è indicato per le stoviglie mediamente sporche ed è il programma più efficiente in termini di consumo combinato di acqua ed energia.
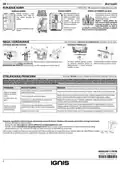
- Page 16: Guida rapida Capienza: 10 coperti standard Cestello per le posate Caricamento dei cestelli Cestello superiore Cestello inferiore Pulizia e manutenzione Pulizia del gruppo filtro Risoluzione dei problemi Assenza di alimentazione idrica o rubinetto La lavastoviglie non esegue il carico dell'acqua.
- Page 17: Snelle referentiegids Lees vóór gebruik van het apparaat de veiligheids- en installatie-instructies zorgvuldig door. Vergeet niet om na de installatie alle transportbeschermingen van de vaatwasser te verwijderen. Het gebruik van zout voorkomt de vorming van kalkaanslag op het vaatwerk en op de functionele onderdelen van de machine. Het zoutreservoir moet worden gevuld wanneer het groene float op de dop van het zoutreservoir niet meer zichtbaar is. Glansspoelmiddel maakt het drogen van de vaat gemakkelijker. Het glansspoelmiddelreservoir moet worden gevuld wanneer de optische indicator op de dispenser transparant wordt. Gebruik de opening om het vaatwasmiddeldoseerbakje te openen en vul alleen het droge doseerbakje. Waterverzachters reduceren automatisch de waterhardheid en voorkomen ketelsteenvorming op de verwarmer. Het Eco-programma is geschikt voor het reinigen van normaal vervuild vaatwerk en is het meest efficiënte programma. Voorbehandeling van het vaatwerk vóór de programma’s is niet nodig.
- Page 18: Snelle Referentiegids Capaciteit: 10 standaard couverts. De mand is uitgerust met rasters aan de bovenkant, om het bestek beter te kunnen rangschikken. De bestekmand mag alleen aan de voorkant van het onderste rek worden geplaatst. Messen en andere gebruiksvoorwerpen met scherpe randen moeten in de bestekmand worden gezet met de punten naar beneden gericht of horizontaal geplaatst in de opklapbare compartimenten op het bovenste rek. Om de bovenste sproeierarm te verwijderen, draait u de plastic borgring rechtsom. Als u vreemde voorwerpen vindt, verwijdert u ze zorgvuldig. Als uw vaatwasmachine niet goed werkt, doorloopt u de onderstaande lijst om te controleren of u het probleem kunt verhelpen. Reserveonderdelen zijn beschikbaar voor een periode van maximaal 7 of maximaal 10 jaar, afhankelijk van de regels die van toepassing zijn. Controleer of er geen knik in de toevoerslang zit. De bedrijfsregels, standaarddocumentatie, bestellen van onderdelen en aanvullende productinformatie kunt u vinden met de QR-code op uw product.
- Page 19: Stručný návod Pred použitím spotrebiča si starostlivo prečítajte bezpečnostné pokyny a návod na inštaláciu. Po inštalácii nezabudnite odstrániť z umývačky všetky súčiastky na ochranu pri preprave. Je nevyhnutné, aby zásobník soli nebol nikdy prázdny. Používanie soli zabraňuje tvorbe vodného kameňa na riadoch a funkčných komponentoch umývačky. Dávkovač leštidla by sa mal naplniť, keď tmavý optický ukazovateľ na dvierkach dávkovača začne byť priehľadný. Umývací prostriedok dávajte iba do suchého dávkovača. Zmäkčovač vody automaticky znižuje tvrdosť vody, čím zabraňuje tvorbe vodného kameňa. Program Eco je najefektívnejší program na umývanie bežne zašpineného kuchynského riadu. Príprava riadu pred umývaním nie je potrebná pri nijakom programe. Skutočný čas umývania sa môže líšiť v závislosti od mnohých faktorov.
- Page 20: Stručný návod Kapacita: 10 štandardných súprav Košík na príbor Ukladanie riadu do košov Spodný kôš Vrchný kôš Čistenie a údržba Riešenie problémov Ak vaša umývačka riadu nefunguje správne, zistite, či problém nemožno vyriešiť po konzultácii s nasledujúcim zoznamom. Náhradné diely budú k dispozícii počas 7 alebo až 10 rokov podľa konkrétnych požiadaviek nariadení.
- Page 21: Kratka navodila Pred uporabo aparata pozorno preberite varnostna navodila in navodila za namestitev. Po namestitvi iz pomivalnega stroja ne pozabite odstraniti vseh transportnih varoval. Obvezno je, da posoda za sol nikoli ni prazna. Trdoto vode je treba obvezno nastaviti. Tekočina za lesk olajša sušenje posode. Pomivalno sredstvo dodajte samo v suh prekat. Sistem za mehčanje vode samodejno zmanjša trdoto vode. Program Eko je primeren za pomivanje običajno umazane posode. Predhodna obdelava posode ni potrebna pri nobenem programu. Dejanski čas pranja je odvisen od številnih faktorjev.
- Page 22: Kratka navodila Zmogljivost: 10 standardnih pogrinjkov Košarica za pribor Najvišja košara Zgornja košara Spodnja košara Več informacij najdete v navodilih za odpravljanje težav na spletni strani. Servis in vzdrževanje Odpravljanje težav Preverite, ali lahko težavo odpravite s spodnjimi nasveti.
- Page 23: Brzi vodič Pre korišćenja uređaja, pažljivo pročitajte uputstva za bezbednost i instalaciju. Nakon instalacije, ne zaboravite da uklonite sve delove za zaštitu tokom transporta iz mašine za pranje sudova. Kontrolna tabla uključuje dugme za uključivanje/isključivanje, dugme za izbor programa, svetlosne indikatore za program i dugme za početak/pauzu. Intervali izvršavanja regeneracije zavise od podešavanja tvrdoće vode. Obavezno je da rezervoar za so nikada ne bude prazan. Jedna regeneracija troši oko 3,5 litara vode i produžava ciklus za još 5 minuta. Sredstvo za ispiranje olakšava sušenje posuđa. Vodite računa da poklopac bude čvrsto zavijen kako deterdžent ne bi ušao u posudu tokom pranja. Omekšivač vode automatski smanjuje tvrdoću vode i sprečava nakupljanje kamenca. Program Eko je najefikasniji za pranje umereno zaprljanog posuđa.
- Page 24: Brzi vodič Kapacitet: 10 standardnih kompleta posuđa Korpa za pribor za jelo Punjenje korpi Donja korpa je za šerpe, poklopce, tanjire, posude za salatu, pribor itd. Gornja korpa je za osetljivo i lako posuđe: čaše, šolje, tacne, plitke posude za salatu. Noževi i drugi pribor oštrih ivica se moraju postaviti u korpu za pribor sa vrhovima okrenutim na dole. Nega i održavanje Čišćenje sklopa filtera Uklonite strane predmete pažljivo. Nikada ne uklanjajte zaštitu pumpe za ciklus pranja. Ukoliko mašina za pranje sudova ne radi pravilno, proverite da li je moguće rešiti problem pomoću sledeće liste.

Respekta GSP60TIDM Dishwasher

FISHER PAYKEL DW60UZ6B FP AA Built-under Dishwasher

SIEMENS SN13ES79CS Dishwasher

IKEA RENODLAD Dishwasher

LG DFB424 Dishwasher

nelson AD40 Commercial Dishwasher

BOSCH SPV6EMX65Q Dishwasher

Whirlpool W10901596A Dishwasher Internet Connectivity

FISHER and PAYKEL DD60DDFHX9 Dishwasher

BOSCH SHX65CM5N Dishwasher