ILVE E5 Dishwasher


Coarse filter
Main filter
Fine filter
Open
1
2
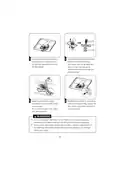
Hold the coarse filter and rotate it
anticlockwise to unlock the filter.
Lift the filter upwards and out of
the dishwasher.
The fine filter can be pulled off the
bottom of the filter assembly.
The coarse filter can be detached
from the main filter by gently
squeezing the tabs at the top and
pulling it away.
3
4
Larger food remnants can be
cleaned by rinsing the filter under
running water.
Reassemble the filters in the reverse
order of the disassembly, replace the
filter insert, and rotate clockwise to
the close arrow.
For a more thorough clean, use a
soft cleaning brush.
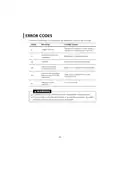
WARNING
Do not over tighten the filters. Put the filters back in sequence securely,
otherwise coarse debris could get into the system and cause a blockage.
Never use the dishwasher without filters in place. Improper replacement of
the filter may reduce the performance level of the appliance and damage
dishes and utensils.
12
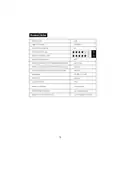
| General | Details |
|---|---|
| Name | ILVE E5 Dishwasher |
| Make | ILVE |
| Language | English |
| Filetype | PDF (Download) |
| File size | 5.24 MB |


ILVE IVFID10 Dishwasher


NOVETE TDQR01 Compact Countertop Dishwasher

BOSCH SMS6ZCW00X Dishwasher

BOSCH GSI6644E Dishwasher

FISHER and PAYKEL DW24U2I1 Dishwasher

FISHER PAYKEL DD24STX6PX1 Sanitize Tall DishDrawer Dishwasher

BOSCH SBI4HCS48E Dishwasher

KitchenAid w11323304 Dishwasher

FISHER AND PAYKEL DD24SHTI9 N Tall Dish Drawer Dishwasher

FISHER AND PAYKEL DD24DCTB9-N Dishwasher

IKEA AA-2179769-5-100 KNYCKLAN Electric Dishwasher