MAYTAG MDTS4224PZ Dishwasher

Dishwasher Quick Start Guide
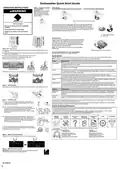
Filter Cleaning:
OPERATING INSTRUCTIONS
Step 1. Prepare and Load
the Dishwasher
FILTER SHOULD BE REMOVED AND CLEANED EVERY 1 - 3 MONTHS FOR BEST PERFORMANCE.
IMPORTANT: Remove leftover
food, bones, toothpicks, and
other hard items from dishes.
Remove labels from containers
before washing.
WARNING
Rinse Filter Cup and Plate under cold water.
Tip Over Hazard
To remove filter, pull out lower rack, grasp Filter Cup and rotate counterclockwise.
Pull up to remove. Remove the Filter Plate. Rinse both under cold water in sink. A
soft brush can be used to remove stuck on food. Replace filter plate. Ensure filter
plate is correctly seated under tabs. To install filter cup, push down through opening.
Turn clockwise to seat. Filter cup will click in to place when seated properly. Do not
operate dishwasher with loose or missing filters.
Do not use dishwasher until completely
installed.
A
Do not push down on open door.
Doing so can result in serious injury or
cuts.
B
A. Upper Filter Assembly
B. Lower Filter
Adjusting Racks:
You can raise or lower the middle rack to fit tall items in either the
middle or bottom rack. Adjusters are located on each side of the
middle rack. To raise the rack: Press both rack adjuster thumb
levers and lift the rack until it is in the up position and level. To
lower the rack: Press both rack adjuster thumb levers and slide
the rack to its down position and level.
Lower Rack
Upper Rack
NOTE: The middle rack must be level. Remove dishes before
NOTE: Racks vary by model.
adjusting rack.
�
Make sure when the dishwasher door is closed that no items are blocking the detergent
dispenser.
Items should be loaded with soiled surfaces facing down and inward toward the spray, as
shown in the graphics above.
Height Adjustments (on some models)
FOLLOW THE PROGRESS OF YOUR DISHWASHER
The Clean indicator glows when a cycle is finished.
�
�
�
Avoid overlapping items like bowls or plates that may trap food.
Place plastics, small plates, and glasses in upper rack.
Cycle Guide
This information covers several different models. Your dishwasher may not have all of the cycles and options described.
NOTE: To repeat the same cycle and options used in the previous wash cycle, select Start twice.
NOTE: Silverware basket may vary by model.
Cycles:
Descriptions:
Quick Wash
For fast results, this cycle will clean dishes using slightly more water and energy. For improved drying, select
a Heated Dry (Short or Long) option.
NOTE: Some detergents are not recommended for short wash cycles; please refer to your detergent
packaging for more information.
Silverware Basket
Normal
This dishwasher’s government energy certifications were based on the Normal cycle with only the Heated
Dry (Short) option selected.** This cycle is recommended for daily, regular, or typical use to completely wash
and dry a full load of normally soiled dishes.
NOTE: Make sure no spray arms are blocked & are rotating freely.
Enhanced Wash This cycle is an enhanced Normal Cycle, and it uses more liters of water and heats it to a higher
temperature throughout a longer cycle time to improve cleaning performance. Defaults to Heated Dry (Long)
for improved drying. Includes a Heated Dry (Short or Long) option.*
Heavy
Use for hard-to-clean, heavily soiled pots, pans, casseroles, and regular tableware. Defaults to Heated Dry
(Long) for improved drying. Includes a Heated Dry (Short or Long) option.*
Extended Soak
This cycle quietly soaks dishes with an extended prewash which eliminates the need to presoak dishes,
saving personal time and effort. For optimal cleaning results during this cycle, add prewash detergent. Use
this cycle for loads with heavy amounts of dried-on or hard-to-clean baked-on food. Defaults to Heated Dry
(Long) for improved drying. Includes a Heated Dry (Short or Long) option.*
Step 2. Add Detergent
High-quality premeasured tablets and packs are recommended for improved performance.
Options:
Descriptions:
Heated Dry
(Short)
Dries dishes with a Heated Dry (Short or Long) cycle. Load Plastic items in upper racks. This dishwasher’s
government energy certifications were based on the Normal cycle with only the Heated Dry (Short) option
selected.**
Heated Dry
(Long)
Increases the cycle time and temperature to provide improved dry performance over the Heated Dry (Short)
option. For best drying results, use Heated Dry (Long) and rinse aid. Load plastic items in upper racks.
*The government energy certifications are not based on this cycle and may increase your energy usage. See the Normal cycle
description for the government energy certification cycle.
**No other washing and drying temperature options were selected, and the dishwasher was not subjected to truncated testing.
Rinse aid was not used, and there was no detergent used in the prewash.
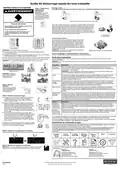
Step 3. Add Rinse Aid
Full
�
Check the rinse aid indicator with the door down (varies by
model). Add rinse aid when indicator drops to “Add” level or
about every 1 to 3 months.
Full
Add
Add
Online Ordering Information
�
Add rinse aid to hinged lid-style dispenser by twisting the
rinse aid cap 1/4 turn clockwise to open and lift off. Pour rinse
aid into the opening until the indicator level is at “Full”.
Replace the rinse aid cap and turn to “Lock”. Make sure cap
is fully locked.
For detailed installation instruction and maintenance information, winter storage, and transportation tips, please see the
Owner’s Manual included with your machine.
For information on any of the following items, the product guide, warranty, detailed product dimensions, or for complete
https://www.maytag.ca/owners. This may save you the cost of a service call.
Register
Product
Schedule
Service
How To’s &
FAQ
Manuals &
Downloads
Add Service
Plan
Parts
Accessories
�
To add rinse aid to sliding lid-style dispenser, open the rinse
dispenser lid by gently pushing in the center of the lid with
your thumb and pulling up on the edge. Pour rinse aid into the
opening until the dispenser is full. Then, close the dispenser
by pushing down gently on the lid.
If you are experiencing poor drying performance, you may want
to try a higher setting. Turn the arrow adjuster to a higher number
to increase the amount of rinse aid.
To contact us, use the information listed below for the appropriate region.
Accessories
United States:
Canada:
1-800-344-1274
1-800-807-6777
Maytag Brand Appliances
Customer eXperience Center
553 Benson Road
Maytag Brand Appliances
Customer eXperience Centre
200-6750 Century Avenue.
Mississauga, Ontario L5N 0B7
Step 4. Select Cycle & Option(s)
Please refer to Cycles & Options chart for more detailed description.
Benton Harbor, MI 49022-2692
Sani High
Extended
Enhanced
Quick
Short Long Rinse Temp
Soak Heavy Wash Normal Wash
Clean
Sanitized
Heated
Rinse
Dry
Cycles
Options
START CANCEL
Resume
Drain
Step 5. Start or Resume a Cycle
IMPORTANT: If anyone opens the door (such as for adding a dish), the
Start/Resumebutton must be selected each time.
W11658623B

| General | Details |
|---|---|
| Name | MAYTAG MDTS4224PZ Dishwasher |
| Make | Maytag |
| Language | English |
| Filetype | PDF (Download) |
| File size | 3.52 MB |


MAYTAG W11363089B Dishwasher

MAYTAG MDB4949SK Dishwasher

MAYTAG W11680100B Dishwasher

MAYTAG MDB Series Dishwasher

MAYTAG ADB1200AWS Dishwasher

MAYTAG PDBTT49AWW Dishwasher

MAYTAG MDB4949SD Series Undercounter Dishwasher

MAYTAG MDTS4224PZ Tub Dishwasher

MAYTAG W11680100A Dishwasher

MAYTAG MDTS4224PZ Dishwasher Overview
Summary of Contents
- Page 1: Dishwasher Quick Start Guide Filter cleaning should be done every 1 - 3 months for best performance. Remove leftover food, bones, toothpicks, and other hard items from dishes. Rinse filter cup and plate under cold water. To remove the filter, pull out the lower rack, grasp the filter cup, and rotate counterclockwise. You can raise or lower the middle rack to fit tall items. Make sure when the dishwasher door is closed that no items are blocking the detergent dispenser. The Clean indicator glows when a cycle is finished. High-quality premeasured tablets and packs are recommended for improved performance. Check the rinse aid indicator with the door down and add rinse aid when necessary. If anyone opens the door, the Start/Resume button must be selected each time.
- Page 2: Guide de démarrage rapide du lave-vaisselle Instructions d'utilisation Étape 1. Préparation et chargement du lave-vaisselle Enlever les restes alimentaires, os, cure-dents et autres articles durs de la vaisselle. Le filtre devrait être enlevé et nettoyé tous les 1 à 3 mois pour obtenir de bons résultats. Pour enlever un filtre, tirer le panier du bas, tenir le récipient du filtre et le faire tourner dans le sens antihoraire. Ne pas faire fonctionner le lave-vaisselle si le filtre est manquant ou mal positionné. Positionnement des paniers : Il est possible de soulever et d’abaisser le panier du centre pour placer des articles de grande taille. Charger les articles dans le panier en orientant la surface sale vers le bas et vers l’intérieur. Suivi de l’avancement d’un programme du lave-vaisselle : Le témoin indicateur Clean s’allume lorsqu’un programme est terminé. Étape 2. Ajout de détergent : Pour de meilleurs résultats, utiliser des pastilles et des sachets prémesurés de qualité supérieure. Étape 3. Ajouter du liquide de rinçage : Contrôler le témoin d’agent de rinçage lorsque la porte est complètement ouverte. Étape 4. Sélectionner le programme et les options : Consulter le tableau des programmes et options pour une description plus détaillée. Étape 5. Démarrer ou reprendre un programme : Si l’on ouvre la porte, il faudra sélectionner le bouton Start/Resume chaque fois.

BOSCH SMS2HMW03E Dishwasher

Whirlpool WDF130PAHB Dishwasher

BOSCH 9000706944 Dishwasher

BOSCH SHX4AEF5N Dishwasher

SIEMENS SN65ZX00AE Dishwasher

Westinghouse WSF6606KXB Dishwasher

BLACK plus DECKER BDW300MHS Dishwasher

FISHER PAYKEL DD60D4NB9 Dishwasher

FISHER and PAYKEL DD60D4HNX9 Contemporary Dishwasher

Electrolux EET43200LX Fully Integrated Dishwasher