
smeg DWAFI6214 Dishwasher






Contents
1. Safety and operating instructions __________________________2
2. Installation and hook-up _________________________________6
3. Description of the controls _______________________________9
4. Operating instructions__________________________________15
5. Cleaning and maintenance______________________________30
6. Troubleshooting ______________________________________36
Thank you for choosing one of our products.
You are advised to read this manual carefully; it contains all the
information you need about the right conditions for the proper, safe use of
your dishwasher.
The individual sections are laid out to provide you with a step-by-step
guide to all your appliance's functions; the texts are easy to understand
and are complete with detailed illustrations.
Recommendations are given for the correct use of the baskets, spray
arms, containers, filters, washing programs, and for operating the controls.
Following the cleaning instructions provided here will keep your
dishwasher's performance at peak levels in the long term.
This user-friendly manual will provide answers to all your questions about
use of the dishwasher.
INSTALLATION INSTRUCTIONS: these are intended for the qualified
technician who must carry out the installation, hook-up and testing of the
appliance.
USER INSTRUCTIONS: these consist of recommendations for using the
appliance, a description of its controls and of the correct cleaning and
maintenance procedures.
1


| General | Details |
|---|---|
| Name | smeg DWAFI6214 Dishwasher |
| Make | Smeg |
| Language | English |
| Filetype | PDF (Download) |
| File size | 0.56 MB |
 (1 votes, average: 5.00 out of 5)
 Loading...

smeg DWAU6224N4 Matte Black Underbench Dishwasher

smeg DWAFI6224-4 Dishwasher

smeg DWA6224X4 Dishwasher

smeg STU8633 Dishwasher

smeg LVS344PM 60 cm Free Standing Dishwasher

smeg LSPU8653X 24″ Fingerprint Resistant Dishwasher

Smeg DI362DQ Dishwasher

smeg DI323BL Dishwasher

smeg DWA6315X1 Dishwasher

smeg STU2FABBL2 Retro Style Dishwasher

smeg DWAFI6214 Dishwasher Overview
Summary of Contents
- Page 1: Safety and operating instructions are essential for proper use. Installation and hook-up should be performed by a qualified technician. The manual provides a step-by-step guide to the appliance's functions. Recommendations are included for the correct use of baskets, spray arms, and filters. Cleaning instructions are provided to maintain peak performance. User instructions cover recommendations for using the appliance. The manual contains detailed illustrations for better understanding. It aims to answer all questions regarding dishwasher use. Proper use ensures safe operation of the dishwasher. The manual emphasizes the importance of reading it carefully.
- Page 2: Safety instructions This manual forms an integral part of the appliance and must always be kept intact together with the dishwasher. Before using the appliance, carefully read all the instructions contained in this manual. Installation must be performed by a qualified technician, in compliance with the regulations in force. This appliance is intended for domestic use and similar applications such as staff kitchens of shops, offices, and other workplaces. The appliance is designed for washing and drying of dishes; any other use shall be considered improper. The name plate featuring the technical data, serial number, and markings is visibly positioned on the inner edge of the door. Do not leave the discarded packaging materials unsupervised within the home. The appliance must be provided with an earth connection in accordance with the electrical safety regulations in force. Always switch off the dishwasher after each use to avoid wasting electricity. In the event of a fault, disconnect the dishwasher from the electrical power supply and shut off the water tap.
- Page 3: Warning: Some dishwasher detergents are strongly alkaline and can be extremely dangerous if swallowed. Avoid contact with the skin and eyes and keep children away from the dishwasher when the door is open. Check that the detergent receptacle is empty after completion of the wash cycle. Obsolete appliances must be rendered unusable. Cut off the mains power cord after unplugging it from the wall outlet. This appliance is marked according to the European directive on waste electrical and electronic equipment (WEEE). Disposal must be carried out in accordance with local environmental regulations for waste disposal. Do not use appliances which have been damaged during transit. If in doubt, consult your dealer. The appliance must be installed and connected in accordance with the instructions provided by the manufacturer or by a qualified technician. This dishwasher must be used by adults. Keep children away from detergents and packaging materials, and never allow them to approach or play with the dishwasher.
- Page 4: Safety instructions Do not drink the water residues which may be present inside the dishes or dishwasher at the end of the washing program and before the drying cycle. Leaning or sitting on the dishwasher door when open may cause the appliance to overturn, putting people at risk. Never leave the dishwasher door open; people might trip over it. Knives or other sharp-ended cooking utensils must be placed in the cutlery basket blade-down, or laid horizontal in the top basket. The Aquastop device prevents flooding in the event of a water leak. When the Aquastop device is tripped, call in a qualified technician to identify and repair the fault. In the event of damage to the water intake hose, disconnect the appliance from the electrical power supply and from the water supply. The appliance’s lighting system belongs to risk group 1 under the IEC/EN 62471 standard. The dishwasher meets all the requirements set out by the regulations in force concerning safety and electrical equipment. The manufacturer declines all responsibility for damage to persons or property resulting from failure to observe the above precautions.
- Page 5: User instructions Technical data Width: 597 to 599 mm Depth measured flush with the outer edge of the control panel Free standing: 627/675 mm Semi-integrated: 584/630 mm Height (depending on models) Capacity: 14 standard place settings Water supply pressure: min. 0.05 - max. 0.9 MPa (min. 0.5 – max. 9 bar) See rating plate
- Page 6: User instructions Installation and hook-up Remove the polystyrene basket retainers. Position the appliance in the desired place of installation. If the dishwasher is installed near a heat source, fit the special insulating panel. To ensure stability, install integrated or built-under dishwashers only under continuous worktops. Make sure that the hoses are not kinked, crushed or pulled too tightly. A hole at least 8 cm in diameter is required to allow the power supply cable and pipes to pass. Level the appliance on the floor using its adjustable feet. Building-in a dishwasher underneath a hob is absolutely forbidden. Dishwashers may not be installed directly touching appliances which are not conventional built-in kitchen appliances. For free-standing models, installing a hob on top of a free-standing dishwasher is absolutely forbidden.
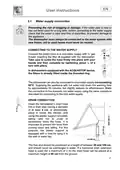
- Page 7: User instructions Water supply connection Preventing the risk of clogging or damage: check that the water is clear and free of impurities before connecting to the water supply. The dishwasher must always be connected to the water system with new hoses; old or used hoses must never be reused. Connect the intake hose to a cold water supply with ¾” gas thread, inserting the filter supplied with the dishwasher. In dishwashers equipped with the ACQUASTOP device, the filter is already fitted inside the threaded ring. The dishwasher can also be connected to a hot water supply not exceeding 60°C. Supplying the appliance with hot water cuts down the washing time by approximately 20 minutes, but slightly reduces its effectiveness. Insert the dishwasher’s drain hose into a drain pipe having a diameter of at least 4 cm. The free end of the drain hose should be positioned at a height of between 30 and 100 cm and should never be submerged in water. If a horizontal drain extension hose is used, the drain hose can be placed at a maximum height of 85 cm from the ground.
- Page 8: User instructions Electrical connection and precautions Check that the voltage and the frequency of the mains match the ratings on the name plate of the appliance. The plug on the supply cord and the corresponding socket outlet must be of the same type and meet the regulations in force. The plug must be accessible after installation. Never disconnect the plug by pulling on the power supply lead. After changing the supply cord, make sure that the bracket which secures the cord is fixed securely in place. Do not use adaptors or shunt connections in order to avoid the possibility of overheating or burning. In the event of damage to the supply cord, have it replaced by the manufacturer or an Authorized Technical Service Centre. Some components are live even with the ON/OFF button in the OFF position. Before maintenance work on the appliance, remove the plug or turn off the power supply at the wall switch. The connection to the mains must be carried out by a qualified technician in accordance to the scheme shown below and the regulations in force.
- Page 9: User instructions Description of the controls All the dishwasher controls are grouped on the upper panel. Switch-on, programming, switch-off etc. procedures are only possible when the door is open. Pressing the ON/OFF button energises the appliance. Illumination of the selected program indicator lights denotes the program selected and the occurrence of a fault. Press the program selection button to select the required washing program. A flashing water hardness adjustment indicator light indicates that the machine is in the “water hardness adjustment” mode. When lit, the salt indicator light indicates that the salt container is empty. A flashing rinse aid dispenser mode indicator light indicates that the machine is in “dispense rinse aid” mode. When lit, the rinse aid indicator light indicates that the rinse aid dispenser is empty.
- Page 10: User instructions Half load button activates the half load wash option. Half load light indicates that the function is activated. Program delay button delays the start of the program by 3, 6, or 9 hours. Delayed start lights show that the start has been delayed. Symbols and styling may vary depending on the model or version of the dishwasher. Setting the washing program involves selecting the most suitable program based on dish type and degree of soiling. Press the ON/OFF button and wait for the program indicator light to illuminate. Press the program selection button until the desired program's indicator light illuminates. Close the door to start the program after about 2 seconds. The relative light will flash while the program is in progress.
- Page 11: User instructions Programs table Load crockery and cutlery Soak: Pans and dishes awaiting completion of the load Normal: Crockery and cutlery normally soiled Regular: Dishes with regular dirt, even with dried-on residues Daily: Dishes with regular dirt, even with dried-on residues Ultra clean: Very dirty pans The ultra clean program terminates with an extra anti-bacteria rinse. Only run the soak program with partial loads. The cycle duration and power consumption may vary according to the water and room temperatures. If the dishwasher door is open or not properly closed, the washing cycle will not start.
- Page 12: User instructions Testing institutes are provided with guidelines for comparative tests. Request the guidelines by contacting us. Before starting a washing program, make sure that the water supply tap is open, the correct amount of detergent has been added, the baskets have been correctly loaded, the spray arms can rotate freely, and the dishwasher door is securely closed. During the initial phase of the washing program, the operation of sprayers is not perceived because they start rotating about 5 minutes after the start. Spread half load is suitable when there are not many dishes to be washed, saving energy and reducing program duration. The start of the program can be delayed by 3, 6, or 9 hours, allowing you to set the dishwasher to work at convenient times. After setting the program delay, press the button to select the delay required; the corresponding light will come on. When the door is closed, the appliance will prewash the dishes before the program delay takes effect. It is not possible to select the program delay option once the cycle has begun.
- Page 13: Cancelling the current program involves opening the door and holding down the program selection button until the indicator lights for programs 4 and 5 illuminate. After cancelling, close the door and the dishwasher will advance to the end of the cycle after approximately 1 minute. To change the program in progress, open the door and select a new program; the dishwasher will automatically select the new program when the door is closed. To save on energy and protect the environment, always try to run the dishwasher fully loaded. Do not wash dishes in running water. Use the washing program that is most appropriate for each type of load. Do not carry out any preliminary rinsing. If available, connect the dishwasher to a hot water supply up to 60°C.
- Page 14: User instructions To cut down on detergent consumption and protect the environment, avoid using excessive amounts of detergent. Separate the more delicate items from dishes that are more resistant to aggressive detergents and high temperatures. Do not pour the detergent directly on the dishes. If the door is opened while washing, the program will be interrupted. At the end of the washing cycle, the dishwasher gives a short acoustic signal. To switch off the dishwasher, open the door and press the ON/OFF button. After 5 minutes of waiting, the dishwasher switches to a standby state to reduce energy consumption. In standby, the dishwasher indicator panel functions more slowly. Wait at least 20 minutes before removing the dishes to allow them to cool down. Unload the lower basket first, then the upper basket to prevent water droplets from falling on the dishes.
- Page 15: User instructions Operating instructions Once the dishwasher has been correctly installed, prepare for use as follows: Adjust the water softening system (if present). Add the regenerating salt (on some models only). Add the rinse aid and detergent. Using the water softening system (if present) The amount of scale contained in the water can cause whitish staining on the dry dishes. The dishwasher is equipped with an automatic softening system which uses a special regenerating salt. When using water of medium hardness, the regenerating salt container should be refilled after approximately 20 washing cycles. The salt container can hold approximately 1.7 Kg of salt in grains. When using the dishwasher for the first time, in addition to the salt it is also necessary to add one litre of water to the container. Each time the salt container is refilled, make sure that the cap is securely closed. Only use regenerating salt specially formulated for domestic dishwashers.
- Page 16: Do not use table salt as it contains insoluble substances which may damage the water softening system. Refill the regenerating salt container before starting the washing program to prevent corrosion. Be careful not to confuse the salt and detergent packages; adding detergent to the salt container will damage the water softening system. The setting of the water softener can be adjusted using the program selection button. Keep the button pressed until the water hardness adjustment indicator light flashes. The selected program indicator lights indicate the current setting. Each press of the button modifies the setting according to a specific sequence. After adjustment, the dishwasher will automatically exit from adjustment mode if the button is not touched for a few seconds.
- Page 17: User instructions Water hardness table Water hardness settings Contact your local water board for information on the hardness of your water supply. Default settings: H3 - 16-21°dH – 28-37°dF Using the rinse aid and detergent dispensers The detergent and rinse aid dispensers are situated on the inner part of the door. The detergent dispenser is on the left, and the rinse aid dispenser is on the right. Before every washing cycle, it is necessary to add the required amount of detergent to the detergent dispenser. The rinse aid should only be added as required.
- Page 18: User instructions Adding the rinse aid The rinse aid helps the dishes dry faster and prevents the formation of scale deposits and staining. It is automatically added to the water during the final rinse cycle, from the container situated on the inner side of the door. To add rinse aid: Open the dispenser by pressing and lifting the tab on the cover. Fill the dispenser with rinse aid. Top up again when the rinse aid indicator light turns on. Close the cover, a click indicates when it is closed. Use a cloth to remove any spillage of rinse aid which might lead to the formation of excess foam.
- Page 19: Adjusting the rinse aid dispenser mode involves pressing and holding the program selection button until the salt indicator flashes. The rinse aid dispenser mode indicator light will flash, and the selected program lights indicate the current setting. You can choose the desired dosage by pressing the button several times according to the rinse aid adjustment table. If no button is pressed for a few seconds, the dishwasher will exit adjustment mode and return to standard operating mode. The rinse aid adjustment table shows dosage levels from 0 (not dispensed) to a maximum of 6 ml. Default settings are set to b4, which corresponds to 5 ml. Increase the amount of rinse aid if washed dishes appear dull or have circular stains. Reduce the rinse aid setting if dishes are sticky or have white streaks.
- Page 20: User instructions Adding the detergent To open the detergent dispenser cover, lightly press button P. Add the detergent or tablet and close the cover by sliding it until it stops, indicated by a click. The dispenser will open automatically during the wash cycle. Only add the detergent if the dispenser is dry. When a program with hot prewash is selected, extra detergent must be placed in the cavity G/H. Use only detergents specially formulated for dishwashers. The detergent packs must be sealed and stored in a dry place to prevent the formation of lumps. Once opened, the detergent packs should not be kept for too long, otherwise the detergent loses its effectiveness. Do not use detergents for washing dishes by hand. Add the correct amount of detergent to avoid partial removal of dirt or wastefulness. For the safeguarding of the environment, we recommend the use of phosphate- and chlorine-free detergents.
- Page 21: The introduction of detergent into the rinse aid dispenser will damage the dishwasher. Before using the dishwasher for the first time, it is advisable to read the recommendations concerning dish types to be washed and their loading. There are generally no constraints on the washing of domestic dishes, but certain characteristics need to be taken into account. Before loading the dishes into the baskets, remove coarse food remains that may clog the filter or damage the wash pump. Soak any pots or pans with burnt-on food remains to facilitate removal, then load them into the lower basket. There is no need to pre-wash the dishes under running water before loading them into the baskets. Correct loading of the dishes helps ensure optimal washing results.
- Page 22: User instructions Make sure that the dishes are securely in place so that they cannot tip over or obstruct the rotation of the spray arms during the washing cycle. Do not place very small objects in the baskets as these could fall and obstruct the spray arms or the wash pump. Containers such as cups, bowls, glasses and pots should always be loaded with the opening facing downwards and with any cavities at an angle, to allow the water to drain out. Do not stack dishes or place them in such a way that they cover one another. Make sure that the items being washed are dishwasher-safe. Wooden dishes, pots or pans may be damaged by the high washing temperatures. Handcrafted items are rarely suitable for washing in a dishwasher. Heat resistant plastic dishes must be washed in the upper basket. Certain types of glass and crystal may become dull and lose their clearness after many washings. Decorated objects may withstand washing in the dishwasher, although the colours may fade after a great many washes.
- Page 23: User instructions The dishwasher has a capacity of 14 place-settings, including serving dishes. The lower basket receives the full force of the lower spray arm and should be used for the toughest items with a heavier degree of soiling. All types and combinations of loads are permitted, provided that the dishes, pots, and pans are arranged with all the soiled surfaces exposed to the water jets coming from the bottom. Certain models are equipped with tip-up supports for plates in 2 or 4 sections to make the most of the space inside the basket when loading large items. Some models are equipped with bottom basket inserts which improve the drying of dishes.
- Page 24: User instructions Loading the lower basket Carefully load flat plates, soup plates, dessert and serving dishes, positioning them vertically. Pots, pans and their covers must be loaded upside down. When loading soup plates and dessert bowls, be sure to leave a gap between them. Upper basket The upper basket should be loaded with small or medium-sized items such as glasses, small plates and saucers, tea or coffee cups, shallow bowls and light objects. If the upper basket is used in the lowermost position, it can also be loaded with serving dishes, provided they are only lightly soiled. Loading the upper basket Load plates facing forward; cups, bowls etc. must always be facing downwards. The left side of the basket can be loaded with cups and glasses on two levels. In the centre section, plates and saucers can be loaded vertically into the supports provided.
- Page 25: User instructions Cutlery basket The basket is suitable for all types of cutlery, except long items that may interfere with the upper spray arm. The cutlery should be arranged in the spaces in the upper racks to allow the water to pass effectively between the items. Forks and spoons should be positioned with the handle facing downwards, taking care not to injure yourself with the prongs of the forks. Knives should be placed in the tray on the upper rack or in the cutlery drawer, if present, otherwise position them with the handles facing upwards. Ladles, wooden spoons, and kitchen knives can be placed on the upper rack, making sure that the blades of the knives do not protrude from the basket. The upper racks can be opened in order to insert, for example, small items. The cutlery basket slides across the dishwasher and can be placed in any position to allow optimal use of the space in the bottom basket.
- Page 26: User instructions Upper basket equipment Cutlery tray For knives, spoons (tea and dessert) and long objects. The ends are designed to hold long stemmed glasses. It can be removed by pressing and pushing the release levers at the same time. It has to be lowered if the upper basket is in the topmost position. Press the catches simultaneously.
- Page 27: User instructions Fold-down shelves are designed for mugs, cups, and long objects. The ends hold long stemmed glasses. When not in use, they can be moved to a vertical position until a click is heard. Shelves with expandable wings are for small objects, mugs, and cups. They can be used either closed or open by pulling the upper sliding part. To close them, press the release device and slide them downwards. The ends also hold long stemmed glasses even when closed. When not in use, they can be moved to a vertical position until a click is heard.
- Page 28: User instructions Fold-down tines These can be secured in a vertical position, resting on the bottom of the basket if unused, or placed in an intermediate position, as required. The single tine on the right is ideal for supporting long stemmed glasses.
- Page 29: Adjusting the upper basket allows for larger dishes or pans in the bottom basket. The adjustment procedure may vary depending on the dishwasher model. Version A involves a pull-out mechanism with two positions for adjustment. To adjust, pull out both basket guides and remove the stops. Fit the upper or lower pair of wheels into the guide based on the desired setting. Return the stops to their original position after adjustment. The left and right sides of the basket must always be set at the same height. Version B allows for adjustment in three positions on both sides. Raise the basket by pulling on the top edge to the desired catch. Adjustment can be made with the basket loaded, but care should be taken to hold it steady when lowering.
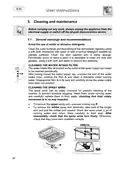
- Page 30: User instructions Cleaning and maintenance Before carrying out any work, always unplug the appliance from the electrical supply or switch off the all-pole disconnection device. General warnings and recommendations Avoid the use of acidic or abrasive detergents. Clean the outer surfaces and door-lining of the dishwasher regularly using a soft cloth moistened with water or with a normal detergent suitable for painted surfaces. Periodically it is advisable to clean the tank and gaskets, using a soft cloth and water to remove any deposits. Cleaning the water intake filter The water intake filter located at the outlet of the water supply tap needs to be cleaned periodically. After having closed the water supply tap, unscrew the end of the water intake hose, remove the filter and clean it delicately under running water. Cleaning the spray arms The spray arms can be easily removed for periodic cleaning of the nozzles, to prevent possible clogging. Wash them under running water and carefully replace them in their seats, checking that their rotary movement is in no way impeded.
- Page 31: User instructions Cleaning the filter unit It is advisable to periodically inspect the centre filter and, if necessary, to clean it. To remove the filter, grip the tabs, turn them anticlockwise and lift upwards. The filters should be cleaned under running water using a stiff brush. When removing the filter, take care that there are no food residues on it. It is essential to thoroughly clean the filters according to the above instructions. The dishwasher cannot function if the filters are clogged. Carefully replace the filters in their seats, to avoid damaging the wash pump. Run the soak program twice in succession if the dishwasher will not be used for a prolonged period. Leave the door slightly open to prevent the formation of unpleasant odours inside the washing tank. Shut off the water supply tap.
- Page 32: Before starting the dishwasher after prolonged disuse, check for deposits of sludge or rust inside the water pipe. Plug the power cord back into the socket and reconnect the water intake hose. Troubleshooting minor problems can often be done by following specific instructions. If the program fails to start, ensure the dishwasher is connected to the electrical power supply and that the water tap is open. If water remains inside the dishwasher, check that the drain hose is not kinked and that the drain siphon is not obstructed. For dishes not being cleaned properly, verify that the correct amount of detergent has been added and that there is regenerating salt inside the special container. Ensure the dishes are loaded correctly and that the selected program is suitable for the dish types and their degree of soiling.
- Page 33: User instructions If the dishes fail to dry or remain dull, check that there is rinse aid inside the special container. The rinse aid dispenser setting is correct. The detergent used is of good quality and has not lost its effectiveness. Non-dry synthetic dishes are harder to dry due to lower heat storage capacity. If the dishes show signs of streaking or staining, check that the rinse aid dispenser setting is not too high. Visible traces of rust inside the tank may be due to external elements. Special products are available to remove rust marks. Check that the amount of detergent being used is correct. Certain detergents can be more corrosive than others. Ensure the cap of the salt container is securely closed and that the water softening setting is correct.
- Page 34: User instructions If the door does not close: Check the position of the door lock catch. If necessary, raise it by adjusting the plastic screw next to the catch. Check the condition of the lock hook; if it has not triggered, the door opens and closes normally. If it has triggered, close the door with force until it resets; open and close the door.
- Page 35: User instructions If after following the above troubleshooting instructions the problem persists, call the nearest After-Sales Centre. WARNING: any operations performed on the appliance by unauthorised persons are not covered by the warranty and shall be paid for by the user.
- Page 36: Troubleshooting The dishwasher signals faults through the illumination of indicator lights. Acquastop failure indicates the anti-flooding system has been activated due to water leaks. Safety level indicates the system limiting the water level has been tripped. Water heating malfunction occurs when the water is not heated or heating parameters are incorrect. Water temperature monitoring malfunction requires interrupting the program and switching off the dishwasher. Water intake malfunction indicates the appliance does not take in water correctly. Water pump-out malfunction occurs when the appliance does not pump out water correctly. For persistent problems, contact the after-sales service.
- Page 37: User instructions Turbine flow-regulator malfunction: The appliance is not able to measure the amount of water loaded accurately. Interrupt the program and switch off the dishwasher. If the problem persists, contact the after-sales service. Alternate washing system malfunction: Interrupt the program and switch off the dishwasher. If the problem persists, contact the after-sales service. Water intake system malfunction: Contact the after-sales service. Wash motor pump does not work. If an alarm occurs, the appliance interrupts the program in progress and signals a fault. Alarms E1, E2, E3, E4, E8, and E9 interrupt the current program immediately. The E5, E6 alarms interrupt the running program once the cause is resolved. The alarm E7 is visualized at the end of the cycle but does not harm the operation of the dishwasher. To reset an alarm, open and close the door or turn off and on the machine.

LG LDTH7972D Smart Dishwasher

Kleenmaid DW6020XB Black Built Under Dishwasher

BOSCH 300 Series 24 Front Dishwasher

BOSCH SMH4EVX08E Dishwasher

element ENB6632PEBB Dishwasher

KKT KOLBE DW4505FS Dishwasher

JENN-AIR JDAF5924RM Dishwasher

Siemens SX75YX00CE Fully Integrated Dishwasher

SIEMENS SR65ZX22ME Dishwasher

IKEA RENGÖRA 204.756.05 Dishwasher