ZLINE Monument Series 24 Red Matte Dishwasher


| General | Details |
|---|---|
| Name | ZLINE Monument Series 24 Red Matte Dishwasher |
| Make | Zline |
| Language | English |
| Filetype | PDF (Download) |
| File size | 1.56 MB |


ZLINE Monument Top Touch Dishwasher

ZLINE 65286410 Monument Dishwasher

ZLINE 65286411 Monument Dishwasher

ZLINE Classic Dishwasher

ZLINE DWV-18 Tallac Dishwasher

ZLINE Monument Series 24 Red Matte Dishwasher Overview
Summary of Contents
- Page 1: Installation manual for the Monument dishwasher with Durawash.
- Page 2: ZLINE Kitchen and Bath provides attainable luxury. The kitchen and bath of your dreams is never out of reach. Unique designs and unparalleled quality are our focus. We are dedicated to providing an elevated experience in your home. An endless selection of features and finishes is available. Our inspiration is your reality.
- Page 3: ZLINE is fueled by a passion for innovation. A relentless pursuit of bringing the highest end luxury designs and professional features into everyone’s homes. We may change specifications and designs without prior notice. WARNING: This product can expose you to chemicals including nickel, which is known to the State of California to cause cancer.
- Page 4: important safety instructions before installation pre-installation notes drain requirements electrical requirements preparing the hot water line installation step 1: install the decorative door panel to the outer door of the dishwasher step 2: check the door balance step 3: adjust the leveling legs
- Page 5: Important safety instructions Observe all governing codes and ordinances. Note to installer – Be sure to leave these installation manual instructions for the consumer’s and local inspector’s use. Note to consumer – Keep these installation manual instructions with your user manual for future reference. Skill level – Installation of this dishwasher requires basic mechanical and electrical skills. Completion time – One to three hours. New installations require more time than replacement installations. The dishwasher must be installed in a manner that allows for easy future removal from the enclosure if service is required. Do not install this dishwasher if it has missing or broken parts. Read and observe all cautions and warnings shown throughout these instructions. While performing installations described in this booklet, gloves and safety glasses or goggles should be worn. This dishwasher comes with a heating element to heat the water.
- Page 6: Important safety instructions should be read and observed. Gloves and safety glasses or goggles should be worn during installations. Read all instructions before using the dishwasher. This installation manual does not cover every possible condition and situation. Use the dishwasher only for the intended functions as described. Rinse off large pieces of food from dishes before washing. Load sharp items and knives carefully to avoid damage and injury. Do not wash plastic items unless they are marked dishwasher-safe. Ensure the garbage disposal is empty if the dishwasher drains into it. Do not tamper with the control panel or operate the dishwasher with missing enclosure panels.
- Page 7: Important safety instructions Some dishwasher detergents are strongly alkaline and can be extremely dangerous if swallowed. Avoid contact with the skin and eyes and keep children away from the dishwasher when the door is open. Under certain conditions, hydrogen gas may be produced in a hot water system that has not been used for two weeks or more. Hydrogen gas is explosive. If your home’s hot water system has not been used for a period of time, let the water flow for several minutes before using the dishwasher again. Keep young children and infants away from the dishwasher when it is operating. Do not use the dishwasher if it has a damaged power line or plug. Remove the door to the washing compartment when removing an old dishwasher from service or discarding it. To reduce the risk of injury, do not allow children to play in or on a dishwasher. This dishwasher is intended for residential use only and should not be used in commercial establishments.
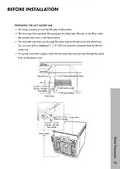
- Page 8: Before installation Package contents include dishwasher, drain hose, installation kits, user manual, and installation manual. If you have a problem after installation, contact the qualified professional who installed the unit. You are responsible for providing adequate electrical, plumbing, and other connecting facilities. Parts supplied include various screws, top mounting clips, hose clamp, drain hose, brackets, and top hook mounting seats. Tools needed include a Phillips-head screwdriver, nut drivers, level, flashlight, gloves, bucket, adjustable wrench, carpenter’s square, measuring tape, and safety glasses. Materials needed (kit purchased separately) include a 90° elbow, ferrule, compression nut, and Teflon thread seal tape. Three wire nuts are included in the kit, with additional items not included. Hand shut-off valve, waste tee for house plumbing, screw-type hose clamps, coupler for extending drain line, and air gap may be required.
- Page 9: Before installation Specifications 23 7/8 W x 24 1/2 D x 33 3/4 (min) - 35 (max) H 606 mm W x 622 mm D x 832 mm (min) - 889 mm (max) H Panel ready dimensions 33 3/4 (min) - 35 (max) Pre-installation notes When installing a ZLINE door panel, the depth of each unit including the panel is 25 3/16 (640 mm). The depth of each unit including the panel and handle is 27 (689 mm). Minimum and maximum heights take into account the legs, which can be extended by roughly 1 1/4 (32 mm). The dishwasher must be installed so the drain hose is no more than 10' (3048 mm) in length for proper drainage.
- Page 10: Before installation Enclosure requirements This dishwasher is designed to be enclosed on the top and on both sides within a standard residential kitchen cabinet unit. The installation enclosure must be clean and free of any obstructions. Pre-installation notes For depth, please note the recommended 25 (635 mm) is larger than a standard 24 (610 mm) depth cabinet due to the depth of the unit itself being slightly larger. In order for the door panel of the dishwasher to be flush with the leading edge of the countertop, the countertop must be at least 25 3/16 (640 mm) deep. This depth may vary if you install a custom door panel. 34 (867 mm) is the minimum height based on legs being at their lowest setting. If installing into a corner, allow 2 (51 mm) minimum clearance between the dishwasher and adjacent cabinet, wall or other appliances. Allow 23 5/8 (600 mm) minimum clearance from the front of the dishwasher for opening the door.
- Page 11: Before installation Drain requirements Follow all local codes and ordinances. Do not exceed 10’ (3048 mm) of drain hose. Do not connect the drain lines from other devices to the dishwasher drain hose. The dishwasher must be connected to a waste line with an air gap or a minimum 32 (813 mm) high drain loop. An air gap must be used if the waste tee or garbage disposal connection is less than 18 (457 mm) above the floor.
- Page 12: Before installation Drain preparation The type of drain installation depends on local codes or ordinances. An air gap must be used if the drain hose is connected to a waste tee or garbage disposal lower than 18 above the floor. Failure to provide the proper drain connection height will result in improper draining of the dishwasher. Install the waste tee or garbage disposal connection and air gap according to manufacturer’s instructions. Method 1 - Air gap with a waste tee or garbage disposal connection. Method 2 - High drain with a waste tee or garbage disposal connection. You must provide a method to attach the drain hose to the underside of the countertop.
- Page 13: Before installation Electrical requirements This appliance must be supplied with 120VAC, 60Hz electricity and connected to its own, properly grounded branch circuit that is protected by a 15- or 20-amp circuit breaker or time delay fuse. Wiring must be two wire with ground. If the electrical supply does not meet the above requirements, call a licensed electrician before proceeding. Disconnect power from the circuit breaker before beginning installation of this dishwasher. Do not use an extension cord or adapter plug with this appliance. Specifications Power requirements: 120VAC, 60Hz Current: 8.4 Amp Water pressure: Between 20 and 120 psi (138 and 827 kPa) Noise: 45 dB
- Page 14: Before installation Grounding instructions are crucial for safety. The appliance must be connected to a grounded metal, permanent wiring system. For power cord models, grounding reduces the risk of electrical shock. The plug must be plugged into an appropriate outlet that is grounded according to local codes. Improper grounding can result in a risk of electric shock. For the direct wire method, the cable must extend a minimum of 24 inches from the rear wall. Use flexible, armored, or nonmetallic sheathed copper wire with grounding wire. A UL Listed/CSA approved strain relief is required. For the power cord method, install a 3-prong grounding type receptacle. The recommended power cord length is between 54 and 64 inches.
- Page 15: Before installation The wiring may enter the opening from either side, the rear, or the floor within the shaded area in the figure below. The electrical connection is located on the front right of the dishwasher. Drill a 1 1/2 (38 mm) maximum diameter hole to run the electrical cable through the wall of the cabinet. The hole must be free of sharp edges. If the cabinet wall is metal, the hole edge must be covered with a bushing or rubber grommet. Cable direct connections may pass through the same hole as the drain hose and hot water line, but power cords with plugs must pass through a separate hole.
- Page 16: Before installation Preparing the hot water line The water connection is on the left side of the dishwasher. The hot water line may enter the opening from either side, the rear, or the floor within the shaded area shown in the figure below. The hot water line may pass through the same hole as the electrical and drain hose. You can drill an additional 1 1/2 (38 mm) maximum diameter hole for the hot water line. If a power cord with a plug is used, the hot water line may not pass through the same hole as the power cord.
- Page 17: Before installation Turn off the home’s water supply before installing this dishwasher. Install a hand shut-off valve in an accessible location, such as under the sink. A hand shut-off valve can be purchased at most hardware stores. Install the hot water inlet line, using at least 3/8 (10 mm) tubing. Route the line and extend it forward at least 18 (457 mm) from the rear wall of the enclosure. Adjust the water heater to a temperature between 120°F and 150°F (49°C and 65°C). Flush the water line to clean out any debris. The hot water pressure must be between 20 and 120 psi (138 and 827 kPa).
- Page 18: Installation You'll need: - Phillips-head screwdriver - 1/4 and 5/16 nut driver - Screws B - ST4 X 14 (8) - Screws C - ST3.5 X 25 (2) - Screws D - ST3.5 X 45 (4) - Brackets (2) - Top hook mounting seats (2) - Screws E - 5mm x 80 pitch, Metric Screw (2) Step 1: Install the decorative door panel to the outer door of the dishwasher 1. Install the hook and brackets on the decorative door panel. 2. Install the handle to the outer door.
- Page 19: Installation instructions include putting the hook into the slot of the outer door for positioning. There is a reference to a decorative door panel installation tutorial.
- Page 20: Installation instructions include fixing the decorative door panel onto the outer door with screws. Opening the door of the dishwasher before installation can cause it to tip forward. Do not open the door until ready to install the dishwasher. If it is necessary to open the door, hold the top of the dishwasher securely with one hand and the door with the other hand.
- Page 21: Installation Step 2: Check the door balance Hold the top of the dishwasher firmly. Open the door slowly, then release it. If the door drops, increase the spring tension. If the door closes, decrease the spring tension. Continue moving the spring pin until the door is balanced. Adjust both springs to the same tension.
- Page 22: Installation Adjust the leveling legs Move the dishwasher close to the installation location and lay it on its back. Make sure that the leveling feet are tightened all the way or removed if trying to tilt the dishwasher. Measure the installation height and the dishwasher height. Extend the leveling legs out from the dishwasher base 1/4 (6 mm) less than the installation height. Legs can be adjusted by roughly 1 1/4 (32 mm).
- Page 23: Installation Step 4: Remove the kick plate Remove the two kick plate screws with a Phillips-head screwdriver, then remove the kick plate. You'll need Adjustable wrench Phillips-head screwdriver Power cord Strain relief (for electrical connection) Three wire nuts (UL listed) Step 5: Install power Turn off the electricity to the dishwasher’s electrical circuit. Make sure that the electrical power is turned off at the source. If your house wiring is not 2-wire with a ground, a ground must be provided by the installer. If your house wiring is aluminum, be sure to use cUL/UL Listed anti-oxidant compound and aluminum-to-copper connectors.
- Page 24: Installation Remove the junction box cover on the front right of the dishwasher. Make sure the junction box’s electrical wires are pulled inside of the junction box. Remove the lock nut from the strain relief, then push the strain relief into the round opening of the junction box. Install the lock nut on the strain relief from inside the junction box. Insert the ends of the power cord’s electrical wires into the junction box through the strain relief. Connect the incoming white (or ribbed) wire to the dishwasher’s white wire, the black (or smooth) wire to the dishwasher’s black wire, and the ground wire to the dishwasher’s green wire. Tighten the strain relief screws and lock nut to stabilize the power cord’s electrical wires, then make sure that all of the connections are secure. Replace the junction box cover on the right front of the dishwasher. Be sure that the wires are not pinched under the cover. If you have trouble replacing the junction box cover, loosen the screws on the strain relief.
- Page 25: Installation Direct wiring Remove the junction box cover from the power supply junction box on the wall. Locate the three dishwasher wires, (white, black, and green) with stripped ends. Insert the dishwasher wires through the small hole in the junction box. Secure the house wiring to the bottom of the junction box with a strain relief fitting. Use wire nuts to connect incoming ground to green, white to white, and black to black. Replace the junction box cover. Make sure that no wires are pinched under the cover.
- Page 26: Installation You'll need an adjustable wrench, a 90° elbow, and Teflon thread seal tape. Step 6: Install the 90° water supply elbow Install the 90° elbow onto the water valve without overtightening to avoid bending the bracket or breaking the fitting. Position the end of the elbow to face the floor when the dishwasher is upright. After installation, the elbow should face the dishwasher hose channel at the bottom left.
- Page 27: Installation You'll need a Phillips-head screwdriver, screw-type hose clamps, and a drain hose. Step 7: Install the drain hose Make sure that the leveling feet are loosened before standing the dishwasher upright. Turn the dishwasher upright. Slide a screw-type hose clamp onto the right-angled end of the drain hose. Install the drain hose to the dishwasher drain outlet on the back of the dishwasher, then tighten the screw-type hose clamp.
- Page 28: Installation Step 8: Level the dishwasher Important: The dishwasher must be level for proper dish rack operation and wash performance. You'll need: - Adjustable wrench - Philips screwdriver - Level 1. Open the door, then place a level on the door and on the rack track inside the tub to make sure the dishwasher is level.
- Page 29: Installation involves leveling the dishwasher by adjusting the three leveling legs individually. To check for proper leveling, pull the lower rack out about halfway and ensure it does not roll forward or back into the dishwasher. If the rack rolls in either direction, you must level the dishwasher again. You may need to pull your dishwasher out of the cabinet if major adjustments to the leveling legs are required. If the door hits the tub, the dishwasher is not installed correctly. Adjust the leveling legs to align the door to the tub.
- Page 30: Installation Step 9: Inserting the drain hose through the cabinet Insert the drain hose into the hole in the cabinet wall. If a power cord is used, guide the end through a separate hole. Tip: Position the water line and house wiring on the floor to avoid interfering with the base of the dishwasher.
- Page 31: Installation Slide the dishwasher partially into the cabinet. Do not push against the front panel with your knees; damage will occur. Position the dishwasher in front of the opening, then slide it into the opening a few inches at a time. Pull the drain hose through the opening under the sink as you proceed. Make sure that the drain hose is not kinked under the dishwasher and that there is no interference with the water line, wiring, or any other component. Position the dishwasher under the countertop. Make sure that the wires are secure under the dishwasher and not pinched or in contact with door springs or other components. Check tub insulation blanket, if equipped, to ensure it is not bunched up or interfering with door springs. Push the dishwasher into the cabinet so the front corners of the door are flush with the cabinet doors. You will not have access to the back leveling legs once the dishwasher is put in place.
- Page 32: Installation You'll need a Phillips-head screwdriver, screws A ST4 x 20 (2), and top mounting clips (2). Step 1: Securing the dishwasher to the countertop For countertops made of wood or materials that won’t be damaged by drilling, use Method 1. For countertops made of granite, marble, or other materials that could be damaged by drilling, use Method 2. If the gap between the control panel and the cabinet is less than 7/16 (11 mm), use Method 2. Method 1 involves inserting the long top mounting clips into the slot, bending the brackets to secure them to the dishwasher tub, and securing the dishwasher to the countertop using the provided screws. Drive the screws straight and flush to avoid scratching the control panel and interfering with the door closing.
- Page 33: Installation Method 2 Remove the plastic tub caps from the inside of the dishwasher tub. Drive a wood screw through the hole in the side of the dishwasher into the cabinet frame. Important: Drive the screws straight and flush. If the screws are too tight, the sides will bow. Do not overtighten. Protruding screw heads will scratch the side of the dishwasher. This method is for attaching the dishwasher to the side of the cabinet and it should be done when the countertop is made of granite or other breakable materials. Reinsert the plastic tub caps.
- Page 34: Installation You'll need an adjustable wrench, hot water line kit, and Teflon thread seal tape. Step 1: Connecting the water supply line Make sure to wrap the 90° elbow with Teflon thread seal tape twice. After installation, the elbow should face the dishwasher hose channel at the bottom left. Slide the compression nut, then the ferrule over the end of the water supply line. If using braided stainless steel, you do not need a ferrule or compression nut. Insert the water supply line into the 90° elbow. Slide the ferrule against the 90° elbow and secure it with the compression nut. Make sure the door spring does not rub or contact the water supply line or drain hose. Test by opening and closing the door. Reroute the lines if interference occurs.
- Page 35: Installation Connecting the drain hose Follow all local codes and ordinances. Cut on the marked line as required for your installation. The drain hose’s molded end will fit 5/8 or 1 diameter connections. If a longer drain hose is required, you can add up to 42 of length. Use 5/8 or 7/8 inside diameter hose and a coupler to connect the two hose ends. Secure the connection with screw-type hose clamps. For proper drain operation, the total drain hose length must not exceed 10'. Secure the drain hose to the air gap, waste tee, or garbage disposal with a screw-type clamp.
- Page 36: Installation You'll need a Phillips-head screwdriver, screw-type hose clamps, and a coupler for extending the drain line if applicable. Method 1 - Air gap to a waste tee or garbage disposal. Method 2 - High drain loop to a waste tee or garbage disposal. If connecting the drain line to a garbage disposal, make sure that the drain plug has been removed. Your dishwasher will not drain if the plug is left in place.
- Page 37: Installation Performing a pre-test check Review this list after installing your dishwasher to avoid problems or charges for a service call not covered by your warranty. Make sure that power is turned off. Make sure all foam and paper packaging is removed. Locate the user manual included with this appliance. Read the user manual for operating instructions. Check the door opening and closing. Make sure that the wiring is secure under the dishwasher and not pinched or in contact with door springs or other components. Check the door alignment with the tub. Turn on the sink’s hot water faucet and verify the water temperature.
- Page 38: Installation Wet testing the dishwasher involves several steps to ensure proper functioning. Turn on the power supply or plug the power cord into the outlet. Select the rinse cycle on the dishwasher and press START/CANCEL. Check that water enters the dishwasher; if not, verify that water and power are turned on. Inspect for leaks under the dishwasher and around the door, making necessary adjustments. Check the drain lines for leaks during the draining process. Restore power after any corrections are made and run the dishwasher through another fill and drain cycle. Ensure that most of the water has drained from the dishwasher after testing. There should be no standing water in the bottom of the tub, but water in the sump system is normal.
- Page 39: Warranty coverage for ZLINE Kitchen and Bath dishwasher products lasts one year from the original purchase date for the original purchaser. This warranty includes all parts and labor for necessary repairs if any part of the product is defective in materials or workmanship. Service must be performed by ZLINE approved and certified service. The warranty applies only to the original purchaser and is valid for normal residential use, defined as a single-family dwelling in a non-commercial setting. The warranty is non-transferable and does not extend based on the installation date. It applies only to products installed in the continental United States and the District of Columbia. Failure to secure certified warranty service will result in forfeiture of the remaining warranty. ZLINE Kitchen and Bath is not responsible for damage resulting from negligence, improper maintenance, misuse, or unauthorized service.
- Page 40: Page 40

FISHER AND PAYKEL DD60SCTX9 Contemporary Tall Dishwasher

BOSCH SMS4EVI04E Dishwasher

ARTUSI ADWFI700 Dishwasher

BOSCH SMS4HCI19E Dishwasher

BOSCH SHP78CM5N Dishwasher

FISHER AND PAYKEL DD24SAX9 N Dishwasher

BERTAZZONI DW24S2IPB Dishwasher

BOSCH SPV4EKX20E Dishwasher

MAINSTREET 541HTUC30 Undercounter Dishwasher

FISHER AND PAYKEL DD24STX6I Tall Dishwasher