
ZLINE Monument Top Touch Dishwasher

















| General | Details |
|---|---|
| Name | ZLINE Monument Top Touch Dishwasher |
| Make | Zline |
| Language | English |
| Filetype | PDF (Download) |
| File size | 1.63 MB |
 (1 votes, average: 5.00 out of 5)
 Loading...

ZLINE Monument Series 24 Red Matte Dishwasher

ZLINE 65286410 Monument Dishwasher

ZLINE 65286411 Monument Dishwasher

ZLINE Classic Dishwasher

ZLINE DWV-18 Tallac Dishwasher

ZLINE Monument Top Touch Dishwasher Overview
Summary of Contents
- Page 1: User manual for the Monument dishwasher.
- Page 2: ZLINE Kitchen and Bath provides attainable luxury. The kitchen and bath of your dreams is never out of reach. Unique designs and unparalleled quality are our dedication. We aim to provide an elevated experience in the heart of your home. An endless selection of features and finishes is available. Our inspiration is your reality.
- Page 3: ZLINE is fueled by a passion for innovation. A relentless pursuit of bringing the highest end luxury designs and professional features into everyone’s homes. We may change specifications and designs without prior notice. WARNING: This product can expose you to chemicals including nickel, which is known to the State of California to cause cancer.
- Page 4: Important safety instructions Operation Maintenance and cleaning Troubleshooting Warranty
- Page 5: Important safety instructions Observe all governing codes and ordinances. Note to installer – Be sure to leave these installation manual instructions for the consumer’s and local inspector’s use. Note to consumer – Keep these installation manual instructions with your user manual for future reference. Skill level – Installation of this dishwasher requires basic mechanical and electrical skills. Completion time – One to three hours. New installations require more time than replacement installations. The dishwasher must be installed in a manner that allows for easy future removal from the enclosure if service is required. Do not install this dishwasher if it has missing or broken parts. Read and observe all cautions and warnings shown throughout these instructions. This dishwasher comes with a heating element to heat the water. To reduce the risk of electrical shock, fire, or injury to persons, the installer must ensure that the dishwasher is completely enclosed at the time of installation.
- Page 6: Important safety instructions Specifications Dimensions (Width x Depth x Height) Unit with decorated door and handle: 23.9” x 26.5” x 33.7” Unit without decorated door and handle: 23.9” x 24” x 33.7”
- Page 7: Important safety instructions should be read and observed. Gloves and safety glasses or goggles should be worn during installations. This installation manual does not cover every possible condition and situation. The dishwasher should only be used for its intended functions. Rinsing off large pieces of food from dishes is recommended before washing. Sharp items and knives should be loaded to avoid damaging the dishwasher components. Plastic items should only be washed if marked dishwasher-safe. Ensure the garbage disposal is empty if the dishwasher drains into it. Do not tamper with the control panel or operate the dishwasher with missing enclosure panels. Keep detergents and rinse agents out of reach of children and pets.
- Page 8: Important safety instructions Some dishwasher detergents are strongly alkaline and can be extremely dangerous if swallowed. Avoid contact with the skin and eyes and keep children away from the dishwasher when the door is open. Under certain conditions, hydrogen gas may be produced in a hot water system that has not been used for two weeks or more. Hydrogen gas is explosive. If your home’s hot water system has not been used for a period of time, let the water flow for several minutes before using the dishwasher again. Keep young children and infants away from the dishwasher when it is operating. Do not use the dishwasher if it has a damaged power line or plug. Remove the door to the washing compartment when removing an old dishwasher from service or discarding it. To reduce the risk of injury, do not allow children to play in or on a dishwasher. This dishwasher is intended for residential use only and should not be used in commercial establishments.
- Page 9: Operation Water supply temperature should be between 120°F and 150°F. Dispose of the discarded appliance and packing material properly. The dishwasher must be grounded to avoid the risk of electric shock. If there is any damage to the dishwasher, please contact customer service. For information on installing and setting up your dishwasher, refer to the Installation Manual. Before using your dishwasher, remove the interior packing. Clean the interior surface with lukewarm water using a soft cloth. This dishwasher is designed to be built-in. Check your local power source; this dishwasher requires a 120VAC, 60HZ power supply. The dishwasher fills with water, covering the filter area at the bottom, and sprays a mixture of hot water and detergent against soiled surfaces.
- Page 10: Operation Your dishwasher has a multiple filter system that includes four separate filter meshes. It separates dirty water and clean water into different chambers. The multiple filter system helps your dishwasher operate with better performance by using less water and less energy. Your dishwasher has a smart wash system under the normal wash program that selects the wash cycle based on how large and soiled the load is. When a partial load of lightly soiled dishes is placed in the unit, a short wash cycle is automatically selected. When a full load of heavily soiled dishes is placed in the unit, a heavy wash cycle is automatically selected. The upper rack of your dishwasher can be raised or lowered to accommodate loading dishes of varying heights in either rack. After removing the third rack, the upper rack clearance height can be adjusted from 8” to 10”. The lower rack clearance height can be adjusted from 11” to 13”. See “Adjusting the upper rack” on Page 12 for more details.
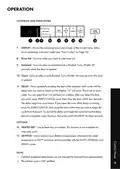
- Page 11: Your dishwasher’s control panel is located on the top edge of the door. The door must be open to select wash cycle settings and operate the dishwasher. Hold the power button down for three seconds to turn the unit’s power on or off. Select a cleaning cycle based on the type of dishes to be washed and the level of soil on the dishes. Cycle times are approximate and will vary with options selected. The timer will be delayed to allow for the water to heat for the main wash of all cycles if the sensor detects the water is not hot enough. Auto cycle is for lightly or heavily soiled dishes, with or without dried-on food. Normal cycle is for regularly soiled dinner dishes or silverware. Heavy cycle is for hard-to-clean, heavily soiled dishes, pots, and pans. Delicate cycle is for lightly soiled dishes and glass. Rinse cycle is for pre-rinsing dishes or glasses and reduces odor buildup in your dishwasher until you are ready to wash a full load.
- Page 12: Operation Controls and indicators display the remaining hours and minutes of the current cycle, delay hours remaining, and error codes. Rinse aid indicator turns on when you need to add rinse aid. Sanitized indicator turns on when a sanitized cycle is finished and turns off after 30 seconds when the door is opened. Clean indicator turns on after a cycle is finished and turns off after 30 seconds when the door is opened. Delay function allows you to delay the start of the selected wash cycle from 1 to 24 hours. Press START/CANCEL to begin the cycle after setting the delay time. To cancel the delay, open the door and press and hold DELAY for three seconds. Heated dry option is used to heat-dry your dishes and is not available for rinse-only cycles. Sanitize option maintains water temperature at 158°F maximum and is available with certain cycles. Certified residential dishwashers are not intended for licensed food establishments.
- Page 13: HI TEMP WASH - Use to maintain the water temperature at 140°F max. This option is available with the AUTO, NORMAL, and HEAVY cycles. START/CANCEL - Press to start the dishwasher after you have selected a cycle and function. Close the door. The cycle indicator begins to blink and the function indicator turns on. If you don’t close the door within four seconds of pressing START/CANCEL, the dishwasher pauses. Press START/CANCEL again to continue with the cycle. To cancel a running cycle, open the door, then press and hold START/CANCEL for three seconds. The dishwasher will return to standby status. To load more dishes or pause the dishwasher while it’s already running, open the door. A safety mechanism stops the cycle. CAUTION - There is a possibility of hot steam from inside the dishwasher. You can add more dishes before the main wash cycle has started. Check the detergent dispenser in the door to determine this. BASIC OPERATION - Load the dishwasher, add detergent, add rinse aid if needed, select the cycle, select the function, and press START/CANCEL to begin. Close the door within four seconds and the wash cycle will begin.
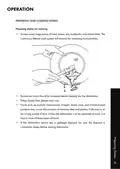
- Page 14: Operation Preparing and loading dishes Preparing dishes for washing Scrape away large pieces of food, bones, pits, toothpicks, and similar items. The continuous filtered wash system will remove the remaining food particles. Burned-on foods should be loosened before loading into the dishwasher. Empty liquids from glasses and cups. Foods such as mustard, mayonnaise, vinegar, lemon juice, and tomato-based products may cause discoloration of stainless steel and plastics if allowed to sit for a long period of time. Unless the dishwasher is to be operated at once, it is best to rinse off these types of foods. If the dishwasher drains into a garbage disposal, be sure the disposal is completely empty before starting dishwasher.
- Page 15: Operation Adjusting the upper rack This dishwasher has a convenient top rack for silverware, cutlery, and small items. This rack can be adjusted to accommodate varying loads.
- Page 16: Operation Adjusting the upper rack The height of the upper rack can be adjusted to accommodate loading taller dishes. Lift the rack to move it to the upper position. Press the handle to move it to the lower position. Loading the upper rack The upper rack is designed for cups, glasses, small plates, bowls, and plastic items marked dishwasher-safe. For best results, place the items with the soiled surface facing down or toward the center. Tilt them slightly for better drainage. Make sure the loaded dishes do not interfere with the rotation of the middle spray arm.
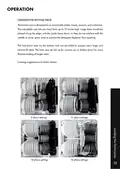
- Page 17: Operation Loading the top rack You can place the items in the top rack randomly or in an orderly fashion. The image below shows how to load the top rack for 16 place settings. Loading suggestions are shown below.
- Page 18: Operation Loading the bottom rack The bottom rack is designed to accommodate plates, bowls, saucers, and cookware. The adjustable rack lets you load items up to 13 inches high. Large items should be placed along the edge, with the inside faces down. The fold-down tines on the bottom rack are provided to support extra large and hard-to-fit items. The tines may be left up for normal use or folded down for more flexible loading of larger items. Loading suggestions are shown below.
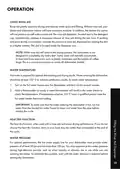
- Page 19: Operation Loading the silverware basket The silverware basket is divided into three separate sections, which can be placed in either the upper or lower racks. Caution: Make sure nothing protrudes through the bottom of the silverware basket that would block the lower spray arm from turning effectively. Adding a dish To avoid burn injury: Open the door slowly and wait until the spray arms and wash action stop. Hot water may splash out of the dishwasher. Before adding dishes, refer to “Preparing and loading dishes” for instructions on loading more dishes. Also see information on START/CANCEL in the “Controls and Indicators” section. To add or remove items after the wash cycle starts: Open the door slightly and wait a few seconds until wash action stops before completely opening. Press START/CANCEL on the control pad and close the door within four seconds. The cycle automatically resumes.
- Page 20: Operation Filling the detergent dispenser Push the detergent dispenser cover latch downward to open the detergent cup. Add detergent (dry powder, liquid, or packet) to the cup. Close the detergent dispenser cover. The amount of detergent required depends on the cycle selected and the soil level on the dishes. Detergent pods are not designed to be used in this dispenser. They should be thrown into the bottom of the tub. Refer to the following table for the recommended amount. Loading suggestions are shown below.
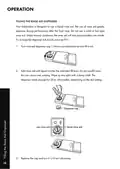
- Page 21: Operation Filling the rinse aid dispenser Your dishwasher is designed to use a liquid rinse aid. The use of rinse aid greatly improves drying performance after the final rinse. Do not use a solid or bar-type rinse aid. Under normal conditions, the rinse aid will last approximately one month. Try to keep the dispenser full, but do not overfill it. Add rinse aid until liquid touches the indicated fill level. Do not overfill since this can cause over sudsing. The dispenser holds enough for 35 to 140 washes, depending on the dial setting. Replace the cap and turn it 1/4 turn clockwise.
- Page 22: Operation Using rinse aid improves drying and reduces water spots and filming. Without rinse aid, dishes and the dishwasher interior will have excessive moisture. The rinse aid dispenser automatically releases a measured amount during the last rinse. Increase the amount dispensed by rotating the dial under the dispenser cap if spotting and poor drying occur. Note: The dishwasher is not designed to completely dry every dish; some water may accumulate in items with reservoirs. Water temperature is crucial for optimal dishwashing and drying results. Water entering the dishwasher should be at least 120°F. To check the temperature, run the hot water faucet and use a thermometer in the water stream. Important: Run hot water from the nearest faucet to clear cool water from the pipe before starting the cycle. The heat dry function enhances drying performance when used with rinse aid. Without it, items may be wetter than expected at the end of the cycle. Water pressure for optimal performance must be at least 20 psi and not more than 120 psi. Low water pressure may occur during high-demand periods; wait until demand is reduced before starting the dishwasher.
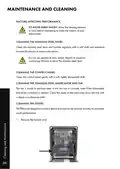
- Page 23: Maintenance and cleaning are essential for optimal performance. Allow the heating element to cool before cleaning the interior of your dishwasher to avoid burn injury. Clean the stainless steel door and handle regularly with a soft cloth and standard household cleaner. Do not use appliance wax, polish, bleach, or products containing chlorine on the stainless steel door. Clean the control panel gently with a soft, lightly dampened cloth. The tub is made of stainless steel and will not rust or corrode. Clean spots on the steel inner door and tub with a damp non-abrasive cloth. The filters need to be cleaned monthly to maximize wash performance. Remove the bottom rack to access the filters.
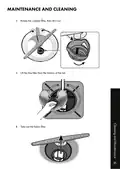
- Page 24: Maintenance and cleaning Rotate the cylinder filter, then lift it out. Lift the fine filter from the bottom of the tub. Take out the fabric filter.
- Page 25: Maintenance and cleaning instructions include flushing the filters under running water. It's important to replace the fabric filter, fine filter, cylinder filter, and bottom rack. Regularly clean the door gasket with a damp cloth to remove food particles.
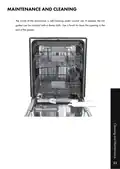
- Page 26: Maintenance and cleaning The inside of the dishwasher is self-cleaning under normal use. If needed, the tub gasket can be cleaned with a damp cloth. Use a brush to clean the opening in the end of the gasket.
- Page 27: Maintenance and cleaning Cleaning the air gap If there is an air gap installed with your dishwasher, make sure it is clean so the dishwasher will drain properly. Before you clean the air gap, turn off the dishwasher, then remove the plastic air gap cover and clean with a toothpick. Disconnecting service Your dishwasher should be protected from freezing if you plan to leave it for extended periods in an unheated place. Have a qualified person do the following: To disconnect service: Turn off the electrical power to the dishwasher at the supply source by moving fuses or tripping the circuit breaker. Turn off the water supply. Place a pan under the inlet valve, then disconnect water line from the inlet valve and drain it into a pan. Disconnect the drain line from pump and drain the water into a pan. To restore service: Reconnect the water, drain, and electrical power. Turn on water and electrical power supply. Fill the detergent cup and the rinse aid cup and run the dishwasher through a heated-wash cycle. Check all connections to make sure they do not leak.
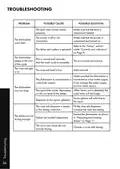
- Page 28: Troubleshooting Refer to this table to correct minor issues before calling for service. Slow fill time/fill time has exceeded time allotted A leak in the dishwasher The orientation of the distributary valve not working The wire is not connected correctly, or the distributary valve is broken A button has been touched for more than 30 seconds Anything (including water) touching a button Caution: If a water overflow occurs, turn off the main water supply before calling for service If there is water in the base pan because of an overfill or small leak, the water should be removed before restarting the dishwasher
- Page 29: Troubleshooting The door may not be closed properly. Make sure that the door is closed and latched. The power is off or not connected. Make sure that the power is connected and turned on. The dishwasher won’t start. Refer to the “Delay” section under “Controls and indicators” on Page 9. The dishwasher beeps at the end of the cycle. This is a normal occurrence that indicates the wash cycle is complete. The rinse aid light is on. The rinse aid level is low. Add rinse aid. Make sure that the dishwasher is connected to a hot water supply. If not, change the water supply to a hot water source. The dishwasher runs too long. The cycle time varies, depending on the soil level of the dishes. Some options will add time to the cycle. Depends on the option selected. The rinse aid dispenser is empty or the setting is too low. Fill the rinse aid dispenser and increase the rinse aid setting. Dishes are loaded improperly. The cycle you chose did not include drying. Choose a cycle with drying.
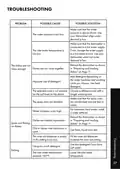
- Page 30: Troubleshooting Possible causes and solutions for common problems with the dishwasher include: The water pressure is too low. Ensure that the water pressure is above 20 psi and use the dishwasher when water demand is low. The inlet water temperature is too low. Confirm that the dishwasher is connected to a hot water supply and use it when hot water demand is low. Dishes are not clean enough. Reload the dishwasher properly and ensure the selected cycle matches the soil level on the dishes. The spray arms are blocked. Check that the spray arms are free to rotate and not obstructed. Water hardness is too high. Consider installing a water softener for extremely hard water. Dishes are loaded improperly. Follow the guidelines in “Preparing and loading dishes.” Spots and filming on dishes can result from using old or damp rinse aid. Use fresh, liquid rinse aid. The rinse aid dispenser may be empty or set too low. Fill the dispenser and adjust the setting as needed. Using too much detergent can lead to issues. Use less detergent if you have soft water. Etching may occur if the inlet water temperature exceeds 150°F. Lower the inlet water temperature.
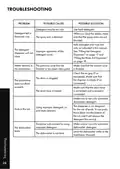
- Page 31: Troubleshooting Possible causes and solutions for common problems include: Detergent may be too old; use fresh detergent. The spray arm may be blocked; ensure it is not obstructed when loading dishes. The detergent dispenser may not close due to improper operation of the detergent cover. Water may remain in the dishwasher if the previous cycle has not finished or has been interrupted. Check the air gap and ensure the disposer is empty if connected. The drain may be clogged; ensure the drain hose is not kinked and is properly connected. Using improper detergent or pod style cleaners can cause excessive suds. Make sure to use only automatic dishwasher detergent. The dishwasher may leak if it is not level; refer to the Installation Manual for leveling instructions.
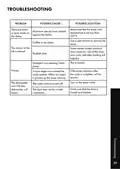
- Page 32: Troubleshooting There are black or gray marks on the dishes. Aluminum utensils have rubbed against the dishes. Use a spot cleaner to remove the stains. Coffee or tea stains may cause reddish stains. The interior of the tub is stained due to some tomato-based products. Use of the rinse only cycle right after loading will help this. Noises may occur if a hard object has entered the wash module. If the noise continues after the cycle is complete, call for service. The dishwasher won’t fill if the water valve is turned off. Make sure that the door is closed and latched.
- Page 33: Warranty coverage for ZLINE Kitchen and Bath dishwasher products lasts one year from the original purchase date for the original purchaser. This warranty covers all parts and labor for necessary repairs if any part of the product is defective in materials or workmanship. Service must be performed by ZLINE approved and certified service. The warranty applies only to the original purchaser and is valid for products installed for normal residential use. Commercial settings are excluded from this warranty. The warranty is non-transferable and does not extend based on the installation date. It applies only to products installed in the continental United States and the District of Columbia. Failure to secure certified warranty service will result in forfeiture of the remaining warranty. Unapproved out of pocket payments for service will not be reimbursed. The warranty does not cover damage from negligence, improper maintenance, misuse, or unauthorized service.
- Page 34: Page 34

BOSCH SMS4EMW06E Dishwasher

Electrolux EFF1460VSA 300 Dishwasher

Miele M.-Nr. 12 506 420 Dishwasher

FISHER AND PAYKEL DD24DI9 Dishwasher

FISHER AND PAYKEL DD24SA9 Dishwasher

COMFEE CDC22P1ABB Countertop Dishwasher

NEFF SBV6EB800E Dishwasher

BOSCH SMS6ZCI00G Dishwasher

BOSCH SHX78CM4N 24 Dishwasher

BOSCH SMS2HVI66G Dishwasher