
AEG FSE83847P Dishwasher













EN User Manual
FSE83847P
Dishwasher
USER
MANUAL


| General | Details |
|---|---|
| Name | AEG FSE83847P Dishwasher |
| Make | AEG |
| Language | English |
| Filetype | PDF (Download) |
| File size | 1.06 MB |
 (1 votes, average: 5.00 out of 5)
 Loading...

AEG FSK76748P Dishwasher

AEG FSK53617Za Dishwasher

AEG FSK74747P Dishwasher

AEG FSE73507P Dishwasher

AEG GS60AIM Dishwasher

AEG FSB73427Z Dishwasher

AEG FSE74737P Quickselect Dishwasher

AEG FFB73727PM Dishwasher

AEG F8642FI Tall Tub Dishwasher

AEG FFE83800PM Dishwasher

AEG FSE83847P Dishwasher Overview
Summary of Contents
- Page 1: User manual for FSE83847P dishwasher.
- Page 2: SAFETY INFORMATION SAFETY INSTRUCTIONS PRODUCT DESCRIPTION CONTROL PANEL PROGRAMME SELECTION BASIC SETTINGS BEFORE FIRST USE DAILY USE HINTS AND TIPS CARE AND CLEANING TROUBLESHOOTING TECHNICAL INFORMATION ENVIRONMENTAL CONCERNS Thank you for choosing this AEG product. We have created it to give you impeccable performance for many years, with innovative technologies that help make life simpler. Please spend a few minutes reading to get the very best from it. Always use original spare parts. When contacting our Authorised Service Centre, ensure that you have the following data available: Model, PNC, Serial Number. Warning / Caution-Safety information General information and tips Environmental information
- Page 3: Children and vulnerable people safety This appliance can be used by children aged from 8 years and above and persons with reduced physical, sensory or mental capabilities if they have been given supervision or instruction concerning the use of the appliance in a safe way. Children between 3 and 8 years of age and persons with very extensive and complex disabilities shall be kept away from the appliance unless continuously supervised. Children of less than 3 years of age should be kept away from the appliance unless continuously supervised. Children should be supervised to ensure that they do not play with the appliance. Keep detergents away from children. Keep children and pets away from the appliance when the door is open. Children shall not carry out cleaning and user maintenance of the appliance without supervision. General safety This appliance is intended to be used in household and similar applications. Do not change the specification of this appliance.
- Page 4: Connect the mains plug to the mains socket only at the end of the installation. Make sure that there is access to the mains plug after the installation. Do not put flammable products or items that are wet with flammable products in, near or on the appliance. Dishwasher detergents are dangerous. Follow the safety instructions on the detergent packaging. Do not pull the mains cable to disconnect the appliance. Always pull the mains plug. Do not drink and play with the water in the appliance. Do not remove the dishes from the appliance until the programme is complete. This appliance has an internal lamp that comes on when you open the door and goes off when the door is closed. To repair the appliance contact the Authorised Service Centre. Use original spare parts only. If the water inlet hose is damaged, immediately close the water tap and disconnect the mains plug from the mains socket.
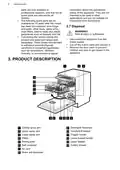
- Page 5: Spare parts are only available to professional repairers, and not all spare parts are relevant for all models. The following spare parts will be available for 10 years after the model has been discontinued: door hinge and seals, other seals, spray arms, drain filters, interior racks, and plastic peripherals such as baskets and lids. These lamps are intended to withstand extreme physical conditions in household appliances. Disconnect the appliance from the mains supply before disposal. Cut off the mains cable and discard it. Remove the door catch to prevent children and pets from getting closed in the appliance. Product description includes various components such as ceiling spray arm, upper spray arm, lower spray arm, filters, and rating plate. The salt container, air vent, detergent dispenser, and ComfortLift basket are also part of the product description. Additional components include the trigger handle, lower basket handle, upper basket, cutlery drawer, and rinse aid dispenser.
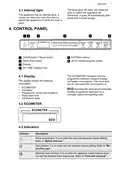
- Page 6: The lamp goes off when you close the door or switch the appliance off. The appliance has an internal lamp that comes on when you open the door or switch the appliance on while the door is open. The control panel includes an On/Off button, Delay Start button, Display, Extras buttons, and AUTO Sense program button. The ECOMETER indicates how the programme selection impacts energy and water consumption. The display shows information including ECOMETER, indicators, programme names and durations, delay start time, and information texts. The ECOMETER indicates the most environmentally friendly programme selection for a normally soiled dishwashing load. The rinse aid indicator is on when the rinse aid dispenser needs refilling. The salt indicator is on when the salt container needs refilling. The Machine Care indicator is on when the appliance needs internal cleaning with the Machine Care programme.
- Page 7: Drying phase indicator is on when you select a programme with the drying phase. Delay Start indicator is on when you set the delay start. Pause indicator flashes when you pause a wash cycle or the delay countdown by opening the appliance door. Alert indicators are on when a malfunction of the appliance occurs. MY TIME selection bar allows selecting a suitable dishwashing cycle based on programme duration. AUTO Sense programme automatically adjusts the dishwashing cycle to the type of load. Quick is the shortest programme (30min) suitable for dishwashing a load with fresh and light soil. ExtraSilent reduces the noise generated by the appliance. ExtraPower improves the dishwashing results of the selected programme by increasing wash temperature and duration. ECO is the longest programme offering the most efficient use of energy and water consumption for crockery and cutlery with normal soil.
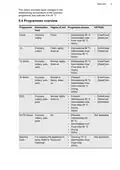
- Page 8: The option prevents rapid changes in the dishwashing temperature of the selected programme and reduces it to 45 °C. Programmes overview Dishwasher degree of soil Crockery, cutlery Fresh Dishwashing 50 °C Intermediate rinse Final rinse 45 °C AirDry ExtraPower GlassCare Crockery, cutlery, pots, dried-on pans Normal, lightly Dishwashing 60 °C Intermediate rinse Final rinse 55 °C Drying ECO Crockery, cutlery, pots, heavy, dried-on pans Dishwashing 60 °C Intermediate rinse Final rinse 60 °C Drying ExtraSilent Dishwashing 50 °C Intermediate rinse Final rinse 55 °C AUTO Sense Crockery, cutlery, pots, pans Dishwashing 50 - 60 °C Machine Care For cleaning the appliance interior.
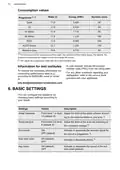
- Page 9: Consumption values for water, energy, and duration are provided for various programmes. The pressure, temperature of water, mains supply variations, options, quantity of dishes, and degree of soil can change the values. Values for programmes other than ECO are indicative only. For test institutes, include the product number code (PNC) from the rating plate in requests. Basic settings can be configured according to user needs. Water hardness can be adjusted from level 1 to level 10, with a default of 5. Rinse aid level can be adjusted from level 0 to level 6, with a default of 4. The end sound can be activated or deactivated, with OFF as the default. Auto door open and key tones can also be activated or deactivated, with ON as the default for both.
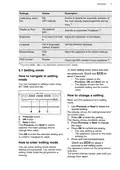
- Page 10: Settings Enable or disable the automatic selection of the most recently used programme and options. Activate or deactivate TimeBeam. Adjust the brightness of the display. Set the preferred language. Reset the appliance to the factory settings. Check the PNC number of your appliance. To enter setting mode, press and hold simultaneously for about 3 seconds. You can navigate in setting mode using the MY TIME selection bar. Make sure the appliance is in setting mode to change a setting. The saved settings remain valid until you change them again.
- Page 11: The water softener should be adjusted according to the hardness of the water in your area. It is important to set the right level of the water softener to assure good washing results. The water softener removes minerals from the water supply, which would have a negative effect on the washing results and on the appliance. Water hardness is measured in equivalent scales. Multi-tabs containing salt are not effective enough to soften hard water. For the correct water softener operation, the resin of the softener device needs to be regenerated regularly. This regeneration process is automatic and is part of the normal dishwasher operation. Regardless of the type of detergent used, set the proper water hardness level to keep the salt refill indicator active. A new regeneration process will be initiated between the final rinse and the programme end. The higher the content of these minerals, the harder your water is.
- Page 12: Rinse aid helps to dry the dishes without streaks and stains. It is automatically released during the hot rinse phase. When the rinse aid dispenser is empty, the display shows the indicator Rinse aid low. For best drying performance, always use rinse aid and keep the notification active. To deactivate the rinse aid dispenser and the notification, set the rinse aid level to 0. The rinsing of the water softener may begin in the same cycle or at the beginning of the next programme. You can activate an acoustic signal that sounds when the programme is completed. Acoustic signals also sound when a malfunction of the appliance occurs. AirDry improves the drying results by automatically opening the appliance door during the drying phase. All consumption values mentioned are determined in accordance with applicable standards in laboratory conditions. AirDry is automatically activated with all programmes.
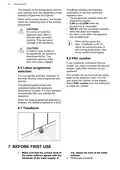
- Page 13: The duration of the drying phase and door opening time vary depending on the selected programme and options. The programme duration when the programme begins is displayed. When AirDry opens the door, the display shows the remaining time of the running programme. An alarm code appears when the appliance has a malfunction. Do not try to close the appliance door within 2 minutes after automatic opening. If children have access to the appliance, it is advised to deactivate AirDry. You need to provide the product number code (PNC number) of your appliance when contacting an Authorised Service Centre. The PNC number can be found on the rating plate on the appliance door. You can set the automatic selection of the most recently used programme and options. Make sure that the current level of the water softener agrees with the hardness of the water supply before first use.
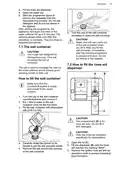
- Page 14: Fill the rinse aid dispenser. Open the water tap. Start the programme Quick to remove any residuals from the manufacturing process. Do not use detergent and do not put dishes in the baskets. The appliance recharges the resin in the water softener for up to 5 minutes. Use rough salt designed for dishwashers only. The salt is used to recharge the resin in the water softener and to assure good washing results. Only use rinse aid designed specifically for dishwashers. Fill the dispenser until the rinse aid reaches the marking MAX. Remove the spilled rinse aid with an absorbent cloth to prevent excessive foam formation.
- Page 15: Close the lid and ensure it locks into position. Fill the rinse aid dispenser when the indicator is clear. Open the water tap and press and hold until the appliance is activated. Fill the salt container if it is empty. Load the baskets and add the detergent. Select and start a programme, then close the water tap when complete. The basket is automatically locked on the upper level. Carefully place or remove items in the basket as per the loading leaflet. Do not exceed the max load capacity of 18 kg. The ComfortLift mechanism allows easy loading and unloading of dishes.
- Page 16: Using the detergent How to select and start a programme using MY TIME selection bar Slide your finger across MY TIME selection bar to choose a suitable programme. The ECOMETER indicates the level of energy and water consumption. Activate applicable EXTRAS if desired. Close the appliance door to start the programme. Only use detergent specifically designed for dishwashers. How to activate EXTRAS Put the detergent (gel, powder or tablets) in the compartment. If the programme has a prewash phase, put a small quantity of detergent on the inner part of the appliance door. Not all options are compatible with each other.
- Page 17: How to start the AUTO Sense program Opening the door while the appliance operates may affect the energy consumption and the programme duration. The appliance senses the type of load and adjusts a suitable wash cycle. How to delay the start of a programme If you cancel the delay start, you have to select the programme again. How to cancel a running programme Opening the door while a programme is running pauses the wash cycle. The Auto Off function saves energy by switching the appliance off when it is not operating. When the programme is complete, the display shows Dishes clean. Make sure that there is detergent in the detergent dispenser before you start a new programme. If you open the door during the delay start countdown, the countdown is paused.
- Page 18: The Auto Off function switches the appliance off automatically. Follow the hints below to ensure optimal cleaning and drying results in daily use and to protect the environment. Only use salt, rinse aid and detergent designed for dishwasher. Other products can cause damage to the appliance. Washing dishes in the dishwasher usually consumes less water and energy than washing dishes by hand. Load the dishwasher to its full capacity to save water and energy. In areas with hard water, we recommend using basic dishwasher detergent, rinse aid, and salt separately for optimal results. Detergent tablets do not fully dissolve with short programmes; use tablets with long programmes to prevent residues. Do not pre-rinse dishes by hand; it increases water and energy consumption. Always use the correct quantity of detergent to avoid poor cleaning results and detergent residues. Select a programme according to the type of load and the degree of soil. ECO offers the most efficient use of water and energy consumption.
- Page 19: the indicator Start the Machine Care programme to clean the appliance interior. If unable to remove the foreign objects, contact an Authorised Service Centre. How to start the Machine Care programme Disassemble the filters system as instructed in this chapter. Before starting the Machine Care programme, clean the filters and spray arms. Clean the appliance with a moist soft cloth. Only use neutral detergents. The filter system is made of 3 parts. To maintain the performance of your appliance, use a cleaning product designed specifically for dishwashers at least once every two months. Check the filters and the sump after each use of the dishwasher.
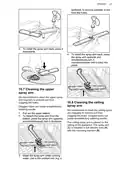
- Page 20: Put back the filter in the flat filter. Remove the filter out of the filter. Remove the flat filter. An incorrect position of the filters can cause bad washing results and damage to the appliance. Wash the filters. We recommend to clean the lower spray arm regularly to prevent soil from clogging the holes. Clogged holes can cause unsatisfactory washing results. To remove the lower spray arm, pull it upwards. Make sure that there are no residues of food or soil in or around the edge of the sump. Wash the spray arm under running water.
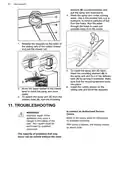
- Page 21: To install the spray arm back, press it downwards. To install the spray arm back, press the spray arm upwards and simultaneously turn it counterclockwise until it locks into place. We recommend to clean the upper spray arm regularly to prevent soil from clogging the holes. Clogged holes can cause unsatisfactory washing results. We recommend to clean the ceiling spray arm regularly to prevent soil from clogging the holes. Pull out the upper basket. To detach the spray arm from the basket, press the spray arm upwards and simultaneously turn it clockwise. The ceiling spray arm is placed on the ceiling of the appliance. Wash the spray arm under running water. Use a thin pointed tool, e.g. a toothpick, to remove particles of soil from the holes.
- Page 22: Wash the spray arm under running water. Use a thin pointed tool to remove particles of soil from the holes. Run the water through the holes to wash soil particles away from the inside. Release the stoppers on the sides of the sliding rails of the cutlery drawer and pull the drawer out. To install the spray arm back, insert the mounting element in the spray arm and fix it in the delivery tube by turning it clockwise. Make sure that the mounting element locks into place. Install the cutlery drawer on the sliding rails and block the stoppers. Move the upper basket to the lowest level to reach the spray arm more easily. Improper repair of the appliance may pose a danger to the safety of the user. Any repairs must be performed by qualified personnel.
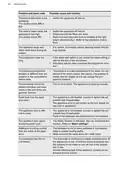
- Page 23: Problem and alarm code Possible cause and solution You cannot activate the appliance. Make sure that the mains plug is connected to the mains socket. Make sure that there is no damaged fuse in the fuse box. The programme does not start. Make sure that the appliance door is closed. If the delay start is set, cancel the setting or wait for the end of the countdown. The appliance does not fill with water. Make sure that the water tap is open. Make sure that the pressure of the water supply is not too low. The appliance does not drain the water. Make sure that the sink spigot is not clogged.
- Page 24: Problem and alarm code Possible cause and solution Technical malfunction of the appliance. Switch the appliance off and on. The level of water inside the appliance is too high. Make sure that the filters are clean. Make sure that the outlet hose is installed at the right height above the floor. The appliance stops and starts more times during operation. It is normal. It provides optimal cleaning results and energy savings. The programme lasts too long. The pressure and the temperature of the water, the variations of the mains supply, the options, the quantity of dishes and the degree of soil can change the programme duration. Small leak from the appliance door. The appliance is not levelled. Loosen or tighten the adjustable feet. The appliance door is difficult to close. Parts of the tableware are protruding from the baskets. The appliance door opens during the wash cycle. Rattling or knocking sounds from the inside of the appliance. The tableware is not properly arranged in the baskets. The appliance trips the circuit-beaker.
- Page 25: Problem and alarm code The appliance is switched on but does not operate. Power supply is out of the operating range. The appliance switches off during operation. Complete power outage. Deactivate and activate the appliance if the problem occurs again. We do not recommend using the appliance until the problem has been completely fixed. For alarm codes not described in the table, contact an Authorised Service Centre. The dishwashing and drying results are not satisfactory. Poor washing results may require a more intensive washing programme. Activate the function AirDry to improve drying performance.
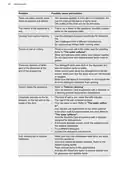
- Page 26: Problem Possible cause and solution There are stains and dry water drops on glasses and dishes. The released quantity of rinse aid is not sufficient. Adjust the rinse aid dosage to a higher level. The quality of the rinse aid can be the cause. The interior of the appliance is wet. This is not a defect of the appliance. Humidity condenses on the appliance walls. Unusual foam during washing. Use the detergent designed specifically for dishwashers. Traces of rust on cutlery. There is too much salt in the water used for washing. Silver and stainless steel cutlery were placed together. There are residues of detergent in the dispenser at the end of the programme. The detergent tablet was stuck in the dispenser and was not washed away by water. Odours inside the appliance. Start the Machine Care programme with a descaler or a cleaning product designed for dishwashers. Limescale deposits on the tableware, on the tub and on the inside of the door. The level of salt is low, check the refill indicator. Make sure that only dishwasher-safe items are washed in the appliance.
- Page 27: Refer to Before first use, Daily use, or Hints and tips for other possible causes. 12. Technical information Dimensions: Width / height / depth (mm) 596 / 818 - 898 / 550 Voltage (V): 200 - 240 Water supply pressure: 0.5 - 10 bar (minimum and maximum) Water supply capacity: max 60 °C Place settings: 14 Refer to the rating plate for other values. The QR code on the energy label provides a web link to the registration of this appliance in the EU EPREL database. Keep the energy label for reference together with the user manual and all other documents provided with this appliance. Recycle materials with the symbol to help protect the environment and human health.
- Page 28: Page 28

edesa EHDB-6930-I Dishwasher

FISHER AND PAYKEL DD24SCTX9 N Dish Drawer Dishwasher
EVERDURE DWC066WE 55cm 6 Place Settings Free Standing Dishwasher

SAMSUNG DW60CB750UAPSA Bespoke Built Under Dishwasher

THPRIMO 45DFULLSLID Vaatwasser Dishwasher

GE APPLIANCES GTW845 Dishwasher

BOSCH SGE53C56UC Black Dishwasher

Whirlpool Dishwasher

FISHER PAYKEL DD24STX6PX1 Sanitize Tall DishDrawer Dishwasher

SIEMENS SN73HX10VG Fully Integrated Dishwasher