BUFFALO DK775,DN975 Dishwasher


DISHWASHER USER MANUAL
Models
DK775 DN975

| General | Details |
|---|---|
| Name | BUFFALO DK775,DN975 Dishwasher |
| Make | BUFFALO |
| Language | English |
| Filetype | PDF (Download) |
| File size | 0.46 MB |


BUFFALO DK775 Dishwasher

BUFFALO DK775 Digital Pass Through Dishwasher

BUFFALO DK775,DN975 Dishwasher Overview
Summary of Contents
- Page 1: DISHWASHER USER MANUAL Models DK775 DN975
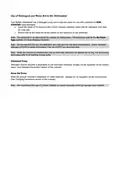
- Page 2: Safety instructions should be followed to ensure proper use of the appliance. Position the appliance on a flat, stable surface. A qualified technician should carry out installation and repairs. Consult local and national standards for compliance with health and safety regulations. Do not immerse the appliance in water and always disconnect the power supply when not in use. The appliance is not suitable for outdoor use. Children should be supervised to prevent them from playing with the glass washer. Only use commercial grade detergents and rinse aids in the glass washer. Damage caused by lime scale or poor water quality is not covered by the manufacturer's warranty. The appliance should operate with softened water and should not exceed specified temperature limits.
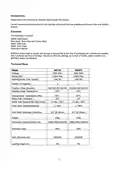
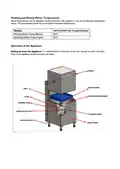
- Page 3: Introduction Please take a few moments to carefully read through this manual. Correct maintenance and operation of this machine will provide the best possible performance from your Buffalo product. Contents The following is included: Buffalo Dishwasher, Plate Rack, Glass Rack and Cutlery Rack, Water Inlet Hose, Water Drain Hose, Instruction Manual. BUFFALO prides itself on quality and service, ensuring that at the time of packaging the contents are supplied fully functional and free of damage. Technical Data Model DK775, 230V 50Hz, 6.6kW Max, 23ltr/7ltr. Model DN975, 400V 50Hz, 9.6kW Max, 23ltr/7ltr. Number of Programs: 5. Washing Water Temperature: 55°C. Rinsing Water Temperature (Max): 85°C. Weight: 93kg. Dimensions (H(open)xWxD) mm: 1480(1960)x700x785. Protection Class: IPX5.
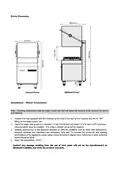
- Page 4: Device dimensions Installation - water connection Plumbing connections must allow the machine to be removed for service and cleaning. Connect the hose supplied with the machine to the inlet at the rear and the ¾” NPT fitting on the water supply line. Check the water inlet pressure is between 2-4 bar (29-58 psi) (not static). If the pressure is more, a pressure reducing valve must be installed. If it is less, a booster pump will be required. Washing performance depends on external conditions such as water inlet temperature, pressure, hardness, and chemicals used. Supply water should be below 9 degree Clark to increase service life and washing performance. Water inlet temperature: 4-50°C. Any damage from the use of hard water will void the product warranty.
- Page 5: Use of detergent and rinse aid in the dishwasher. Your Buffalo Dishwasher has a detergent pump and a rinse-aid pump for use with non-foaming liquid detergent. Insert the hoses of the pumps in the correct chemical container. Ensure both of the hoses are at the bottom of the containers of the chemicals. The chemicals to be used should be suitable for dishwashers. The detergent shall be the no foam type, suitable for glass washing machines. We recommend that you use detergent and rinse aid from the same manufacturer. Detergent amount required is dependent on soil and water hardness. Rinse aid amount required is dependent on water hardness. We recommend the use of a water softener to reduce limescale which can damage your machine.
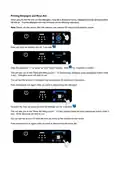
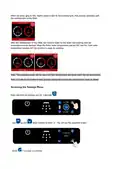
- Page 6: Priming detergent and rinse aid When using for the first time or if the detergent/rinse aid is allowed to run dry, detergent and rinse aid hoses will be full with air. To prime detergent and rinse aid hoses use the following instructions. Please use this option after the machine has reached the required temperature values. Press and hold the settings icon for 3 seconds. Enter the password “1” by using “up” and “down” buttons. This will take you to the “Detergent filling screen”. To start priming detergent press start/pause button (Hold 3 sec). To prime the rinse aid press and hold the settings icon for 3 seconds. This will take you to the “Rinse Aid filling screen”.
- Page 7: Washing and rinsing water temperatures can be adjusted. The appliance is set to specific temperature values during production. The temperature should not be set higher than these values. To understand the information in the user manual correctly, the main parts of the appliance should be known.
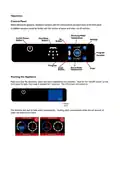
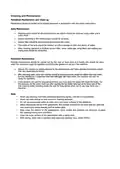
- Page 8: Operation Control panel Before starting the appliance, familiarise operators with the control buttons and signal items on the front panel. Operators should be familiar with the location of power and water cut-off switches. Starting the appliance Make sure that the electricity, water and drain installations are complete. Wait for the “On/Off switch” on the front panel to light, then keep it pressed for 3 seconds. The LCD screen will switch on. The machine will start to take water automatically. Heating starts automatically when the set amount of water has entered the boiler.
- Page 9: When the boiler gets to 60C, heated water is sent to the washing tank. This process continues until the washing tank is fully filled. After the washing tank is fully filled, the machine waits for the boiler and washing tank set temperatures to be reached. When the boiler water temperature reaches 85C and the tank water temperature reaches 55C, the machine is ready for washing. The washing process will not start until the washing tank and boiler reach the set temperature. In order for the water to heat up faster during the process, the machine door must be closed. Accessing the settings menu requires pressing and holding the settings icon for 3 seconds. Use the up and down buttons to enter ‘2’. You will see the password screen. Hold for 3 seconds to confirm.
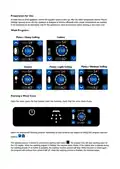
- Page 10: Changing parameters involves accessing the settings menu and selecting the desired program. You can adjust the tank temperature, boiler temperature, washing time, waiting time after washing, detergent time, rinse aid time, and dirtiness counter for each program. The waiting time after washing prevents droplets from falling on glasses during rinsing. The detergent pump operates on a timer, affecting the amount of detergent used. The rinse aid pump also operates on a timer, influencing the amount of rinse aid dispensed. The dirtiness counter tracks the number of washes until the washing tank water needs changing. Preheating settings determine whether the washing cycle can start without reaching set temperatures. The start by door/hood setting controls whether the cycle begins when the door is closed or by touching the control screen icon.
- Page 11: Preparation for use involves waiting for the supplied water to warm up. The appliance functions efficiently when proper temperatures are reached. If temperatures decrease, wait for the appliance to reach temperature before starting a new wash cycle. Open the hood and place the first basket inside the machine, ensuring the arms rotate freely. Select the appropriate washing program based on the type of dishes and degree of soiling. The washing process starts by pressing the washing start button. The program time will count down on the LCD display. If the cabinet door is opened during the washing process, the machine will stop. When the door is closed again, the program will continue from where it left off. The machine beeps when the washing process is finished.
- Page 12: Draining Excess water generated during the operation of the machine will be automatically removed via the drain. At the end of each day, the door should be left open to drain and dry. Before the machine is turned off at the end of the day, the boiler water must be completely drained. Models without drain pump (drain by gravity) require removing the drain plug in the tank to start draining. Models with a drain pump automatically activate the drain system when the rinsing cycle is started. Before turning off the unit at the end of the day, the unit should be drained. After the drain process is finished, press the 'On/Off' switch to turn off the machine. It is recommended to disconnect mains water and electrical supply after draining is complete. For a more hygienic operation, leave the appliance door open after the draining process.
- Page 13: Cleaning and maintenance should be carried out by trained personnel in accordance with safety instructions. Daily maintenance includes disconnecting washing arms and removing debris with water and a nylon brush. Debris in the washing tank should be removed, and the suction filter should be cleaned with water. The inside of the tank should be cleaned with a sponge or cloth and plenty of water. Periodic maintenance should be conducted at least once a month before the machine is used. Descale the machine by adding descaler to the washing tank and following the descaler instructions. After descaling, drain the water and refill the machine with fresh water. If the device is not used for a long time, drain the water left inside the boiler. Never use cleaning chemicals containing bleaching agents, chlorine, or hypochlorite. Clean the outer surface of the glasswasher with a damp cloth and sanitize with a stainless-steel approved sanitizer.
- Page 14: Page 14
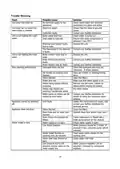
- Page 15: Trouble shooting Unit does not switch on Check mains water and electrical connection is in place and active. Unit does not run when the start button is pressed Ensure that the hood is securely closed. Unit is not heating the wash water Check water is turned on and ensure inlet water temperature is between 5 and 50°C. Washing tank resistor faulty due to scale Descale the unit. Unit is not heating the boiler water Descale the unit. Poor washing performance Check the detergent and rinse aid chemicals. Dishes being loaded without emptying Remove any left-overs or debris on dishes before loading the basket. White marks on dishes can be caused by hard water Contact your distributor for details on using the necessary water softener. Appliance does not drain Clean the filters. Water intake is slow Ensure water supply is open and water pressure should be 2-4 bars.
- Page 16: Electrical wiring Connection to a suitable power supply should only be carried out by a qualified and competent electrical engineer. DK775 is supplied wired for installation to a single phase 230v 32A power supply. DN975 is supplied wired for installation to a 3 phase 400v 16A power supply. This appliance must be earthed. For safety reasons your machine must be bonded to adjacent metalwork or earthed so that it is at the same potential. Electrical isolation points must be kept clear of any obstructions. Buffalo recommend that this product is connected to a circuit protected by an appropriate RCD. The WEEE logo on this product indicates that the product must not be disposed of as household waste. To help prevent possible harm to human health and/or the environment, the product must be disposed of in an approved and environmentally safe recycling process. Every effort is made to ensure all details are correct at the time of going to press, however, Buffalo reserve the right to change specifications without notice.
- Page 17: Page 17
- Page 18: Page 18

BOSCH SGX78B55UC Smart Dishwasher

FISHER PAYKEL DD24STX6PX1 Sanitize Tall DishDrawer Dishwasher

BOSCH SMS2HMW03E Dishwasher

BOSCH SMS6TCI01G Dishwasher

newWORLD NW60DWFSW Full Size 15 Place Dishwasher

BOSCH SMS4HKI06E Free Standing Dishwasher

FISHER PAYKEL DD24DDFT9 Series Dishwasher

BOSCH SMV26DX00T Dishwasher

TEKNIX TFD455W Dishwasher

Hoover 32901787 Dishwasher