COOKOLOGY CFSD613WH Dishwasher


Instruction Manual
DISHWASHER
Please read this manual before use and save for future reference.
MODEL: CFSD613WH
PLEASE REGISTER YOUR NEW APPLIANCE AT WWW.COOKOLOGY.COM

| General | Details |
|---|---|
| Name | COOKOLOGY CFSD613WH Dishwasher |
| Make | COOKOLOGY |
| Language | English |
| Filetype | PDF (Download) |
| File size | 1.24 MB |


COOKOLOGY CBID601 Dishwasher

COOKOLOGY CSID601SS Dishwasher

COOKOLOGY 45cm Dishwasher

COOKOLOGY CFSD613WH Dishwasher Overview
Summary of Contents
- Page 1: Instruction manual for the dishwasher. Read this manual before use and save for future reference. Model: CFSD613WH. Please register your new appliance.
- Page 2: Installation and repair can only be carried out by a qualified technician. This appliance is intended for household and similar applications. This appliance can be used by children aged from 8 years and above with supervision. Children shall not play with the appliance. This appliance is for indoor household use only. To protect against the risk of electrical shock, do not immerse the unit, cord, or plug in water. This appliance must be earthed to reduce the risk of electric shock. Do not operate your dishwasher unless all enclosure panels are properly in place. Some dishwasher detergents are strongly alkaline and can be dangerous if swallowed. Use only detergent and rinse agents recommended for use in an automatic dishwasher.
- Page 3: Parts to your dishwasher To ensure your food is evenly cooked, remove the frying drawer halfway through cooking and turn or shake the items on the wire rack. Always make sure the air fryer is switched off when you remove the frying drawer. Reload it once the drawer is back in the fryer and it will start cooking again within 10 minutes. Pictures are only for reference, different models may be different.
- Page 4: Set the water softener. Always use salt intended for dishwasher use. The salt container is located beneath the lower basket. Only use salt specifically designed for dishwashers. Fill with salt before running a cycle to prevent corrosion. Remove the lower basket and unscrew the reservoir cap. Pour in about 1.5kg of dishwasher salt. Screw back the cap tightly after filling the container. Start a washing program immediately after filling the salt container. The salt warning light indicates when to refill the salt container.
- Page 5: Maintenance and cleaning External care Clean the door seals regularly with a soft damp cloth to remove food deposits. Food and drink residues may drip onto the sides of the dishwasher door. These surfaces are outside the wash cabinet and are not accessed by water from the spray arms. The control panel should be wiped with a soft damp cloth only. Internal care The filtering system in the base of the wash cabinet retains coarse debris from the washing cycle. Check the condition of the filters regularly and clean them if necessary under running water. Pictures are only for reference; different models of the filtering system and spray arms may be different. To ensure your food is evenly cooked, remove the frying drawer halfway through cooking and turn or shake the items. Always make sure the air fryer is switched off when you remove the frying drawer.
- Page 6: It is necessary to clean the spray arms regularly for hard water chemicals will clog the spray arm jets and bearings. Please take frost protection measures on the dishwasher in winter. Cut off the electrical power to the dishwasher at the supply source. Turn off the water supply and disconnect the water inlet pipe from the water valve. After every wash, turn off the water supply to the appliance and leave the door slightly open so that moisture and odors are not trapped inside. Before cleaning or performing maintenance, always remove the plug from the socket. To clean the exterior and rubber parts of the dishwasher, do not use solvents or abrasive cleaning products. It is recommended that you run a wash cycle with the dishwasher empty and then remove the plug from the socket. If the appliance must be moved, try to keep it in the vertical position. Periodic cleaning with a damp sponge will prevent odors from occurring.
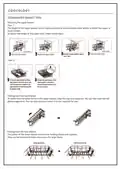
- Page 7: Installation Electrical requirements Check the rating label for the appropriate power supply and use the required fuse. Electrical connection Ensure the voltage and frequency match the rating plate and use a properly earthed socket. Water supply and drain Cold water connection Connect the cold water supply hose securely to a threaded connector. Safety supply hose The safety supply hose has double walls to prevent water flow in case of a break. How to connect the safety supply hose Pull the safety supply hoses from the storage compartment and tighten to the faucet. How to disconnect the safety supply hose Turn off the water and unscrew the safety supply hose from the faucet.
- Page 8: Connections of drain hoses Insert the drain hose into a drain pipe with a minimum diameter of 4 cm, or let it run into the sink, making sure to avoid bending or crimping it. The height of the drain pipe must be less than 1000mm. The free end of the hose must not be immersed in water to avoid backflow. How to drain excess water from hoses If the sink is 1000 mm higher from the floor, the excess water in hoses cannot be drained directly into the sink. It will be necessary to drain excess water from hoses into a bowl or suitable container that is held outside and lower than the sink. Water outlet Connect the water drain hose. The drain hose must be correctly fitted to avoid water leaks. Ensure that the water drain hose is not kinked or squashed. Extension hose If you need a drain hose extension, make sure to use a similar drain hose. It must be no longer than 4 meters; otherwise, the cleaning effect of the dishwasher could be reduced. Syphon connection The waste connection must be at a height less than 100 cm from the bottom of the dish. The water drain hose should be fixed. Position the appliance Position the appliance in the desired location. The back should rest against the wall behind it, and the sides along the adjacent cabinets or walls. Levelling the appliance Once the appliance is positioned for levelling, the height of the dishwasher may be altered via adjustment of the screwing level of the feet. In any case, the appliance should not be inclined more than 2°.
- Page 9: Built-in installation The installation position of the dishwasher should be near the existing inlet and drain hoses and power cord. Less than 5 mm between the top of the dishwasher and cabinet and the outer door aligned to the cabinet. If the dishwasher is installed at the corner of the cabinet, there should be some space when the door is opened. Freestanding installation The height of the dishwasher, 845 mm, has been designed to allow the machine to be fitted between existing cabinets of the same height. The feet can be adjusted so that the correct height is reached. The laminated top of the machine does not require any particular care since it is heatproof, scratchproof, and stainproof.
- Page 10: Loading the dishwasher. Quick user guide. To ensure your food is evenly cooked, remove the frying drawer halfway through cooking and turn or shake the items on the wire rack. Always make sure the air fryer is switched off when you remove the frying drawer. Reload it once the drawer is back in the fryer and it will start cooking again within 10 minutes.
- Page 11: Control panels Press this button to turn on your dishwasher. Select the appropriate washing program, the selected program indicator will be lit. When you have about or less than 6 place settings dishware to wash, you can choose this function to save energy and water. This option allows you to lock the buttons on the control panel, except the Power button, so children cannot accidentally start the dishwasher. To start the selected washing program or pause it when the dishwasher is working. Intensive is for heaviest soiled crockery and normally soiled pots, pans, dishes, etc. ECO is the most efficient program in terms of its combined energy and water consumption for normally soiled tableware. If the rinse aid indicator is lit, it means the dishwasher is low on rinse aid and requires a refill. If the salt indicator is lit, it means the dishwasher is low on salt. If the water faucet indicator is lit, it means the water faucet is closed.
- Page 12: Water softener must be set manually using the water hardness dial. The water softener is designed to remove minerals and salts from the water, which would have a detrimental effect on the operation of the appliance. The softener should be adjusted according to the hardness of the water in your area. The dishwasher allows for adjustment in the amount of salt consumed based on the hardness of the water used. Open the door, switch on the appliance; press the Program button for more than 5 seconds to start the water softener set model. Press the Program button to select the proper set according to your local environment. Contact your local water board for information on the hardness of your water supply. If hard water is used in the dishwasher, deposits will form on the dishes and utensils. The appliance is equipped with a special softener that uses a salt container specifically designed to eliminate lime and minerals from the water. Always make sure the air fryer is switched off when you remove the frying drawer.
- Page 13: Preparing and loading the dishes Consider buying utensils which are identified as dishwasher-proof. For particular items, select a program with the lowest possible temperature. Do not take glass and cutlery out of the dishwasher immediately after the program has ended. Cutlery with wooden, horn, china or mother-of-pearl handles are not suitable. Recommendations for loading the dishwasher include scraping off large amounts of leftover food. Items such as cups, glasses, pots, and pans should be faced downwards. All utensils must be stacked securely and cannot tip over. The upper basket is designed to hold more delicate and lighter dishware. Very small items should not be washed in the dishwasher as they could easily fall out of the basket. To prevent water dripping from the upper basket into the lower basket, empty the lower basket first.
- Page 14: Loading the upper basket is designed for delicate and lighter dishware such as glasses and cups. Position dishes to avoid movement by the spray of water. The lower basket should hold large and difficult-to-clean items like pots and pans. Place serving dishes and lids on the side to avoid blocking the spray arm. The maximum diameter for plates in front of the detergent dispenser is 19 cm to ensure it opens properly. Cutlery should be placed separately in the cutlery rack to prevent nesting, which can affect performance. Rinse aid is released during the final rinse to prevent water droplets, spots, and streaks on dishes. It also improves drying. The frequency of refilling the rinse aid dispenser depends on usage and settings. The low rinse aid indicator will light up when more is needed. Do not overfill the rinse aid dispenser. Detergent ingredients are necessary to remove dirt from the dishwasher. Most commercial quality detergents are suitable for this purpose. To ensure even cooking, remove the frying drawer halfway through and turn or shake the items. Always switch off the air fryer before removing the frying drawer. Reload it to resume cooking within 10 minutes.
- Page 15: To ensure your food is evenly cooked, remove the frying drawer halfway through cooking and turn or shake the items on the wire rack. Always make sure the air fryer is switched off when you remove the frying drawer. Reload it once the drawer is back in the fryer and it will start cooking again within 10 minutes.
- Page 16: To ensure your food is evenly cooked, remove the frying drawer halfway through cooking and turn or shake the items on the wire rack. Always make sure the air fryer is switched off when you remove the frying drawer. Reload it once the drawer is back in the fryer and it will start cooking again within 10 minutes.
- Page 17: To ensure your food is evenly cooked, remove the frying drawer halfway through cooking and turn or shake the items on the wire rack. Always make sure the air fryer is switched off when you remove the frying drawer. Reload it once the drawer is back in the fryer and it will start cooking again within 10 minutes.
- Page 18: To ensure your food is evenly cooked, remove the frying drawer halfway through cooking and turn or shake the items on the wire rack. Always make sure the air fryer is switched off when you remove the frying drawer. Reload it once the drawer is back in the fryer and it will start cooking again within 10 minutes.
- Page 19: To ensure your food is evenly cooked, remove the frying drawer halfway through cooking and turn or shake the items on the wire rack. Always make sure the air fryer is switched off when you remove the frying drawer. Reload it once the drawer is back in the fryer and it will start cooking again within 10 minutes.
- Page 20: To ensure your food is evenly cooked, remove the frying drawer halfway through cooking and turn or shake the items on the wire rack. Always make sure the air fryer is switched off when you remove the frying drawer. Reload it once the drawer is back in the fryer and it will start cooking again within 10 minutes.
- Page 21: Problem: Dishes are not clean. Possible causes: Not enough detergent was dispensed. What to do: Use more detergent, or change your detergent. Problem: Stained tub interior. Possible causes: Detergent with colorant may have been used. What to do: Make sure that the detergent has no colorant. Problem: White film on inside surface. Possible causes: The filter combination is not clean or is not correctly fitted. What to do: Clean and/or fit the filter correctly. Problem: Cloudiness on glassware. Possible causes: Hard water area can cause limescale deposits. What to do: Add more detergent. Problem: White spots appear on dishes and glasses. Possible causes: The lid of the softener is loose. What to do: Check the softener lid is secure. Problem: Knocking noise in the dishwasher. Possible causes: A spray arm is knocking against an item in a basket. What to do: Interrupt the program and rearrange the items obstructing the spray arm. Problem: The dishes aren't drying. Possible causes: Improper loading. What to do: Load the dishwasher as suggested in the directions. Problem: Dishwasher doesn't start. Possible causes: Fuse blown, or the circuit breaker tripped. What to do: Replace fuse or reset circuit breaker. Problem: Water not pumped from dishwasher. Possible causes: Filter clogged. What to do: Check coarse the filter. Problem: Suds in the tub. Possible causes: Wrong detergent. What to do: Use only the special dishwasher detergent to avoid suds.
- Page 22: Warranty information states that your Cookology appliance is covered by a 1-year guarantee from the date of purchase. If a fault develops during this period, contact customer service for support on making your claim. Register your warranty by visiting the website and completing the form. Waste electrical products should not be disposed of with household waste; check with local authorities for recycling advice. To ensure even cooking, remove the frying drawer halfway through cooking to turn or shake the items on the wire rack. Always ensure the air fryer is switched off when removing the frying drawer.
- Page 23: Dishwasher basket tips Adjusting the upper basket The height of the upper basket can be easily adjusted to accommodate taller dishes. To adjust the height of the upper rack, follow these steps. Folding back the cup shelves Raise the cup rack upwards to make room for taller items. You can lean tall glasses against it or remove it when not in use. Folding back the rack shelves The spikes of the lower basket hold plates and platters. They can be lowered to make more room for large items. To ensure even cooking, remove the frying drawer halfway through cooking and turn or shake the items.
- Page 24: Function of the rinse aid and detergent The rinse aid is released during the final rinse to prevent water from forming droplets on your dishes. It also improves drying by allowing water to roll off the dishes. Your dishwasher is designed to use liquid rinse aids. When to refill the rinse aid dispenser You can estimate the amount from the color of the optical level indicator located next to the cap. You should never let the rinse aid level be less than 1/4 full. Function of detergent The chemical ingredients that compose the detergent are necessary to remove, crush and dispense all dirt out of the dishwasher. Adjusting the rinse aid reservoir Turn the rinse aid indicator dial to a number. The higher the number, the more rinse aid the dishwasher uses. Adjust the dial if the dishes are not drying properly or are spotted.

FISHER PAYKEL DD60ST4NX9 Dishwasher

HEINNER HWDM-V9614D Front Load Dishwasher

LG Electronics LDTH7972S 23.75 in. in PrintProof Smart Dishwasher

GRUNDIG GNFP3440X Dishwasher

BOSCH SGV4HTX27G Dishwasher

ETA 274890010D Dishwasher

BOSCH SBD6ECX12E Dishwasher

BOSCH SMS46NI10M Dishwasher

Whirlpool 400011634913 Dishwasher

FISHER PAYKEL DW60FC1X1 Dishwasher