Home > Electrolux > Electrolux EEC67310L Dishwasher
Electrolux EEC67310L Dishwasher


EEC67310L
EN
Dishwasher
User Manual

| General | Details |
|---|---|
| Name | Electrolux EEC67310L Dishwasher |
| Make | Electrolux |
| Language | English |
| Filetype | PDF (Download) |
| File size | 1.2 MB |


Electrolux ESS87300UX Dishwasher

Electrolux EES48401L Dishwasher

Electrolux EFF9392SXA Dishwasher

Electrolux ESZ89400UX 800 SprayZone Dishwasher

Electrolux ESL2500RO Dishwasher

Electrolux KECA7400W Builtin Dishwasher

Electrolux TAPPAN Dishwasher

Electrolux KESC7320L Dishwasher

Electrolux EEC87400W Sliding Door Dishwasher

Electrolux EFC3862MS UltimateCare 300 Compact Dishwasher

Electrolux EEC67310L Dishwasher Overview
Summary of Contents
- Page 1: Dishwasher user manual.
- Page 2: SAFETY INFORMATION Before the installation and use of the appliance, carefully read the supplied instructions. SAFETY INSTRUCTIONS PRODUCT DESCRIPTION CONTROL PANEL PROGRAMME SELECTION BASIC SETTINGS BEFORE FIRST USE DAILY USE HINTS AND TIPS CARE AND CLEANING TROUBLESHOOTING TECHNICAL INFORMATION ENVIRONMENTAL CONCERNS Thank you for purchasing an Electrolux appliance. You’ve chosen a product that brings with it decades of professional experience and innovation.
- Page 3: responsible for any injuries or damage that are the result of incorrect installation or usage. Always keep the instructions in a safe and accessible location for future reference. This appliance can be used by children aged from 8 years and above and persons with reduced physical, sensory or mental capabilities or lack of experience and knowledge if they have been given supervision or instruction concerning the use of the appliance in a safe way and understand the hazards involved. Children between 3 and 8 years of age and persons with very extensive and complex disabilities shall be kept away from the appliance unless continuously supervised. Children of less than 3 years of age should be kept away from the appliance unless continuously supervised. Do not let children play with the appliance. This appliance is intended to be used in household and similar applications such as farm houses; staff kitchen areas in shops, offices and other working environments; by clients in hotels, motels, bed & breakfast and other residential type environments. Do not change the specification of this appliance. The operating water pressure (minimum and maximum) must be between 0.5 (0.05) / 10 (1.0) bar (MPa). Follow the maximum number of 14 place settings.
- Page 4: Connect the mains plug to the mains socket only at the end of the installation. Do not put flammable products or items that are wet with flammable products near the appliance. Dishwasher detergents are dangerous. Follow the safety instructions on the detergent packaging. Do not pull the mains cable to disconnect the appliance. Always pull the mains plug. Do not drink and play with the water in the appliance. Do not remove the dishes from the appliance until the programme is complete. This appliance is fitted with a 13 A mains plug. To repair the appliance contact the Authorised Service Centre. Use original spare parts only. Ensure that there are no visible water leaks during and after the first use of the appliance. If the water inlet hose is damaged, immediately close the water tap and disconnect the mains plug.
- Page 5: Disposal instructions emphasize the risk of injury or suffocation. Disconnect the appliance from the mains supply and cut off the mains cable. Remove the door catch to prevent children and pets from getting closed in the appliance. The product description includes various components such as the ceiling spray arm, upper spray arm, and lower spray arm. A green light indicates when the programme is complete. The Beam-on-Floor light is displayed on the floor below the appliance door. A red light flashes when the appliance has a malfunction. The Beam-on-Floor is off when the appliance is deactivated. A red light comes on when a programme starts and remains on for its duration. The lamps are intended to signal information about the operational status of the appliance.
- Page 6: Control panel On/Off button / Reset button Delay Start button Display Extras buttons Auto sense program button My time selection bar Ecometer indicates how the programme selection impacts energy and water consumption. Rinse aid indicator is on when the rinse aid dispenser needs refilling. Salt indicator is on when the salt container needs refilling.
- Page 7: Programme selection includes various options for dishwashing cycles. My Time selection bar allows for choosing a suitable cycle based on duration. AUTO Sense automatically adjusts the cycle to the load type, sensing soil degree and dish quantity. Extras can be activated to customize programme selection. Quick is a 30-minute programme for lightly soiled dishes. ExtraHygiene maintains high temperatures for better hygiene results during rinsing. Pre-rinse is a 15-minute programme to rinse off food remains without detergent. ExtraPower enhances dishwashing results by increasing temperature and duration. ECO is the longest programme for efficient energy and water use with normal soil. GlassCare prevents damage to delicate glassware by reducing temperature changes.
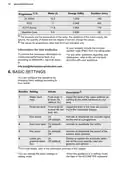
- Page 8: Programme phases include various options for dishwashing, such as prewash, dishwashing at different temperatures, and drying methods. The ECO programme is designed for lightly soiled crockery and operates at 50 °C. AUTO Sense adjusts the washing parameters based on the load and soil level, with temperatures ranging from 50 to 60 °C. Machine care instructions are provided for cleaning the appliance interior. Consumption values detail water usage, energy consumption, and duration for each programme. The Quick programme offers a fast cleaning option with a duration of 30 minutes. Pre-rinse is available for initial cleaning before the main wash cycle. ExtraPower, GlassCare, and ExtraHygiene are additional features that enhance cleaning performance. Intermediate and final rinses are part of the dishwashing process to ensure cleanliness. AirDry is a drying method included in various programmes to improve drying efficiency.
- Page 9: Programme details include water usage, energy consumption, and duration for various settings. The pressure, temperature, mains supply variations, options, quantity of dishes, and soil degree can affect these values. Values for programmes other than ECO are indicative only. For performance tests, contact the relevant email for necessary information. Basic settings can be configured according to user needs. Water hardness can be adjusted from level 1L to 10L, with a default of 5L. Rinse aid level can be adjusted from level 0A to 6A, with a default of 4A. The end sound can be activated or deactivated, with off as the default. Auto door open is on by default, allowing for AirDry activation. Key tones can be activated or deactivated, with on as the default setting.
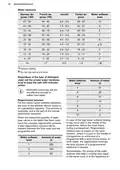
- Page 10: How to change a setting Make sure the appliance is in setting mode. Use Previous or Next to select the bar of the ECOMETER dedicated to the desired setting. The display shows the current setting value. Press OK to enter the setting. The new setting is saved. Press and hold simultaneously to exit setting mode. The saved settings remain valid until you change them again. The water softener removes minerals from the water supply. The water softener should be adjusted according to the hardness of the water in your area.
- Page 11: Water hardness levels are categorized in German degrees, French degrees, mmol/l, and Clarke degrees. The water softener level is crucial for maintaining the dishwasher's efficiency. Do not use salt at the factory setting level. Set the proper water hardness level to keep the salt refill indicator active, regardless of the detergent type used. Multi-tabs containing salt are not effective enough to soften hard water. The resin of the softener device needs to be regenerated regularly for correct operation. The regeneration process is automatic and part of normal dishwasher operation. A new regeneration process will be initiated based on the amount of water used since the last regeneration. Regeneration may occur during the programme, potentially extending the total duration by 5 minutes. Rinsing of the water softener may begin in the same cycle or at the beginning of the next cycle.
- Page 12: The next programme increases total water consumption by an additional 4 litres and total energy consumption by an additional 2 Wh. Acoustic signals sound when a malfunction occurs and cannot be deactivated. Each performed softener rinse may prolong the programme duration by another 5 minutes. AirDry improves drying results by automatically opening the appliance door during the drying phase. All consumption values are determined under laboratory conditions with specific water hardness. AirDry is automatically activated with all programmes except Pre-rinse. The rinse aid helps to dry dishes without streaks and stains and is automatically released during the hot rinse phase. When the rinse aid chamber is empty, the rinse aid indicator notifies to refill. Do not try to close the appliance door within 2 minutes after automatic opening to avoid damage. If children have access to the appliance, it is advised to deactivate AirDry due to safety concerns.
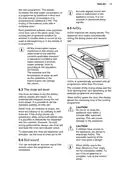
- Page 13: The latest programme that was completed before the appliance deactivation is saved and selected automatically after activation. The buttons on the control panel make a click sound when pressed, which can be deactivated. When the latest programme selection is disabled, the default programme is ECO. Make sure that the current level of the water softener agrees with the hardness of the water supply and adjust if necessary. Fill the salt container and rinse aid dispenser before first use. Start the programme Quick to remove any residuals from the manufacturing process without detergent or dishes. Use rough salt designed for dishwashers only, as fine salt increases the risk of corrosion. The salt is used to recharge the resin in the water softener and ensure good washing results. After filling the salt container, immediately start the shortest programme to prevent corrosion. Make sure that the ComfortLift basket is empty and locked in the raised position before filling the salt container.
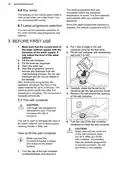
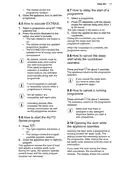
- Page 14: How to fill the rinse aid Only use rinse aid designed specifically for dishwashers. Fill the dispenser until the rinse aid reaches the marking MAX. Remove the spilled rinse aid with an absorbent cloth to prevent excessive foam formation. Close the lid and ensure it locks into position. Fill the rinse aid dispenser when the indicator is clear. The compartment is for rinse aid only; do not fill it with detergent. Daily use Open the water tap. Make sure that items do not stick out of the basket frame to avoid damage. Fill the salt container if it is empty. Load the baskets using the ComfortLift mechanism for easy access. Add the detergent and select a programme. Close the water tap when the programme is complete. Do not sit on the rack or put excessive pressure on the locked basket. Do not exceed the max load capacity of 18 kg.
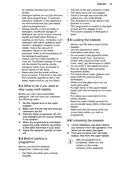
- Page 15: The basket is automatically locked on the upper level. Put the detergent (gel, powder or tablets) in the compartment. If the programme has a prewash phase, put a small quantity of detergent on the inner part of the appliance door. Carefully place items in the basket or remove them. Close the lid. Make sure that the lid locks into position. For information about the detergent dosage, refer to the manufacturer's instructions on the packaging of the product. The upper ends of the two vertical ribs inside the compartment indicate the maximum level for filling the dispenser with gel. Slide your finger across MY TIME selection bar to choose a suitable programme. The ECOMETER indicates the level of energy and water consumption. To select Pre-rinse, press and hold for 3 seconds.
- Page 16: The display shows the programme duration. Close the appliance door to start the programme. Select a programme using MY TIME selection bar. Press the button dedicated to the option you want to activate. The ECOMETER indicates the updated level of energy and water consumption. If you cancel the delay start, you have to select the programme again. It is not possible to activate or deactivate options while a programme is running. Opening the door while a programme is running pauses the wash cycle. The appliance senses the type of load and adjusts a suitable wash cycle. If you open the door during the delay start countdown, the countdown is paused.
- Page 17: Countdown status resumes after closing the door. The program completes when the display shows 0:00. Opening the door during operation may affect energy consumption and program duration. The Auto Off function saves energy by switching off the appliance when not in use. Hints and tips ensure optimal cleaning and drying results while protecting the environment. Washing dishes in the dishwasher usually consumes less water and energy than washing by hand. Load the dishwasher to full capacity to save water and energy. Use the recommended dosage of detergent and rinse aid. Do not pre-rinse dishes by hand to avoid increasing water and energy consumption. Only use products designed for dishwashers to prevent damage to the appliance.
- Page 18: for optimal cleaning and drying results. Detergent tablets do not fully dissolve with short programmes. Always use the correct quantity of detergent. Insufficient dosage of detergent can result in poor cleaning results. Using too much rinse aid results in bluish layers on the items. Make sure that the water softener level is correct. Always use the whole space of the baskets. Do not wash in the appliance items made of wood, horn, aluminium, pewter and copper. Put hollow items with the opening facing downwards. Let the tableware cool down before you remove it from the appliance.
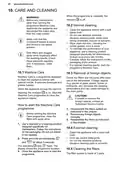
- Page 19: Care and cleaning When the programme is complete, the indicator is off. Before any maintenance other than running the programme Machine Care, deactivate the appliance and disconnect the mains plug from the main socket. Clean the appliance interior with a soft damp cloth. Do not use abrasive products, abrasive cleaning pads, sharp tools, strong chemicals, scourer or solvents. To maintain the performance of your appliance, use a cleaning product designed specifically for dishwashers at least once every two months. Check the filters and the sump after each use of the dishwasher. Machine Care is a programme designed to clean the appliance interior with optimal results. Foreign objects decrease the cleaning performance and can cause damage to the drain pump. If unable to remove the foreign objects, contact an Authorised Service Centre. Clean the appliance with a moist soft cloth.
- Page 20: Make sure that there are no residues of food or soil in or around the edge of the sump. Put back in place the flat filter (A). Make sure that it is correctly positioned under the 2 guides. Turn the filter (B) counterclockwise and remove it. Reassemble the filters (B) and (C). Put back the filter (B) in the flat filter (A). Turn it clockwise until it locks. Remove the filter (C) out of filter (B). Remove the flat filter (A). Wash the filters. An incorrect position of the filters can cause bad washing results and damage to the appliance.
- Page 21: Cleaning the lower spray arm We recommend to clean the lower spray arm regularly to prevent soil from clogging the holes. Clogged holes can cause unsatisfactory washing results. To remove the lower spray arm, pull it upwards. Wash the spray arm under running water. Use a thin pointed tool, e.g. a toothpick, to remove particles of soil from the holes. To install the spray arm back, press it downwards. Cleaning the upper spray arm We recommend to clean the upper spray arm regularly to prevent soil from clogging the holes. Clogged holes can cause unsatisfactory washing results. Pull out the upper basket. To detach the spray arm from the basket, press the spray arm upwards and simultaneously turn it clockwise. To install the spray arm back, press the spray arm upwards and simultaneously turn it counterclockwise until it locks into place.
- Page 22: Move the upper basket to the lowest level to reach the spray arm more easily. To detach the spray arm from the delivery tube, turn the mounting element counterclockwise and pull the spray arm downwards. Wash the spray arm under running water. Use a thin pointed tool to remove particles of soil from the holes. We recommend cleaning the ceiling spray arm regularly to prevent soil from clogging the holes. The ceiling spray arm is placed on the ceiling of the appliance. To install the spray arm back, insert the mounting element in the spray arm and fix it in the delivery tube by turning it clockwise. Make sure that the mounting element locks into place. Install the cutlery drawer on the sliding rails and block the stoppers. Release the stoppers on the sides of the sliding rails of the cutlery drawer and pull the drawer out.
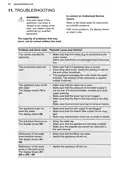
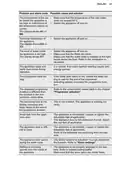
- Page 23: Troubleshooting Improper repair of the appliance may pose a danger to the safety of the user. Any repairs must be performed by qualified personnel. Refer to the below table for information on possible problems. The majority of problems that may occur can be solved without the need for contact with an Authorised Service Centre. You cannot activate the appliance. Make sure that the mains plug is connected to the mains socket. The programme does not start. Make sure that the appliance door is closed. The appliance does not fill with water. Make sure that the water tap is open. The appliance does not drain the water. Make sure that the sink spigot is not clogged. The anti-flood device is on. Close the water tap. Malfunction of the water level detection sensor. Make sure that the filters are clean. Malfunction of the wash pump or the drain pump. Switch the appliance off and on.
- Page 24: Problem and alarm code Possible cause and solution The temperature of the water inside the appliance is too high or malfunction of the temperature sensor occurred. The display shows i61 or i69. Technical malfunction of the appliance. The display shows iC0 or iC3. The level of water inside the appliance is too high. The display shows iF1. The appliance stops and starts more times during operation. It is normal. It provides optimal cleaning results and energy savings. The programme lasts too long. If the delay start option is set, cancel the delay setting or wait for the end of the countdown. The displayed programme duration is different than the duration in the consumption values table. Refer to the consumption values table in the chapter Programme selection. The remaining time in the display increases and skips nearly to the end of the programme duration. This is not a defect. The appliance is working correctly. Small leak from the appliance door. The appliance is not levelled. The appliance door is difficult to close. The appliance is not levelled.
- Page 25: Problem and alarm code The appliance trips the circuit-breaker. The amperage is insufficient to supply simultaneously all the appliances in use. Internal electrical fault of the appliance. Contact an Authorised Service Centre. The PNC can be found on the rating plate on the appliance door. For alarm codes not described in the table, contact an Authorised Service Centre. The product number code (PNC) If you contact an Authorised Service Centre, you need to provide the product number code of your appliance. The dishwashing and drying results are not satisfactory. Poor washing results. Use more intensive washing programme.
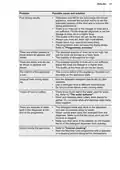
- Page 26: Problem Possible cause and solution Poor drying results. Activate the function AirDry to set the automatic opening of the door and to improve the drying performance. Fill the rinse aid dispenser or set the dosage of rinse aid to a higher level. Always use rinse aid, even with multi-tablets. Plastic items may need to be towel dried. The programme does not have the drying phase. There are whitish streaks or bluish layers on glasses and dishes. Adjust the rinse aid dosage to a lower level. There are stains and dry water drops on glasses and dishes. The interior of the appliance is wet. This is not a defect of the appliance. Humidity condensates on the appliance walls. Unusual foam during washing. Use the detergent designed specifically for dishwashers. Traces of rust on cutlery. There is too much salt in the water used for washing. There are residues of detergent in the dispenser at the end of the programme. The detergent tablet was stuck in the dispenser and was not washed away by water. Odours inside the appliance. Start the Machine Care programme with a descaler or a cleaning product designed for dishwashers.
- Page 27: Limescale deposits on the tableware, on the tub and on the inside of the door. The level of salt is low, check the refill indicator. The cap of the salt container is loose. Your tap water is hard. Use salt and set regeneration of the water softener even when multi-functional tablets are used. Start the Machine Care programme with a descaler designed for dishwashers. Dull, discoloured or chipped tableware. Make sure that only dishwasher-safe items are washed in the appliance. Place delicate items in the upper basket. Refer to the rating plate for other values.
- Page 28: It is possible to find information related to the performance of the product in the EU EPREL database using the model name and product number on the rating plate of the appliance. Refer to the chapter Product description for more detailed information about the energy label. Appliances marked with the symbol should not be disposed of with household waste. Return the product to your local recycling facility or contact your municipal office. Recycle materials with the appropriate symbol. Put the packaging in relevant containers to recycle it. Help protect the environment and human health by recycling waste of electrical and electronic appliances. Do not dispose of electrical and electronic appliances in regular waste.
- Page 29: Page 29

BOSCH SMS6ECC00E Dishwasher

SAMSUNG DW80CG545 Dishwasher

BOSCH SHX78B75UC Dishwasher

FISHER and PAYKEL DD24DTI9 N Tall Dishwasher

BLAKESLEE RC-62 Rack Conveyor Type Dishwasher

BOSCH SMS4EKW06E Smart Dishwasher

AEG FEE63600ZM Dishwasher

BOSCH SMD6YCX02E Available Customer Service Dishwasher

BOSCH SMS26AI08G Dishwasher

CMA DISHMACHINES CMA-180 Dishwasher