Home > GE Appliances > GE APPLIANCES DT605PSMSS with Plastic Interior Dishwasher
GE APPLIANCES DT605PSMSS with Plastic Interior Dishwasher


Installation Instructions Built-In Dishwashers
See your Owner’s Manual for details on how to contact us regarding installation questions
BEFORE YOU BEGIN
FOR YOUR SAFETY
Read these instructions completely and carefully.
Read and observe all WARNINGS and CAUTIONS
shown throughout these instructions.
While performing installations described in this booklet,
gloves, safety glasses or goggles should be worn.
WARNING
• Remove all power leading to the appliance from the
IMPORTANT – Observe all governing codes and ordinances.
circuit breaker or fuse box before beginning installation.
• Note to Installer – Be sure to leave these instructions
Failure to do so can result in a risk of electrical shock.
for the consumer’s and local inspector’s use.
•
To reduce the risk of electric shock, fire, or injury to persons,
the installer must ensure that the dishwasher is completely
enclosed at the time of installation.
• Note to Consumer – Keep these instructions with
your Owner’s Manual for future reference.
• The improper connection of the equipment grounding
conductor can result in a risk of electric shock. Check
with a qualified electrician or service representative
if you are in doubt that the appliance is properly
grounded. If house wiring is not 2-wire with ground, a
ground must be by the installer. When house wiring
is aluminum, be sure to use UL-Listed anti-oxidant
compound and aluminum-to-copper connectors.
• Skill Level – Installation of this dishwasher requires
basic mechanical, electrical and plumbing skills.
Proper installation is the responsibility of the
installer. Product failure due to improper installation
is not covered under the GE Appliances Warranty.
See warranty information.
• Completion Time – 1 to 3 Hours. New installations
require more time than replacement installations.
•
To reduce the risk of electric shock, fire, or injury to persons,
the installer should check to ensure that wires are not pinched
or damaged, the house wiring is attached to the junction box
bracket through a strain relief, and all electrical connections
made at the time of install (wire nuts) are contained inside of
the junction box cover.
IMPORTANT – The dishwasher MUST be installed to allow
for future removal from the enclosure if service is required.
Care should be exercised when the appliance is installed
or removed, to reduce the likelihood of damage to the
power supply cord.
If you received a damaged dishwasher, you should
immediately contact your dealer or builder.
Optional Accessories – See the Owner’s Manual for
available custom panel kits.
ADVERTENCIA
• Retire todos los conductores de corriente del
Your dishwasher is a water heating appliance.
electrodoméstico de disyuntor o de la caja del fusible
antes de comenzar con la instalación. Si no cumple con
esto, se podrá producir el riesgo de descargas eléctricas.
• Para reducir el riesgo de descarga eléctrica, incendio
o lesiones a personas, el instalador debe asegurarse
de que el lavaplatos esté completamente cerrado en
el momento de la instalación.
Opening the door will cause the
CAUTION
dishwasher to tip forward when it is
not fully installed. When opening the door prior to the
dishwasher being fully installed, hold the top of the
dishwasher securely with one hand and hold the door
with the other hand. Gloves should be worn.
• La conexión inadecuada del conductor de conexión a
tierra del equipamiento puede provocar un riesgo de
descarga eléctrica. Consulte a un electricista calificado
o representante de servicio técnico si tiene dudas
sobre la correcta conexión a tierra del aparato. Si el
cableado doméstico no cuenta con un cable de 2 hilos
con conexión a tierra, un instalador debe realizar una
conexión a tierra. Cuando el cableado doméstico es de
aluminio, asegúrese de usar un compuesto antioxidante
y conectores de aluminio a cobre aprobados por UL.
• Para reducir el riesgo de descarga eléctrica, incendio
o lesiones a personas, el instalador deberá realizar un
control para asegurar que los cables no estén pellizcados
ni dañados, que el cableado del hogar esté conectado a la
ficha de la caja de empalmes a través de un amortiguador
de refuerzo, y que todas las conexiones eléctricas
realizadas en el momento de la instalación (tuercas para
cables) estén dentro de la tapa de la caja de empalmes.
Abrir la puerta hará que el
PRECAUCIÓN
lavavajillas se incline hacia
adelante cuando no se encuentre completamente
instalado. Al abrir la puerta antes de haber instalado
completamente el lavavajillas, sostenga la parte superior
del lavavajillas de forma segura con una mano y sostenga
la puerta con la otra mano. Se deberán usar guantes.
READ CAREFULLY
KEEP THESE INSTRUCTIONS
31-4000220 Rev 5 02-24

| General | Details |
|---|---|
| Name | GE APPLIANCES DT605PSMSS with Plastic Interior Dishwasher |
| Make | GE Appliances |
| Language | English |
| Filetype | PDF (Download) |
| File size | 10.94 MB |


GE APPLIANCES GTW845 Dishwasher

GE APPLIANCES GSD2100VBB Dishwasher

GE APPLIANCES GDF550PGR Plastic Interior Dishwasher with Front Controls

GE APPLIANCES PDT755SYV/BTV UltraFresh System Dishwasher with Interior

GE APPLIANCES GDT670SGV Interior Dishwasher with Hidden Controls

GE APPLIANCES GDT650SYV Interior Dishwasher with Hidden Controls

GE APPLIANCES PDP715SYVFS GE Profile Series Interior Dishwasher

GE APPLIANCES PDT715SYV Interior Dishwasher with Hidden Controls

GE APPLIANCES PDT705SYWFS Dishwasher

GE APPLIANCES GDT565HSYSS Energy Star Hybrid Tub Dishwasher

GE APPLIANCES DT605PSMSS with Plastic Interior Dishwasher Overview
Summary of Contents
- Page 1: Installation instructions for built-in dishwashers are provided. Read these instructions completely and carefully. Observe all warnings and cautions shown throughout these instructions. Gloves, safety glasses or goggles should be worn during installation. Remove all power leading to the appliance from the circuit breaker or fuse box before beginning installation. The installer must ensure that the dishwasher is completely enclosed at the time of installation. Keep these instructions with your Owner’s Manual for future reference. Installation requires basic mechanical, electrical, and plumbing skills. The dishwasher must be installed to allow for future removal from the enclosure if service is required. Opening the door will cause the dishwasher to tip forward when it is not fully installed.
- Page 2: Installation preparation includes essential parts supplied for the installation process. Key components include bottle jets clips, junction box cover, drain hose hanger, and mounting brackets. Materials needed for installation consist of thread seal tape, wire nuts, and masking tape. For new installations, an air gap for the drain hose and a waste tee for plumbing may be required. Electrical connections require a power cord kit or electrical cable, along with strain relief. A hand shut-off valve is recommended for the hot water line, which should be a minimum of 3/8” copper tubing. Tools necessary for installation include a Phillips-head screwdriver, nutdrivers, and an adjustable wrench. Safety equipment such as safety glasses and gloves should be used during installation. A bucket is needed to catch water when flushing the line. For new installations, additional tools like a tubing cutter and drill may be required.
- Page 3: Installation preparation is crucial for the dishwasher setup. The dishwasher must be completely enclosed during installation to reduce risks. Ensure the wall area is free of pipes and wires. The dishwasher door should be flush with the cabinet, with a maximum depth of 26-1/4” for models with a handle. Maintain a minimum clearance of 2” between the dishwasher and adjacent cabinets or appliances. The rough cabinet opening must be at least 24” deep, 24” wide, and approximately 34-1/2” high. The drain hose must not exceed 16’ in length for proper drainage. An air gap is required by local codes if the waste tee or disposer connection is less than 18” above the floor. Drill a 1-1/2” diameter hole in the cabinet wall for the drain hose connection. Always ensure the drain plug has been removed from the disposer to avoid drainage issues.
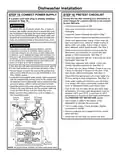
- Page 4: Installation preparation involves ensuring electrical wiring is ready before installation. Remove all power from the circuit breaker or fuse box to avoid electrical shock risks. Electrical requirements include a 120V, 60Hz, AC-only, 15-ampere or 20-ampere fused electrical supply. Wiring must be 2 wire with ground and rated for 75°C (167°F). If electrical supply does not meet requirements, consult a licensed electrician. Grounding instructions specify that the appliance must be connected to a grounded metal, permanent wiring system. For power cord models, grounding reduces the risk of electric shock during malfunctions. The wiring may enter the opening from various sides, and a maximum 1-1/2 diameter hole should be cut for the electrical cable. Electrical connection to the dishwasher is on the right front, with specific routing instructions for permanent connections. Use only specified dishwasher power cord kits and do not use extension cords or adapter plugs.
- Page 5: Installation preparation involves locating items in the installation package. It is recommended to use copper tubing for the water line, but flexible braided hose can also be used. The water supply line may enter from various locations and can share a hole with the electrical cable and drain hose. If using a flexible braided supply hose, label it with the installation date for future reference. It is advised to turn off the water supply before installation. Installing a hand shut-off valve in an accessible location is strongly recommended. The water connection is located on the left side of the dishwasher. The hot water inlet line should be installed using 3/8” copper tubing or a flexible braided hose. Adjust the water heater to a temperature between 120°F and 140°F. Flush the water line to remove debris before connecting.
- Page 6: Dishwasher installation involves several key steps. Check the door balance by opening and closing the door. The door is properly balanced if it self-closes within 20° from vertical. The door should stay in position from 20° to 70° and fall fully open beyond 70°. Remove the packaged handle from the lower rack by pulling its shipping clips out and up. Hold the top of the dishwasher securely when opening the door prior to full installation. Use gloves when handling the door during installation. Loosen the set screws with a 1/8” Allen wrench to remove the shipping clips. Ensure the pulley cable is properly routed and held in place by the pulley shoulders. Tighten the set screws on the handle after placing it on the dishwasher door mounting fasteners. Make sure the door opens and closes smoothly.
- Page 7: Dishwasher installation involves several key steps. Remove the wood base before installation. Position the water supply line and house wiring on the floor of the opening. Do not remove the wood base until you are ready to install the dishwasher. The dishwasher may tip over when the door is opened if the base is removed. Move the dishwasher close to the installation location and lay it on its back. For models with an attached wood base, remove the leveling legs with a socket wrench. Install the drain hose through the cabinet. Thread a 90° elbow onto the water valve, ensuring the rubber gasket is in place. Do not overtighten the elbow to avoid damaging the water valve bracket. Position the end of the elbow to face the rear of the dishwasher.
- Page 8: Dishwasher installation involves several key steps. Position the dishwasher in front of the cabinet opening. Insert the drain hose into the hole in the cabinet side. Ensure the drain hose is not kinked under or behind the dishwasher. Make certain the house wiring, drain line, and water line do not interfere with components under the dishwasher. In this step, you will need the trim pieces set aside in Step 1. Ensure the drain hose is not twisted or pinched. Do not disconnect or remove the high drain loop from the left side of the dishwasher. Position utility lines so they do not interfere with anything under or behind the dishwasher. Do not push against the front panel with knees to avoid damage. Grasp the sides of the front panel and slide the dishwasher into the opening a few inches at a time.
- Page 9: Dishwasher installation involves several key steps for proper mounting. Install mounting brackets on the sides if the countertop is granite or similar material. Mounting brackets must be installed onto the dishwasher tub frame top or sides before sliding the dishwasher into place. Break off the front portion of the bracket with pliers prior to attaching it to the dishwasher. Ensure the tub insulation blanket is smoothly wrapped around the tub and does not interfere with the door springs. Adjust the brackets before closing the dishwasher door to prevent damage. Slide the dishwasher into its final position by pushing on the sides of the door panel. Check that the dishwasher is squarely positioned in the cabinet opening at both the top and bottom. Ensure the edges of the dishwasher door panel are behind the face of the adjacent cabinet before opening the door. Remove excess length from countertop brackets if they extend beyond the edge of the counter.
- Page 10: Dishwasher installation requires proper leveling for optimal performance. The dishwasher must be level left to right and front to back to ensure smooth operation. Check the alignment before opening the door to prevent panel damage. Open and close the door to ensure it operates smoothly without rubbing against the cabinet. Adjust the level of the dishwasher by turning the legs at the bottom. Utility lines should not be trapped or crushed behind the dishwasher to avoid restricting water flow. The level indicator should be centered for proper leveling. The door should close without hitting the side of the tub. Replace the lower rack after leveling. Verify that the dish racks stay in place when pulled halfway out.
- Page 11: Dishwasher installation involves several key steps. Position the dishwasher squarely in the cabinet at both the top and bottom after mounting. The dishwasher must be secured to the countertop or cabinet sides. Use different methods for securing depending on the countertop material. Ensure all leveling legs are in contact with the floor to prevent rocking. The front panel and control panel should not contact adjacent cabinets or countertops. Connect the water supply line to the 90° elbow using the appropriate method. Check that the door spring does not rub against the fill hose or water supply line. Install plug buttons to ensure proper door to tub alignment. Fasten the dishwasher to the adjacent cabinets with provided screws, ensuring they are driven straight and flush. Do not screw into the cabinet face frame when securing the dishwasher.
- Page 12: Dishwasher installation involves connecting the drain line. The hose should have already been detached from the tub at indicated locations. Do not remove the high drain loop. Connect the drain line to an air gap, waste tee, or disposer using the determined method. Secure the hose with a hose clamp. If a longer drain hose is required, you can purchase an extension drain hose. When connecting the drain line to the disposer, ensure that the drain plug has been removed. The total drain hose length must not exceed 16 feet from the rear of the dishwasher for proper drain operation. Fasten the drain hose to the underside of the countertop with the provided hanger. Avoid unnecessary service call charges for a no drain complaint.
- Page 13: Dishwasher installation involves several critical steps to ensure safety and functionality. Check to be sure power is OFF to reduce the risk of electric shock, fire, or injury. The installer should ensure that wires are not pinched or damaged and that all electrical connections are contained inside the junction box cover. Remove all foam and paper packaging before proceeding with installation. Read the Owner’s Manual for operating instructions after locating it. Check door opening and closing for proper functionality and adjust spring tension if necessary. Secure house wiring to the back of the junction box with a strain relief. Use UL-listed wire nuts to connect incoming ground, white, and black wires appropriately. Verify that the water supply and drain lines are not kinked and check for leaks after turning on the water supply. Add 2 quarts of water to the bottom of the dishwasher to lubricate the pump seal before final checks.
- Page 14: Dishwasher installation involves several important steps to ensure proper functioning. Turn on the power supply or plug the power cord into the outlet. Select a cycle to run and push the Start/Reset pad. Ensure the door is latched for the dishwasher to start. Check that water enters the dishwasher; if not, verify that water and power are turned on. Inspect for leaks under the dishwasher and tighten water connections if necessary. A small amount of water may splash out during the first use after installation. Apply insulation to the underside of the control box and ensure it is flush with its front face. Check for leaks around the door and reposition the dishwasher if necessary. Make sure all water has drained from the dishwasher before proceeding. Ensure the vent opening is not blocked by insulation and is properly aligned.
- Page 15: Dishwasher installation involves several key steps. The toekick may come pre-installed on some models. Locate the bottle jets clips, which may be found in the silverware basket or user bag. Install a clip over a bottle jets stem by slipping its clip end over the nozzle. Ensure the tub trim does not interfere with the door. Check that the dishwasher is square and level at both the top and bottom of the cabinet opening. All four legs of the dishwasher should be firmly in contact with the floor. The drain hose must not be pinched between the dishwasher and adjacent cabinets or walls. When reinstalling the toekick, ensure the bottom edge is flush with the floor. Leave the complete literature package and installation instructions with the consumer.
- Page 16: Product improvement is a continuing endeavor. Materials, appearance and specifications are subject to change without notice. Printed in the United States.
- Page 17: Préparation pour l’installation Pièces fournies Les pinces du Bottle Jets (certains modèles) Support de tuyau de vidange Couvercle de la boîte de jonction Vis à tête hexagonale n° 10 Support de tuyau de vidange Boutons de bouchon Plinthe (préinstallée sur certains modèles) Moulure de cuve (certains modèles) Documentation, échantillons et/ou bons Matériaux nécessaires Ruban pour joints filetés Connecteurs vissables homologués UL (3) Coupure anti-refoulement pour le boyau de vidange, si nécessaire Raccord en T pour la plomberie de la résidence, s’il y a lieu Robinet d’arrêt (recommandé) Outils nécessaires Tournevis cruciforme Clé à molette de 15 cm (6 po) Équerre de menuisier Lunettes de sécurité Seau pour attraper l’eau lors de la purge du tuyau
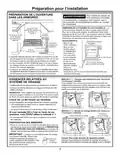
- Page 18: Préparation pour l’installation Pour réduire les risques de choc électrique, d’incendie ou de blessures, l’installateur doit s’assurer que le lave-vaisselle est complètement encastré au moment de l’installation. La porte de ce lave-vaisselle doit être à niveau avec l’armoire. L’ouverture dans les armoires doit mesurer au moins 61,0 cm de largeur et de profondeur, et environ 87,6 cm de hauteur à partir du plancher jusqu’au-dessous du comptoir. Le lave-vaisselle doit être installé de façon à ce que le boyau de vidange mesure au maximum 4,88 mètres pour assurer une vidange adéquate. Le dessus, les côtés et l’arrière du lave-vaisselle doivent être complètement dissimulés à l’intérieur de l’ouverture. Il faut installer une coupure anti-refoulement lorsqu’elle est exigée par les ordonnances et les codes locaux en vigueur. Le boyau de vidange doit avoir une longueur maximale de 4,88 mètres. Assurez-vous d’enlever le bouchon de vidange du broyeur à déchets avant d’y brancher le boyau de vidange du lave-vaisselle. Lorsque vous branchez le boyau de vidange à un broyeur à déchets, assurez-vous d’enlever le bouchon de vidange. Le lave-vaisselle ne pourra pas se vider si vous laissez le bouchon de vidange.
- Page 19: Préparation pour l’installation Avant de commencer l’installation, coupez toute alimentation menant de l’appareil au disjoncteur ou au fusible. Assurez-vous que le branchement électrique et le calibre du fil sont adéquats et conformes aux règlements de votre région. L’alimentation électrique de cet appareil doit être protégée par un fusible de 15 ou 20 A. Le câble électrique doit posséder deux fils, plus un fil de mise à la terre. Ne modifiez pas la fiche fournie avec l’appareil; faites installer une prise de courant appropriée par un technicien qualifié. Cet appareil doit être branché à un réseau électrique permanent mis à la terre. Percez un trou de 3,8 cm (1-1/2 po) de diamètre au maximum pour le passage du câble électrique. En cas de mauvais fonctionnement, la mise à la terre réduit les risques de choc électrique. Le branchement électrique s’effectue du côté avant droit du lave-vaisselle. Utilisez uniquement les cordons d’alimentation spécifiés pour cet appareil.
- Page 20: Préparation pour l’installation Préparation de l'alimentation en eau chaude Nous recommandons l’utilisation d’un tuyau en cuivre pour la conduite d’alimentation en eau. Si vous utilisez un boyau flexible tressé, étiquetez le boyau et indiquez la date d’installation à des fins de référence. Installez un robinet d’arrêt à un endroit accessible, par exemple sous l’évier. La conduite d’alimentation en eau doit passer dans le même trou que le câble électrique et le boyau de vidange. Le raccordement de la conduite d’eau s’effectue du côté gauche du lave-vaisselle. Réglez le chauffe-eau à une température appropriée. Rincez la conduite d’eau pour éliminer tous les débris. La pression de la conduite d’alimentation en eau chaude doit varier entre 1,4 bar et 8,3 bars. Prenez les pièces fournies dans l’emballage et mettez-les de côté.
- Page 21: Installation du lave-vaisselle Vérification de l'équilibre de la porte Ouvrir la porte causera le basculement du lave-vaisselle vers l’avant si son installation n’est pas complètement terminée. Pour vérifier l’équilibre de la porte, fermement maintenir le haut du lave-vaisselle. La porte se referme d’elle-même à l’intérieur de 20° de la verticale. La porte reste en position de 20° à 70°. Avec la clé Allen de 1/8 po fournie, dévissez les vis de serrage pour retirer les pinces d’expédition. Vérifiez la disposition du câble du ressort. Assurez-vous que le câble est bien installé sur les épaulements de la poulie. Placez la poignée sur les fixations de montage de la porte du lave-vaisselle. Serrez les vis de serrage avec la clé Allen.
- Page 22: Installation du lave-vaisselle Positionnez la conduite d’alimentation en eau et le câblage de la résidence sur le plancher de l’ouverture afin qu’ils n’entrent pas en contact avec la base du lave-vaisselle et les pièces sous l’appareil. N’enlevez pas la base de bois avant d’être prêt à installer le lave-vaisselle. Si vous enlevez la base de bois, le lave-vaisselle pourrait basculer lorsque vous ouvrez la porte. Ne frappez pas sur la base de bois pour l’enlever! Vous endommagerez ainsi l’appareil. Amenez le lave-vaisselle à proximité de son emplacement définitif et couchez-le sur le dos. Pour les modèles avec une base en bois fixée, enlevez les quatre pieds de nivellement sous la base de bois à l’aide d’une clé à douille de 24 cm (15/16 po). Avec clé à douille de 24 mm (15/16 po), réglez les pieds de nivellement à l’intérieur du cadre du lave-vaisselle à environ 13 mm (1/2 po) du cadre. Ne retirez pas la boucle du boyau de vidange supérieur. Vissez le tuyau d’arrosage de 19,1 mm (3/4 po) dans l’électrovanne. Assurez-vous que le joint d’étanchéité en caoutchouc se situe entre l’électrovanne et le coude. Ne serrez pas le coude de façon excessive; le support de l’électrovanne pourrait se déformer ou le raccord de l’électrovanne pourrait se casser.
- Page 23: Installation du lave-vaisselle Placez le lave-vaisselle vis-à-vis de l’ouverture dans les armoires. Insérez le boyau de vidange dans l’orifice que vous avez précédemment percé dans la paroi des armoires. Tirez sur le boyau de vidange et le cordon d’alimentation, s’il y a lieu, par les trous des armoires adjacentes. Assurez-vous que le boyau de vidange n’est pas plié à l’arrière ou en dessous du lave-vaisselle. Ne débranchez ni ne retirez la boucle de vidange haute du côté gauche du lave-vaisselle. La longueur maximale du tuyau de vidange est de 4,88 m (16 pi) à l’arrière du lave-vaisselle. Pour éviter des frais de réparation inutiles pour des problèmes de remplissage, de vidange ou de bruit. Ne poussez pas sur le panneau avant avec vos genoux. Vous pourriez endommager l’appareil. Saisissez le panneau avant de l’appareil par les côtés et faites glisser le lave-vaisselle dans l’ouverture. Prenez la garniture supérieure et centrez-la avec le loquet supérieur.
- Page 24: Installation du lave-vaisselle Vous aurez besoin des supports de montage mises de côté à l’étape 1. Posez les supports de montage sur les côtés si le comptoir est en granite ou un matériau similaire qui n’accepte pas les vis à bois. Installez les supports en insérant les languettes dans les fentes du cadre de la cuve. Vérifiez l’isolant de la cuve pour vous assurer qu’il enveloppe complètement la cuve. Ajustez les supports en les pliant de façon à ce qu’ils ne soient pas en contact avec le haut de la porte du lave-vaisselle. Ne poussez pas sur le centre du panneau avec votre genou pour éviter d'endommager le panneau. Le lave-vaisselle est à son emplacement définitif lorsque les bords du panneau avant sont à égalité avec les armoires adjacentes. Avant d’ouvrir la porte du lave-vaisselle, assurez-vous que les bords du panneau de porte sont en retrait par rapport au devant des armoires adjacentes.
- Page 25: Installation du lave-vaisselle Mise de niveau du lave-vaisselle Vérifiez l’alignement du lave-vaisselle avant d’ouvrir la porte afin de prévenir tout dommage au panneau de la porte. Ouvrez et fermez la porte du lave-vaisselle pour vous assurer qu’elle fonctionne correctement et qu’elle ne frotte pas contre les armoires adjacentes. Mettez le lave-vaisselle de niveau en vissant ou dévissant chacun des quatre pieds de nivellement sous l’appareil. Un alignement incorrect causera des dommages au panneau de la porte. Assurez-vous que la conduite d’eau et le câble électrique ne sont pas coincés ou écrasés à l’arrière du lave-vaisselle. Le lave-vaisselle est correctement de niveau lorsque l’indicateur de niveau est centré de gauche à droite et de l’avant vers l’arrière. La porte du lave-vaisselle devrait se fermer sans frotter contre les côtés de la cuve. Pour éviter des frais de réparation inutiles, vérifiez si le lave-vaisselle est de niveau. Le lave-vaisselle doit être de niveau pour assurer le bon fonctionnement des paniers et de la porte.
- Page 26: Installation du lave-vaisselle Au cours de cette étape, vous aurez besoin des deux vis à tête spéciale Phillips mises de côté à l’étape 1. Un fois le lave-vaisselle fixé aux armoires ou au comptoir de cuisine, vérifiez à nouveau qu’il est placé d’équerre dans l’armoire. Assurez-vous que tous les pieds de nivellement reposent fermement sur le plancher. Le lave-vaisselle doit être fixé au dessous du comptoir ou aux côtés des armoires. Pour éviter tout dommage au panneau de la porte et au tableau de commande, il faut que le lave-vaisselle soit installé de manière que le panneau avant et le tableau de commande n’entrent pas en contact avec les armoires adjacentes. Raccordez la conduite d’alimentation en eau au coude de 90°. Les boutons de bouchon doivent être installés pour assurer l’alignement correct de la porte à la cuve. Assurez-vous que les ressorts et(ou) les câbles des ressorts de la porte n’entrent pas en contact avec le boyau de remplissage ou la conduite d’alimentation en eau. Les têtes de vis qui dépassent pourraient égratigner le panneau de porte ou le tableau de commande. Revérifiez l’alignement du lave-vaisselle dans l’ouverture des armoires.
- Page 27: Installation du lave-vaisselle Raccordement du boyau de vidange Le tuyau doit déjà avoir été détaché de la baignoire aux emplacements indiqués. Ne retirez pas la boucle du boyau de vidange supérieur. Branchez le boyau de vidange à la coupure anti-refoulement, au raccord en T ou au broyeur à déchets. L’extrémité moulée du boyau de vidange est conçue pour s’installer sur l’orifice d’entrée d’un diamètre variant entre 15,8 mm (5/8 po) et 25,4 mm (1 po). Si un tuyau de vidange plus long est nécessaire, vous pouvez acheter une rallonge de tuyau de vidange. Lorsque vous raccordez le boyau de vidange à un broyeur à déchets, assurez-vous d’enlever le bouchon de vidange. La longueur totale du tuyau de vidange ne doit pas dépasser 4,88 m (16 pieds) pour un fonctionnement correct de la vidange. Tirez sur le boyau de vidange par l’ouverture pratiquée dans les armoires afin d’empêcher le lave-vaisselle d’écraser ou de plier une longueur excessive de boyau.
- Page 28: Installation du lave-vaisselle Passez en revue cette liste après l’installation de votre lave-vaisselle pour éviter des frais de réparation inutiles non couverts par votre garantie. Assurez-vous que le courant électrique est coupé à la source. Ouvrez la porte du lave-vaisselle et enlevez tout le matériel d’emballage en carton et en mousse. L’installateur doit vérifier que les fils ne sont pas pliés ou endommagés et que toutes les connexions électriques sont à l’intérieur du couvercle de la boîte de connexion. Vérifiez l’ouverture et la fermeture de la porte. Si la porte n’ouvre pas et ne se ferme pas librement, vérifiez si le câble du ressort est installé sur la poulie. Assurez-vous que le câblage électrique est bien placé sous le lave-vaisselle et qu’il n’entre pas en contact avec d’autres pièces de l’appareil. Repérez les trois fils du lave-vaisselle et utilisez les capuchons de connexion homologués pour les connecter correctement. Vérifiez si la porte est bien parallèle par rapport à la cuve et aux armoires. Installez le couvercle de la boîte de jonction à l’aide de la vis à tête hexagonale n° 10. Ouvrez le robinet d’eau chaude de l’évier et vérifiez s’il y a des fuites.
- Page 29: Installation du lave-vaisselle Rétablissez l’alimentation électrique ou branchez le cordon d’alimentation dans la prise de courant murale. Sélectionnez un cycle à exécuter et pressez la touche Start/Reset. Vérifiez que la porte est verrouillée. Le lave-vaisselle devrait démarrer. Assurez-vous que le lave-vaisselle se remplit d’eau. Vérifiez s’il y a des fuites sous le lave-vaisselle. Une petite quantité d’eau peut être projetée hors de l’entonnoir de remplissage lors de la première utilisation. Vérifiez s’il y a des fuites autour de la porte. Maintenez enfoncée la touche Start/Reset durant 3 secondes pour annuler le cycle. Ouvrez la porte complètement ; si elle ne reste pas totalement ouverte, ajustez le panneau d’isolant. Assurez-vous que l’évent de ventilation n’est pas obstrué par l’isolant.
- Page 30: Installation du lave-vaisselle Repérez les 2 pinces de jets de bouteille fournis, sur certains modèles, soit dans le panier d’argenterie ou le sac de quincaillerie. Installez la pince sur la tige des jets de bouteille en glissant sa pince sur la buse et en la poussant vers sa base. Appuyez le panneau inférieur contre les pieds de nivellement du lave-vaisselle. Vérifiez que la moulure de la cuve ne gêne pas la porte. Le lave-vaisselle doit être d’équerre et de niveau par rapport au bas et au haut de l’ouverture de l’armoire. Les quatre pieds doivent reposer fermement sur le plancher. Le boyau de vidange ne doit pas être coincé entre le lave-vaisselle et les armoires ou les murs adjacents. Insérez et serrez les deux vis de fixation du panneau inférieur. Évitez le serrage excessif des vis de la plinthe. Laissez le Manuel d’utilisation, les directives d’installation, les échantillons et(ou) les bons au consommateur.

BOSCH Voll-I 44x Dishwasher

FRIGIDAIRE GDPH4525SS Dishwasher

SIEMENS SX73HX10VE Dishwasher

BOSCH SPV6ZMX23E Dishwasher

FISHER PAYKEL DW60UC6X Built-under Dishwasher

GRUNDIG GSV Dishwasher
FISHER PAYKEL DD60SCX9 DishDrawer Dishwasher

Miele PFD 100 SmartBiz Free-Standing Dishwasher

BOSCH SMU2ITS01A Series 2 Built Under Dishwasher

COVE DW2451 Dishwasher