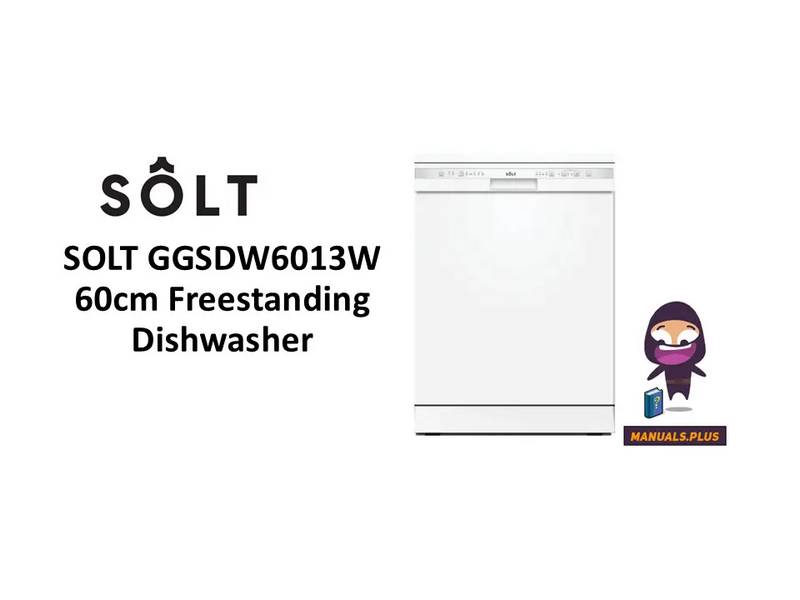
SOLT GGSDW6013W Dishwasher


MODELS
GGSDW6013W
GGSDW6013X
V1.5 1124
User
Manual
60cm Freestanding
Dishwasher

| General | Details |
|---|---|
| Name | SOLT GGSDW6013W Dishwasher |
| Make | SOLT |
| Language | English |
| Filetype | PDF (Download) |
| File size | 1.74 MB |


SOLT GGSDW6012B Dishwasher
SOLT GGSDW6013W Dishwasher Overview
Summary of Contents
- Page 1: Models include GGSDW6013W and GGSDW6013X. This is version 1.5 1124 of the user manual. The document is for a 60cm freestanding dishwasher.
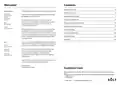
- Page 2: Welcome! Congratulations on purchasing your new dishwasher! It is important that you read through the following use and care manual thoroughly to familiarise yourself with the installation and operation requirements of your appliance to ensure optimum performance. At Residentia Group, we are customer obsessed and our Support Team are there to ensure you get the most out of your appliance. Please refer to the warranty card at the rear of this manual for information regarding your product’s parts and labour warranty. Sôlt recommends the use of original spare parts. You can use our online Support Centre at any time. Should you want to learn more about the features, our Support Team are here to help. Thank you for choosing an Sôlt appliance and we look forward to being of service to you. Kind regards, The Residentia Team.
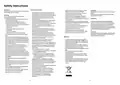
- Page 3: Safety instructions should be read entirely before using the dishwasher. Never use soap, laundry detergent, or hand washing detergent in your dishwasher. This appliance must be earthed to reduce the risk of electric shock. The door should not be left open to prevent tripping hazards. Installation and repair must be carried out by a qualified technician. The appliance needs to be connected to the main water valve using new hose sets. Children aged 8 years and above can use the appliance with supervision. Do not operate the dishwasher unless all enclosure panels are properly in place. Some dishwasher detergents are strongly alkaline and can be dangerous if swallowed. This appliance is for indoor household use only.
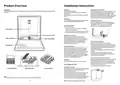
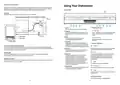
- Page 4: Product overview Installation instructions To get the best performance from your dishwasher, read all operating instructions before using it for the first time. Warning: Electrical shock hazard. Disconnect electrical power before installing dishwasher. Position the appliance in the desired location. The back should rest against the wall behind it. The installation of the pipes and electrical equipment should be done by professionals. Once the appliance is positioned for leveling, the height of the dishwasher may be altered via adjustment of the screwing level of the feet. Do not use an extension cord or an adapter plug with this appliance. Ensure the voltage and frequency of the power being corresponds to those on the rating plate. The height of the dishwasher, 845 mm, has been designed to allow the machine to be fitted between existing cabinets of the same height. Connect the cold water supply hose to a threaded ¾(inch) connector and make sure that it is fastened tightly in place.
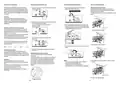
- Page 5: Connection of drain hoses Insert the drain hose into a drain pipe with a minimum diameter of 4 cm, or let it run into the sink, avoiding bending or crimping it. The height of the drain pipe must be less than 1000mm. The free end of the hose must not be immersed in water to avoid backflow. Please securely fix the drain hose in either position A or position B. Press the power button to turn on your dishwasher. Select the appropriate washing program; the selected program indicator will be lit. If the rinse aid indicator is lit, it means the dishwasher is low on rinse aid and requires a refill. When you have about or less than 6 place settings, you can choose the half load function to save energy and water. For heaviest soiled crockery, use the intensive program. This option allows you to lock the buttons on the control panel so children cannot accidentally start the dishwasher.
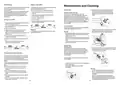
- Page 6: Rinse aid is released during the final rinse to prevent water from forming droplets on your dishes, which can leave spots and streaks. It also improves drying by allowing water to roll off the dishes. Your dishwasher is designed to use liquid rinse aids. Only use branded rinse aid for dishwashers. Never fill the rinse aid dispenser with any other substances such as dishwasher cleaning agent or liquid detergent as they may damage the appliance. The chemical ingredients that compose the detergent are necessary to remove, crush, and dispense all dirt out of the dishwasher. Most commercial quality detergents are suitable for this purpose. Turn the rinse aid indicator dial to a number between 1 and 6. The higher the number, the more rinse aid the dishwasher uses. Use only detergent specifically made for dishwasher use. Dishwasher detergent is corrosive; keep it out of the reach of children.
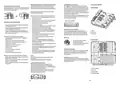
- Page 7: Recommendations for loading the dishwasher include scraping off large amounts of leftover food and softening burnt food remnants in pans. It is not necessary to rinse dishes under running water. Large items and difficult-to-clean items should be placed in the lower basket, such as pots, pans, lids, and serving dishes. Serving dishes and lids should be placed on the side of the racks to avoid blocking the top spray arm. The spikes of the lower basket can be lowered to make more room for bulky items. For best performance, follow the loading guidelines. Items such as cups, glasses, and pots should be faced downwards, and curved items should be loaded at an angle to allow water to run off. All utensils must be stacked securely to prevent tipping over. Cutlery should be placed separately in the cutlery rack to ensure proper cleaning and avoid nesting. Glasses should not touch one another to prevent damage. The upper basket is designed for delicate and lighter dishware, while sharp utensils should be loaded with the sharp point down. It is important not to overload the dishwasher for optimal results and energy consumption. When removing dishes, empty the lower basket first to prevent water dripping from the upper basket. Some types of glasses may become dull after many washes, and very small items should not be washed in the dishwasher.
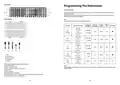
- Page 8: Cutlery rack Programming the dishwasher Wash cycle table The table shows which programs are best for the levels of food residue and how much detergent is needed. Consumption values and program duration are only indicative except for ECO program. Rinse aid: The need to fill rinse into the Rinse-Aid Dispenser. Program description of cycle includes prewash, wash, rinse, and drying stages. Information for comparability tests in accordance with AS/NZS 2007.1. Capacity: 13 place settings. Program: ECO with specific rinse aid setting and detergent amounts. Door is open at the end of the drying cycle for the drying performance test.
- Page 9: Saving energy is important for efficient dishwasher use. Pre-rinsing tableware is not recommended as it increases water and energy consumption. A forgotten dish can be added before the detergent dispenser opens. The fine and coarse filters should be regularly cleaned to prevent clogging. Cleaning the door seals with a damp cloth is necessary to remove food deposits. It is dangerous to open the door mid-cycle due to hot steam. Avoid using abrasive cleaners or scouring pads on the outer surfaces. The filtering system retains coarse debris and should be checked regularly. A wash cycle can only be changed if it has been running for a short time. Improper replacement of filters may reduce appliance performance and damage dishes.
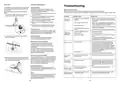
- Page 10: Spray arms It is necessary to clean the spray arms regularly for hard water chemicals will clog the spray arm jets and bearings. Please take frost protection measures on the dishwasher in winter. Reviewing the charts on the following pages may save you from calling for service. To clean the spray arms, follow the instructions below. After every wash, turn off the water supply to the appliance and leave the door slightly open so that moisture and odors are not trapped inside. To clean the exterior and rubber parts of the dishwasher, do not use solvents or abrasive cleaning products. It is recommended that you run a wash cycle with the dishwasher empty and then remove the plug from the socket. One of the factors that cause odors to form in the dishwasher is food that remains trapped in the seals. If the appliance must be moved, try to keep it in the vertical position. A spray arm is knocking against an item in a basket.
- Page 11: Troubleshooting error codes help identify malfunctions in the dishwasher. Rattling noise may occur if items are loose in the dishwasher. If the rapid indicator flashes, it indicates a longer inlet time due to restricted water intake. Dishes may not be clean if the program was not powerful enough or if items block the spray arms. Cloudiness on glassware can result from a combination of soft water and too much detergent. Black or grey marks on dishes may be caused by aluminium utensils rubbing against them. If overflow occurs, turn off the main water supply before calling for service. Dishes may not dry properly if there is water in the base pan due to an overfill or small leak. Increase the amount of rinse-aid if dishes are not drying. Do not empty the dishwasher immediately after washing; allow steam to escape first.
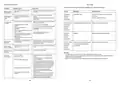
- Page 12: Product information includes technical specifications for models GGSDW6013X and GGSDW6013W. The appliance has a capacity of 13 standard place settings. It is rated with an energy efficiency class of W and a water consumption class of 4.5 stars. The standard cleaning cycle is ECO, consuming 0.792 kWh of energy and 10.98 liters of water. The program duration for the standard cleaning cycle is 185 minutes. The noise level is measured at 52 dB(A) re 1 pW. The appliance is freestanding and has dimensions of 845mm in height, 598mm in width, and 600mm in depth when the door is closed. It can be built-in and has a depth of 1175mm when the door is opened 90°. The power consumption ranges from 1760 to 2100W. The rated voltage is AC 220-240V with a frequency of 50Hz, and it operates under a water pressure of 0.04-1.0MPa (0.4-10 bar).
- Page 13: Purchase details should be recorded on this page. Attach your receipt to this page for future reference. Record information from the rating plate and the date of purchase. Store details include store name, address, and telephone. Document the purchase date. Product details include model number and serial number.
- Page 14: Warranty information outlines the responsibilities and rights regarding the appliance. You will bear the cost of transportation, travel, and delivery of the appliance to and from Residentia Group or its ASR. Proof of purchase is required before making a claim under this warranty. For appliances provided by Residentia Group in Australia, the appliances come with a guarantee that cannot be excluded under the Australian Consumer Law. Missing parts are not covered by warranty, and any parts not reported missing within the first week after purchase will not be provided free of charge. You may not make a claim under this warranty unless the defect is due to faulty or defective parts or workmanship. This warranty only applies to appliances purchased and used in Australia and is in addition to any non-excludable statutory warranties. During the warranty period, Residentia Group or its ASR will repair or replace any parts considered defective at no extra charge if the appliance is readily accessible. To the extent permitted by law, Residentia Group excludes all warranties and liabilities not contained in this document. The Australian Consumer Law requires the inclusion of guarantees that cannot be excluded, entitling you to a replacement or refund for a major failure.
- Page 15: Page 15

BOSCH SGE53C56UC Black Dishwasher
BOSCH SMH6ZCX06E Dishwasher

BOSCH SBV6YCX02E Fully Integrated Dishwasher
IKEA AA-2412057-2-1 RÅGLANDA Integrated Dishwasher

Whirlpool D2I HD526 A Dishwasher
BOSCH SMS8ZDI86M Dishwasher

FISHER AND PAYKEL DD24ST4NX9 Dishwasher
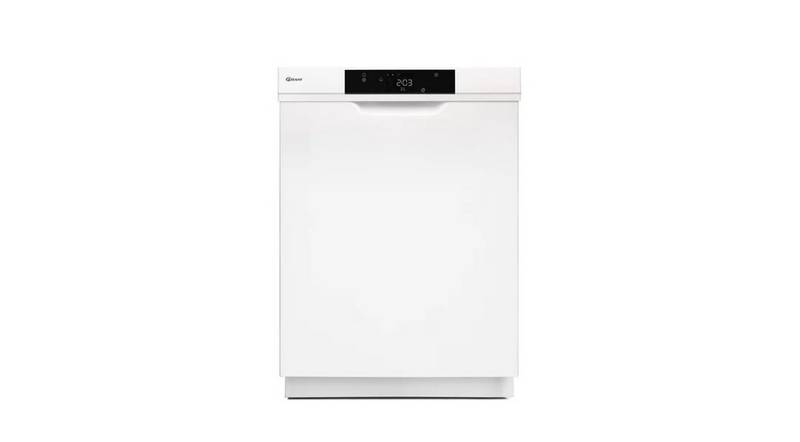
GRAM DS 4010 Dishwasher

FISHER PAYKEL DD24STI9N Dishwasher

smeg DWAFI6224-4 Dishwasher