SOLT GGSDW6013W Dishwasher

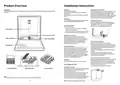


Product Overview
Installation Instructions
Important
To get the best performance from your dishwasher, read all operating instructions before using it for the
before using it for the first time.
first time.
Warning
Electrical Shock Hazard
Disconnect electrical power before installing
dishwasher.
Failure to do so could result in death or electrical
shock.
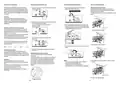
Positioning the Appliance
Position the appliance in the desired location. The
back should rest against the wall behind it, and
the sides, along the adjacent cabinets or walls.
The dishwasher is equipped with water supply and
drain hoses that can be positioned either right or
the left sides to facilitate proper installation.
Attention
The installation of the pipes and electrical equip-
ments should be done by professionals.
Levelling the appliance
Once the appliance is positioned for levelling,
the height of the dishwasher may be altered via
adjustment of the screwing level of the feet.
Power Connection
For personal safety:
Do not incline the appliance more than 2°.
•
•
Do not use an extension cord or an adapter
plug with this appliance.
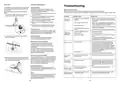
Inner pipe
Do not, under any circumstances, cut or remove
the earthing connection from the power cord.
Lower spray arm
Electrical requirements
Please look at the rating label to know the
rating voltage and connect the dishwasher to
the appropriate power supply. Use the required
fuse 10A, time delay fuse or circuit breaker
recommended and provide separate circuit
serving only this appliance.
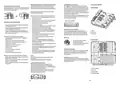
Salt container
Filter assembly
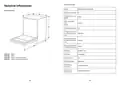
Freestanding Installation
Type 1: Fitting between existing cabinets
The height of the dishwasher, 845 mm, has been
designed in order to allow the machine to be fitted
between existing cabinets of the same height in
modern fitted kitchens.
The feet can be adjusted so that correct height is
reached.
Dispenser
Dispenser
Electrical connection
Ensure the voltage and frequency of the power
being corresponds to those on the rating plate.
Only insert the plug into an electrical socket
which is earthed properly. If the electrical socket
to which the appliance must be connected is
not appropriate for the plug, replace the socket,
rather than using a adapters or the like as they
could cause overheating and burns.
The laminated top of the machine does not
require any particular care since it is heatproof,
scratchproof and stainproof.
Type 2: Underneath existing work top
(When fitting beneath a work top) In most modern
fitted kitchens there is only one single work top
under which cabinets and electrical appliances
are fitted. In this case remove the work top of the
dishwasher by unscrewing the
Warning
Ensure that proper earthing exists before use.
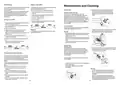
Water Supply and Drain
Cold water connection
Upper spray arm
Cutlery rack Upper spray arm Cup rack
Cutlery rack
Cup rack
screws under the rear edge of the top (a).
Cutlery basket
Cutlery basket
Upper basket
Lower basket
Lower basket
Connect the cold water supply hose to a threaded
¾(inch) connector and make sure that it is
fastened tightly in place.
a
b
a
b
If the water pipes are new or have not been used
for an extended period of time, let the water
run to make sure that the water is clear. This
precaution is needed to avoid the risk of the water
inlet to be blocked and damage the appliance.
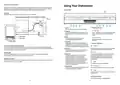
Note
The diagrams above are only for reference, models may appear differently.
6
7
Note: Please close the hydrant after using.
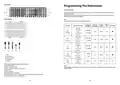
| General | Details |
|---|---|
| Name | SOLT GGSDW6013W Dishwasher |
| Make | SOLT |
| Language | English |
| Filetype | PDF (Download) |
| File size | 1.74 MB |


SOLT GGSDW6012B Dishwasher

FISHER PAYKEL DD24DV2T9-N Dishwasher

FISHER AND PAYKEL DW24UNT2X2 Dishwasher

CMA DISHMACHINES EST-66 Conveyor Dishwasher

FISHER AND PAYKEL DD60STX6I1 Dishwasher

Whirlpool W8I-HP42-L-UK Dishwasher

BLAKESLEE RC-62 Rack Conveyor Type Dishwasher

CMA DISHMACHINES EST-AH Door Type Rack Low Dishwasher

Whirlpool 2B19 Dishwasher

FISHER AND PAYKEL DD24STX6PX1 Simple Contemporary Dishwasher

BOSCH SMV2ITX09E Dishwasher