
TECHNIKA TDX7SS-7 Dishwasher
















TDX7SS-7
60cm Freestanding Dishwasher
USER MANUAL
technika.com.au


| General | Details |
|---|---|
| Name | TECHNIKA TDX7SS-7 Dishwasher |
| Make | TECHNIKA |
| Language | English |
| Filetype | PDF (Download) |
| File size | 4.28 MB |
 (1 votes, average: 5.00 out of 5)
 Loading...

TECHNIKA TDX7SS-7 Dishwasher Overview
Summary of Contents
- Page 1: 60cm freestanding dishwasher User manual
- Page 2: Thank you for your purchase. Congratulations on the purchase of your new product from Technika. We recommend you please take some time to read the instruction manual thoroughly to familiarize yourself with the functionality and operations. The installation of your new appliance must be carried out by a qualified installer/technician in accordance with local regulations. Please ensure all packaging materials are disposed of correctly. Our Customer Care centre is available should you wish to learn more about your appliance. For further details, please contact our Customer Care team. Please store the manual in a safe and accessible location for future reference. Tips on cleaning as well as available accessories can be provided. Thank you.
- Page 3: Before you begin Operation (continued) Explanation of symbols Basket use and tips For your safety General safety Electrical safety Product safety Intended use Trouble shooting
- Page 4: Please read the user manual carefully before using the unit. Ensure that the appliance is used in a safe manner and under proper supervision. The appliance can be used by children aged from 8 years and above and persons with reduced physical, sensory or mental capabilities or lack of experience and knowledge if they have been given supervision or instruction. Children should not play with the appliance. Cleaning and user maintenance should not be made by children without supervision. The appliance is intended for household use only. Do not use the appliance outdoors. Keep the appliance and its cord out of reach of children less than 8 years. The appliance must not be immersed in water or other liquids. If the supply cord is damaged, it must be replaced by the manufacturer, its service agent or similarly qualified persons in order to avoid a hazard.
- Page 5: - Please take some time to read the instruction manual thoroughly. - Congratulations on the purchase of your new product from Belling. - The installation of your new appliance must be carried out by a qualified technician. - Ensure all packaging materials are disposed of correctly. - Please ensure that all packaging materials are disposed of correctly. - After reading the manual, please store it in a safe and accessible location for future reference. - Customer Care. - The installation of your new appliance must be carried out in accordance with local regulations. - The installation of your new appliance must be carried out by a qualified technician. - Please ensure that all packaging materials are disposed of correctly.
- Page 6: - The installation of your new appliance must be carried out by a qualified professional. - Please ensure all packaging materials are disposed of correctly. - After reading the manual, please store it in a safe and accessible location for future reference. - The installation of your new appliance must be carried out in accordance with local regulations. - Customer care is available should you wish to learn more about your appliance. - The installation of your new appliance must be carried out by a qualified professional. - Please ensure all packaging materials are disposed of correctly. - After reading the manual, please store it in a safe and accessible location for future reference. - The installation of your new appliance must be carried out in accordance with local regulations. - Customer care is available should you wish to learn more about your appliance.
- Page 7: For your safety This appliance can be used by children aged 8 and above and by persons with reduced physical and mental capabilities or lack of experience and knowledge if they have been given supervision or instruction. Intended use The appliance has been designed for domestic use. It is not suitable for commercial use and it must not be used out of its intended use. Child safety Packaging materials are dangerous for children. Keep packaging materials away from children. Electrical products are dangerous for children. Keep children away from the product when it is operating. Keep loading door closed even when the dishwasher is not in use. Disposal regulations This product has been manufactured with high quality parts and materials which can be reused and are suitable for recycling. Do not dispose of the waste product with normal domestic and other wastes at the end of its service life. By ensuring this product is disposed of correctly, you will help prevent potential negative consequences for the environment and human health.
- Page 8: - The document appears to be a user manual for a product, likely a dishwasher. - It emphasizes the importance of following safety instructions to prevent risks such as fire or electric shock. - Users are advised to ensure that the appliance is properly earthed and that the electrical installation meets safety standards. - The manual includes warnings against using the appliance in a manner that could lead to overheating or damage. - It stresses the need for proper maintenance and care of the appliance to ensure its efficiency and safety. - There are instructions regarding the handling of the appliance and the importance of not allowing children to operate it unsupervised. - The document mentions the necessity of using the appliance according to the provided instructions to avoid accidents. - It highlights the importance of disconnecting the power supply before performing any maintenance or installation tasks. - The manual advises users to contact customer care for any issues or further information regarding the product. - It includes a reminder to keep the appliance in a clean and safe environment to prevent hazards.
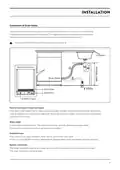
- Page 9: Installation Position the appliance in the desired location. The back should rest against the wall behind it. The sides should align with adjacent cabinets or walls. The dishwasher is equipped with water supply and drain hoses that can be positioned to the right or left sides. Once positioned for leveling, the height of the dishwasher may be altered via adjustment of the screwing level of the feet. The appliance should not be inclined more than 2°.
- Page 10: Installation Carefully read all instructions before using your appliance. The appliance must be installed in a safe way and understand the hazards involved. Children should not play with the appliance. The appliance and its accessible parts should be kept out of reach of children. The appliance can be used by children aged from 8 years and above and persons with reduced physical, sensory or mental capabilities or lack of experience and knowledge if they have been given supervision or instruction. The appliance must be installed in a safe way and understand the hazards involved. The appliance must be connected to the water supply and drainage system properly. Connect the cold water supply hose to a threaded 3/4(inch) connector and make sure that it is fastened tightly in place. If the water pipes are new or have not been used for an extended period of time, let the water run to make sure that the water is clear. Close the hydrant after using.
- Page 11: - Read all instructions before using your appliance. - Ensure supervision when the appliance is used by or near children. - The appliance and its accessible parts can become hot during use. - Installation should be performed by qualified personnel. - The appliance must be used in a safe manner to avoid hazards. - The drain hose must be securely fixed to prevent leaks. - If the sink is higher than 1000mm from the floor, excess water cannot be drained directly into it. - Use a suitable container to drain excess water from hoses if necessary. - Ensure the water drain hose is not kinked or squashed. - The waste connection must be at a height less than 100 cm from the bottom of the dish.
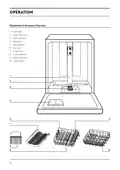
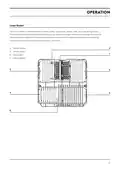
- Page 12: Operation Dishwasher and accessory overview Inner pipe Lower spray arm Filter assembly Dispenser Upper basket Cup rack Cutlery tray Cutlery basket Upper spray arm Lower basket
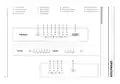
- Page 13: Power button Intensive program Heavy program Eco program 90min program Glass program Rapid program Soak program LED screen Child lock function
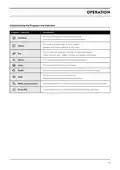
- Page 14: Operation How to use the control panel Press this button to turn on your dishwasher. Press the Delay button to increase the delay start time. Delay a cycle for up to 24 hours in one-hour increments. When you have about or less than 6 place setting dishware to wash, you can choose this function to save energy and water. It can be used with Intensive, Heavy, ECO, Glass and 90min. Add to cycle for an improved drying result. This option allows you to lock the buttons on the control panel - except the Power button - so children cannot accidentally start the dishwasher. To start the selected washing program or pause it when the dishwasher is working. To show the remaining time, delay time or error code.
- Page 15: Operation Understanding the programs and indicators Intensive: For heaviest soiled crockery, such as pots, pans and casserole dishes with dried on food. Heavy: For heavily soiled loads, such as plates, glasses and lightly soiled pots and pans. Eco: This is standard program, suitable for normally soiled loads, such as pots, plates, glasses and lightly soiled pans. 90 min: For normally soiled loads that need quick wash. Glass: For lightly soiled crockery and glass. Rapid: A shorter wash for lightly soiled loads that do not need drying. Soak: Use to rinse heavily soiled dishes or dishes that you plan to wash later that day. Water supply failure: If the indicator is lit, it means that no water is reaching the dishwasher. Rinse aid: If the indicator is lit, it means the dishwasher's rinse aid is low.
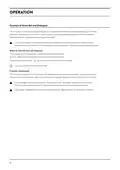
- Page 16: - Please ensure all packaging materials are disposed of correctly. - The function of rinse aid and detergent is crucial for optimal performance. - After reading the manual, please store it in a safe and accessible location for future reference. - The installation of your new appliance must be carried out by a qualified technician. - The operation of the system must comply with local regulations. - Please ensure that all safety instructions are followed before using the appliance. - The rinse aid is released during the final rinse to prevent water from forming droplets on your dishes. - Only use branded rinse aid for dishwashers. - The regularity of the dispenser needing to be refilled depends on how often dishes are washed and the rinse aid setting used. - Dishwasher detergent is corrosive! Keep dishwasher detergent out of the reach of children.
- Page 17: Operation Filling the rinse aid reservoir involves removing the cap, pouring the rinse aid into the dispenser, and closing the cap. Do not overfill the rinse aid dispenser. Adjusting the rinse aid reservoir can improve drying performance with limited rinse aid. To adjust, switch on the dishwasher and press the Soak button within 60 seconds. The rinse aid indication blinks at a frequency of 1Hz, with the factory setting at d3. Press the Soak button again to select the program according to your habits. The setting changes in the sequence: d3->d4->d5->d1->d2->d3. A higher number indicates more rinse aid usage by the dishwasher. Complete the setup by leaving it for 5 seconds or pressing the Power button.
- Page 18: Operation Filling the detergent dispenser Choose an open way according to your model. Open the cap by sliding, pressing down, or pressing in the release latch. Add detergent into the larger cavity for the main wash. For better cleaning results, pour a small amount of detergent onto the door. The additional detergent will activate during the pre-wash phase. Close the flap by sliding it to the front and then pressing it down. Please follow the manufacturer’s recommendations on the detergent packaging.
- Page 19: Operation Basket use and tips Adjusting the upper basket The height of the upper basket can be easily adjusted to accommodate taller dishes in either the upper or lower basket. To adjust the height of the upper rack, follow these steps: To raise the upper basket, just lift the upper basket at the center of each side until the basket locks into place in the upper position. To lower the upper basket, lift the handles on each side to release the basket and lower it to the lower position. Folding back the cup shelve To make room for taller items in the upper basket, raise the cup rack upwards. You can then lean the tall glasses against it. Folding down the rack shelves The racks of the lower basket are used for holding plates. They can be folded down to make more room for large items.
- Page 20: Operation Upper basket Please place the light flatwares on the rack. The total weight is less than 1.5kg.
- Page 21: Operation The lower basket is recommended for dinner plates, soup bowls, dishes, pots, pans, lids and grill trays. Plates should be positioned vertically and facing the center of the rack. Make sure that large items do not interfere with the rotation of the spray arms, and do not prevent the detergent dispenser from opening. There are two ways to load the cutlery baskets.
- Page 22: Operation Cutlery tray and basket: top view Basket loading according to AS/NZS 2007.1 Information for comparability tests in accordance with AS/NZS 2007.1 Rinse aid setting: 6 Detergent (pre/main): 5g/27.5g Capacity: 14 place settings Door is open at the end of the drying cycle for the drying performance test and last 40 mins. Door position: open 50 mm Position of the upper basket: lower position Program: ECO
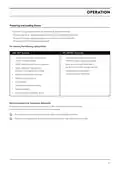
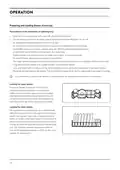
- Page 23: Operation Preparing and loading dishes Consider buying utensils which are identified as dishwasher-proof. For particular items, select a program with the lowest possible temperature. To prevent damage, do not take glass and cutlery out of the dishwasher immediately after the program has ended. Recommendations for loading the dishwasher include scraping off any large amounts of leftover food and softening remnants of burnt food in pans. It is not necessary to rinse the dishes under running water. For best performance of the dishwasher, follow these loading guidelines. Features and appearance of baskets and cutlery baskets may vary from your model.
- Page 24: Preparing and loading dishes involves specific guidelines for optimal results. Items such as cups, glasses, pots, and pans should be faced downwards. Curved items should be loaded at an angle to allow water to run off. All utensils must be stacked securely to prevent tipping over. Utensils should be arranged to allow the spray arms to rotate freely during washing. Hollow items should be loaded with openings facing downwards to prevent water collection. Dishes and cutlery must not lie inside one another or cover each other to avoid damage. The upper basket is designed for delicate and lighter dishware like glasses and cups. Long bladed knives should be stored upright, while sharp items must be positioned horizontally in the upper basket. Overloading the dishwasher can affect cleaning results and energy consumption.
- Page 25: Preparing and loading dishes This appliance can be used by children aged from 8 years and above and by persons with reduced physical, sensory or mental capabilities or lack of experience and knowledge if they have been given supervision or instruction concerning use of the appliance in a safe way and understand the hazards involved. Children should not play with the appliance. Cleaning and user maintenance shall not be made by children without supervision. The appliance in a safe way and understand the hazards involved. The appliance and its accessible parts become hot during use. Care should be taken to avoid touching heating elements. This appliance can be used by children aged from 8 years and above and by persons with reduced physical, sensory or mental capabilities or lack of experience and knowledge if they have been given supervision or instruction concerning use of the appliance in a safe way and understand the hazards involved. Children should not play with the appliance. Cleaning and user maintenance shall not be made by children without supervision. The appliance in a safe way and understand the hazards involved. The appliance and its accessible parts become hot during use. Care should be taken to avoid touching heating elements.
- Page 26: Operation Starting a wash cycle Draw out the lower and upper basket, load the dishes and push them back. It is recommended to load the lower basket first, then the upper one. Pour in the detergent. Make sure that the water supply is turned on to full pressure. Close the door, press the Power button, to switch on the dishwasher. Press the Start/Pause button, the dishwasher will start its cycle. Changing the program mid-cycle A wash cycle can only be changed if it has been running for a short time otherwise, the detergent may have already been dispensed. It is dangerous to open the door mid-cycle, as hot steam may scald you. Add a dish during a cycle A forgotten dish can be added any time before the detergent dispenser opens.
- Page 27: The filtering system in the base of the wash cabinet retains coarse debris from the washing cycle. The collected coarse debris may cause the filters to clog. Check the condition of the filters regularly and clean them if necessary under running water. Follow the steps below to clean the filters in the wash cabinet. Pictures are only for reference, different models of the filtering system and spray arms may be different. Hold the coarse filter and rotate it anticlockwise to unlock the filter. Lift the filter upwards and out of the dishwasher. The fine filter can be pulled off the bottom of the filter assembly. Larger food remnants can be cleaned by rinsing the filter under running water. For a more thorough clean, use a soft cleaning brush.
- Page 28: - It is necessary to clean the spray arms regularly as hard water chemicals will clog the arm jets and bearings. - To clean the spray arms, follow the instructions below. - To remove the upper spray arm, hold the nut, rotate the arm clockwise to remove it. - To remove the lower spray arm, pull out the spray arm upward. - Wash the arms in soapy and warm water and use a soft brush to clean the jets. - Replace them after rinsing them thoroughly. - The appliance should be used in accordance with the provided instructions. - Never use the dishwasher without filters in place. - Improper replacement of the filter may reduce the performance level of the appliance. - The appliance is designed to avoid the possibility of electric shock.
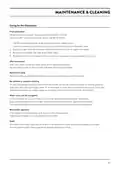
- Page 29: Maintenance & cleaning Caring for the dishwasher Frost precaution: Please take frost protection measures on the dishwasher in winter. After every wash: Turn off the water supply to the appliance and leave the door slightly open to prevent moisture and odors. Remove the plug: Always remove the plug from the socket before cleaning or performing maintenance. No solvents or abrasive cleaning: Use only a cloth with warm soapy water for the exterior and rubber parts. When not in use for a long time: Run a wash cycle with the dishwasher empty, then remove the plug and turn off the water supply. Moving the appliance: Keep the appliance in a vertical position when moving; it can be positioned on its back if necessary. Seals: Periodic cleaning with a damp sponge will prevent odors caused by food trapped in the seals.
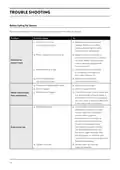
- Page 30: Trouble shooting Before calling for service, reviewing the charts may save you from calling for service. Dishwasher doesn’t start: Check if the fuse is blown or the circuit breaker is tripped, ensure the power supply is turned on, and verify that the door is properly closed. Water not pumped from dishwasher: Check for a twisted or trapped drain hose, a clogged filter, and ensure the kitchen sink is draining well. Suds in the tub: Use only the special dishwasher detergent to avoid suds and wipe up rinse-aid spills immediately.
- Page 31: Trouble shooting Before calling for service Stained tub interior may be caused by detergent with colourant. Make sure that the detergent has no colourant. White film on inside surface may be due to hard water minerals. To clean the interior, use a damp sponge with dishwasher detergent and wear rubber gloves. Rust stains on cutlery may occur if the affected items are not corrosion resistant. The items should be corrosion resistant. Knocking noise in the dishwasher may happen if a spray arm is knocking against an item in a basket. Interrupt the program and rearrange the items which are obstructing the spray arm. Rattling noise in the dishwasher may be caused by items of crockery being loose. Interrupt the program and rearrange the items of crockery. Knocking noise in the water pipes may be due to on-site installation or the cross-section of the piping. This has no influence on the dishwasher function. The dishes are not clean if they were not loaded correctly. See notes in “Loading & unloading your dishwasher”. Cloudiness on glassware may result from a combination of soft water and too much detergent. Use less detergent if you have soft water and select a shorter cycle to wash the glassware. Black or grey marks on dishes may occur if aluminium utensils have rubbed against dishes. Use a mild abrasive cleaner to eliminate those marks.
- Page 32: Trouble shooting Before calling for service Detergent left in dispenser Dishes block detergent dispenser. Re-loading the dishes properly. Improper loading. Load the dishwasher as suggested in the directions. Too little rinse-aid. Increase the amount of rinse-aid or refill the rinse-aid dispenser. Dishes are removed too soon. Do not empty your dishwasher immediately after washing. The dishes aren’t drying. Wrong program has been selected. Choose a program with a long washing time.
- Page 33: - Installation - After reading the manual, please store it in a safe and accessible location for future reference. - The installation of your new appliance must be carried out by a qualified technician. - Please ensure all packaging materials are disposed of correctly. - Customer Care - Our customer care center is available should you wish to learn more about your appliance. - Please ensure all packaging materials are disposed of correctly. - Troubleshooting - If overflow occurs, turn off the main water supply before calling a service. - The appliance should be used to avoid the possibility of electric shock. - The appliance and its accessible parts should be cleaned regularly.
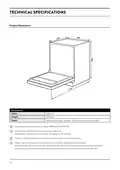
- Page 34: Technical specifications Product dimensions Width: 598mm Height: 845mm Depth: 600mm (with door closed) / 1175mm (with door open 90°) Specification according to EU Directive 1016/2010 & 1059/2010 Technical specifications of this product are subject to specification without notice to improve the quality of the product. Figures in this manual are schematic and may not match the product exactly. Values stated on markers on this product or in the other published documentation are obtained in laboratory in accordance with the relevant standards. Depending on operational and environmental conditions of this product, these values may vary.
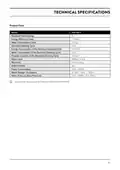
- Page 35: Technical specifications include the model TDX7SS-7. The product supports 14 standard place settings. It has an energy efficiency class of 3.5 stars and a water consumption class of 4.5 stars. The energy consumption of the standard cleaning cycle is 0.721 kWh. Water consumption for the standard cleaning cycle is 12.6 liters. The program duration for the standard cleaning cycle is 184 minutes. The noise level is 49 dB(A) re 1pW. The product can be freestanding or built-in. Power consumption ranges from 1760 to 2100 watts. The rated voltage is AC 220 - 240V at 50Hz.
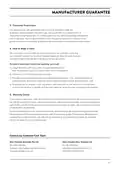
- Page 36: Manufacturer guarantee provided by Glen Dimplex Australia Pty Limited and Glen Dimplex New Zealand Limited for Technika products. Technika express warranty covers electrical or mechanical breakdowns for a period of 2 years for personal, domestic, or household use. For non-personal use, the warranty period is 90 days from the date of purchase. Warranty repairs must be carried out by Glen Dimplex or their nominated service agent. Warranty periods may vary based on agreements with select retail and builder partners. The benefits of this warranty are in addition to consumer guarantees under Australian/New Zealand Consumer Law. Warranty exclusions include improper installation, misuse, and damage from accidents or unauthorized repairs. Repairs related to consumable parts like fuses and bulbs are not covered under the warranty. Proof of purchase is required to validate the warranty. Breakdowns occurring after the warranty period or products not purchased as new in Australia/New Zealand are excluded.
- Page 37: Manufacturer guarantee Consumer guarantees Our goods come with guarantees that cannot be excluded under the Australian / New Zealand Consumer Law. You are entitled to a replacement or refund for a major failure and for compensation for any other reasonably foreseeable loss or damage. You are also entitled to have the goods repaired or replaced if the goods fail to be of acceptable quality. How to make a claim You may make a claim under this warranty through our website, contacting our customer care line or via email. To make a valid claim under this warranty, you must lodge the claim with us as soon as possible and no later than 14 days after you first become aware of the breakdown. If you make a valid claim under this warranty and none of the exclusions set out in section 2 apply, we will either repair the product or replace the product with a product of identical specification. Products are designed and supplied for normal domestic use.
- Page 38: Page 38
- Page 39: Read the instruction booklet before installing and using the appliance. The manufacturer will not be responsible for any damage to property or to persons caused by incorrect installation or improper use of the appliance. All appliances must be installed by a qualified person(s) with adherence to the relevant electrical, plumbing and building codes. All upright cookers must have the anti-tilt device installed correctly in adherence to the relevant standards by a licensed installer. For maximum effectiveness and efficiency, all rangehoods should be installed with the use of ductwork. All Glen Dimplex appliances are for domestic use only and must be installed by a licensed installer into domestic applications only. Any installation outside of this will void warranty. Alfresco areas are not a domestic application. The manufacturer reserves the right to make changes to its products when considered necessary and useful. This document should not be regarded as an infallible guide.
- Page 40: Page 40

FISHER AND PAYKEL DD24SHTI9N Integrated Single Dishwasher

FISHER PAYKEL DW60U4HI2 Dishwasher

Hisense HV642C60 Dishwasher

BOSCH SMH4EVX00E Dishwasher

Whirlpool WDT740SALB Dishwasher

SIEMENS SN23HI02KE Dishwasher

BOSCH SHP865ZD5N Pocket Handle Dishwasher

BOSCH SPH4EKX24E Dishwasher

BOSCH 9001902380 Dishwasher

BOSCH SMV6HCX2FR Dishwasher