Whirlpool W2IHKD526A Fully Integrated Dishwasher

EN
DAILY REFERENCE
GUIDE
THANK YOU FOR BUYING A WHIRLPOOL PRODUCT.
In order to receive a more complete assistance, please
register your appliance on: www.whirlpool.eu/register
You can download the Safety Instructions and the
User Manual, by visiting our website
docs.whirlpool.eu and following the Instructions on
the back of this booklet.
Before using the appliance carefully read Safety Instructions guide.
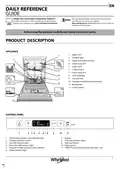
PRODUCT DESCRIPTION
APPLIANCE
1. Upper rack
1
3
2. Foldable flaps
7
8
3. Upper rack height adjuster
4. Upper spray arm
5. Lower rack
2
6. Cutlery basket
7. Lower spray arm
8. Filter Assembly
4
5
9
9. Salt reservoir
10. Detergent and Rinse Aid dispensers
11. Rating plate
6
12. Control panel
11
10
Service:
0000 000 00000
12
CONTROL PANEL
11
1
2
3 4
5
6 7 8
9
10
1. ON-OFF/Reset button with indicator light
2. Program selection button
3. Salt refill indicator light
7. Display
8. Half Load indicator lights
9. Half Load button
10. Delay button
4. Rinse Aid refill indicator light
5. Program number and delay time indicator
6. Tablet indicator light
11. START/Pause button with indicator light / Tab
1

| General | Details |
|---|---|
| Name | Whirlpool W2IHKD526A Fully Integrated Dishwasher |
| Make | Whirlpool |
| Language | English |
| Filetype | PDF (Download) |
| File size | 2.09 MB |


Whirlpool 2B19 Dishwasher

Whirlpool WFO3O33PLAUS Standard Dishwasher

Whirlpool W11323304G Dishwasher

Whirlpool WH7IPC15BM60 Dishwasher

Whirlpool FINPUTSAD Dishwasher

Whirlpool W7U HS31 X Dishwasher

Whirlpool Thron Dishwasher

Whirlpool WDF332PAMS 24 Front Tall Tub Dishwasher

Whirlpool WRF540CWHZ Dishwasher

Whirlpool WDF130PAHB Dishwasher

Whirlpool W2IHKD526A Fully Integrated Dishwasher Overview
Summary of Contents
- Page 1: Thank you for buying a Whirlpool product. In order to receive more complete assistance, please register your appliance. You can download the Safety Instructions and the User Manual from our website. Before using the appliance, carefully read the Safety Instructions guide. Product description includes various parts of the appliance such as the upper rack, lower rack, and control panel. The control panel features buttons for ON-OFF/Reset, program selection, and indicators for salt and rinse aid. The display shows program numbers and delay time. There are specific buttons for half load and delay functions. The appliance includes a filter assembly and a salt reservoir. Make sure to familiarize yourself with the control panel and its functions.
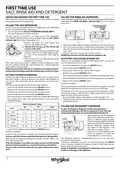
- Page 2: First time use Advice regarding the first time use Rinse aid makes dish drying easier. The rinse aid dispenser should be filled when the rinse aid refill indicator light is lit. The use of salt prevents the formation of limescale on the dishes and on the machine’s functional components. It is mandatory that the salt reservoir never be empty. It is important to set the water hardness. Whenever you need to add salt, it is mandatory to complete the procedure before the beginning of the washing cycle to avoid corrosion. To allow the water softener to work in a perfect way, it is essential that the water hardness setting is based on the actual water hardness in your house. If the rinse aid level is set to zero, no rinse aid will be supplied. A maximum of five levels can be set according to the dishwasher model. Only use salt that has been specifically designed for dishwashers.
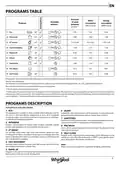
- Page 3: Programs table outlines the duration, water consumption, energy consumption, and available options for various wash programs. ECO program data is measured under laboratory conditions according to European Standard EN 60436:2020. Pre-treatment of the dishes is not needed before any of the programs. Not all options can be used simultaneously. Values for programs other than the ECO program are indicative only and may vary based on several factors. Instructions on wash cycle selection are provided for different programs. The ECO program is suitable for normally soiled tableware and is the most efficient in terms of energy and water consumption. The INTENSIVE program is recommended for heavily soiled crockery, especially pans and saucepans. The 6th SENSE® program senses the level of soiling on dishes and adjusts the program accordingly. The SELF-CLEAN program is for maintenance of the dishwasher and should only be used when the dishwasher is empty.
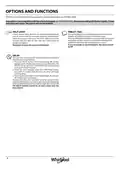
- Page 4: Options can be selected directly by pressing the corresponding button. If an option is not compatible with the selected program, the corresponding LED flashes rapidly 3 times and beeps will sound. This setting allows you to optimize the performance of the program according to the type of detergent used. Press the START/PAUSE button for 3 seconds if you use combined detergents in tablet form. If you use powder or liquid detergent, this option should be off. A half load cycle may be used in order to save water, electricity, and detergent. The start time of the program may be delayed for a period of time between 1 and 12 hours. Press the DELAY button to increase the time from the start of the selected wash cycle. Once the delay time has elapsed, the wash cycle begins. The DELAY function cannot be set once a wash cycle has been started.
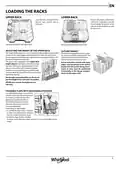
- Page 5: Loading the racks involves proper placement of dishes in the upper and lower racks. The upper rack is suitable for delicate and light dishes such as glasses, cups, and low salad bowls. The lower rack is designed for larger items like pots, lids, and plates, with large plates ideally placed at the sides to avoid interference with the spray arm. The height of the upper rack can be adjusted to accommodate bulky crockery in the lower basket or to create more space upwards. The cutlery basket should be positioned at the front of the lower rack and is equipped with top grilles for improved cutlery arrangement. Knives and sharp utensils must be placed in the cutlery basket with points facing downwards or horizontally in the tip-up compartments. It is recommended not to adjust the height of the rack when it is loaded, and never raise or lower the basket on one side only. The side foldable flaps can be adjusted to optimize the arrangement of crockery inside the rack. Wine glasses can be safely placed in the foldable flaps by inserting the stem into the corresponding slots. Instructions for unfolding and folding the flaps vary depending on the model.
- Page 6: Daily use Check water connection The machine will switch off automatically during certain extended periods of inactivity to minimize electricity consumption. Check that the dishwasher is connected to the water supply and that the tap is open. Switch on the dishwasher Open the door and press the ON/OFF button. Load the racks If a wrong program was selected, it is possible to change it, provided that it has only just begun. Fill the detergent dispenser Choose the program and customize the cycle Select the most appropriate program in accordance with the type of crockery and its soiling level. Start of wash cycle The end of the wash cycle is indicated by beeps and by the flashing of the wash cycle number on the display. Advice and tips Before loading the baskets, remove all food residues from the crockery and empty the glasses. Tips on energy saving When the household dishwasher is used according to the manufacturer’s instructions, washing tableware in a dishwasher usually consumes less energy and water than hand dishwashing.
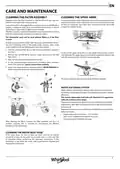
- Page 7: Care and maintenance Cleaning the filter assembly Regularly clean the filter assembly to prevent clogging. Check the spray arms periodically and clean them with a small non-metallic brush. Using the dishwasher with clogged filters may cause malfunction and higher resource usage. The filter assembly consists of three filters that remove food residues from the washing water. The dishwasher must not be used without filters or if the filter is loose. Check the filter assembly at least once per month or after every 30 cycles. Water softening system The water softener reduces water hardness and prevents scale buildup. Regeneration of the water softener occurs once per 6 Eco cycles.
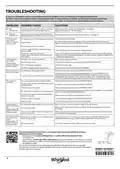
- Page 8: Troubleshooting In case your dishwasher doesn’t work properly, check if the problem can be solved by going through the following list. For other errors or issues please contact authorized After-sales Service. Spare parts will be available for a period of either up to 7 or up to 10 years. Salt indicator is lit: Salt reservoir is empty. Refill reservoir with salt. Rinse aid indicator is lit: Rinse aid dispenser is empty. Refill dispenser with rinse aid. The dishwasher won’t start or does not respond to commands: The appliance has not been plugged in properly. Insert the plug into the socket. The dishwasher won’t drain: The wash cycle has not finished yet. Wait until the wash cycle finishes. The dishwasher makes excessive noise: The detergent has not been measured out correctly or it is not suitable for use in dishwashers. The dishes are not clean: The crockery has not been arranged properly. Arrange the crockery correctly. The dishwasher does not fill the water: No water in the water supply or the tap is closed. Make sure there is water in the water supply. Dishwasher finishes the cycle prematurely: Drain hose positioned too low or siphoning into home sewage system. Check if end of drain hose is placed at correct height.

KitchenAid W11373417 Dishwasher

LG LDTH7972SS Black Dishwasher

Westinghouse WSF6608XB Dishwasher

BOSCH SMH4HVX31E Dishwasher

PKM GSP12A++7TI2 Dishwasher

FISHER PAYKEL DD24DCTX9N Tall Dishwasher

FISHER AND PAYKEL DD24DDFTX9 N Contemporary Tall Dishwasher

Gaggenau 9001923390_A Free Standing Dishwasher

Whirlpool DU1014XTXQ Undercounter Dishwasher

Miele G7130au Dishwasher