AEG F8242FI-18 Dishwasher


USA/CAN Dishwasher / User Manual
F8242FI-18
| General | Details |
|---|---|
| Name | AEG F8242FI-18 Dishwasher |
| Make | AEG |
| Language | English |
| Filetype | PDF (Download) |
| File size | 34.61 MB |


AEG FSK76748P Dishwasher

AEG FSK53617Za Dishwasher

AEG FSK74747P Dishwasher

AEG FSE73507P Dishwasher

AEG GS60AIM Dishwasher

AEG FSB73427Z Dishwasher

AEG FSE74737P Quickselect Dishwasher

AEG FFB73727PM Dishwasher

AEG F8642FI Tall Tub Dishwasher

AEG FFE83800PM Dishwasher

AEG F8242FI-18 Dishwasher Overview
Summary of Contents
- Page 1: Page 1
- Page 2: Important safety instructions Installation Technical specifications Before using the appliance Loading your dishwasher Programs and options table The control panel Maintenance and cleaning Troubleshooting
- Page 3: Introduction Please read this user manual and particularly the safety instructions completely and carefully. Be sure to observe all listed warnings and cautions. Look particularly for the icons with exclamation marks inside. WARNING: Indicates a potentially hazardous situation which, if not avoided, could result in death or serious injury. CAUTION: Indicates a potentially hazardous situation which, if not avoided, may result in injury. NOTICE: Indicates a potentially hazardous situation which, if not avoided, may result in damage to the dishwasher, the tableware, the equipment or the environment.
- Page 4: Important safety instructions should be followed when using the dishwasher. Read all instructions before using the dishwasher and save these operating instructions for future users. Use the dishwasher only for its intended purpose as described in the user manual. The appliance is intended for normal household use only. The manufacturer disclaims responsibility for damage or injury caused by improper use of the appliance. Follow the information in this user manual to minimize the risk of fire or explosion and to prevent property damage, personal injury, or loss of life. Use only detergents or wetting agents recommended for use in a dishwasher and keep them out of the reach of children. When loading items, locate sharp items to avoid damaging the door seal and load sharp knives with handles up. Do not wash plastic items unless they are marked dishwasher safe or check the manufacturer's recommendations. Do not touch the heating element during or immediately after use.
- Page 5: Infirm persons should be kept away from the dishwasher when the door is open. Consult a doctor immediately if detergent has been swallowed or inhaled. Do not remove the dishes from the appliance until the program is complete, as some detergent may remain on the dishes. Check that the detergent dispenser is empty after the completion of each wash program. Do not drink or play with the water in the appliance, as harmful residues could be present. To reduce the risk of injury, do not allow children to play in or on a dishwasher. Parents or legal guardians must ensure children are instructed in safe practices when they are old enough to operate the appliance. Do not leave the appliance with the open door unattended to avoid accidental stepping onto it. Before any maintenance operation, deactivate the appliance and disconnect the mains plug from the socket. Do not use high pressure water sprays or steam to clean the appliance.
- Page 6: To avoid floor damage and possible mold growth, do not allow wet areas to remain around or under the dishwasher. To avoid dishwasher damage, do not allow water to remain in your dishwasher systems through extended periods of freezing. To avoid risk of injury, always use caution when opening the door during or following a wash cycle as hot water or steam may escape. Do not store or use flammable liquids or vapors in the area of the dishwasher, near or on the appliance. Under certain conditions, hydrogen gas may be produced in a hot water system that has not been used for two weeks or more. If the hot-water system has not been used for such a period, before using the dishwasher turn on all hot-water faucets and let the water flow from each for several minutes. Please check the water supply line periodically as it is susceptible to breakage. Replace the water supply line immediately when it is torn, cut, swollen or there is water leakage.
- Page 7: The dishwasher requires a dedicated electrical circuit rated for 15 amperes. Electrical supply conductors must be a minimum of #16 AWG copper wire rated at 75 °C or higher. These requirements are essential to prevent injury and machine damage. Consult a qualified electrician if there are any doubts about the electrical setup. Do not use any extension cord or portable outlet device for the dishwasher. There is a danger of suffocation from plastic wrappings and bags. Ensure that plastic wrappings and small pieces are disposed of safely. Keep plastic materials out of the reach of children.
- Page 8: Technical specifications include permissible water pressure of 4.35 - 145 psi (0.3 - 10 bars) and electrical connection of 120 V, 12 A, 60Hz. Total power is 1400 W and heater power is 1100 W. Specifications and design may change without prior notice. The device corresponds to UL 749 Household Dishwasher directive. General appearance features include upper basket with racks, upper spray arm, lower basket, lower spray arm, and a third basket. The control panel includes a detergent and rinse-aid dispenser, salt dispenser, and upper basket track latch. The drying unit provides better drying performance for dishes.
- Page 9: Before using the appliance Preparing your dishwasher for first use Make sure the electricity and supply water specifications match the values indicated in the installation instructions for the machine. Remove all packaging material inside the machine. Set the water softener level. Fill the rinse aid compartment. Only add water to the salt compartment on first use. For a good washing function, the dishwasher needs soft, less calcareous water. Use softener salt specifically produced for use in dishwashers. Do not use any small grained or powdered type of salts which can be easily soluble. After every 20-30 cycles, add salt into your machine until it fills up.
- Page 10: Test strip Run water through the tap (1min.) Keep the strip in the water (1sec) Shake the strip. Wait (1min.) Set the hardness level of your machine. The level is set to 1 as default. If the water is well water or has a hardness level above 90 dF, we recommend that you use filter and refinement devices. The dishwasher is equipped with a water softener which reduces the hardness in the mains water supply. To find out the hardness level of your tap water, contact your water company or use a test strip (if available). In order to change the salt level, follow the below steps: Open the door of the machine, press and hold “Start/Pause + On/Off” key for 3 seconds.
- Page 11: Detergent usage Only use detergents specifically designed for domestic dishwashers. Add the proper detergent for the selected program to ensure the best performance. The amount of detergent needed depends on the cycle, load size, and soil level of dishes. Do not fill detergent into the detergent compartment more than required. Using little detergent can result in poor cleaning. Rinse-aid usage The rinse aid helps to dry the dishes without streaks and stains. If rinse aid dosage setting is set too low, whitish stains remain on dishes. To fill the rinse aid compartment, open the rinse-aid compartment cap. Be careful not to overfill the rinse aid compartment and wipe up any spills. Using combined detergents These products should be used according to the manufacturer’s instructions. Never put combined detergents into the interior section or the cutlery basket.
- Page 12: Level brightener dose indicators show the amount dispensed. R:1 indicates that no rinse-aid is dispensed. R:2 indicates that 1 dose is dispensed. R:3 indicates that 2 doses are dispensed. R:4 indicates that 3 doses are dispensed. R:5 indicates that 4 doses are dispensed. Each indicator corresponds to the number of doses dispensed. The display shows the respective rinse-aid dose status. The document includes a reference to USA-CAN.
- Page 13: Loading your dishwasher requires attention to manufacturer instructions regarding suitable dishes for optimal washing results. Proper placement of dishes enhances energy consumption, washing, and drying performance. The lower basket is designed for round and deep items like pots, plates, and cutlery sets, while the upper basket is for dessert plates, salad bowls, cups, and glasses. Long stem glasses should be leaned against the basket edge to prevent damage. To prevent cutlery from sticking together, spoons can be placed among other cutlery. High temperature water and detergent may damage certain items, so caution is advised. When loading sharp items, knives should be placed with handles up to reduce injury risk. Always remove coarse food leftovers before loading the dishwasher. Ensure that dishes do not obstruct the spray arms and avoid placing items that can absorb water inside the appliance. Containers should be loaded with openings facing downwards to prevent water collection. Dishes and cutlery should not be stacked above each other.
- Page 14: Upper rack should be loaded with dessert plates, cups, and glasses. Large knives and sharp utensils must be placed horizontally in the upper rack to avoid injury. Ensure large items do not interfere with the spray arms or detergent dispenser. The cutlery rack can hold knives, spoons, forks, and serving spoons. The lower rack is for round and deep items like pots, pot lids, and plates. Small items such as cups and wine glasses should not be placed in the lower rack. Load patterns are provided for 8 place settings in the top, lower, and 3rd racks.
- Page 15: Loading cutlery basket is model dependent. Incorrect loading can cause poor washing and drying performance. Please follow the manufacturer’s recommendations for a good performance result. Cutlery basket load pattern is designed for 8 place settings. Sharp cutlery may have shifted position during the wash operation and can be wet and slippery. Carefully remove sharp cutlery to prevent injury. Small items should be placed in the cutlery tray or cutlery basket, depending on the model. Small items can fall through the holders from the baskets.
- Page 16: Top basket Rack with height adjustment These racks are designed to increase the capacity of the top basket. You can place your cups and glasses on these racks. Thanks to the adjustable feature of the racks, you can place glasses of different sizes under the racks. Height adjustment plastics mounted on the basket allow racks to be in 2 different positions. You can also place long knives, forks, and spoons on these racks horizontally for them not to block the movement of spray arms. The basket height adjustment mechanism on the top basket of your machine is designed to let you adjust the height of your top basket upwards or downwards. Basket of your machine is set to upper position in factory settings. In loaded basket adjustment mechanism, make sure that both sides are in the same position. Top basket horizontal wire located on top basket allows you to place your plates and bowls where required.
- Page 17: Height setting when basket is filled. Lower basket folding racks are designed to let you place big items easier such as pots and pans. Each part of the folding racks can be folded separately or all can be folded for larger spaces. You can use folding racks by raising them upwards or by folding. The upper basket includes a mechanism to adjust the height without removing the basket. Hold the basket on both sides to pull it up or push it down. Ensure both sides of the upper basket are in the same position.
- Page 18: Silverware basket is designed to wash your dishes such as knife, fork, spoon, etc. in a cleaner manner. The cutlery basket can be moved to create a wider space while placing your dishes in the lower basket. It frees up space for your dishes in different sizes.
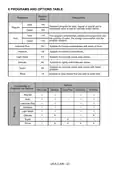
- Page 19: Programs and options table outlines various washing programs and their durations. The standard program is designed for daily use to wash normally soiled dishes completely. The auto program adjusts temperature, water quantity, energy consumption, and duration automatically. Intensive Plus is suitable for heavily soiled dishes with dried-on food. Light Wash is for normally soiled daily dishes with a faster program. Delicate is intended for lightly soiled delicate dishes. The rinse option is suitable for rinsing dishes that will be washed later. Extra Fast and Extra Dry are additional options available for selected programs. Compatibility of programs and options is provided, indicating which options can be used with each program. Half Load and Sanitize options are also available for various programs.
- Page 20: The program duration may change according to the amount of dishes, water temperature, ambient temperature, and selected additional functions. The energy-usage label is based on the “Regular” program, which is the most efficient for cleaning normally soiled dishes. Only use powder detergent for short programs, which do not include drying. To assist drying, slightly open the door after a cycle is complete. Hot water is needed for the best dishwashing and drying results, with water entering the dishwasher at least 120°F (49°C). To check the water temperature, turn on the hot water faucet nearest to the dishwasher and use a thermometer. Check the salt indicator on the control panel to see if there is adequate softening salt in the dishwasher. Refill the salt reservoir whenever the salt warning indicator appears on the control panel. To add salt, open the door, press and hold “Start/Pause + On/Off” for 3 seconds, and follow the prompts on the display. Adjust the amount of salt by pressing “Program Selection + Cancel” key and turn off the machine to save the selected salt amount.
- Page 21: Programming the washing time delay timer allows you to wash dishes during appropriate hours. You can delay the start of the selected program until 19 hours. Delay timer cannot be set after the program starts. Press the delay timer function key after selecting the washing program. The display will show program number, program duration, and delay time alternately for 2 seconds. The sanitize function raises the water temperature in the final rinse. If the program is successfully sanitized, the sanitized indicator lights up at the end of the program. Select the extra fast option to decrease the duration of a washing program. The machine changes the water temperature for the extra dry function. While the delay timer function is activated, you cannot make changes in the washing program or auxiliary functions.
- Page 22: If this is insufficient, use specific cleansing material available in the market. To clean any accumulated residue in the door seals, wipe the seals regularly by using a damp cloth. Before cleaning or carrying out maintenance, switch off the appliance, disconnect the mains plug and turn off the water tap. Clean the filters and spray arms at least once a month. Your dishwasher can only be repaired by an authorized service agent. Do not try to repair your machine unless any recommendation in this manual. Check if any food waste has remained on the coarse and fine filters. All surfaces are susceptible to scratching. Keep the floor around your dishwasher clean and dry to prevent any possible injury. Cleaning the machine in regular intervals prolongs the machine’s service life.
- Page 23: Spray arms Cleaning the impellers Clean the impellers at least once a week for the machine to operate efficiently. Check whether or not the holes for the upper and lower spray arms are clogged. If there is any clogging, remove the spray arms and clean them under water. You can remove the lower spray arm by pulling it upwards, while the upper spray arm nut can be removed by turning the nut to the left. Check if the holes on the lower spray arm are clogged. If they are clogged, remove and clean the spray arm. Be sure that the nut is perfectly tightened when refitting the upper spray arm. WARNING: Lower spray arm is metal; after removing the lower spray arm for maintenance and cleaning, do not disassemble the plastic part from the spray arm. WARNING: Only the 24 dishwasher has a metal lower spray arm.
- Page 24: Remove blue film before use. Check if the holes on the upper impeller are clogged. If they are clogged, remove and clean the impeller. Turn its nut to the left to remove the upper impeller. Make sure that the nut is tightened well when installing the upper impeller.
- Page 25: What should not be washed in your dishwasher? All items to be placed in the dishwasher should be dishwasher safe. Plastics with “dishwasher safe” or equivalent label can only be used in dishwashers. Any dishes made out of wood or made with wooden parts are not suitable for washing in dishwashers. Silver items without dishwasher safe label should not be washed in the dishwasher. Dishwasher safe silver items and stainless steel items should not come into contact. Porcelain and glassware with decorations and hand-painted utensils may lose their color and patterns. Do not wash sponges or dish cloths in the dishwasher. Do not wash any material like acrylic, copper, brass, pewter, iron, bronze or tin. Glued dishes or cutlery are not suitable for machine washing. If in doubt, wash by hand or follow the instructions from the manufacturer.
- Page 26: Troubleshooting Possible causes for issues with the dishwasher include being unplugged or switched off. Check indoor fuses if the fuse is blown. Ensure the water inlet tap is turned on. Close the dishwasher door to start the program. If the program does not start, check for a closed water inlet tap or an open door. Clogged water inlet hose and machine filters can prevent operation. Water remaining inside the machine may indicate clogged filters or an unfinished program. If the machine stops during washing, check for water inlet failure. Shaking and hitting noises may occur if the spray arm is blocked by dishes. Use the correct amount of detergent to avoid partial food waste on dishes.
- Page 27: Fault possible cause troubleshooting Use the correct amount of detergent, as instructed in the programme table. Not enough detergent used. Increase rinse aid and/or water softener setting. Whitish stains remain on dishes. High water hardness level. Increase water softener level and add salt. Salt compartment cap not closed properly. Check that the salt compartment cap is closed properly. Drying option is not selected. Select a programme with a drying option.
- Page 28: Automatic fault warnings and what to do Possible fault and what to do for water inlet system failure: Make sure the water inlet tap is open and water is flowing. Separate the inlet hose from the tap and clean the filter of the hose. Contact for service if the error continues. Pressure system failure: Close the tap and contact for service. Inability to discharge water: Water discharge hose and filters may be clogged. Cancel the program. If the error continues, contact for service. Heater error: Unplug the machine and close the tap. Contact for service. Overflow: Contact for service. Overheating: Contact for service. Divisor position error: Contact for service. Faulty heater sensor: Contact for service. High voltage failure: Contact for service.
- Page 29: Practical information When the machine isn’t in operation, disconnect the plug and close the tap. Leave the door slightly open to prevent odour formation. Select the dry option to remove water droplets. Place dishes in the machine properly to achieve the best energy consumption, washing, and drying performance. Rinse dirty dishes before placing them in the dishwasher. Only use the rinse program when necessary. Do not place the machine near a refrigerator because it will reach high temperatures. If the machine is located in an area that is at risk of freezing, close the tap, disconnect the inlet hose from the tap, and drain the water inside the hose and the machine completely.

BOSCH SPV6EMX76Q Dishwasher

FISHER and PAYKEL DD60DTX6HI1 Dishwasher

comfee CDC22P4AWW Dishwasher

GGM Gastro GE500ND -walled Dishwasher

NEFF S187TC800E Dishwasher

AEG FFB73507ZW Dishwasher

Miele PFD 102 i Dishwasher

FISHER PAYKEL DD60D4NX9 Built-Under Dishwasher

FISHER PAYKEL DD24STX6PX1 Sanitize Tall DishDrawer Dishwasher

CMA DISHMACHINES CMA-180 Dishwasher