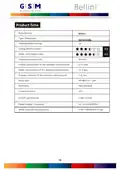
Bellini BDWM48B Dishwasher


OPERATION INSTRUCTIONS
60cm Freestanding Dishwasher
Model No. BDWM48B

| General | Details |
|---|---|
| Name | Bellini BDWM48B Dishwasher |
| Make | Bellini |
| Language | English |
| Filetype | PDF (Download) |
| File size | 0.71 MB |


Bellini BDW504 Series 45cm and Dishwasher

bellini BDW96W, BDW96X Series 45cm Dishwasher

Bellini BDWM48B Dishwasher Overview
Summary of Contents
- Page 1: Operation instructions for the 60cm freestanding dishwasher. Model number is BDWM48B.
- Page 2: Thank you for your inquiry. This document includes important information about the product. The text mentions a model, WM48B, indicating specific details related to its operation. There are references to the product's features and functionalities. It discusses the importance of proper usage and maintenance. Safety instructions are likely included to ensure user protection. The document may provide troubleshooting tips for common issues. It emphasizes the significance of following guidelines for optimal performance. There are indications of warranty or service information. Finally, it suggests contacting support for further assistance.
- Page 3: Using your dishwasher Control panel Preparing and loading dishes Function of the rinse aid and detergent Filling the rinse aid reservoir Filling the detergent dispenser Programming the dishwasher Wash cycle table Starting a cycle wash Error codes
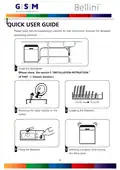
- Page 4: Quick user guide Please read the corresponding content on the instruction manual for detailed operating method. Install the dishwasher. Loading the baskets. Removing the larger residue on the cutlery. Filling the dispenser. Selecting a program and running the dishwasher.
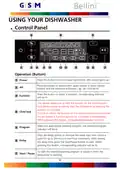
- Page 5: Using your dishwasher Control panel Press this button to turn on your dishwasher, the screen lights up. Press the button to select either upper basket or lower basket loaded, and the response indicators will be lit. Press the button to select a function, corresponding indicator will be lit. This option allows you to lock the buttons on the control panel so children cannot accidentally start the dishwasher. To lock or unlock the buttons on the control panel, press and hold the Alt button + Function button for 3 seconds simultaneously. Select the appropriate washing program, the selected program indicator will be lit. Press the Delay button to increase the delay start time. Delay a cycle for up to 24 hours in one-hour increments. After setting the delay time, press the Start/Pause button to start. To start the selected washing program or pause it when the dishwasher is working.
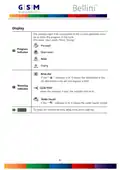
- Page 6: Display options include Auto, Intensive, Heavy, Normal, Glass, 90 Min, Rapid, and Soak. Auto is for lightly, normally, or heavily soiled crockery. Intensive is for the heaviest soiled crockery, such as pots and pans. Heavy is for heavily soiled loads like pots, plates, and glasses. Normal is suitable for normally soiled loads. Glass is for lightly soiled crockery and glass. 90 Min is for normally soiled loads that need a quick wash. Rapid is a shorter wash for lightly soiled loads without drying. Soak is to rinse dishes planned for washing later. Extra Drying can be used with specific programs for more complete drying.
- Page 7: The progress light that corresponds to the current operation turns on to show the progress of the cycle. If the rinse aid indicator is lit, it means the dishwasher is low on dishwasher rinse aid and requires a refill. When the program ends, the cycle finish indicator will be lit. If the water faucet indicator is lit, it means the water faucet is closed. The display shows the remaining time, delay time, error code, etc.
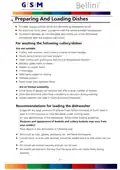
- Page 8: Preparing and loading dishes Consider buying utensils which are identified as dishwasher-proof. For particular items, select a program with the lowest possible temperature. To prevent damage, do not take glass and cutlery out of the dishwasher immediately after the program has ended. Cutlery with wooden, horn china or mother-of-pearl handles are not suitable. Plastic items that are not heat resistant are not suitable. Some types of glasses can become dull after a large number of washes. Recommendations for loading the dishwasher include scraping off any large amounts of leftover food. For best performance of the dishwasher, follow loading guidelines. Items such as cups, glasses, pots/pans, etc. are faced downwards. All utensils are placed in a way that the spray arms can rotate freely during washing.
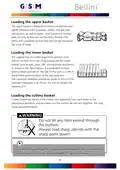
- Page 9: Recommendations for loading the dishwasher Scrape off any large amounts of leftover food. Soften remnants of burnt food in pans. It is not necessary to rinse the dishes under running water. For best performance of the dishwasher, follow these loading guidelines. Place objects in the dishwasher with the opening facing downwards to prevent water collection. Dishes and items of cutlery must not lie inside one another or cover each other. To avoid damage, glasses should not touch one another. The upper basket is designed to hold more delicate and lighter dishware. Long bladed knives stored in an upright position are a potential hazard. Please do not overload your dishwasher for good results and reasonable energy consumption. Very small items should not be washed in the dishwasher as they could easily fall out of the basket. To prevent water dripping from the upper basket, empty the lower basket first. Items will be hot! Do not take glass and cutlery out of the dishwasher for around 15 minutes after the program has ended.
- Page 10: Loading the upper basket is designed for delicate and lighter dishware such as glasses, coffee and tea cups, and saucers. Position dishes and cookware to prevent movement by the spray of water. Loading the lower basket should include large items and difficult-to-clean items like pots, pans, lids, and serving dishes. Place serving dishes and lids on the side of the racks to avoid blocking the top spray arm. The maximum diameter for plates in front of the detergent dispenser is 19 cm to ensure it can open properly. Cutlery should be placed separately in the cutlery rack, ensuring utensils do not nest together to avoid poor performance. Do not let any item extend through the bottom and always load sharp utensils with the sharp point down. For the best washing effect, refer to standard loading options in the last section of the manual.
- Page 11: Function of the rinse aid and detergent The rinse aid is released during the final rinse to prevent water from forming droplets on your dishes, which can leave spots and streaks. It also improves drying by allowing water to roll off the dishes. Your dishwasher is designed to use liquid rinse aids. WARNING Only use branded rinse aid for dishwasher. Never fill the rinse aid dispenser with any other substances. This would damage the appliance. When to refill the rinse aid dispenser You can always estimate the amount from the color of the optical level indicator located next to the cap. You should never let the rinse aid level be less than 1/4 full. Function of detergent The chemical ingredients that compose the detergent are necessary to remove, crush and dispense all dirt out of the dishwasher. Most of the commercial quality detergents are suitable for this purpose. WARNING Use only detergent specifically made for dishwashers. Keep your detergent fresh and dry. Dishwasher detergent is corrosive! Keep dishwasher detergent out of the reach of children.
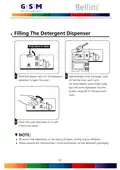
- Page 12: Filling the rinse aid reservoir involves turning the cap to the open arrow and lifting it out. Carefully pour in the rinse-aid into its dispenser, avoiding overflow. Clean up any spilled rinse aid with an absorbent cloth to avoid excessive foaming during the next wash. The rinse aid reservoir has six settings, with the recommended and factory setting being 4. If dishes are not drying properly or are spotted, adjust the dial to a higher number until dishes are spot-free. Reduce the setting if there are sticky whitish stains or a bluish film on glassware or knife blades.
- Page 13: Filling the detergent dispenser involves several steps. Press the release catch on the detergent dispenser to open the cover. Add detergent into the larger cavity for the main wash cycle. For more heavily soiled wash loads, also add some detergent into the smaller cavity for the pre-wash cycle. Close the cover and press on it until it locks into place. Be aware that depending on the soiling of water, settings may be different. Please observe the manufacturer's recommendations on the detergent packaging.
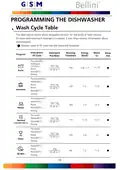
- Page 14: Programming the dishwasher Wash cycle table The table below shows which programs are best for the levels of food residue on them and how much detergent is needed. Description of cycle Energy (Kwh) Water (L) Running time (min) Detergent Pre/Main rinse aid Program Pre-wash (45℃) Autowash (45-55℃) Rinse Rinse (65℃) Drying Heavy rinse (65℃) Drying Normal (AS/NZS 2007.1) Glass wash (65℃)
- Page 15: Description of cycle includes energy consumption, water usage, and running time for different programs. The wash program at 40°C uses 0.6 kWh, 11.5 liters of water, and has a running time of 8 minutes. The rapid rinse program at 45°C uses 0.02 kWh and includes a prewash soak. The program information is based on AS/NZS 2007.1 for comparability testing. To start a wash cycle, load the dishes in the lower and upper baskets. Pour in the detergent and ensure the power supply is connected. Make sure the water supply is turned on to full pressure before closing the door. Press the power button to switch on the machine and select a program. The response light will indicate the selected program, and pressing the start/pause button will begin the cycle. Changing the program mid-cycle is only possible if the cycle has not run for long, otherwise, a reset is required.
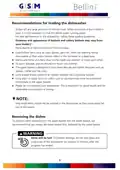
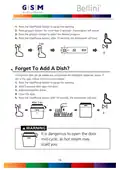
- Page 16: Press the Start/Pause button to pause the washing. Press program button for more than 3 seconds - the program will cancel. Press the program button to select the desired program. A forgotten dish can be added any time before the detergent dispenser opens. Press the Start/Pause button to pause the washing. Wait 5 seconds then open the door. It is dangerous to open the door mid-cycle, as hot steam may scald you. Add the forgotten dishes. Close the door. Press the Start/Pause button after 10 seconds, the dishwasher will start.
- Page 17: Error codes indicate malfunctions in the dishwasher. Faucets may not be opened, or water intake could be restricted, or water pressure may be too low. E1 indicates longer inlet time. E3 signifies the dishwasher is not reaching the required temperature. E4 relates to overflow issues. E8 points to a leak from some element of the dishwasher. There may be a failure of orientation of the distributary valve. An open circuit or break of the distributary valve can also occur. If overflow occurs, turn off the main water supply before calling for service. Water in the base pan due to overfill or small leak should be removed before restarting the dishwasher.
- Page 18: Height (H): 845mm Width (W): 598mm Depth (D1): 600mm (with the door closed) Depth (D2): 1175mm (with the door opened 90°)
- Page 19: Product fiche Manufacturer: Bellini Type / Description: Standard place settings Energy efficiency class: BDWM48B Water consumption class: Standard cleaning cycle Energy consumption of the standard cleaning cycle: 0.73 kWh Water consumption of the standard cleaning cycle: 12.7 liter Program duration of the standard cleaning cycle: 170 min Noise level: 49 dB(A) re 1 pW Mounting: Could be built-in Rated voltage / frequency: AC 220-240V/50Hz
- Page 20: This document contains important information regarding consumer rights and warranty details. The Australian Consumer Law means the law as set out in Schedule 2 of the Competition and Consumer Act 2010. Consumer means a person who acquires goods or services for personal, domestic or household use. The warranty is provided in addition to any rights and remedies you may have under the Australian Consumer Law. The benefits of this warranty are in addition to other rights and remedies that you may have under the law. The warranty covers defects in materials and workmanship. To make a claim under this warranty, you must provide proof of purchase. The warranty does not cover damage caused by misuse or neglect. For further information, please refer to the warranty terms and conditions. This warranty is valid for a specified period from the date of purchase.
- Page 21: Page 21

Whirlpool GU2800XTVS Full Console Dishwasher

FISHER AND PAYKEL DD60DCX9 Contemporary Dishwasher

INFINITON DIW-G61N, DIW-G62W Dishwasher

FISHER AND PAYKEL DD24SAX9 N Dishwasher

BOSCH SBH4HVX00E Dishwasher

BOSCH SBV6ZCX16E Dishwasher

FISHER and PAYKEL DD60DDFHB9 Contemporary Dishwasher

FISHER AND PAYKEL DD24STI9 N Tall Dishwasher

Electrolux EEG62310L Dishwasher

FISHER AND PAYKEL DD60DDFHX9 Contemporary Dishwasher