Hotpoint H7F HS41 UK Full Size Dishwasher


Daily Reference Guide
EN
Before using the appliance carefully read Safety
and Installation Instructions. More information about your product
available on website: docs.hotpoint.eu
THANK YOU FOR BUYING A HOTPOINT PRODUCT.
In order to receive a more complete assistance, please
register your appliance on: www.hotpoint.eu/register
After installation, please remember to remove all transport protection
parts from the dishwasher.
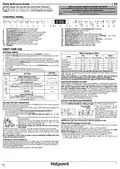
CONTROL PANEL
21
22
1
2
3
4
5
6
7
8
9
10
11
12
13 14
15
16
17
18
19
20
1. ON-OFF/Reset button with indicator light
2. Eco program button with indicator light
12. Program number and remaining time indicator
13. Closed water tap indicator light
14. DESCALE indicator light
3. Auto Intensive program button with indicator light
4. Auto Mixed program button with indicator light
5. Auto Fast program button with indicator light
6. Rapid program button with indicator light
7. Delicates program button with indicator light
8. Soak program button with indicator light
9. Salt reservoir empty indicator light
15. 3D Zone Wash option button with indicator light
16. Half Load option button with indicator light/ Settings - 3 sec. press
17. Extra Dry option button with indicator light
18. Silent option button with indicator light/ Key lock - 3 sec. press
19. Sani Rinse option button with indicator light
20. Self-Clean program button with indicator light
21. Delay option button with indicator light
10. Rinse Aid reservoir empty indicator light
11. Display
22. START/Pause button with indicator light
FIRST TIME USE
SETTING MENU
Water Hardness Table
1. Switch on the appliance by pressing the ON-OFF button.
°dH
German degrees
°fH
French degrees
°Clark
English degrees
2. Hold the Settings (Half Load ) button for 3 seconds until you hear
a beep.
3. After one second the first available setting (letter„h”) will be displayed.
Level
1 (soft)
0 - 6
7 - 11
0 - 10
11 - 20
21 - 29
30 - 60
61 - 90
0 - 7
8 - 14
4. Press
button to scroll through the list of available settings (see table
below), then press START/Pause to view and change the value of the
currently selected setting.
5. Press to change the value, then press START/Pause to save the
new value.
6. To change another setting, repeat points 2 and 5.
7. Press ON-OFF or wait 30 seconds to exit the menu.
2 (medium)
3 (average)
4 (hard)
12 - 16
17 - 34
35 - 50
15 - 20
21 - 42
43 - 62
5 (very hard)
Only use salt that has been specifically designed for dishwashers.
After the salt has been poured into the machine, the SALT REFILL indicator
light switches off.
VALUES
(Default - in bold)
LETTER
SETTING
If the salt container is not filled, the water softener and the heating
element may be damaged as a result of limescale accumulation.
Use of salt is recommended with any type of dishwasher detergent.
Water Hardness Level
(see “SETTING THE WATER HARDNESS”
and “WATER HARDNESS TABLE”)
1 | 2 | 3 | 4 | 5
WATER SOFTENING SYSTEM
Rinse Aid Level
(see “ADJUSTING THE DOSAGE OF RINSE AID”)
0 | 1 | 2 | 3 | 4 | 5
1 | 0
Water softener automatically reduces water hardness, consequently preventing
scale buildup on the heater, contributing also to better cleaning efficiency.
This system regenerates itself with salt, therefore it is required to refill
the salt container when empty. The frequency of regeneration depends
on the water hardness level setting - regeneration takes place once per 4-6
Eco cycles with the water hardness level set to 3. The regeneration process
occurs at the beginning of the cycle with additional fresh water.
ActiveDry (see “OPTIONS AND FUNCTIONS”)
“1”= On, “0”= Off
Sound
“1”= On, “0”= Off
Factory Settings
1 | 0
•
•
•
Single regeneration consumes: ~3L of water;
Takes up to 5 additional minutes for the cycle;
Consumes below 0.005kWh of energy.
Press START/Pause to restore to the factory
default all the values of the settings included
in the settings menu.
-
FILLING THE RINSE AID DISPENSER
Rinse aid makes dish DRYING easier. The rinse aid dispenser A should be filled
when the RINSE AID REFILL indicator light in the control panel is lit.
FILLING THE SALT RESERVOIR
The use of salt prevents the formation of LIMESCALE on the dishes and the
machine’s functional components.
1. Open the dispenser
B
by
pressing and pulling up the
tab on the lid.
The salt reservoir is located in the lower part of the dishwasher (under the
lower rack on the left side).
2. Pour in the rinse aid (max. 110
ml), making sure it does not
overflow from the dispenser.
If this happens, clean the spill
immediately with a dry cloth.
•
•
•
It is mandatory that THE SALT RESERVOIR NEVER BE EMPTY.
It is important to set the water hardness.
Salt must be filled when the SALT REFILL indicator light
control panel is lit.
on the
A
B
1. Remove the lower rack and unscrew the reservoir cap
(anticlockwise).
3. Press the lid down until you hear a click to close it.
NEVER pour the rinse aid directly into the appliance tub.
2. Position the funnel (see figure) and fill the salt reservoir
right up to its edge (approximately 0,5 kg); it is not
unusual for a little water to leak out.
Adjusting the dosage of rinse aid
If you are not completely satisfied with the drying results, you can adjust
the quantity of rinse aid used.
To change, follow instructions in the section „SETTING MENU”.
If the rinse aid level is set to ZERO, no rinse aid will be supplied. The LOW
RINSE AID indicator light will not be lit if you run out of rinse aid.
A maximum of 6 levels can be set according to the dishwasher model.
• If you see bluish streaks on the dishes, set a low number (0-3).
• If there are drops of water or limescale marks on the dishes, set
a mid-range number (4-5).
3. Only the first time you do this: fill the salt reservoir
with water.
4. Remove the funnel and wipe any salt residue away from the opening.
Make sure the cap is screwed on tightly so that no detergent can get into
the container during the wash program (this could damage the water
softener beyond repair).
Run a program every time as soon as you completed refilling the salt
reservoir to avoid corrosion.
Setting the water hardness
To allow the water softener to work in a perfect way, it is essential that the water
hardness setting is based on the actual water hardness in your house. This infor-
mation can be obtained from your local water supplier. The factory setting is“3”.
See „WATER HARDNESS TABLE”.
To change, follow instructions in section „SETTING MENU”.
1

| General | Details |
|---|---|
| Name | Hotpoint H7F HS41 UK Full Size Dishwasher |
| Make | Hotpoint |
| Language | English |
| Filetype | PDF (Download) |
| File size | 6.14 MB |


Hotpoint H7I HP42 L UK Dishwasher

Hotpoint H7F HP33 UK Dishwasher

Hotpoint H8I HT59 LS UK Dishwasher

Hotpoint H7F HS51 Dishwasher

Hotpoint H7FHS41 Dishwasher

Hotpoint HA3FC10BS7A0S Dishwasher

Hotpoint H7F HS41 X Dishwasher

Hotpoint 869991662940 Dishwasher

Hotpoint H7I HT59 L Dishwasher

Hotpoint HFC 3C26 WCUK Dishwasher

Hotpoint H7F HS41 UK Full Size Dishwasher Overview
Summary of Contents
- Page 1: Daily Reference Guide Before using the appliance, carefully read safety and installation instructions. Thank you for buying a Hotpoint product. After installation, please remember to remove all transport protection parts from the dishwasher. Control panel includes various buttons for different programs and indicators. First time use involves switching on the appliance and adjusting settings. Water hardness levels must be set according to the actual water hardness in your house. Only use salt that has been specifically designed for dishwashers. Rinse aid makes dish drying easier and should be filled when the indicator light is lit. The use of salt prevents the formation of limescale on the dishes and the machine’s components. Adjusting the dosage of rinse aid can improve drying results based on observed performance.
- Page 2: The detergent dispenser automatically opens at the right time according to the program. Usage of detergent not designed for dishwashers may cause malfunction or damage to the appliance. To open the detergent dispenser, use the opening device. Introduce the detergent into the dry dispenser only. Check that the dishwasher is connected to the water supply and that the tap is open. If a wrong program was selected, it is possible to change it, provided that it has only just begun. The end of the wash cycle is indicated by sound and the display shows END. Before loading the baskets, remove all food residues from the crockery and empty the glasses. Washing tableware in a dishwasher usually consumes less energy and water than hand dishwashing. Manual pre-rinsing of tableware items leads to increased water and energy consumption and is not recommended. To avoid odour and sediment, run a high-temperature program at least once a month.
- Page 3: Daily Reference Guide Programs table Eco 50° - Program is suitable to clean normally soiled tableware, and it is the most efficient program in terms of its combined energy and water consumption. Auto Intensive 65° - Automatic program for heavily soiled dishes that senses the level of soiling. Auto Mixed 55° - Automatic program for normally soiled dishes with dried food residues. Auto Fast 50° - Automatic program for normally and lightly soiled dishes that ensures optimal cleaning in a shorter time. Rapid 45° - Recommended for limited amounts of lightly-soiled dishes with no dried food residues. Delicates 45° - Program for delicate items sensitive to high temperatures, such as glasses and cups. Soak - Use to refresh crockery planned to be washed later without detergent. Self-Clean 65° - Program for maintenance of the dishwasher, to be carried out when the dishwasher is empty. ECO program data is measured under laboratory conditions according to European Standard EN 60436:2020. Pre-treatment of the dishes is not needed before any of the programs.
- Page 4: Capacity: 15 standard place-settings Foldable flaps with adjustable position optimize the arrangement of crockery inside the rack. The third rack was designed to house the cutlery, improving washing and drying performance. Knives and other utensils with sharp edges must be positioned with the blades facing downwards. The lower rack has tip-up supports for arranging plates or loading pans and salad bowls easily. Load delicate and light dishes in the upper rack, which also has tip-up supports for versatile loading. 3D Zone Wash uses additional water jets to wash heavily soiled items more intensively. The height of the upper rack can be adjusted to create more space and avoid collisions with lower rack items. Regularly clean the filter assembly to prevent clogging and ensure proper water flow. The dishwasher must not be used without filters or if the filter is loose.
- Page 5: The lower spray arm may be removed by pulling it upwards and rotating it anti-clockwise. The top spray arm may be removed by pressing it up and then rotating it anti-clockwise. It is recommended to check the arms from time to time and clean them with a small non-metallic brush. In case your dishwasher doesn’t work properly, check if the problem can be solved by going through the following list. Spare parts will be available for a period of either up to 7 or up to 10 years, according to the specific Regulation requirements. Refill the reservoir with salt if the salt indicator is lit or blinking. Rinse aid dispenser is empty if the rinse aid indicator is lit or blinking. Descale the appliance immediately using the Self Clean program if the descale indicator is lit or blinking. The dishwasher won’t start or does not respond to commands if the appliance has not been plugged in properly. The filter is clogged with food residues or limescale if the dishwasher won’t drain.
- Page 6: The dishwasher does not fill with water. Make sure there is water in the water supply and the water tap is open. The water inlet hose is kinked. Check the inlet hose. The screen in the water inlet hose is clogged. Check and clean the screen in the water inlet hose. The dishwasher finishes the cycle prematurely. The filter is clogged with food residues or limescale. The detergent has not been measured out correctly or it is not suitable for use in dishwashers. Check the detergent dispenser. The dishes are not dried well. Make sure the rinse aid dispenser is filled. The selected cycle does not have the drying phase. Change cycle selection for one that has the drying phase. Rinse aid dosage is excessive. Adjust the dosage to a lower setting. The salt reservoir is empty. Refill the reservoir with salt as soon as possible. The dishwasher shows F8 E5. Valve is blocked or faulty.
- Page 7: Page 7
- Page 8: Page 8

FISHER AND PAYKEL DD24SDFTX9 N Tall Dish Drawer Dishwasher

FISHER PAYKEL DW60UT4HI2 Dishwasher

PHILCO PD 1045 EA Dishwasher

Haier HDW13F0W1 Hygiene Dishwasher

BOSCH SMS4HMC01R Dishwasher

CMA DISHMACHINES EST-66 Conveyor Dishwasher

FISHER and PAYKEL DD24STX6PX1 DishDrawer Sanitize Dishwasher

FISHER PAYKEL DD60SCTX9 Single Dishwasher

BOSCH SMV50M00EU Dishwasher

Haier HDW9TFE3WH Compact Dishwasher