BOSCH SM Mega Power Silver Dishwasher


| General | Details |
|---|---|
| Name | BOSCH SM Mega Power Silver Dishwasher |
| Make | Bosch |
| Language | English |
| Filetype | PDF (Download) |
| File size | 2.52 MB |
 (1 votes, average: 5.00 out of 5)

BOSCH SMV6ZCX49E-39 Dishwasher

BOSCH SMI4HVS33E Dishwasher

BOSCH SRV2HKX39G Dishwasher

BOSCH SGH4HVX32G Dishwasher

BOSCH SGS4HAW40G Dishwasher

BOSCH SMS4ECI26E Dishwasher

BOSCH SMS6EDI02G Free-Standing Dishwasher

BOSCH SMS6EDW02G Free-Standing Dishwasher

BOSCH SMV4HTX27G Dishwasher

BOSCH SMV4HCX48E Dishwasher

BOSCH SM Mega Power Silver Dishwasher Overview
Summary of Contents
- Page 1: Register your new Bosch now. Dishwasher. Instruction manual.
- Page 2: Page 2
- Page 3: - Table of contents - Intended use - Warnings and safety instructions - Loading the dishwasher - Unloading the dishwasher - Cups and glasses - Pans - Cutlery basket - Operating the appliance - Water softening system
- Page 4: Keep children below the age of installation. Following installation ensures that the back of the dishwasher is not freely accessible. Before you switch on the appliance, read the instructions for use and installation carefully. They contain important information on how to install, use and maintain the appliance. Retain all documents for later use or for the subsequent owner. The appliance according to the installation and assembly instructions. Prior to installation, disconnect the dishwasher from the power supply. Ensure that the protective conductor system is correctly installed. If the power cord of this appliance is damaged, it must be replaced with a special power cord. Do not let children play with packaging and its parts.
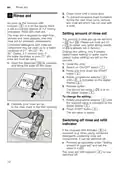
- Page 5: Water softening system special salt To change the setting Water softening The required value is indicated on the digital display. Press the START button To ensure good washing results The dishwasher requires soft water. The set value is saved. Water hardness table The amount of salt depends on the degree of hardness of your tap water. Salt is not required at the set value. Find out about the hardness value of your tap water. The company will help you with this.
- Page 6: - Water softening system special salt. - Using special salt. - Switching off salt refilling indicator. - Always refill with special salt. - Immediately before switching on the appliance. - This ensures that overrun special salt solution is immediately washed out and does not corrode the rinsing tank. - The water softening system and salt refilling indicator are now switched off. - Never fill the salt dispenser with salt or tablets. - The water is dispensed and runs out. - Never fill the salt dispenser with detergent.
- Page 7: - Close cover until it clicks shut. - To prevent excessive foam formation during the next rinse cycle, remove any rinse aid which has run over with a cloth. - Rinse aid is required for stain-free results. - The rinse aid is required for stain-free results. - The amount of rinse aid can be set from 1 to 6. - The rinse aid must be used. - The amount of rinse aid can be set from 1 to 6. - Open the dispenser by pressing down the tab. - Press and hold down the START button until the display indicates the digital display. - The required value is indicated on the digital display.
- Page 8: - Loading the dishwasher. - Remove large food remnants; it is not necessary to pre-rinse utensils under running water. - Place the utensils so that cutlery and utensils made of wood are secure and cannot tip. - The dishwasher should not be loaded with their openings facing down. - Utensils which are soiled with ash should not be placed in the dishwasher. - Aluminum and silver parts have a tendency to discolor and fade during the washing cycle. - Very small utensils should not be washed in the machine as they may fall out of the basket. - Glass types and glass production processes. - Use only glasses and porcelain which the manufacturer designates as dishwasher-safe. - Use a detergent which protects utensils.
- Page 9: HQ Cups and glasses Pans Top basket Bottom basket Note Tip Utensils must not be placed above the collecting tray. These may block the lid of the detergent dispenser and prevent it from opening fully. Heavily soiled utensils should be placed in the bottom basket. The more powerful spray jet provides a better dishwashing result. Other examples, such as the best way of loading your dishwasher, can be found on our homepage as a free download. The corresponding internet address can be found on the back page of these instructions for use.
- Page 10: You should always place the cutlery basket. The sink can be folded down to improve arrangement of pans, bowls, and glasses. To prevent injuries, place long pointed items on the knife shelf. The cutlery can be folded down to improve arrangement of pans, bowls, and glasses. The cutlery basket can be used for small cups and glasses or for larger items of cutlery such as wooden spoons or serving cutlery. The cutlery basket can be held securely in the small accessories holder. The height adjustment is possible to do this. To do this, first place the height adjustment lever in the required height position. The height adjustment lever is located on the side of the small accessories holder. The small accessories holder can be used for small cups and glasses or for larger items of cutlery.
- Page 11: - Adjusting the height of the basket. - Adjusting the height of the upper basket. - Depending on model. - Long knives and other utensils can be arranged horizontally. - If required, the height of the upper utensils basket can be adjusted to provide more space for tall utensils. - Appliance height. - Setting max. - Setting min. - Setting mid. - Appliance height bottom.
- Page 12: Select one of the two following procedures according to the design of the top basket for your appliance model. Top basket with upper and lower roller slides. Pull out the top basket. Top basket with side levers. Remove the upper basket and reattach it to the upper stage or lower stage. To lower the basket press in the left and then the right lever on the outside of the basket. To raise the basket hold the sides of the basket along the upper edge to prevent it from sliding down. Before re-inserting the basket again ensure that it is at the same height on both sides. Otherwise, the appliance door cannot be closed and the upper spray arm will not be connected to the water circuit. Ensure that it is at the same height on both sides. The appliance door cannot be closed and the upper spray arm will not be connected to the water circuit.
- Page 13: - Adding detergent. - The detergent dispenser is still closed. - You can use tablets as well as powder or liquid detergents. - Never use washing-up liquid. - The dosage can be individually adjusted with power or a liquid detergent according to the degree of soiling. - Modern powerful detergents. - Always follow the instructions on the detergent packaging. - The detergent dispenser helps you add the correct amount of powder or liquid detergent. - The detergent dispenser opens automatically at the optimum time depending on the program. - The power or liquid detergent is distributed in the appliance and is dissolved in the water.
- Page 14: - The units are only lightly soiled. - Lightly less than the indicated amount of detergent is usually adequate. - Suitable detergents and care products can be purchased online. - You will obtain optimum rinsing and drying results by using solar detergents and applying salt. - If programs are short, tablets may not have full cleaning effect due to different dissolving properties. - It is recommended to use washing powder for these programs. - The intensive program requires one tablet only. - When using washing powder, you can apply some of this cleaning agent to the inside of the appliance's door. - Even if the rinse aid and salt refill indicator is lit, the rinse program will run correctly with combined detergents. - Do not place small parts for washing in the table collecting tray.
- Page 15: program overview intensive zone pre-rinse cleaning intermediate rinse final rinse drying sensitive utensils catering temperature sensitive plastic and glasses express wash speed perfect vario speed half load extra drying all types of utensils cold rinsing intermediate cleaning program selection you can select a suitable program according to the type of utensils and degree of soiling information for test institutions test institutions receive the information for comparable tests according to EN 60436 these are the conditions for conducting the tests request by email to the product number and the production number are required which you can find on the rating plate on the appliance door
- Page 16: The temperature is increased during the cleaning process. This increases the hygiene status. This additional option is ideal for cleaning hoods and baby bottles. Depending on a model, additional options can be set with the buttons. The pressure in the lower basket is reduced. This function can reduce the running time by approximately. The change in the running time is indicated on the digital display. To obtain optimum cleaning results at a reduced running time. An increased temperature during the final rinse ensures that even plastic parts dry better. It is recommended to put a little less detergent in the detergent dispenser than for a full load.
- Page 17: Operating the appliance Switching on the appliance Turn on the tap fully Switch on 21:00 switch The appliance Rotate program selector to Program data The required program The expected program duration Press START button The program data consumption values can be found in the summary of instructions.
- Page 18: - Operating the appliance - Timer programming - Switching off automatically - The program ends - You can delay the start of the program - Close the door - Press button until the digital display corresponds with your requirements - The factory set value is lit on the digital display - The program is activated - The required value is indicated on the digital display
- Page 19: Cleaning and maintenance Filters The filters keep large foreign objects in the rinsing water away from the pump. These foreign objects may block the filters. Limescale and contaminants in the rinsing water may block nozzles and bearings on the spray arms. The filter system consists of a coarse filter, a flat fine filter, and a microfilter. Check outlet nozzles on the spray arms for blockages. Unscrew the upper spray arm to remove the filters for cleaning. Remove the lower spray arm and clean the filters for residue. Reinstall the lower spray arm and clean filters under running water. Ensure that the arrows mark opposite each other after closing the filter system.
- Page 20: - In this case, the appliance from the power supply. - Experience has shown that you can rectify most faults which occur in daily operation yourself. - This ensures that the machine is quickly available to you again. - You can find possible causes of malfunctions and helpful information for rectifying them. - Take out top basket and bottom basket. - Remove the filters. - Screw out water supply using a spanner if required. - Prise out the white pump cover using a spoon. - If the appliance stops during dishwashing or does not start for no obvious reason, first run the abort program function. - Ensure that you do not injure yourself on pieces of broken glass or pointed implements.
- Page 21: - Check water supply. - Supply hose kinked. - Turn off the tap. - Water connection. - Clean filter in the supply hose. - Error code is lit. - Water protection system activated. - Call customer service and mention the fault code. - Waste water hose is blocked or kinked. - Check connection to the waste water pump.
- Page 22: - The document includes a section on error codes. - Waste water pump blockages are addressed. - The waste water pump is not blocked in position. - Clean pump and lock cover correctly. - The main voltage is too low. - There is a different error code indicated on the digital display. - A technical fault may have occurred. - Switch off appliances with the 21-0) switch. - If the problem recurs, turn off the tap and pull out the mains plug. - Call customer service and mention the error code.
- Page 23: 5remedial action causes utensils not dry no more too little rinse aid in the dispenser refill rinse aid programs selected without drying select program with drying overview of programs program sequence water collecting in depressions arrangement utensils in a sloshing position on the utensils and cutlery arrangement affected utensils as sloshing as possible the combined detergent used use different combined detergent with has a poor drying performance better drying performance use of rinse aid also increases the drying performance intensive drying to increase drying drying not activated activate intensive drying see operating the appliance utensils were removed too early wait until program ends or wait until program ends before removing the eco rinse aid used has a poor drying performance use a proprietary rinse aid (eco products are drying performance is pumped out on account of the 'condensation drying' principle principle water droplets are physically induced and required in the container the humidity in the air condenses on the inner walls of the dishwasher drains and is pumped out on account of the 'condensation drying' principle
- Page 24: - The document includes information about various components and actions related to the device. - It discusses the arrangement of the device and its maintenance. - There are instructions on how to clean and maintain the device effectively. - The document emphasizes the importance of proper handling and care of the device. - It mentions the need to avoid certain actions that could damage the device. - There are guidelines for troubleshooting and addressing common issues. - The document provides details on the use of specific programs and settings. - It highlights the significance of following safety protocols during operation. - There are warnings against improper usage that could lead to malfunction. - The document outlines the importance of regular maintenance to ensure optimal performance.
- Page 25: - Use a more intensive program for water stains on plastic. - Surface is physically unavoidably water changes. - After drying, water stains are. - Arrange utensils in a sloping position. - Use rinse aid if required. - Change detergent brand. - Clean appliance mechanically. - Only for glasses, initial glass corrosion can only appear. - Select a more intensive rinse program. - Do not pre-rinse utensils.
- Page 26: - The document discusses the removal of components using machinery. - It mentions the importance of cleaning components either manually or through mechanical cleaning. - There are references to colored components and difficulties in removing certain residues from materials. - It highlights the need for caution when dealing with non-removable coatings. - The document addresses the functionality of the water softening system. - It includes information about the appliance's main area and the discolouration of plastic parts. - There are warnings about potential discoloration during the operation of the dishwasher. - The document specifies that the appliance's service life may be affected by certain conditions. - It discusses the importance of selecting appropriate programs for higher washing temperatures. - There are guidelines on the handling of detergents and the importance of not overloading the appliance.
- Page 27: - Use the dishwasher only for dishware that is dishwasher-safe. - Avoid long steam phases after washing cycles. - Use detergent with glass protection components. - Ensure that the power cord is plugged in properly. - The appliance does not start if the door is not closed. - The door is difficult to open. - The appliance cannot be set to start. - The door lock has been activated. - The appliance is in the program start phase. - The door cannot be closed due to installation.
- Page 28: - The document includes instructions for handling various actions related to the device. - It emphasizes that the detergent dispenser cannot be closed. - The detergent dispenser or cover should be removed. - The document provides guidance on blocking the detergent dispenser. - It mentions that the detergent dispenser should not be rinsed or collected out. - The document states that the detergent dispenser was designed for dry detergent only. - It advises against placing utensils or fragrances in the detergent dispenser. - The document highlights that the appliance stops during the program or is interrupted. - It includes warnings about the power and water supply. - The document discusses the importance of ensuring that the appliance is not blocked or obstructed.
- Page 29: Customer service Installation and connection If you are unable to rectify the fault, please contact your customer service. We always find a suitable solution to avoid unnecessary visits by technicians. For your nearest customer service can be found on the back of these instructions for use or on the enclosed customer service list. When calling, please state the appliance number (E-Nr) and the production number (FD). The dishwasher must be connected correctly; otherwise, it will not function properly. The specifications for the inlet and outlet as well as the electrical connection must correspond with the required criteria as specified in the following paragraphs. Installing the appliance in the correct sequence. Checking appliance on delivery. Installing the appliance.
- Page 30: Installation and connection Product packaging Technical specifications If you have any complaints, contact the dealer where you purchased the appliance or our customer service. Weight Max. 4.5 kg Voltage 230V or 50Hz Connected load 1.5 kW Power input Instructions for use Installation instructions Warranty Installation materials Steam guard plate Rubber apron Power cord Dishwasher Please follow the safety instructions under Installation. Water pressure must be at least 0.3 MPa. Max. 0.6 MPa. Water temperature Preferably cold water if hot water is used. Depending on the type of water inlet hose. Delivery Your dishwasher has been checked in the factory to ensure that it is in working order.
- Page 31: Installation and connection Electrical connection Removing the appliance Connect the appliance to a power supply Turn off the water supply Undo the waste water and draining The socket must be near the appliance and freely accessible If the plug is not freely accessible, all pole disconnectors with a contact opening of at least 3 mm must be fitted on the installation side to satisfy the relevant safety instructions Water connection Loosen fastening screws for the furniture parts Pull out the appliance carefully
- Page 32: - Activate the childproof lock. - Open the door with activated childproof lock. - Always close the appliance door completely when you leave the appliance. - This is the only way you can protect your. - Deactivate childproof lock. - Children from potential dangers. - Baking sheets, spray heads, and grills that have a diameter greater than 6 cm. - Surfaces can be cleaned with the aid of the spray head. - To do this, remove the top basket and insert the spray head as illustrated in the diagram. - Ensure that the spray jet can reach all parts, arrange the baking sheets as illustrated.
- Page 33: AquaStop guarantee If our AquaStop system is defective and causes water damage, we will make good the damage for private users. To ensure water damage protection, the appliance must be connected to the power supply. This liability guarantee is valid for the service life of the appliance. A prerequisite for the warranty claim is that the appliance has been correctly installed and connected with AquaStop according to our instructions. Our warranty does not extend to defective feed lines or fittings up to the AquaStop connection on the tap. If your appliance is fitted with AquaStop, you can leave your appliance unattended during operation and leave the tap turned on afterwards. The tap should only be turned off if you are absent from home for a prolonged period. Repair order and advice on faults.

Monsher MD 4502 Dishwasher

BOSCH SMS4EMW06G Dishwasher

Fisher and Paykel DW24UNT4X2 Built-Under Dishwasher

BOSCH SMV6HVX01I Integrated Dishwasher

Kenmore W10898468B Ultra WashTMHE Dishwasher

BOSCH SMV6HCX2FR Dishwasher

BOSCH SHS53C Dishwasher

SAMSUNG DW80 R2031 Series Dishwasher

BOSCH SPI2HKS42E Dishwasher

adiding GV673C61 House Hold Dishwasher