Home > Frigidaire > FRIGIDAIRE FDPH4316A Dishwasher
FRIGIDAIRE FDPH4316A Dishwasher


Dishwasher
use & care
Introduction.......................................................2
Operating Instructions..................................8
Care And Cleaning........................................14
Troubleshooting.............................................16
Limited Warranty ..........................................19
Important Safety Information ....................3
Features..............................................................5
Controls and Settings....................................6
A23587501 (November 2022)
Frigidaire.ca Canada 1-800-265-8352

| General | Details |
|---|---|
| Name | FRIGIDAIRE FDPH4316A Dishwasher |
| Make | Frigidaire |
| Language | English |
| Filetype | PDF (Download) |
| File size | 1.62 MB |


FRIGIDAIRE GDPH4525SS Dishwasher

FRIGIDAIRE GDPP4517A Gallery Series Dishwasher

FRIGIDAIRE FDPC4314AS Dishwasher

FRIGIDAIRE GDPH4515AF Gallery Dishwasher

FRIGIDAIRE FFBD2406NB Full Console Dishwasher

FRIGIDAIRE GDPH4525AF Gallery Dishwasher

FRIGIDAIRE FDHP4336AS 24 Tall Tub Dishwasher

FRIGIDAIRE FDHP4336AS Dishwasher

FRIGIDAIRE FDSR4501AP Panel Ready Dishwasher

FRIGIDAIRE FFBD1821MS Dishwasher
FRIGIDAIRE FDPH4316A Dishwasher Overview
Summary of Contents
- Page 1: Introduction Important safety information Features Controls and settings Operating instructions Care and cleaning Troubleshooting Limited warranty
- Page 2: Welcome to our family. Very important information - read before operating your dishwasher. This manual is your resource for the use and care of your product. Your Precision Direct Wash System dishwasher uses energy efficient motors for the wash and drain portions of the cycle you select. Each cycle has a series of water fills and drains for washing and rinsing dishes. If you compare this dishwasher to previous models, you may be surprised at what you don’t hear. Why energy efficient units run long cycles: several factors are important to washing dishware. The energy use of the dishwasher was reduced by applying more of the factors that don’t use so much energy. You will see that the wash cycles take longer. The filters will need to be cleaned to maximize wash performance during the life of your dishwasher. Keep your product info here so it’s easy to find.
- Page 3: IMPORTANT SAFETY INFORMATION When using your dishwasher, follow basic precautions. Disconnect electrical power to dishwasher before servicing. Use your dishwasher only as instructed in this Use and Care Manual. Repairs should be done by a qualified technician. Use care unloading the dishwasher when the Sanitize option has been selected. Dishwasher must be electrically grounded. This dishwasher is designed to operate on regular house current (120V, 60Hz). Do not operate dishwasher unless all enclosure panels are in their proper place. Hydrogen gas may be produced in a hot water system that has not been used for 2 weeks or more. Keep young children and infants away from the dishwasher when it is operating.
- Page 4: Important safety information includes child safety warnings and precautions to reduce the risk of fire, electrical shock, or injury when using the dishwasher. Children should never use cartons, plastic bags, or wrapping materials to play, as they can cause suffocation. Do not store or use gasoline or other flammable liquids near the appliance. Read all instructions before using the appliance. The safety alert symbol indicates potential personal injury hazards. Remove all staples from the carton to prevent cuts and damage to finishes. DANGER indicates a hazardous situation that could result in death or serious injury. WARNING indicates a potentially hazardous situation that could result in death or serious injury. CAUTION indicates a potentially hazardous situation that may result in minor or moderate injury. IMPORTANT indicates crucial installation, operation, or maintenance information that is not hazard-related.
- Page 5: Your dishwasher cleans by spraying a mixture of hot water and detergent through the spray arms against soiled surfaces. The dishwasher drains for a few seconds to remove soils dropped while loading, then fills with water covering the filter area. Water is then pumped through the spray arms. Soil particles go through and across the filter and down the drain as the water is pumped out. This series of steps are repeated as needed. Features may vary according to model. Accessories are available for your appliance.
- Page 6: Controls and settings Cycle times are approximate and will vary with options selected. Hot water is necessary to activate dishwasher detergent and melt fatty food soils. An automatic sensor will check the incoming water temperature and lengthen the cycle for heating if necessary. DishSense technology checks the soil level on your dishes and adjusts water fills accordingly. Cycle time and water usage will vary based on the amount of soil on the dishes. The dishwasher is programmed to remember your last cycle. To start the dishwasher using the same cycle, press the START/CANCEL pad. The Normal wash cycle is recommended for everyday use and suitable for a range of dish loads. To sanitize dishes, select the Sanitize option, which raises the water temperature in the final rinse. Not all cycles and options are available on all models.
- Page 7: Controls and settings Select the Normal Wash cycle and the cycle time will be extended until the proper water temperature is reached. For best results, the incoming water temperature should be at least 120°F (49°C). The Delay option allows you to automatically delay starting your dishwasher from 2-4-6 hours. The sanitize criteria may not be satisfied if there is an interruption of the cycle, power failure or if the incoming water temperature is below 120°F (49°C). When the High Temp option is selected, the dishwasher heats water in the main wash to approximately 155°F (68°C). To cancel the Delay option and to begin the selected cycle before the delay period is over, press and hold the START/CANCEL pad for 3 seconds. When cycle and options are selected, LEDs of selected cycle and options are illuminated. The Max Dry option extends drying time by approximately 20 minutes. The Washing light comes on at the beginning of the cycle and remains on until the end of the main wash. The Heat Dry option in combination with rinse aid will enhance drying performance.
- Page 8: Operating instructions provide guidance on using the dishwasher effectively. The LEDs of selected cycle and options are illuminated, and the status window displays the remaining cycle time. To resume, press the START pad and close the dishwasher door immediately. Load the dishwasher and add detergent before starting the cycle. Add rinse aid if needed, and a tone will sound indicating the dishwasher will begin running from the point of interruption. Select the desired cycle and option, with indicator lights glowing when selected. If the door is kept open too long or closed without pressing START, the running cycle will be canceled. Run hot water until it reaches 120°F for optimal performance before turning it off. To prevent children from changing settings, lock the controls by pressing and holding the Dry pad for 3 seconds. You can cancel a cycle anytime by pressing and holding the START/CANCEL pad for 3 seconds.
- Page 9: Operating instructions Cycle and option chart Cycle and intended use Heavy wash is recommended for pots, pans, casseroles, and dinnerware having light to heavily soiled loads. Normal wash is recommended for lightly to heavily soiled loads. 1 Hr wash is recommended for lightly soiled loads only. Energy saver is a cycle used to reduce dishwasher energy consumption. Scrape away large pieces of food, bones, pits, toothpicks, etc. The upper rack is designed for flexibility in loading a wide variety of items including cups, glasses, stemware, small plates, bowls, etc. Load glasses in the top rack only to avoid damage. Foods such as mustard, mayonnaise, vinegar, lemon juice, and tomato-based products may cause discoloration of stainless steel and plastics.
- Page 10: Operating instructions 10 place settings standard loading pattern Some models have a fold-down cup shelf or a cup shelf/stemware holder. They can be used to load two levels of cups, juice glasses, and other short items. Stagger items on upper level so that water can reach all inside surfaces. Fold up to load tall glasses. 12 place settings standard loading pattern The upper rack can be used to wash a wide assortment of items when you don’t have a full load. When the upper rack fills up with glasses and the lower rack is still empty, you don’t have to wait anymore for clean glasses. Stemware holder/cup shelf not available on all models.
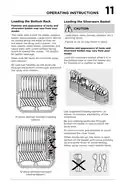
- Page 11: Loading the silverware basket is an important part of the operating instructions. The lower rack is best for plates, saucers, bowls, and cookware. Large items should be placed along the edge to avoid blocking the spray arm rotation. For best results, place bowls, casseroles, and saucepans with soiled surfaces facing down or toward the center. Load sharp items, such as knives and skewers, pointing down to prevent injury. Make sure tall items do not block spray arm rotation. Use suggested loading patterns to increase washability of the silverware. Do not mix silver and stainless to avoid damaging the silver finish. When covers are up, mix items in each section of the basket to avoid nesting. Water spray cannot reach nested items.
- Page 12: To add or remove items after the wash cycle starts, unlatch the door and wait a few seconds until the wash action stops before opening. Add detergent just before starting the cycle and store it in a cool, dry location. Using industrial grade detergent can damage the heating coil and other parts of the dishwasher. The amount of detergent to use depends on the water hardness, which is measured in grains per gallon. Using too little detergent can result in poor cleaning and hard water filming or spotting. The detergent dispenser has two detergent cups: a smaller one for the pre-wash and a larger one for the main wash. Use only fresh automatic dishwashing detergent to avoid oversudsing. When using detergent tabs, place one tab in the main wash cup and close it. As a rule, use 1 teaspoon of detergent for each grain above 12 for very hard water. For very hard water, a water softener is recommended to improve water quality and dishwashing performance.
- Page 13: Operating instructions Rinse aid greatly improves drying, reduces water spots, and lubricates wash arm bearing for proper rotation. Water pressure must be between 20 and 120 psi. Low water pressure may occur when laundry or showers are in operation. A dispenser automatically releases a measured amount of rinse aid during the last rinse. Increase the amount of rinse aid dispensed by rotating the dial to a higher number. Hot water is needed for best dishwashing and drying results. Water entering the dishwasher should be at least 120°F (49°C). Before starting a cycle, run hot water to clear cool water from the pipe. The use of industrial grade detergent can damage the heating coil and other parts of the dishwasher. Select the Normal Wash and High Temp options along with a rinse aid agent for improved drying performance.
- Page 14: Care and cleaning Warning: Allow heating element to cool before cleaning the interior to avoid burns. Outer door: Clean with warm soapy water and a dishcloth or sponge. Rinse with clean water and a dry cloth. Do not use harsh cleaners. Inside: The inside of the dishwasher and filter are self-cleaning with normal use. Clean around the tub gasket area with a damp cloth if needed. Glass trap: A glass trap located in the center of the filter collects pieces of broken glass, straws, bones, and pits. Overfill protector: Keeps dishwasher from overfilling and should move up and down freely about one inch. Clean occasionally with a household cleaner containing vinegar or bleach. Glass trap removal: Pull the glass trap handle up and out to remove, empty any debris, and slide it back into position. Cleaning the interior: Use Frigidaire ReadyClean Dishwasher Cleaner tablets to clean and freshen the interior. One tablet used monthly is recommended for best results. Note: Hard water may cause lime deposit buildup on the interior of the dishwasher.
- Page 15: Care and cleaning Care of drain air gap If a drain air gap was installed for your built-in dishwasher, check to make sure it is clean so the dishwasher will drain properly. A dishwasher left in an unheated place should be protected from freezing. To disconnect service: Turn off electrical power to the dishwasher at the supply source by removing fuses or tripping circuit breaker. Shut off water supply. Freezing temperatures may cause water lines to rupture. To restore service: Reconnect the water, drain, and electrical power supply. Check connections to make sure they do not leak.
- Page 16: Troubleshooting Cups with a concave bottom will collect water. Load them at the far left and right of the upper rack so they will be held in a tilted position. Review this list before calling for service. It may save you both time and expense. Select the Normal Wash and High Temp option along with a Rinse Aid agent for improved drying performance. Choose another cycle for longer washing time. Containers, bowls, pots/pans, and any dishware with concave surfaces should be placed in the rack facing or angled down so that water is able to drain. Check incoming water temperature. It should be about 120°F (49°C). Check water hardness. For extremely hard water, it may be necessary to install a water softener. Use fresh detergent. Old detergent is ineffective. Check to verify that the glass trap is maintained and installed properly. Load with care and do not overload.
- Page 17: Using too much detergent in soft or softened water causes damage that looks like a film but cannot be removed. Spilled rinse aid can cause foam and lead to overflowing. Adjust the amount of detergent based on the water hardness. Tea and coffee can stain cups; remove the stains by hand washing in a solution of bleach and warm water. Iron deposits in water can cause a yellow or brown film; a special filter installed in the water supply line will correct this problem. Detergent may be old; discard and use fresh detergent. Certain high acid foods can cause discoloration of stainless steel and plastics if allowed to sit for a long period. Mixing stainless steel and silver utensils can cause pitting of the stainless steel blades. Water left in the tub bottom after the cycle is complete is not normal; the dishwasher may not be draining properly. Normal sounds include water fill, water spray, draining, and motor sounds.
- Page 18: Troubleshooting If the dishwasher door is opened while the unit is running, the START/CANCEL pad must be pressed and the door shut immediately to return the unit to the selected cycle. Check to see if the circuit breaker is tripped or if a fuse is blown. Make sure the water supply is turned on. Is the dishwasher set for Delay Option? To remove buildup and film, clean using the provided instructions. Assure the water supply is turned on for the dishwasher to fill. If the unit is hooked up to a food waste disposer, make sure the disposer is empty. Soiled dishes left in the dishwasher too long can create an odor. Washing large amounts of dishware with tomato-based soil can cause a pink/orange appearance on the tub interior.
- Page 19: Your appliance is covered by a one year limited warranty. Electrolux will repair or replace any parts of this appliance that prove to be defective in materials or workmanship when such appliance is installed, used, and maintained in accordance with the provided instructions. The stainless tub and door liner of your appliance are covered by a lifetime limited warranty. Dishwasher racks and the electronic control module are covered by a two through five year limited warranty. This warranty does not cover products with original serial numbers that have been removed or altered. It also does not cover products that have been transferred to another party or removed outside the USA or Canada. Rust on the interior or exterior of the unit is not covered. Service calls that do not involve malfunction or defects in materials or workmanship are not covered. Expenses for making the appliance accessible for servicing are not included. Customer's sole and exclusive remedy under this limited warranty shall be repair or replacement as provided herein. Claims based on implied warranties are limited to one year or the shortest period allowed by law. This warranty only applies in the USA, Puerto Rico, and Canada. Electrolux authorizes no person to change or add to any obligations under this warranty.
- Page 20: Welcome home. Our home is your home. Visit us if you need help with owner support, accessories, service, or registration. See your registration card for more information.
BOSCH SMV6HVX00I Fully- Dishwasher

Fisher and Paykel DW24UT2I2 Dishwasher

FISHER AND PAYKEL DD24SHTI9 N Tall Dish Drawer Dishwasher

smeg STX23CLLO Classica Undercounter dishwasher

BOMANN GSP 7409 Household Dishwasher

GAGGENAU 400 Dishwasher

FISHER PAYKEL DD24SCTB9_N Tall Dishwasher

BOSCH SMV4EDX17E Dishwasher

SIEMENS SN87YX01CE Dishwasher

BOSCH SHP65CM6N Dishwasher