
Home > Frigidaire > FRIGIDAIRE PDSH4816AF Dishwasher
FRIGIDAIRE PDSH4816AF Dishwasher









Dishwasher
use & care
Introduction.......................................................2
Care and Cleaning ........................................19
Saving Energy ................................................ 21
Normal Operating Sounds ....................... 22
Troubleshooting............................................ 23
Limited Warranty ........................................ 27
Important Safety information.....................3
Features..............................................................5
Controls and Settings....................................6
Operating Instructions................................10
117839840 (March 2023)
Frigidaire.ca Canada 1-800-265-8352


| General | Details |
|---|---|
| Name | FRIGIDAIRE PDSH4816AF Dishwasher |
| Make | Frigidaire |
| Language | English |
| Filetype | PDF (Download) |
| File size | 6.38 MB |
 (1 votes, average: 5.00 out of 5)
 Loading...

FRIGIDAIRE GDPH4525SS Dishwasher

FRIGIDAIRE GDPP4517A Gallery Series Dishwasher

FRIGIDAIRE FDPC4314AS Dishwasher

FRIGIDAIRE GDPH4515AF Gallery Dishwasher

FRIGIDAIRE FFBD2406NB Full Console Dishwasher

FRIGIDAIRE GDPH4525AF Gallery Dishwasher

FRIGIDAIRE FDHP4336AS 24 Tall Tub Dishwasher

FRIGIDAIRE FDHP4336AS Dishwasher

FRIGIDAIRE FDSR4501AP Panel Ready Dishwasher

FRIGIDAIRE FFBD1821MS Dishwasher

FRIGIDAIRE PDSH4816AF Dishwasher Overview
Summary of Contents
- Page 1: Introduction Important safety information Features Controls and settings Operating instructions Care and cleaning Saving energy Normal operating sounds Troubleshooting Limited warranty
- Page 2: Welcome to our family. The filters will need to be cleaned to maximize wash performance during the life of your dishwasher. This manual is your resource for the use and care of your product. Please read it before using your appliance. If something doesn’t seem right, the troubleshooting section will help you with common issues. This dishwasher does not sound like most dishwashers - it’s quieter. Your Direct Feed Wash System dishwasher uses energy efficient motors for the wash and drain portions of the cycle you select. If you compare this dishwasher to previous models, you may be surprised at what you don’t hear. Several factors are important to washing dishware, which is why energy efficient units run long cycles. The dishwasher is programmed to remember your last cycle so you do not have to reset each time. Not all cycles and options are available on all models.
- Page 3: IMPORTANT SAFETY INFORMATION Store dishwasher detergent and rinse agents out of the reach of children. If the dishwasher drains into a food disposer, make sure disposer is completely empty before running dishwasher. Do not wash plastic items unless marked: “Dishwasher Safe” or equivalent. Use your dishwasher only as instructed in this Use and Care Manual. NSF certified residential dishwashers are not intended for licensed food establishments. Dishwasher must be electrically grounded. Do not tamper with controls. Hydrogen gas may be produced in a hot water system that has not been used for 2 weeks or more. Do not operate dishwasher unless all enclosure panels are in their proper place. Disconnect electrical power to dishwasher before servicing.
- Page 4: Important safety information includes child safety warnings about packaging materials that can cause suffocation. To reduce the risk of fire, electrical shock, or injury, basic precautions should be followed. Flammable liquids should not be stored or used near the appliance. All instructions should be read before using the dishwasher. The safety alert symbol indicates potential personal injury hazards. Staples from the carton should be removed to prevent cuts and damage to finishes. DANGER indicates a hazardous situation that can result in death or serious injury. WARNING indicates a potentially hazardous situation that could result in death or serious injury. CAUTION indicates a potentially hazardous situation that may result in minor or moderate injury. IMPORTANT information pertains to installation, operation, or maintenance that is not hazard-related.
- Page 5: Your dishwasher cleans by spraying a mixture of hot water and detergent through the spray arms against soiled surfaces. The dishwasher drains for a few seconds to remove soils dropped while loading, then fills with water covering the filter area. Water is then pumped through the spray arms. Soil particles go through and across the filter and down the drain as the water is pumped out. This series of steps are repeated as needed. Features may vary according to model. Accessories are available for your appliance and may be purchased at Frigidaire.com or from an authorized seller.
- Page 6: controls and settings wash cycle and options cycle times are approximate and vary by options selected. hot water is necessary to activate dishwasher detergent and melt fatty food soils. press the favorite button once to initiate the program save, then press and hold until the led stays lit and a tone is heard to save the current settings as a favorite. the smart sensor checks the soil level on your dishes in the normal, eco, sanitize, and heavy cycles. cycle time and water usage varies based on the amount of soil on the dishes. press the desired cycle or option button on the control panel to make a selection. each button press plays a tone, and the led light above the selection turns on when a cycle or option is selected. to clear current settings: releasing the favorite button before the 3 second window to save passes will fail to save the program. normal for light to heavily soiled dishes and silverware. water usage ranges from approximately 3.0 to 7.4 gallons. quick for lightly soiled and pre-rinsed dishes and silverware. water usage is approximately 4.5 gallons. wash time is about 30 min. with the air dry setting.
- Page 7: controls and settings eco option is for lightly soiled and pre-rinsed dishes and silverware, with water usage ranging from approximately 4.3 to 7.7 gallons and a wash time of about 86 to 229 minutes depending on the dry setting. selecting a dry setting involves touching and sliding to choose based on the touch release point, with updates to the cycle time displayed. delicate option is for lightly soiled china and crystal, using approximately 4.9 gallons of water with a wash time of about 95 minutes. air dry option does not use the heating element during the dry cycle, reducing energy consumption but may leave items not fully dry. heavy option is for pots, pans, and dinnerware with dried-on soils, with water usage ranging from approximately 7.1 to 8.1 gallons and wash times from 170 to 214 minutes. maxboost option increases cycle time and is not available for the rinse cycle. sanitize cycle heats water to 157°F (69.4°C) for 7 minutes to sanitize dishes and glassware. delay option allows automatic delay of starting the dishwasher from 1-12 hours, with the delay time displayed in the status window. rinse option is for rinsing dishes that will be washed later, using approximately 2.2 gallons of water with a cycle time of about 15 minutes.
- Page 8: Controls and settings Press START and close the door immediately (within 4 seconds). A tone indicating that countdown has started sounds while the Close Door LEDs blink. If the cycle was not yet started, to cancel a delay time press the delay button until the time returns to zero. Both a running cycle and a delay countdown can be canceled at any time. Open the dishwasher door and press CANCEL. The status window indicates the number of delay start hours, the number of minutes left in a cycle, the level of rinse aid dosage, and the cycle prompts. Control lock locks the controls to avoid accidental button presses. To lock the control panel, press and hold the CONTROL LOCK button. The LEDs of the selected cycle and options are illuminated when the cycle and options are selected. Press START and close the dishwasher door immediately (within 4 seconds) to start the cycle. The blue floor indicator light illuminates to indicate the washer is running. If a cycle is paused the floor indicator light stays ON until the door is opened.
- Page 9: Controls and settings To resume a wash If the cycle is paused, the floor indicator light stays on until the door is open. The control lock LED will blink three times and then stay lit if any buttons are pressed while control lock is active. Opening the door during normal operation pauses the wash cycle. The control panel will go into sleep mode if there is no interaction for a period of 5 minutes. If a cycle is paused, it is not possible to change program or options unless the running one is canceled. Cancel a wash Press the cancel button to cancel a running wash cycle. When a wash is canceled, the tub drains either on door close or at the beginning of the next wash. A running wash cycle must be canceled to reselect options for a running cycle. If the newly selected wash option cannot be selected, the LED button for that option will blink 3 times and then turn off.
- Page 10: Operating instructions The STATUS window indicates the number of delay start hours for the selected cycle. Selecting a wash setting automatically selects the default dry setting. Each wash and dry setting displays Eco feedback above the wash time in the display window. The cycle duration or the remaining time is shown in the format H:MIN. Level of Rinse Aid dosage is indicated by L0–L6. When a wash cycle is finished, the COMPLETE LED and the white beam on the floor illuminate. The floor indicator light will turn off once the door is opened. The wash cycle is running when the blue light is illuminated. All lights on the control panel go off 15 seconds after the door has been opened. Last run settings display on the control panel when the door is opened.
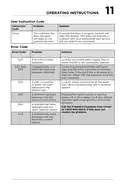
- Page 11: Operating instructions This indicates the door has been left open or not properly latched. Ensuring the door is properly latched will clear the display. This does not indicate a problem with your dishwasher and service will not need to be contacted. A low fill has been detected. Look for a pinched water supply line, or water shutoff is not completely opened. Clogged filters or a restricted drain line has been detected. Check and clean both filters and sump area and check for a pinched or blocked drain hose. A leak or overflow of water has been detected in the bottom pan. Look for loose connections at the water inlet valve and ensure the unit is properly leveled. A problem has been detected with the drain or wash motor.
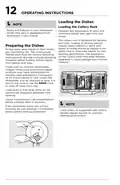
- Page 12: Operating instructions Loading the dishes Loading the cutlery rack The cutlery rack is designed for flatware and most cooking or serving utensils. Heavily soiled utensils or items with baked on foods should be placed in the upper rack or silverware basket for best washing performance. The separators on the cutlery racks help keep flatware separated to avoid damage and improve cleaning. Preparing the dishes Scrape away large pieces of food, bones, pits, toothpicks, etc. Foods such as mustard, mayonnaise, vinegar, lemon juice and tomato based products may cause discoloration of stainless steel and plastics if allowed to sit for a long period of time. Load racks so that large items do not prevent the detergent dispenser from opening.
- Page 13: Operating instructions Loading the upper rack The upper rack is designed for flexibility in loading a wide variety of items including cups, glasses, stemware, small plates, bowls, etc. Load glasses and plastic items in upper rack only. Load items with open end facing down for better cleaning and draining. Long-handled knives and utensils can be placed in upper rack. Be sure nothing protrudes through the bottom of the rack to block rotation of the spray arm. Make sure the loaded items do not interfere with the rotation of the spray arm. Damage may occur if delicate items touch each other during dishwasher operation.
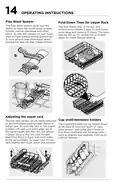
- Page 14: Operating instructions Flex Wash system The Flex Wash system allows you to wash the inside areas of baby bottles, narrow glassware, and other items. To turn this feature on, turn the clips to have them pointing upward. To turn off, slide them back down toward the rack. The fold-down tines in the top and bottom racks make it easy to load extra large and hard-to-fit items. The tines may be left up for normal use or folded down for more flexible loading. Adjusting the upper rack The top rack height can be easily adjusted to accommodate taller dishes. To raise the rack, lift until both sides are at the same height. To lower the rack, lift slightly then push down and release. The Cupshelf holder can be folded down to load two levels of cups or long items.
- Page 15: Operating instructions The stemware holder is used to securely hold your wine glasses in place for the best wash. To properly secure your glass, press the stem of the glass into the center of the Cupshelf. The lower rack is best for plates, saucers, bowls, and cookware. Large items should be placed along the edge so they do not block the spray arm rotation. For best results, place bowls, casseroles, and sauce pans with soiled surface facing down or toward the center. Tilt slightly for better drainage. Be sure pan handles do not protrude through the bottom of the rack and block the spray arm rotation. Make sure the loaded items do not interfere with the rotation of the spray arm. Check this by rotating the spray arm by hand.
- Page 16: Operating instructions Be sure nothing protrudes through the bottom of the basket or rack to block the spray arm. The fold-down tines in the top and bottom racks make it easy to load extra large and hard-to-fit items. Do not mix silver and stainless to avoid damaging the silver finish. When covers are up, mix items in each section of the basket with some pointing up and some down to avoid nesting. Make sure the loaded items do not interfere with the rotation of the spray arm. Features and appearance of racks and silverware basket may vary from your model. Load sharp items pointing down to avoid injury. Unlatch the door and wait a few seconds until wash action stops before opening. Load the silverware basket while it is in the bottom rack or take the basket out for loading. Use suggested loading patterns to increase washability of the silverware.
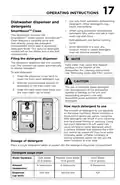
- Page 17: Operating instructions Use only fresh automatic dishwashing detergent. Other detergents may cause oversudsing. This dishwasher includes the SmartBoost Clean system, which features a separate spray arm that aids in dissolving detergent faster. Add detergent just before starting the cycle and store it in a cool, dry location. The detergent dispenser has one covered cup that opens automatically to release detergent. Hard water may cause lime deposit buildup on the interior of the dishwasher. The amount of detergent to use depends on the water hardness, measured in grains per gallon. Using too little detergent can result in poor cleaning and hard water filming or spotting. Using too much detergent in soft water can cause etching to glassware. Your local water company can provide information on the water hardness in your area. Place a single detergent tablet or packet into the detergent dispenser compartment.
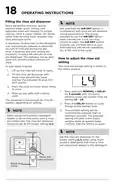
- Page 18: Filling the rinse aid dispenser Rinse aid greatly improves drying, reduces water spots, filming, and lubricates wash arm bearing for proper rotation. Not selecting the AIR DRY option in combination with rinse aid will enhance drying performance. A dispenser automatically releases a measured amount of rinse aid during the last rinse. If spotting and poor drying are problems, increase the amount of rinse aid dispensed. The rinse aid dosage setting is shown in the status window. To add liquid rinse aid, lift up the rinse aid cover to open. The dispenser holds enough for 11 to 66 washes, depending on setting. When using multi-product detergent tablets or All-In-One packs with a rinse aid component, the rinse aid dispenser should be set at the lowest setting (L1). Set the rinse aid dispenser to the lowest setting (L1) when using multi-product detergents that have a rinse aid component added to the detergent.
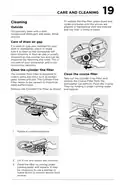
- Page 19: Care and cleaning To replace the fine filter, press down and rotate clockwise until the arrows are aligned. Occasionally wipe the outside with a mild nonabrasive detergent and water. Rinse and dry. If a drain air gap was installed, check to make sure it is clean so the dishwasher will drain properly. The Cylinder Fine Filter is designed to collect big items such as broken glass, bones, and pits. The Cylinder Fine Filter needs to be cleaned to maximize wash performance. Take out the Cylinder Fine Filter and remove the Coarse Filter from the dishwasher tub bottom. Flush the Coarse Filter by holding it under running water and replace. Remove the Cylinder Fine Filter by rotating it counterclockwise. Clean the filter by rinsing under running water and replace. It may be necessary to use a sponge or bottle brush to remove excess food residue.
- Page 20: Care and cleaning Winterizing a dishwasher left in an unheated place should be protected from freezing. If the dishwasher door is opened while the unit is running, the START/CANCEL button must be pressed and the door shut immediately to return the unit to the selected cycle and option. To disconnect service, turn off electrical power to the dishwasher at the supply source by removing fuses or tripping circuit breaker. Shut off the water supply and place a pan under the inlet valve. Disconnect the water line from the inlet valve and drain into the pan. To remove buildup and film, clean using the provided instructions. To restore service, load clean dishes and glasses in a normal manner without metal utensils or silverware. Reconnect the water, drain, and electrical power supply. Select the NORMAL cycle, press START, and close and latch the door. Pour 2 cups of white vinegar into the bottom of the dishwasher before starting the cleaning cycle.
- Page 21: Saving energy Energy use DishSense technology The yellow energy guide label indicates annual energy consumption and comparisons to other units. Energy consumption is based on the normal cycle response to tests simulating average use. The total energy is calculated from the average number of cycles per year and typical soil levels. Actual energy and water use depend on the selected cycle and options. DishSense technology senses soil levels and adjusts the cycle accordingly to prevent energy waste. The sensor is calibrated at the end of each cycle to ensure a clean load. The unit uses an in-line water heating element, ensuring no exposed heater is accessible. Users can choose the AIR DRY option to save energy or select heated dry options for drier dishes. More energy is consumed when more water and heat are used in a cycle.
- Page 22: Normal operating sounds include energy-efficient motors for washing and draining. Each cycle involves a series of water fills and drains. You may hear the drain motor at the beginning of each cycle. The splashing of water occurs as it enters the tub and during the spray arms' rotation. The wash motor pulsates throughout the cycle to vary water pressure and optimize performance. Normal operating lights indicate selected cycles and options. The buttons light up with an LED that turns white when selected. Deselected buttons turn off when the control lock is active.
- Page 23: Troubleshooting Factors affecting performance Water pressure must be between 20 and 120 psi for the dishwasher to function properly. Low water pressure may occur when other water sources are in use, affecting wash performance. Hot water is necessary for optimal dishwashing and drying, with a minimum temperature of 120°F (49°C). If power is abnormal during cycle selection, the START LED will go out and a red power message will display. To check water temperature, run the hot water faucet nearest to the dishwasher for several minutes. If the water temperature is below 120°F (49°C), adjust the hot water heater thermostat. When power is restored, the control panel lights up for 3 seconds, and the wash settings will display. The dishwasher stops temporarily during periods of abnormal voltage. To resume a wash cycle after a power outage, open the door and press START. Touch any button except START or CANCEL to acknowledge a power alert without resuming a wash.
- Page 24: Troubleshooting Dishes not dry By selecting Heat Dry, High Temp Wash, or Sanitize options, this will improve drying. Make sure the rinse aid dispenser is filled. Check the incoming water temperature; it should be at least 120°F (49°C). Check for proper loading; avoid nesting items. Cups with a concave bottom will collect water; load them at the far left of the upper rack. Before you call: Review this list to save time and expense. Drying tip: Select the Normal Wash and High Temp Wash pads along with a rinse aid agent for improved drying performance. Food soils left on dishes: Choose another cycle for longer washing time. Glassware/flatware spotted or cloudy: Check water hardness; for extremely hard water, a water softener may be necessary.
- Page 25: Troubleshooting Assure the water supply is turned on. Load with care and do not overload. Check that the overfill protector moves up and down freely. Place delicate items in the top rack. Detergent may be old; discard and use fresh detergent. Water vapor escapes from the vent during the drying part of the cycle; this is normal. Iron deposits in water can cause a yellow or brown film. Normal sounds include water fill, water circulation, and motor sounds. Water left in the tub bottom after the cycle is complete is not normal. Using too much detergent, especially in soft water, causes damage that looks like a film but cannot be removed.
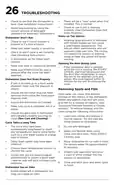
- Page 26: Troubleshooting There will be a “new” smell when first installed. This is normal. Check to see that the dishwasher is level. Check to see if unit is draining properly. Avoid oversudsing by using the correct amount of detergent designed for automatic dishwashers. Washing large amounts of dishware with tomato-based soil can cause a pink/orange appearance. Check to see if circuit breaker is tripped or if a fuse is blown. Make sure water supply is turned on. If the dishwasher door is opened while the unit is running, the START/CANCEL pad must be pressed and the door shut immediately. Hard water can cause lime deposit buildup on the interior of the dishwasher. Soiled dishes left in dishwasher too long can create an odor.
- Page 27: Your appliance is covered by a one year limited warranty. Electrolux will pay all costs for repairing or replacing any parts of this appliance that prove to be defective in materials or workmanship. This warranty does not cover products with original serial numbers that have been removed or altered. Products that have been transferred from their original owner or removed outside the USA or Canada are not covered. Rust on the interior or exterior of the unit is excluded from the warranty. Food loss due to any refrigerator or freezer failures is not covered. Service calls that do not involve malfunction or defects in materials or workmanship are not included. Expenses for making the appliance accessible for servicing are not covered. Customer’s sole and exclusive remedy under this limited warranty shall be product repair or replacement. This warranty only applies in the USA and Canada.
- Page 28: Welcome home. Our home is your home. Visit us if you need help with owner support, accessories, service, or registration. See your registration card for more information.

LG LDFN4542S Dishwasher

Gaggenau 9001923390_A Free Standing Dishwasher

FISHER AND PAYKEL DD24SA9 Dishwasher

BOSCH SHS53C Dishwasher

FISHER PAYKEL DD60D4HNX9 Built-under Dishwasher

BOSCH SMS6ITI00I Dishwasher

Miele 401 U Dishwasher

Miele G 7960 C SCVi Dishwasher

GERMAN POOL 450 Series Dishwasher

BOSCH SHP9PCM5N Custom Panel Dishwasher