HAFELE HDW-F605B Free Standing Dishwasher


Product Name: : Dishwasher Free Standing HDW-F605B
Product Applied: 535.29.660
| General | Details |
|---|---|
| Name | HAFELE HDW-F605B Free Standing Dishwasher |
| Make | HAFELE |
| Language | English |
| Filetype | PDF (Download) |
| File size | 8.33 MB |


HAFELE HDW-F605B Free Standing Dishwasher Overview
Summary of Contents
- Page 1: Product name: Dishwasher Free Standing HDW-F605B Product applied: 535.29.660
- Page 2: Please read this manual carefully before using the dishwasher. Keep this manual for future reference.
- Page 3: Safety information Product overview Using your dishwasher Loading the salt into the softener Maintenance and cleaning Installation instruction Troubleshooting Loading the baskets according to EN50242 Reviewing the section on troubleshooting tips will help you solve some common problems by yourself. The manufacturer may make modifications without giving prior notice.
- Page 4: When using your dishwasher, follow the precautions listed below. Installation and repair can only be carried out by a qualified technician. This appliance is intended to be used in household and similar applications such as staff kitchen areas in shops, offices, and other working environments. This appliance can be used by children aged from 8 years and above and persons with reduced physical, sensory or mental capabilities if they have been given supervision or instruction concerning use of the appliance in a safe way. Children shall not play with the appliance. Cleaning and user maintenance shall not be done by children without supervision. This appliance is not intended for use by persons with reduced physical, sensory or mental capabilities.
- Page 5: This appliance is for indoor household use only. To protect against the risk of electrical shock, do not immerse the unit, cord or plug in water or other liquid. Please unplug before cleaning and performing maintenance on the appliance. Use a soft cloth moistened with mild soap, and then use a dry cloth to wipe it again. This appliance must be earthed. In the event of a malfunction or breakdown, earthing will reduce the risk of an electric shock. The appliance is equipped with an earthing conductor plug. The plug must be plugged into an appropriate outlet that is installed and earthed in accordance with all local codes and ordinances. Improper connection of the equipment-earthing conductor can result in the risk of an electric shock. Check with a qualified electrician or service representative if you are in doubt whether the appliance is properly grounded.
- Page 6: Do not modify the plug provided with the appliance. Have a proper outlet installed by a qualified electrician. Do not abuse, sit on, or stand on the door or dish rack of the dishwasher. Do not operate your dishwasher unless all enclosure panels are properly in place. Open the door very carefully if the dishwasher is operating; there is a risk of water squirting out. Do not place any heavy objects on or stand on the door when it is open. When loading items to be washed, locate sharp items so that they are not likely to damage the door seal. Knives and other utensils with sharp points must be loaded in the basket with their points facing down or placed in a horizontal position. Some dishwasher detergents are strongly alkaline and can be extremely dangerous if swallowed. Avoid contact with the skin and eyes and keep children away from the dishwasher when the door is open.
- Page 7: Do not wash plastic items unless they are marked dishwasher safe or the equivalent. Use only detergent and rinse agents recommended for use in an automatic dishwasher. Never use soap, laundry detergent, or hand washing detergent in your dishwasher. The door should not be left open, since this could increase the risk of tripping. If the supply cord is damaged, it must be replaced by the manufacturer or its service agent. During installation, the power supply must not be excessively or dangerously bent or flattened. The appliance needs to be connected to the main water valve using new hose sets. To save energy, in standby mode, the appliance will switch off automatically while there is no operation in 30 minutes. The maximum number of place settings to be washed is 15. The maximum permissible inlet water pressure is 1MPa.
- Page 8: For disposing of the package and the appliance, please go to a recycling center. Cut off the power supply cable and make the door closing device unusable. Cardboard packaging is manufactured from recycled paper and should be disposed of in the waste paper collection for recycling. By ensuring this product is disposed of correctly, you will help prevent potential negative consequences for the environment and human health. For more detailed information about recycling of this product, please contact your local city office and your household waste disposal service. Do not dispose of this product as unsorted municipal waste. Collection of such waste separately for special treatment is necessary.
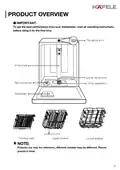
- Page 9: Product overview To get the best performance from your dishwasher, read all operating instructions before using it for the first time. Top spray arm Inner pipe Lower spray arm Salt container Dispenser Filter assembly Upper spray arm Cutlery rack Upper basket Lower basket Pictures are only for reference, different models may be different. Please prevail in kind.
- Page 10: Using your dishwasher Before using your dishwasher Set the water softener Loading the salt into the softener Loading the basket Fill the dispenser If your model does not have any water softener, you may skip this section. Always use salt intended for dishwasher use. Only use salt specifically designed for dishwasher use. Only fill with salt before running a cycle.
- Page 11: Please follow the steps below for adding dishwasher salt: Remove the lower basket and unscrew the reservoir cap. Place the end of the funnel into the hole and pour in about 1.5kg of dishwasher salt. Fill the salt container to its maximum limit with water. After filling the container, screw back the cap tightly. The salt warning light will stop being after the salt container has been filled with salt. Immediately after filling the salt into the salt container, a washing program should be started. The salt container must only be refilled when the salt warning light in the control panel comes on. If there is no salt warning light in the control panel, you can estimate when to fill the salt into the softener by the cycles that the dishwasher has run. If salt has spilled, run a soak or quick program to remove it.
- Page 12: Basket used tips The height of the upper basket can be easily adjusted to accommodate taller dishes in either the upper or lower basket. To adjust the height of the upper rack, follow these steps: Remove the upper basket. Pull out the upper basket. Push in the upper basket. Re-attach the upper basket to upper or lower rollers.
- Page 13: To raise the upper basket, just lift the upper basket at the center of each side until the basket locks into place in the upper position. To lower the upper basket, lift the adjust handles on each side to release the basket and lower it to the lower position. To make room for taller items in the upper basket, raise the cup rack upwards. You can lean tall glasses against the raised cup rack. The spikes of the lower basket are used for holding plates and a platter. They can be lowered to make more room for large items. You can also remove the cup rack when it is not required for use. Folding back the cup shelves allows for more space in the upper basket. The upper basket can be adjusted without lifting the adjuster handle. The lower basket can accommodate larger items by lowering the spikes.
- Page 14: Maintenance and cleaning External care Clean the door seals regularly with a soft damp cloth to remove food deposits. Food and drink residues may drip onto the sides of the dishwasher door. These surfaces are outside the wash cabinet and are not accessed by water from the spray arms. The control panel should be wiped with a soft damp cloth only. To avoid penetration of water into the door lock and electrical components, do not use a spray cleaner of any kind. Never use abrasive cleaners or scouring pads on the outer surfaces. The filtering system in the base of the wash cabinet retains coarse debris from the washing cycle. Check the condition of the filters regularly and clean them if necessary under running water. Pictures are only for reference; different models of the filtering system and spray arms may be different.
- Page 15: Coarse filter Main filter Fine filter Hold the coarse filter and rotate it anticlockwise to unlock the filter. Lift the filter upwards and out of the dishwasher. The fine filter can be pulled off the bottom of the filter assembly. Larger food remnants can be cleaned by rinsing the filter under running water. For a more thorough clean, use a soft cleaning brush. Reassemble the filters in the reverse order of the disassembly. Do not over tighten the filters. Never use the dishwasher without filters in place. Improper replacement of the filter may reduce the performance level of the appliance.
- Page 16: Spray arms It is necessary to clean the spray arms regularly for hard water chemicals will clog the spray arm jets and bearings. To clean the spray arms, follow the instructions below: To remove the upper spray arm, hold the nut in the center still and rotate the spray arm counterclockwise to remove it. To remove the lower spray arm, pull out the spray arm upward. Wash the arms in soapy and warm water and use a soft brush to clean the jets. Replace them after rinsing them thoroughly.
- Page 17: Caring for the dishwasher includes frost precautions during winter. After washing cycles, cut off the electrical power and turn off the water supply. Drain the water from the inlet pipe and water valve, and remove the filter at the bottom of the tub. After every wash, turn off the water supply and leave the door slightly open to prevent moisture and odors. Always remove the plug from the socket before cleaning or performing maintenance. Do not use solvents or abrasive cleaning products on the dishwasher's exterior and rubber parts. For interior stains, use a cloth dampened with water and vinegar or a dishwasher-specific cleaning product. When not in use for a long time, run an empty wash cycle, remove the plug, and leave the door slightly open. Keep the appliance in a vertical position when moving it; it can be placed on its back if necessary. Periodic cleaning of seals with a damp sponge will help prevent odors from forming.
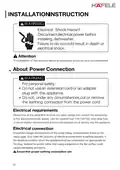
- Page 18: Installation instruction Warning: Electrical shock hazard Disconnect electrical power before installing dishwasher. Failure to do so could result in death or electrical shock. The installation of the pipes and electrical equipment should be done by professionals. Warning: For personal safety Do not use an extension cord or an adapter plug with this appliance. Do not cut or remove the earthing connection from the power cord. Please look at the rating label to know the rating voltage and connect the dishwasher to the appropriate power supply. Ensure the voltage and frequency of the power correspond to those on the rating plate. Only insert the plug into an electrical socket which is earthed properly.
- Page 19: Water supply and drain Cold water connection Connect the cold water supply hose to a threaded 3/4 inch connector and make sure that it is fastened tightly in place. If the water pipes are new or have not been used for an extended period of time, let the water run to make sure that the water is clear. The safety supply hose consists of double walls, which guarantees intervention by blocking the flow of water in case of a break. A hose that attaches to a sink spray can burst if installed on the same water line as the dishwasher. It is recommended that the hose be disconnected and the hole plugged if your sink has one. To connect the safety supply hose, pull it completely out from the storage compartment. Tighten the screws of the safety supply hose to the faucet with a 3/4 inch thread. Turn the water fully on before starting the dishwasher. To disconnect the safety supply hose, turn off the water and unscrew the hose from the faucet.
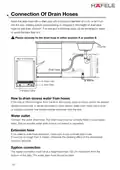
- Page 20: Connection of drain hoses requires inserting the hose into a drain pipe with a minimum diameter of 4 cm or letting it run into the sink. The height of the drain pipe must be less than 1000mm, and the free end of the hose must not be immersed in water to avoid backflow. Securely fix the drain hose in either position A or position B. If the sink is 1000mm higher from the floor, excess water in hoses cannot be drained directly into the sink. Drain excess water from hoses into a bowl or suitable container held outside and lower than the sink. Ensure that the water drain hose is correctly fitted to avoid leaks and is not kinked or squashed. If an extension hose is needed, use a similar drain hose that is no longer than 4 meters. The waste connection must be at a height less than 100 cm from the bottom of the dish. The water drain hose should be fixed properly.
- Page 21: Position the appliance in the desired location. The back should rest against the wall behind it, and the sides, along the adjacent cabinets or walls. The dishwasher is equipped with water supply and drain hoses that can be positioned either to the right or the left sides to facilitate proper installation. Once the appliance is positioned for levelling, the height of the dishwasher may be altered via adjustment of the screwing level of the feet. The appliance should not be inclined more than 2°. The height of the dishwasher, 845 mm, has been designed to allow the machine to be fitted between existing cabinets of the same height in modern fitted kitchens. The feet can be adjusted so that correct height is reached. The laminated top of the machine does not require any particular care since it is heatproof, scratchproof, and stainproof.
- Page 22: Step 2. Underneath existing work top When fitting beneath a work top, remove the work top of the dishwasher by unscrewing the screws under the rear edge of the top. After removing the work top, the screws must be screwed again under the rear edge of the top. The height will then be reduced to 815 mm, as scheduled by the International Regulations (ISO). The installation position of the dishwasher should be near the existing inlet and drain hoses and power cord. Less than 5 mm between the top of the dishwasher and cabinet and the outer door aligned to cabinet. Illustrations of cabinet dimensions and installation position of the dishwasher. Electrical, drain and water supply line entrances. Space between cabinet bottom and floor is 600 mm for 60 cm model and 450 mm for 45 cm model.
- Page 23: If the dishwasher is installed at the corner of the cabinet, there should be some space when the door is opened. Minimum space of 50mm is required. Depending on the location of your electrical outlet, you may need to cut a hole in the opposite cabinet side.
- Page 24: Troubleshooting tips Before calling for service, reviewing the charts may save you from calling for service. Dishwasher doesn't start Possible causes include a blown fuse or tripped circuit breaker. Replace the fuse or reset the circuit breaker. Ensure the power supply is turned on and the door is closed securely. Check that the water supply is connected properly and turned on. Make sure to close the door properly and latch it. Check the drain hose for twists or traps. Water not pumped from dishwasher Check the coarse filter for clogs. Ensure the kitchen sink is draining well. Use only special dishwasher detergent to avoid suds.
- Page 25: Problem: Spilled rinse-aid. Always wipe up rinse-aid spills immediately. Stained tub interior. Detergent with colourant may have been used. Make sure that the detergent has no colourant. White film on inside surface. Hard water minerals. To clean the interior, use a damp sponge with dishwasher detergent and wear rubber gloves. There are rust stains on cutlery. The affected items are not corrosion resistant. Avoid washing items that are not corrosion resistant in the dishwasher. A program was not run after dishwasher salt was added. Always run a wash program without any crockery after adding salt. A spray arm is knocking against an item in a basket. Interrupt the program and rearrange the items which are obstructing the spray arm. Rattling noise in the dishwasher. Items of crockery are loose in the dishwasher. Interrupt the program and rearrange the items of crockery. Knocking noise in the water pipes. This may be caused by on-site installation or the cross-section of the piping. The dishes are not clean. The dishes were not loaded correctly. See PART “Preparing And Loading Dishes”.
- Page 26: Problem: The dishes are not clean. Possible Causes: Not enough detergent was dispensed. What To Do: Use more detergent, or change your detergent. Items are blocking the movement of the spray arms. Rearrange the items so that the spray can rotate freely. The filter combination is not clean or is not correctly fitted in the base of the wash cabinet. Clean and/or fit the filter correctly. Combination of soft water and too much detergent. Use less detergent if you have soft water and select a shorter cycle to wash the glassware. Cloudiness on glassware. Hard water area can cause limescale deposits. White spots appear on dishes and glasses. Aluminium utensils have rubbed against dishes. Black or grey marks on dishes. Dishes block detergent dispenser. The dishes aren't drying. Improper loading can affect drying. Dishes are removed too soon. Open the door slightly so that the steam can come out.
- Page 27: The dishes aren't drying. Wrong program has been selected. With a short program, the washing temperature is lower, decreasing cleaning performance. Choose a program with a long washing time. Use of cutlery with a low-quality coating. Water drainage is more difficult with these items. Cutlery or dishes of this type are not suitable for washing in the dishwasher.
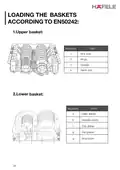
- Page 28: Loading the baskets according to EN50242. Upper basket items include rice bowls, mugs, and glasses. Lower basket items include deep dishes, noodle bowls, tray dishes, fish platters, and soup bowls.
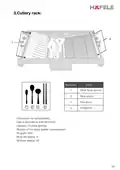
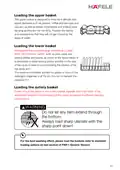
- Page 29: Cutlery rack Capacity: 15 place settings Position of the upper basket: lower position Program: ECO Rinse aid setting: 6 Softener setting: H3 Information for comparability tests in accordance with EN 50242
- Page 30: Cutlery rack used tips. Lift the right basket up; both left and right baskets are flat. Move the right basket from right to left; two baskets are overlapping. Remove the right basket from the tray; only the left basket remains.
- Page 31: Part II: Special Version Please read this manual carefully before using the dishwasher. Keep this manual for future reference.
- Page 32: Using your dishwasher Control panel Water softener Preparing and loading dishes Function of the rinse aid and detergent Filling the rinse aid reservoir Filling the detergent dispenser Program selection Wash cycle table Error codes
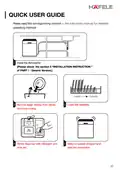
- Page 33: Quick user guide Please read the corresponding content in the instruction manual for detailed operating method. Install the dishwasher. Check the section 5 “Installation Instruction” of Part I: Generic Version. Load the baskets. Remove larger residue from dishes. Avoid pre-rinsing. Fill the dispenser with detergent and rinse aid. Select a suitable program and start the dishwasher.
- Page 34: Using your dishwasher Control panel Operation button turns on the dishwasher and lights up the screen. The storage function improves drying and keeps air fresh for up to 72 hours after washing. The dry storage function is not available with Rapid, Soak, or Self-cleaning wash selections. UV sterilization can be used with specific programs like Hygiene, ECO, Glass, 90 min, and Self-Cleaning. Press the button to select a function, and the corresponding indicator will light up. Delay function allows setting a delayed start for washing up to 24 hours.
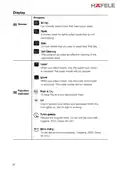
- Page 35: Operation (Button) This option allows you to lock the buttons on the control panel so children cannot accidentally start the dishwasher. To lock or unlock the buttons on the control panel, press and hold the Delay button + Alt button for 3 seconds simultaneously. Child lock Press the button to select either upper basket or lower basket. To start the selected washing program or pause it when the dishwasher is working. If the “Rinse Aid” indicator is lit, it means the dishwasher is low on rinse aid and needs to be refilled. If the “Salt” indicator is lit, it means the dishwasher is low on dishwasher salt and needs to be refilled. If the “Water Faucet” indicator is lit, it means the water faucet is closed. Auto: Auto sensing wash, lightly, normally or heavily soiled crockery, with or without dried-on food. Hygiene: Use to sanitize your dishes and glassware. The highest water temperature is 72℃. ECO: This is the standard program, suitable to clean normally soiled tableware and is the most efficient program in terms of energy and water consumption.
- Page 36: Display Program: 90 min For normally soiled loads that need quick wash. A shorter wash for lightly soiled loads that do not need drying. To rinse dishes that you plan to wash later that day. This program provides an effective cleaning of the dishwasher itself. When you select Upper, only the upper rack nozzle is activated. When you select Lower, only the lower rack nozzle is activated. To keep the air in the dishwasher fresh. Use to sanitize your dishes and glassware. Reduce the program time.
- Page 37: The original hot air drying and storage technology can quickly dry tableware. During operation, there may be water droplets or steam at the air outlet. This is a normal phenomenon. Please rest assured.
- Page 38: Water softener must be set manually using the water hardness dial. The water softener is designed to remove minerals and salts from the water. The more minerals there are, the harder your water is. The softener should be adjusted according to the hardness of the water in your area. Your local Water Authority can advise you on the hardness of the water in your area. The dishwasher allows for adjustment in the amount of salt consumed based on water hardness. Please follow the steps below for adjustment in salt consumption. The factory setting is H3. Every cycle with a regeneration operation consumes additional 2.0 litres of water. The energy consumption increases by 0.02 kWh and the program extends by 4 minutes.
- Page 39: Please check the section 3 “Loading the salt into the softener” of PART I: Generic Version, if your dishwasher lacks salt. If your model does not have any water softener, you may skip this section. The hardness of the water varies from place to place. If hard water is used in the dishwasher, deposits will form on the dishes and utensils. The appliance is equipped with a special softener that uses a salt container specifically designed to eliminate lime and minerals from the water. Consider buying utensils which are identified as dishwasher-proof. To prevent damage, do not take glass and cutlery out of the dishwasher immediately after the program has ended. Cutlery with wooden, horn china or mother-of-pearl handles are not suitable. Plastic items that are not heat resistant are not suitable. Some types of glasses can become dull after a large number of washes. Silver and aluminum parts have a tendency to discolour during washing.
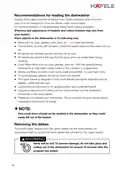
- Page 40: Recommendations for loading the dishwasher Scrape off any large amounts of leftover food. It is not necessary to rinse the dishes under running water. For best performance of the dishwasher, follow these loading guidelines. Place objects in the dishwasher in the following way: items such as cups, glasses, pots, pans, etc. must face downwards. Curved items, or ones with recesses, should be loaded aslant so that water can run off. All utensils are stacked securely and cannot tip over. Load hollow items such as cups, glasses, pans etc. with the opening facing downwards. Dishes and items of cutlery must not lie inside one another, or cover each other. The upper basket is designed to hold more delicate and lighter dishware such as glasses, coffee and tea cups. To prevent water dripping from the upper basket into the lower basket, we recommend that you empty the lower basket first.
- Page 41: Loading the upper basket is designed to hold more delicate and lighter dishware such as glasses, coffee and tea cups, and saucers. Position the dishes and cookware so that they will not get moved by the spray of water. We suggest that you place large and difficult to clean items into the lower basket, such as pots, pans, lids, serving dishes, and bowls. It is preferable to place serving dishes and lids on the side of the racks to avoid blocking the rotation of the top spray arm. The maximum diameter advised for plates in front of the detergent dispenser is 19 cm, to not hamper the opening of it. Cutlery should be placed in the cutlery basket separate from each other in the appropriate positions. Avoid nesting of the cutlery to prevent insufficient cleaning performance. Do not let any item extend through the bottom. Always load sharp utensils with the sharp point down.
- Page 42: Function of the rinse aid and detergent The rinse aid is released during the final rinse to prevent water from forming droplets on your dishes, which can leave spots and streaks. It also improves drying by allowing water to run off the dishes. Your dishwasher is designed to use liquid rinse aids. Only use branded rinse aid for dishwasher. Never fill the rinse aid dispenser with any other substances. The regularity of the dispenser needing to be refilled depends on how often dishes are washed. The Low Rinse Aid indicator will be lit when more rinse aid is needed. Use only detergent specifically made for dishwasher use. Keep your detergent fresh and dry. Dishwasher detergent is corrosive.
- Page 43: Filling the rinse aid reservoir involves removing the cap, pouring in the rinse aid, and closing the cap afterward. To adjust the rinse aid reservoir for better drying performance, the dishwasher allows user-controlled consumption. The adjustment process starts by closing the door and switching on the appliance. Press the Program button for more than 5 seconds within 60 seconds of turning on the appliance. The rinse aid indication will blink at a frequency of 1Hz to indicate the setting mode. Press the Program button again to select the appropriate setting based on usage habits. The settings change in the sequence: d3, d4, d5, d1, d2, and back to d3. A higher number indicates more rinse aid usage by the dishwasher. Complete the setup by either not operating for 5 seconds or pressing the Power button. The factory setting for rinse aid consumption is d3.
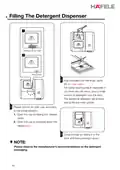
- Page 44: Filling the detergent dispenser involves sliding it to the right and pressing down. Add detergent into the larger cavity for the main wash. For better cleaning results, especially with very dirty items, pour a small amount of detergent onto the door. The additional detergent will activate during the pre-wash phase. Open the cap by sliding the release catch or by pressing down the release latch. Close the flap by sliding it to the front and then pressing it down. Please observe the manufacturer's recommendations on the detergent packaging.
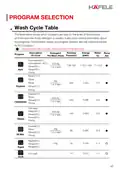
- Page 45: Program selection provides guidance on the best wash cycles for different levels of food residue. The wash cycle table includes information on energy consumption, water usage, running time, and detergent requirements. Consumption values and program duration are indicative, except for the ECO program. Certain programs utilize rinse aid in the last rinse, indicated by specific symbols. The table outlines various wash cycles, including pre-wash, autowash, hygiene rinse, and rapid soak. Detergent amounts vary by program, with recommendations for pre/main wash and rinse aid. Energy consumption ranges from 0.750 kWh to 1.650 kWh across different cycles. Water usage varies from 11 to 14.8 liters depending on the selected program. Running times for cycles can range from 30 minutes to over 200 minutes. The document emphasizes the importance of selecting the appropriate program based on the level of food residue.
- Page 46: Description of cycle includes energy consumption, water usage, and running time for various programs. The ECO program is designed to save energy and is the test cycle for comparability tests according to EN50242. Pre-rinsing of tableware is not recommended as it increases water and energy consumption. Using a household dishwasher typically consumes less energy and water than hand dishwashing when used correctly. To start a program, load the dishes in the baskets, pour in detergent, and ensure the water supply is on. Close the door and press the Power button, then choose a program and press Start/Pause to begin the cycle. A program can only be changed if it has been running for a short time; otherwise, the detergent may have been released. To reset the dishwasher, pause the washing by pressing the Start/Pause button. Make sure to refill the detergent dispenser if the program is changed mid-cycle. It is recommended to load the lower basket first, followed by the upper basket.
- Page 47: Press Program backward button more than three seconds to enter program selection mode. You can change the program forward or backward to the desired cycle setting. A forgotten dish can be added any time before the detergent dispenser opens. Press the Start/Pause button to pause the washing. After the spray arms stopped working, you can open the door completely. Add the forgotten dishes. Close the door. Press the Start/Pause button; the dishwasher will continue to run after 5 seconds. It is dangerous to open the door mid-cycle, as hot steam may scald you.
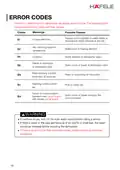
- Page 48: Error codes indicate malfunctions in the dishwasher. The dishwasher displays an error code when a malfunction occurs. E1 indicates issues with water intake or pressure. E3 signifies an overflow or leak in the dishwasher. E4 relates to a failure of the distributary valve. E8 suggests prolonged button pressing. E9 indicates a failure in the washing control system. Ec points to a PCB or motor failure. Ed signifies communication failure between circuit boards. Professional assistance is recommended for unresolved error codes.
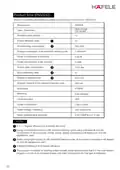
- Page 49: Height (H): 845mm Width (W): 598mm Depth (D1): 600mm (with the door closed) Depth (D2): 1175mm (with the door opened 90°)
- Page 50: Product fiche (EN50242) Sheet of household dishwasher according to EU Directive 1016/2010 & 1059/2010: Manufacturer: HAFELE Type / Description: HDW-F605B Energy efficiency class: A+ Annual energy consumption: 304 kWh Energy consumption of the standard cleaning cycle: 1,069 kWh Annual water consumption: 2744 liter Drying efficiency class: A Noise level: 47dB(A) Power consumption: 1760-2100W Rated voltage / frequency: 220-240V/50Hz
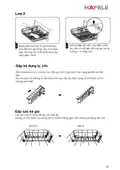
- Page 51: Hướng dẫn sử dụng máy rửa chén độc lập HDW-F605B. Các mã sản phẩm áp dụng: 535.29.660.
- Page 52: Máy rửa chén Hướng dẫn sử dụng Phiên bản phổ thông Vui lòng đọc kỹ hướng dẫn này trước khi sử dụng máy rửa chén và giữ lại hướng dẫn này để tham khảo sau này.
- Page 53: Mục lục Thông tin an toàn Tổng quan về sản phẩm Sử dụng máy rửa chén của bạn Nạp muối làm mềm nước vào bộ làm mềm nước Hướng dẫn sử dụng giỏ Bảo trì và vệ sinh Vệ sinh bên ngoài Vệ sinh bên trong Hướng dẫn xử lý sự cố Lưu ý: Xem lại phần hướng dẫn khắc phục sự cố sẽ giúp bạn tự mình giải quyết một số vấn đề thường gặp.
- Page 54: Thông tin an toàn Cảnh báo Khi sử dụng máy rửa chén, phải lưu ý đến các cảnh báo an toàn. Việc lắp đặt và sửa chữa chỉ có thể được thực hiện bởi kỹ thuật viên có trình độ. Thiết bị này được thiết kế để sử dụng trong gia đình và các mục đích sử dụng tương tự. Thiết bị này có thể được sử dụng bởi trẻ em từ 8 tuổi trở lên và những người bị suy giảm năng lực nếu họ được giám sát. Trẻ em không được chơi đùa với thiết bị. Trẻ em không được phép vệ sinh và bảo trì thiết bị nếu không được giám sát. Thiết bị này không dành cho những người bị suy giảm thể chất, giác quan hoặc tâm thần hoặc thiếu kinh nghiệm và kiến thức sử dụng.
- Page 55: Vật liệu đóng gói có thể gây nguy hiểm cho trẻ em. Thiết bị này chỉ dành để sử dụng trong nhà. Để bảo vệ khỏi nguy cơ bị điện giật, không nhúng thiết bị, dây hoặc phích cắm vào nước hoặc chất lỏng khác. Phải rút phích cắm trước khi vệ sinh và bảo trì thiết bị. Những thiết bị này phải được nối đất. Trong trường hợp xảy ra sự cố, nối đất sẽ giảm nguy cơ bị điện giật. Phích cắm phải được cắm vào ổ cắm thích hợp, được lắp đặt và nối đất theo tất cả các quy định và quy định của địa phương. Việc kết nối dây dẫn nối đất của thiết bị không đúng cách có thể dẫn đến nguy cơ bị điện giật. Không sửa đổi phích cắm đi kèm với thiết bị nếu phích cắm không vừa với ổ cắm. Không vận hành máy rửa chén của bạn trừ khi các nắp đậy được lắp đặt đúng chỗ.
- Page 56: Khi đưa bát đĩa vào, xác định vị trí đặt các vật sắc nhọn sao cho không có khả năng làm hỏng đệm cửa. Dao và các dụng cụ có đầu nhọn khác phải được xếp vào giỏ với đầu nhọn hướng xuống dưới hoặc đặt ở vị trí nằm ngang. Một số chất tẩy rửa máy rửa chén có tính kiềm mạnh. Nếu nuốt phải sẽ rất nguy hiểm. Tránh tiếp xúc với da và mắt và trẻ em phải tránh xa máy rửa chén. Kiểm tra xem nước rửa chén đã hết sau khi hoàn thành chu trình rửa hay chưa. Không rửa đồ dùng bằng nhựa trừ khi chúng được đánh dấu “dùng được trong máy rửa chén” hoặc tương đương. Đối với các đồ dùng bằng nhựa không được đánh dấu, phải kiểm tra khuyến nghị của nhà sản xuất. Chỉ sử dụng nước rửa chén và chất trợ xả được khuyến nghị sử dụng trong máy rửa chén tự động. Không bao giờ sử dụng xà phòng, nước rửa tay hoặc bột rửa tay trong máy rửa chén.
- Page 57: Nếu dây nguồn bị hỏng thì phải được thay thế bởi nhà sản xuất hoặc đại lý được ủy quyền hoặc người có trình độ chuyên môn để tránh nguy hiểm. Trong quá trình lắp đặt, dây điện không được uốn cong hoặc đè nén quá mức. Không được can thiệp vào hệ thống điều khiển. Thiết bị phải kết nối với van nước chính bằng ống mềm mới. Không được sử dụng ống cũ. Để tiết kiệm điện năng, ở chế độ chờ, thiết bị sẽ tự động tắt khi không hoạt động nào trong 30 phút. Số lượng chế độ cài đặt tối đa là 15. Áp lực nước đầu vào tối đa cho phép là 1MPa. Áp lực nước đầu vào tối thiểu cho phép là 0,04MPa.
- Page 58: Thải bỏ Để thải bỏ bao bì và thiết bị, vui lòng đến trung tâm tái chế. Hãy cắt cáp nguồn và làm cho thiết bị đóng cửa không thể sử dụng được. Bao bì các tông được sản xuất từ giấy tái chế và phải thải bỏ ở khu vực giấy tái chế. Đảm bảo sản phẩm thải bỏ đúng cách, bạn sẽ giúp ngăn ngừa những hậu quả tiêu cực tiềm ẩn đối với môi trường và sức khỏe con người. Để biết thêm thông tin chi tiết về việc tái chế sản phẩm này, vui lòng liên hệ với văn phòng thành phố địa phương. Không thải bỏ sản phẩm mà chưa phân loại. Cần phải thu gom riêng và xử lý bằng phương pháp đặc biệt theo quy định.
- Page 59: Tổng quan về sản phẩm Để máy rửa chén của bạn đạt hiệu suất tốt nhất, đọc tất cả hướng dẫn vận hành trước khi sử dụng lần đầu tiên. Cần phun ở trên Cần phun ở dưới Cụm lọc Ngăn chứa muối làm mềm nước Ngăn phân phối chất tẩy rửa Giá để dao kéo Giỏ trên Giỏ dưới Hình ảnh chỉ mang tính tham khảo, các model khác nhau có thể khác nhau.
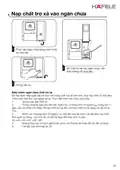
- Page 60: Sử dụng máy rửa chén của bạn Trước khi sử dụng máy rửa chén Cài đặt bộ làm mềm nước Nạp muối vào bộ làm mềm nước Đưa giỏ đựng vào Nạp chất tẩy rửa vào ngăn Nếu model của bạn không có bộ làm mềm nước, bạn có thể bỏ qua phần này. Luôn sử dụng đúng loại muối làm mềm nước dành cho máy rửa chén. Chỉ sử dụng muối chuyên dụng cho máy rửa chén. Chỉ đổ đầy muối trước khi chạy máy để rửa chén đĩa.
- Page 61: Vui lòng làm theo các bước dưới đây để thêm muối vào máy rửa chén. Tháo giỏ dưới và tháo nắp bình chứa. Đặt đầu phễu vào lỗ và đổ khoảng 1,5kg muối rửa chén vào. Đổ đầy nước vào ngăn chứa muối đến mức tối đa. Sau khi đổ đầy thùng chứa, vặn chặt nắp lại. Đèn cảnh báo muối sẽ ngừng sáng sau khi ngăn chứa muối đã được đổ đầy muối. Ngay sau khi đổ muối vào ngăn chứa muối, nên bắt đầu chạy máy. Ngăn chứa muối chỉ được đổ đầy lại khi đèn cảnh báo muối bật lên. Nếu muối bị đổ ra ngoài, hãy chạy chương trình ngâm hoặc chương trình nhanh để loại bỏ muối.
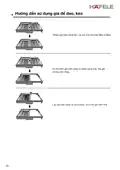
- Page 62: Hướng dẫn sử dụng giỏ Điều chỉnh giỏ trên Chiều cao của giỏ trên có thể dễ dàng điều chỉnh để phù hợp với chén đĩa ở vị trí cao hơn trong giỏ trên hoặc giỏ dưới. Để điều chỉnh chiều cao của giá trên, hãy làm theo các bước sau: Tháo giỏ trên. Kéo giỏ trên ra. Đẩy giỏ trên vào. Lắp lại giỏ trên vào con lăn trên hoặc dưới.
- Page 63: Để hạ thấp giỏ trên, hãy điều chỉnh tay cầm ở mỗi bên để nhả giỏ và hạ xuống vị trí thấp hơn. Nâng giỏ phía trên ở giữa mỗi bên cho đến khi giỏ khớp vào vị trí phía trên. Không cần thiết phải nâng tay cầm điều chỉnh. Để nhường chỗ cho những món đồ cao hơn ở giỏ trên, hãy nâng giá để cốc lên trên. Bạn cũng có thể tháo ra khi không cần thiết. Các gai của kệ dùng để giữ các loại đĩa. Chúng có thể được hạ xuống để có thêm không gian cho những đồ dùng lớn hơn. Nâng lên. Gấp lại.
- Page 64: Bảo trì và vệ sinh Vệ sinh bên ngoài Thường xuyên lau chùi các gioăng cửa bằng vải ẩm mềm để loại bỏ cặn thức ăn. Khi đưa bát đĩa, đồ dùng vào máy, cặn thức ăn và đồ uống có thể nhỏ giọt sang hai bên cửa máy rửa chén. Phải lau sạch cặn bả trước khi đóng lại. Bảng điều khiển Nếu cần vệ sinh, chỉ nên lau bảng điều khiển bằng vải mềm ẩm. Cảnh báo Để tránh nước xâm nhập vào khóa cửa và các thiết bị điện, không sử dụng bất kỳ loại chất tẩy rửa dạng xịt nào. Không bao giờ sử dụng chất tẩy rửa có tính ăn mòn hoặc miếng cọ rửa trên bề mặt bên ngoài. Hệ thống lọc Hệ thống lọc ở đáy máy giữ lại các mảnh vụn thô từ quá trình rửa. Kiểm tra các bộ lọc thường xuyên và làm sạch chúng nếu cần thiết bằng vòi nước chảy.
- Page 65: Lọc thô, lọc chính, lọc tinh. Bộ lọc mịn có thể được kéo ra khỏi phần dưới của cụm bộ lọc. Có thể tháo bộ lọc thô ra khỏi bộ lọc chính bằng cách bóp nhẹ các tab ở trên cùng và kéo ra. Giữ bộ lọc thô và xoay ngược chiều kim đồng hồ để mở khóa bộ lọc. Nhấc bộ lọc lên trên và tháo ra khỏi máy rửa chén. Thức ăn còn sót lại lớn có thể được làm sạch bằng vòi nước chảy. Để làm sạch kỹ hơn, hãy sử dụng bàn chải loại mềm. Lắp lại các bộ lọc theo thứ tự ngược lại khi tháo và xoay theo chiều kim đồng hồ đến mũi tên đóng. Không vặn chặt các bộ lọc quá mức. Không sử dụng máy rửa chén mà không có bộ lọc trên máy.
- Page 66: Cần phải vệ sinh cần phun thường xuyên vì hóa chất nước cứng sẽ làm tắc cần phun và vòng bi. Để làm sạch cần phun, hãy làm theo hướng dẫn dưới đây. Để tháo cần phun phía trên, hãy giữ yên đai ốc ở giữa và xoay cần phun ngược chiều kim đồng hồ để tháo ra. Để tháo cần phun phía dưới, kéo cần phun lên. Rửa cần phun bằng xà phòng và nước ấm rồi dùng bàn chải mềm để làm sạch vòi phun. Lắp lại sau khi rửa kỹ.
- Page 67: Bảo dưỡng máy rửa chén Đề phòng đóng băng Hãy thực hiện các biện pháp chống đóng băng trên máy rửa chén vào mùa đông. Ngắt nguồn điện của máy. Tắt nguồn cấp nước và ngắt đường ống cấp nước tại van. Xả nước từ đường ống vào và từ van nước. Sau mỗi lần rửa, hãy tắt nguồn cấp nước cho thiết bị và để cửa mở nhẹ để hơi ẩm và mùi hôi không bị đọng lại bên trong. Trước khi vệ sinh hoặc thực hiện bảo trì, luôn rút phích cắm ra khỏi ổ cắm. Không sử dụng môi hoặc chất tẩy rửa ăn mòn để làm sạch bên ngoài và các bộ phận cao su của máy rửa chén. Khi không sử dụng trong thời gian dài, bạn nên chạy máy không tải, sau đó rút phích cắm ra khỏi ổ cắm. Một trong những yếu tố hình thành mùi hôi trong máy rửa chén là thức ăn còn đọng lại trong các gioăng cửa.
- Page 68: Hướng dẫn lắp đặt Cảnh báo Nguy cơ điện giật Ngắt nguồn điện trước khi lắp đặt máy rửa chén. Việc lắp đặt đường ống và thiết bị điện phải được thực hiện bởi những người có chuyên môn. Để đảm bảo an toàn cá nhân: Không sử dụng dây nối dài hoặc phích cắm chuyển đổi với thiết bị này. Yêu cầu về điện: Xem nhãn thông số để biết điện áp định mức và kết nối máy rửa chén với nguồn điện thích hợp. Kết nối điện: Đảm bảo điện áp và tần số của nguồn điện tương ứng với điện áp trên nhãn thông số. Chỉ cắm phích cắm vào ổ điện đã được nối đất đúng cách. Nếu ổ cắm điện mà thiết bị kết nối không phù hợp với phích cắm, hãy thay ổ cắm thay vì sử dụng bộ chuyển đổi. Đảm bảo rằng đã có nối đất thích hợp trước khi sử dụng.
- Page 69: Cấp và thoát nước cho máy rửa chén Kết nối nước lạnh Nối ống cấp nước lạnh với đầu nối có ren 3/4 inch và đảm bảo lắp đặt đúng vị trí. Nếu đường ống nước mới hoặc chưa được sử dụng trong một thời gian dài, để nước chảy một lúc trước khi lắp. Biện pháp phòng ngừa này là cần thiết để tránh nguy cơ tắc nước đầu vào và làm hỏng máy. Ống cung cấp an toàn bao gồm hai lớp. Hệ thống ống mềm đảm bảo chặn dòng nước trong trường hợp ống cấp bị vỡ. Ống gắn vào vòi xịt bồn rửa có thể bị vỡ nếu được lắp đặt trên cùng đường nước với máy rửa chén. Nếu bồn rửa của bạn có vòi xịt, bạn nên ngắt ống và bịt lỗ lại. Bật nước hoàn toàn trước khi khởi động máy rửa chén. Tắt vòi nước trước khi rút ống cấp an toàn ra khỏi vòi.
- Page 70: Kết nối ống thoát nước. Lắp ống thoát nước mềm vào ống thoát nước có đường kính tối thiểu 4 cm hoặc để chảy vào bồn rửa, đảm bảo không bị cong, gấp mép. Chiều cao ống thoát nước phải nhỏ hơn 1000mm. Đầu tự do của ống không được ngâm trong nước để tránh nước chảy ngược. Cần phải xả nước thừa từ ống vào bát hoặc thùng chứa thích hợp được đặt bên ngoài và thấp hơn bồn rửa. Ống thoát nước phải được lắp đúng cách để tránh rò rỉ nước. Đảm bảo ống xả nước không bị xoắn hoặc bị đè bẹp. Nếu bạn cần nối dài ống thoát nước, phải đảm bảo loại ống tương tự. Ống không được dài quá 4 mét; nếu không hiệu quả làm sạch của máy rửa chén có thể bị giảm. Đường nối ống nước thải phải ở độ cao dưới 100 cm (tối đa) tính từ đáy máy.
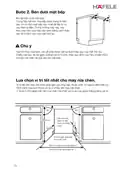
- Page 71: Định vị máy Đặt máy ở vị trí mong muốn. Mặt sau phải tựa vào bức tường phía sau và hai bên dọc theo tủ hoặc tường liền kề. Máy rửa chén được trang bị các ống cấp và xả nước có thể được đặt ở bên phải hoặc bên trái để thuận tiện cho việc lắp đặt. Cân bằng thiết bị Sau khi thiết bị được định vị để cân bằng, chiều cao của máy rửa chén có thể được thay đổi nhờ điều chỉnh mức vít của các chân. Trong mọi trường hợp, thiết bị không được nghiêng quá 2°. Lưu ý: Chỉ áp dụng cho máy rửa chén đứng tự do. Lắp đặt đứng tự do Chiều cao của máy rửa chén, 845 mm, được thiết kế để lắp máy giữa các tủ hiện có có cùng chiều cao trong nhà bếp. Chân có thể được điều chỉnh để đạt được chiều cao phù hợp. Mặt trên nhiều lớp của máy không cần chăm sóc đặc biệt vì nó có khả năng chịu nhiệt, chống trầy xước và chống bám bẩn.
- Page 72: Bên dưới mặt bếp. Khi lắp bên dưới mặt bếp. Chỉ có một mặt bếp duy nhất để lắp tủ và các thiết bị điện. Tháo mặt trên của máy rửa chén bằng cách tháo các vít ở cạnh sau. Sau khi tháo mặt trên, các vít phải được vặn lại dưới mép sau của mặt trên. Chiều cao sẽ giảm xuống còn 815 mm, theo quy định của Tiêu chuẩn (ISO). Lựa chọn vị trí tốt nhất cho máy rửa chén. Vị trí lắp đặt máy rửa chén phải gần các ống cấp, thoát nước và nguồn điện hiện có. Hình minh họa kích thước tủ và vị trí lắp đặt máy rửa chén. Không gian giữa đáy tủ và nền nhà đối với model 60cm là 600 mm.
- Page 73: Nếu máy rửa chén được lắp ở góc tủ, cần có khoảng trống khi mở cửa. Khoảng cách nhỏ nhất 50mm. Tùy thuộc vào vị trí ổ cắm điện, bạn có thể phải khoét một lỗ ở phía tủ đối diện.
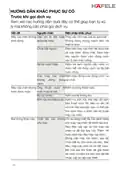
- Page 74: Hướng dẫn khắc phục sự cố Trước khi gọi dịch vụ, xem xét các hướng dẫn dưới đây có thể giúp bạn tự xử lý mà không cần phải gọi dịch vụ. Máy rửa chén không khởi động: Kiểm tra cầu chì bị đứt hoặc thay cầu chì hoặc bật lại aptomat. Đảm bảo máy rửa chén đã được bật và cửa được đóng chặt. Áp lực nước thấp: Kiểm tra xem nguồn cấp nước có được kết nối đúng cách và đã bật nước chưa. Đảm bảo đóng cửa đúng cách và không đóng không đúng cách. Ống thoát nước bị bơm được nước xoắn hoặc bị kẹt: Kiểm tra ống thoát nước. Bộ lọc bị tắc: Kiểm tra hệ thống lọc. Bồn rửa nhà bếp bị tắc: Kiểm tra bồn rửa nhà bếp để đảm bảo thoát nước tốt. Chất tẩy rửa không phù hợp: Chỉ sử dụng chất tẩy rửa dành riêng cho máy rửa chén để tránh tạo bọt. Nếu điều này xảy ra, mở máy rửa chén và để bọt bay hơi. Thêm 1 lít nước lạnh vào đáy máy rửa chén.
- Page 75: Vấn đề Nguyên nhân Biện pháp khắc phục Chất trợ xả bị tràn Luôn lau sạch chất trợ xả tràn ra ngay lập tức. Bên trong lồng rửa bị chất tẩy rửa có chất tạo màu. Màng trắng ở bề mặt khoáng chất nước. Tránh rửa các vật dụng không có khả năng chống ăn mòn trong máy rửa chén. Không chạy chương trình rửa mà không dùng bát đĩa sau khi thêm muối. Có tiếng gõ trong máy.
- Page 76: Vấn đề Nguyên nhân Biện pháp khắc phục Không đầy đủ chất tẩy Sử dụng nhiều chất tẩy rửa hơn Rửa hoặc thay chất tẩy rửa phù hợp. Các vật dụng đa dạng cảng trở chuyển độ ng của cần phun. Sắp xếp lại các vật dụng để cần phun có thể xoay tự do. Bát đĩa không sạch. Bộ lọc kết hợp khô ng sạch hoặc khô ng được.
- Page 77: Vấn đề Nguyên nhân Biện pháp khắc phục Bát đĩa không khô Chọn chương trình sai với chương trình ngắn, nhiệt độ rửa thấp hơn, làm giảm hiệu suất rửa. Chọn chương trình có thời gian rửa lâu. Sử dụng dao kéo có lớp phủ chất lỏng. Việc thoát nước khó khăn hơn với vật dụng này. Dao kéo hoặc bát đĩa loại này không thích hợp để rửa trong máy rửa chén.
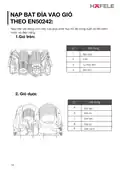
- Page 78: Nạp bát đĩa vào giỏ theo EN50242. Nạp đầy vật dụng cho máy rửa giúp phát huy tối đa công suất và tiết kiệm nước và điện năng. Giỏ trên bao gồm bát cơm, cốc, ly thủy tinh, và đĩa nhỏ. Giỏ dưới bao gồm đĩa sâu, bát mì, đĩa cạn, đĩa cá, và bát canh.
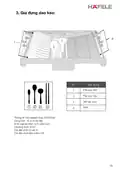
- Page 79: Giá đựng dao kéo Thông tin thử nghiệm theo EN 50242 Dung tích: 15 vị trí cài đặt Vị trí của giỏ trên: vị trí phía dưới Chương trình: ECO Cài đặt chất trợ xả: 6 Cài đặt muối làm mềm: H3 Thìa súp nhỏ Thìa súp vừa Môi lấy cơm
- Page 80: Hướng dẫn sử dụng giá để dao, kéo. Nhấc giỏ bên phải lên, cả giỏ trái và phải đều phẳng. Di chuyển giỏ bên phải từ phải sang trái, hai giỏ chồng lên nhau. Lấy giỏ bên phải ra khỏi khay, chỉ còn giỏ bên trái.
- Page 81: Máy rửa chén Hướng dẫn sử dụng Phiên bản đặc biệt Vui lòng đọc kỹ hướng dẫn này trước khi sử dụng máy rửa chén và giữ lại hướng dẫn này để tham khảo sau này.
- Page 82: Mục lục Sử dụng máy rửa chén của bạn Bảng điều khiển Bộ làm mềm nước Chuẩn bị và sắp xếp bát đĩa vào máy Chức năng chất trợ xả và chất tẩy rửa Nạp chất trợ xả vào ngăn chứa Nạp chất tẩy rửa vào ngăn chứa Chọn chương trình Bảng chu kỳ rửa Lưu ý: Nếu bạn không thể tự mình giải quyết vấn đề, phải nhờ kỹ thuật viên chuyên nghiệp hỗ trợ.
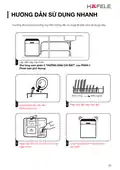
- Page 83: Hướng dẫn sử dụng nhanh Vui lòng đọc nội dung tương ứng trên hướng dẫn sử dụng để biết cách sử dụng máy. Lắp đặt máy rửa chén Nạp bát đĩa vào các giỏ. Loại bỏ cặn lớn trên đĩa. Không rửa trước. Nạp chất tẩy rửa và chất trợ xả vào ngăn chứa. Chọn chương trình và chạy máy rửa chén.
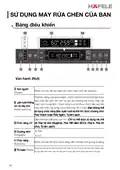
- Page 84: Sử dụng máy rửa chén của bạn Bảng điều khiển Vận hành (Nút) Nhấn nút này để bật máy rửa chén, màn hình sẽ sáng lên. Chức năng lưu trữ có thể đạt được hiệu quả sấy khô tốt hơn và giữ cho không khí trong máy rửa chén luôn trong lành. Chức năng lưu trữ được thực hiện sau khi máy rửa chén rửa xong và có thể chạy tới 72 giờ. Bạn không thể sử dụng chức năng bảo quản tươi và khô khi chọn chương trình rửa nhanh hoặc rửa ngâm, tự làm sạch. Làm tươi không khí và sấy khô. Diệt vi khuẩn bằng tia cực tím. Chức năng UV độ rửa vệ sinh, rửa tiết kiệm, rửa ly, rửa 90 phút, tự làm sạch. Nhấn nút này để chọn chức năng, đèn chỉ báo tương ứng sẽ sáng. Nhấn nút này để cài đặt độ trễ khi rửa. Bạn có thể trì hoãn việc bắt đầu rửa lên đến 24 giờ.
- Page 85: Tùy chọn này cho phép bạn khóa các nút trên bảng điều khiển để trẻ em không thể vô tình khởi động máy rửa chén. Để khóa hoặc mở khóa các nút trên bảng điều khiển, nhấn và giữ đồng thời nút Alt + Delay trong 3 giây. Khóa trẻ em (Child lock). Để khởi động chương trình rửa đã chọn hoặc tạm dừng khi máy rửa chén đang hoạt động. Nếu đèn báo “Chất trợ xả” sáng nghĩa là máy rửa chén sắp hết chất trợ xả và cần nạp thêm. Nếu đèn báo “Muối” sáng lên, điều đó có nghĩa là máy rửa chén sắp hết muối và cần nạp thêm. Nếu đèn báo “Vòi nước” sáng nghĩa là vòi nước đã đóng.
- Page 86: Để hiển thị chương trình nào đã được chọn, nhiệt độ thời gian thực và thời gian còn lại, v.v. Chương trình: Rửa Tự động (Auto) Cảm biến tự động rửa sạch đồ sành sứ bị bẩn nhẹ, bình thường hoặc nặng, có hoặc không có thức ăn khô. Rửa Vệ sinh (Hygiene) Sử dụng để vệ sinh bát đĩa và đồ thủy tinh của bạn. Nhiệt độ nước cao nhất là 72°C. Rửa Tiết kiệm (ECO) Đây là chương trình tiêu chuẩn, phù hợp để rửa vật dụng bị bẩn thông thường và là chương trình hiệu quả nhất xét về mức tiêu thụ năng lượng và nước. Rửa ly (Glass) Dùng cho bát đĩa và ly cốc bị bẩn nhẹ. Rửa 90 phút (90 min) Dành cho đồ bẩn thông thường cần rửa nhanh. Rửa Nhanh (Rapid) Thời gian rửa ngắn hơn cho đồ dùng ít bẩn và không cần sấy khô. Rửa Ngâm (Soak) Để ngâm bát đĩa trước khi rửa. Tự làm sạch (Self-cleaning) Chương trình này cung cấp khả năng làm sạch máy rửa chén hiệu quả.
- Page 87: Rửa nửa tải trên (Upper) Khi bạn chọn Upper, chỉ có cần phun của giá trên được kích hoạt. Cần phun phía dưới sẽ không hoạt động. Rửa nửa tải dưới (Lower) Khi bạn chọn Lower, chỉ có cần phun của giá dưới được kích hoạt. Cần phun phía trên sẽ không hoạt động. Đèn chỉ báo chức năng làm tươi không khí và sấy khô (Fresh & Dry) Giữ cho không khí trong lành và khô trong suốt 72 giờ. Bạn không thể sử dụng chức năng Bảo quản tươi và khô khi chọn chương trình Rửa Nhanh hoặc Rửa Ngâm, Tự làm sạch. Chức năng UV Sử dụng để vệ sinh, diệt khuẩn bát đĩa và đồ thủy tinh. Khi biểu tượng sáng lên nghĩa là đèn UV đang hoạt động. Tăng tốc độ rửa (Turbo speed+) Giảm thời gian chương trình. (Chỉ có thể được sử dụng với chế độ Rửa Vệ sinh (Hygien), Rửa tiết kiệm ECO, Rửa ly, Rửa 90 phút). Làm khô tăng cường (Extra drying) Để làm khô bát đĩa kỹ hơn. (Chỉ có thể được sử dụng với chế độ Rửa Vệ sinh (Hygien), Rửa tiết kiệm ECO, Rửa ly, Rửa 90 phút). Ghi chú: Công nghệ bảo quản và sấy khô bằng không khí nóng có thể làm khô bát đĩa, dụng cụ một cách nhanh chóng. Trong quá trình vận hành có thể có những giọt nước hoặc hơi nước ở cửa thoát khí. Đây là hiện tượng bình thường.
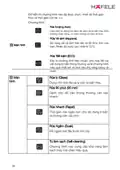
- Page 88: Bộ làm mềm nước phải được cài đặt thủ công sử dụng nút xoay độ cứng của nước. Bộ làm mềm nước được thiết kế để loại bỏ các khoáng chất và muối khỏi nước, những chất này có thể có tác động bất lợi hoặc có hại đến hoạt động của máy. Càng có nhiều khoáng chất thì nước của bạn càng cứng. Bộ làm mềm phải được điều chỉnh theo độ cứng của nước ở khu vực của bạn. Cơ quan cấp nước địa phương có thể tư vấn cho bạn về độ cứng của nước ở khu vực của bạn. Máy rửa chén được thiết kế để cho phép điều chỉnh lượng muối tiêu thụ dựa trên độ cứng của nước sử dụng. Vui lòng làm theo các bước dưới đây để điều chỉnh lượng muối tiêu thụ. Nhấn nút chương trình (Program) trong hơn 5 giây để vào chế độ cài đặt bộ làm mềm nước. Nhấn nút Power để kết thúc chế độ cài đặt. Cài đặt gốc: H3.
- Page 89: Vui lòng kiểm tra phần 3 “Nạp muối vào bộ làm mềm nước” của PHẦN I. Nếu model của bạn không có thiết bị làm mềm nước, bạn có thể bỏ qua phần này. Độ cứng của nước thay đổi tùy theo từng nơi. Nếu sử dụng nước cứng trong máy rửa chén, cặn sẽ hình thành trên bát đĩa và đồ dùng. Thiết bị được trang bị một bộ làm mềm nước sử dụng ngăn chứa muối được thiết kế đặc biệt để loại bỏ vôi và khoáng chất khỏi nước. Cân nhắc khi mua đồ dùng để rửa bằng máy rửa chén. Đối với các đồ dùng cụ thể, hãy chọn chương trình có nhiệt độ thấp nhất có thể. Để tránh hư hỏng, không lấy ly và dao kéo ra khỏi máy rửa chén ngay sau khi chương trình kết thúc. Một số loại kính có thể bị xỉn màu sau nhiều lần rửa. Các đồ dùng bằng bạc và nhôm có xu hướng đổi màu sau khi rửa.
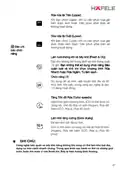
- Page 90: Khuyến nghị khi xếp đồ dùng vào máy rửa chén. Cạo bỏ lượng lớn thức ăn thừa. Để máy rửa bát hoạt động tốt nhất, hãy làm theo các hướng dẫn sắp xếp bát đĩa sau. Đặt đồ dùng vào máy rửa chén theo cách sau: Các vật dụng như cốc, ly, nồi/chảo, v.v. được đặt hướng xuống dưới. Tất cả các đồ dùng được xếp chồng lên nhau một cách an toàn và không để lật. Xếp các vật dụng rỗng như cốc, ly, chảo, v.v. với lỗ mở hướng xuống dưới để nước không thể đọng lại. Bát đĩa và dao kéo không được nằm chồng lên nhau. Giỏ phía trên được thiết kế để đựng những đồ dùng nhẹ hơn như ly, tách cà phê và trà. Để tránh hư hỏng, không lấy ly và dao kéo ra khỏi máy rửa chén trong khoảng 15 phút sau khi kết thúc rửa.
- Page 91: Sắp xếp bát đĩa, vật dụng vào giỏ trên. Giỏ phía trên được thiết kế để đựng những đồ dùng nhỏ và nhẹ. Đặt vật dụng sao cho không di chuyển khi máy chạy. Sắp xếp bát đĩa, vật dụng vào giỏ dưới. Nên đặt những vật dụng lớn và khó làm sạch vào giỏ dưới. Tốt nhất nên đặt đĩa và vung ở phía cạnh giá đỡ. Đường kính tối đa được khuyên dùng cho các đĩa ở phía trước là 19 cm. Dao kéo phải được đặt trong giỏ dao kéo tách biệt với nhau. Không xếp chồng dao kéo để tránh làm giảm hiệu suất làm sạch. Đừng để lưỡi dao kéo nhô ra khỏi giỏ.
- Page 92: Chức năng của chất trợ xả và chất tẩy rửa Chất trợ xả được giải phóng trong lần xả cuối cùng để ngăn nước hình thành các giọt trên bát đĩa. Chất trợ xả cũng giúp cải thiện khả năng sấy khô nhờ các giọt nước lăn ra khỏi bát đĩa. Chỉ sử dụng nước trợ xả có thương hiệu cho máy rửa chén. Không bao giờ đổ bất kỳ chất nào khác vào ngăn chứa chất trợ xả. Tần suất đổ nước trợ xả phụ thuộc vào tần suất rửa bát đĩa và chế độ cài đặt chất trợ xả. Đèn chỉ báo chất trợ xả ở mức thấp sẽ xuất hiện trên màn hình khi cần thêm chất trợ xả. Chức năng của chất tẩy rửa Các thành phần hóa học có trong chất tẩy rửa cần thiết để loại bỏ, nghiền nát và đánh bay mọi chất bẩn ra khỏi máy rửa chén. Chỉ sử dụng chất tẩy rửa được sản xuất riêng cho máy rửa chén. Không cho chất tẩy vào ngăn chứa cho đến khi bạn sẵn sàng rửa chén. Chất tẩy rửa máy rửa chén có tính ăn mòn.
- Page 93: Nạp chất trợ xả vào ngăn chứa. Tháo nắp ngăn chứa bằng cách nhấc tay cầm lên. Đổ chất trợ xả vào ngăn chứa, cẩn thận không đổ quá đầy. Đóng nắp lại. Điều chỉnh ngăn chứa chất trợ xả để đạt được hiệu suất sấy tốt hơn với lượng chất trợ xả hạn chế. Đóng cửa, bật thiết bị. Trong vòng 60 giây sau khi bật, nhấn nút chương trình trong hơn 5 giây. Nhấn nút chương trình một lần nữa để chọn cài đặt phù hợp theo thói quen sử dụng. Các chế độ cài đặt sẽ thay đổi theo trình tự: d3->d4->d5->d1->d2->d3. Cài đặt của nhà máy là: d3.
- Page 94: Nạp chất tẩy rửa vào ngăn chứa. Thêm chất tẩy rửa vào khoang lớn cho chu trình rửa chính. Để có kết quả rửa tốt hơn, hãy đổ một lượng nhỏ chất tẩy rửa lên cửa. Chất tẩy rửa bổ sung sẽ được sử dụng trong giai đoạn rửa sơ bộ. Hãy chọn một cách mở theo tình hình thực tế. Mở nắp bằng cách trượt chốt mở. Mở nắp bằng cách nhấn chốt mở xuống. Đóng nắp bằng cách trượt nắp về phía trước rồi ấn xuống. Tuân thủ khuyến nghị của nhà sản xuất trên bao bì chất tẩy rửa.
- Page 95: Lựa chọn chương trình Bảng chế độ rửa Bảng dưới đây cho biết chương trình nào phù hợp nhất với mức độ tồn dư thức ăn và lượng chất tẩy rửa cần thiết. Giá trị tiêu thụ và thời lượng chương trình chỉ mang tính tham khảo ngoại trừ chương trình ECO. Chương trình mô tả chu trình rửa. Chất tẩy rửa. Thời gian. Điện năng. Nước. Chất giải đoạn rửa sơ.
- Page 96: Rửa sơ bộ Rửa (60°C) Xả Xả (70°C) Sấy Lưu ý: ECO là chu trình kiểm tra. Thông tin để kiểm tra khả năng tương thích tuân thủ EN 50242. Tiết kiệm điện năng: Rửa trước bát đĩa sẽ làm tăng mức tiêu thụ nước và điện năng và không khuyến khích bước này. Rửa bát đĩa bằng máy rửa chén gia đình thường tiêu tốn ít điện năng và nước hơn so với rửa bằng tay nếu làm đúng theo hướng dẫn. Khởi động một chương trình rửa: Kéo giỏ dưới và giỏ trên ra, xếp bát đĩa vào và đẩy vào. Đổ chất tẩy rửa vào. Cắm phích cắm vào ổ cắm. Đảm bảo rằng nguồn cấp nước được bật ở mức áp suất tối đa. Đóng cửa lại, nhấn nút Power để bật máy. Chọn chương trình, đèn phản hồi sẽ sáng. Nhấn nút Start/Pause, máy rửa chén sẽ bắt đầu chạy. Thay đổi chương trình giữa chu trình rửa: Chỉ có thể thay đổi chương trình nếu vừa chạy trong một khoảng thời gian ngắn. Nhấn nút Start/Pause để tạm dừng quá trình rửa. Nhấn nút lùi chương trình (Program) hơn 3 giây, máy sẽ ở chế độ lựa chọn.
- Page 97: Quên thêm bát đĩa có thể được thêm vào bất cứ lúc nào trước khi ngăn chứa chất tẩy rửa mở ra. Nhấn nút Start/Pause để tạm dừng quá trình rửa. Sau khi cần phun ngừng, bạn có thể mở cửa hoàn toàn. Thêm bát đĩa bị quên. Đóng cửa. Nhấn nút Start/Pause, máy rửa chén sẽ tiếp tục chạy sau 5 giây. Mở cửa giữa chu kỳ sẽ rất nguy hiểm vì hơi nước nóng có thể làm bạn bị bỏng. Sau khi rửa, cửa sẽ tự động mở để đạt hiệu quả sấy tốt hơn nếu chức năng này được chọn. Cửa máy rửa chén không để bị chặn khi cài đặt ở chế độ mở tự động vì có thể làm gián đoạn chức năng của cửa.
- Page 98: Mã lỗi Nếu có sự cố, máy rửa chén sẽ hiển thị mã lỗi. Bảng sau đây hiển thị các mã lỗi có thể xảy ra và nguyên nhân. E1: Thời gian cấp nước lâu. Vòi không được mở hoặc lượng nước vào hạn chế hoặc áp lực nước quá thấp. E3: Bộ gia nhiệt nước bị sự cố. E4: Không đạt nhiệt độ yêu cầu. E8: Lỗi định hướng của van phân phối. E9: Tiếp tục nhấn một nút có nước hoặc vật thể lạ xâm nhập vào trong hơn 30 giây. Ec: Hệ thống điều khiển máy lỗi. Ed: Lỗi giao tiếp giữa bo mạch chính với bo mạch hiển thị. Cảnh báo Nếu xảy ra tràn nước, phải tắt nguồn cấp nước chính trước khi gọi dịch vụ. Nếu có nước trong bình hứng nước tràn do đổ đầy hoặc rò rỉ nhỏ, cần xả nước trước khi khởi động lại máy rửa chén. Nếu có mã lỗi không thể khắc phục được, yêu cầu chuyên gia hỗ trợ.
- Page 99: Thông số kỹ thuật bao gồm chiều cao, chiều rộng và chiều sâu. Chiều cao (H) là 845mm. Chiều rộng (W) là 598mm. Chiều sâu (D1) là 600mm khi cửa đóng. Chiều sâu (D2) là 1175mm khi cửa mở 90°.
- Page 100: Thông tin sản phẩm (EN50242) Máy rửa bát gia dụng tuân theo Chỉ thị EU 1016/2010 và 1059/2010. Nhà sản xuất: HAFELE. Loại/Mô tả: HDW-F605B. Tiêu thụ điện năng hàng năm: 304 kWh. Tiêu thụ điện năng một chu trình rửa tiêu chuẩn: 1,069 kWh. Lượng nước tiêu thụ hàng năm: 2744 lít. Chương trình rửa tiêu chuẩn: ECO 53°C. Thời lượng chương trình của chương trình rửa tiêu chuẩn: 200 phút. Độ ồn: 47 dB(A). Công suất tiêu thụ: 1760-2100 W.
- Page 101: Page 101

FISHER and PAYKEL DD60STI9 Tail Dishwasher

FISHER PAYKEL DD60DAX9 Dishwasher

LG SDWB24S3 STUDIO Smart Dishwasher

JENNAIR JDPSS246LL Dishwasher

FISHER PAYKEL DD24SHTI9 N Dishwasher

BOSCH SME26EX00E Dishwasher

FISHER PAYKEL DD24DHTI9 N Integrated Double Dishwasher

FISHER and PAYKEL DD60ST4ZB9 Dishwasher

VALBERG 14S40 B WAD929C Dishwasher

IKEA LAGAN Integrated Dishwasher