
LG SDWB24S3 STUDIO Smart Dishwasher







Scan to see the online manual.
OWNER'S MANUAL
DISHWASHER
Read this owner's manual thoroughly before operating the
appliance and keep it handy for reference at all times.
ENGLISH
SDWB24**
MFL71917418
Rev.00_021523
Copyright © 2023 LG Electronics Inc. All Rights Reserved.


| General | Details |
|---|---|
| Name | LG SDWB24S3 STUDIO Smart Dishwasher |
| Make | LG |
| Language | English |
| Filetype | PDF (Download) |
| File size | 4.9 MB |
 (1 votes, average: 5.00 out of 5)
 Loading...

LG LDTH7972SS Black Dishwasher

LG LDTH7972D Smart Tub Dishwasher

LG LDPH7972D Smart Dishwasher

LG XD3A25UMB 15 Place QuadWash Dishwasher

LG LDT779 Dishwasher

LG LDT7808BD Dishwasher

LG LDFN4542S Dishwasher

LG DFB424 Dishwasher

LG LDTS5552D PrintProof Black Dishwasher

LG LDPH7972S Smart Dishwasher
LG SDWB24S3 STUDIO Smart Dishwasher Overview
Summary of Contents
- Page 1: Owner's manual for the dishwasher. Read this owner's manual thoroughly before operating the appliance. Keep it handy for reference at all times. Model SDWB24**. Copyright © 2023 LG Electronics Inc. All rights reserved.
- Page 2: Important safety instructions should be read before use. The document includes warning and caution statements. Product overview provides essential features. Installation section covers steps before installing the dishwasher. Preparing the cabinet opening is crucial for proper fit. Water and electrical connections must be set up correctly. Sliding the dishwasher into the cabinet opening is a key step. Connecting the water supply line and power is necessary for operation. Leveling the dishwasher ensures optimal performance. Final installation check is important before use.
- Page 3: IMPORTANT SAFETY INSTRUCTIONS READ ALL INSTRUCTIONS BEFORE USE Your safety and the safety of others are very important. Always read and follow all safety messages. This is the safety alert symbol. This symbol alerts you to potential hazards that can kill or injure you and others. WARNING: You may be killed or seriously injured if you do not follow instructions. CAUTION: You may be injured or cause damage to the product if you do not follow instructions. To reduce the risk of explosion, fire, death, electric shock, scalding or injury to persons when using this product, follow basic precautions. The appliance must be installed and electrically grounded by qualified service personnel in accordance with local codes.
- Page 4: IMPORTANT SAFETY INSTRUCTIONS When installing or moving the appliance, be careful not to pinch, crush, or damage the power supply line. Do not install the appliance in humid spaces. Destroy the carton, plastic bag, and other packing materials after the appliance is unpacked. Never attempt to operate this appliance if it is damaged, malfunctioning, partially disassembled, or has missing or broken parts. Use new hoses when connecting the appliance to the water supply. Do not reuse old hoses. If you detect a strange sound, a chemical or burning smell, or smoke coming from the appliance, unplug it immediately. Do not use an extension cable or adapter with this appliance. This appliance is not intended for use by persons with reduced physical, sensory or mental capabilities unless supervised. Read all instructions before using the appliance and save these instructions. Under certain conditions, hydrogen gas may be produced in a hot-water system that has not been used for two weeks or more.
- Page 5: IMPORTANT SAFETY INSTRUCTIONS Fix the drain hose securely in place. Use only detergents or wetting agents recommended for use in a dishwasher and keep them out of the reach of children. Do not let children eat detergent or dishwasher rinse agent. When loading items to be washed, locate sharp items so that they are not likely to damage the door seal. Do not wash plastic items unless they are marked dishwasher safe or the equivalent. Do not touch the heating element during or immediately after use. Do not operate your dishwasher unless all enclosure panels are properly in place. Do not open the appliance door while it is operating. Do not plug the dishwasher into a damaged outlet. Disconnect this appliance from the power supply before cleaning and attempting any user maintenance.
- Page 6: IMPORTANT SAFETY INSTRUCTIONS Connect the ground wire to the green ground connector in the terminal box. Do not use the dishwasher until completely installed. Do not push down on the open dishwasher door. Failure to follow these instructions may result in serious injury or cuts. To reduce the risk of minor or moderate injury to persons, malfunction, or damage to the product or property when using this product, follow basic precautions. Install the product on a firm and level floor. This dishwasher must be connected to a hot water supply with a temperature range between 120 °F (49 °C) and 149 °F (65 °C). Do not place objects on top of the appliance. Turn off the water faucets and unplug the appliance if it is to be left for an extended period of time. If cooking oil is spilled on the exterior of the product, wipe it off immediately.
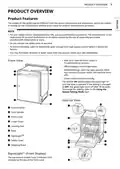
- Page 7: Product overview The images in this guide may be different from the actual components and accessories, which are subject to change by the manufacturer without prior notice for product improvement purposes. For your safety and for extended product life, use only authorized components. The manufacturer is not responsible for product malfunction or accidents caused by the use of separately purchased unauthorized components or parts. Do not remove the safety cover at any time. To ensure reliability, each LG dishwasher goes through thorough quality control before it leaves the factory. You may find water droplets or water spots from this process inside your new dishwasher. Red: Error (See the Error Codes in Troubleshooting section.) White (steady): Normal operation. White (blinking): Cycle has been paused. Green: Cycle finished normally. The top-control models have 3 indicator LEDs centered at the top of the front cover.
- Page 8: Product overview Top wash impeller Upper spray arm Heat dry blower Detergent and rinse aid dispenser Drying vent cover Filtration system Steam nozzle The appearance and specifications listed in this manual may vary due to constant product improvements. Remove all packing materials from the exterior and interior of the dishwasher before installing the appliance.
- Page 9: Before installing, refer to the owner's manual supplied with each dishwasher for complete installation instructions. Electrical cable should be 16 AWG, with 2 conductors and 1 ground. Use a minimum 3/8″ O.D. copper tubing or stainless steel braided water supply line. Tools needed for installation are specified. This guide is strictly confidential and shall not be copied or distributed without prior written authorization. The guide may contain inaccuracies and/or typographical errors and may be changed or updated at any time without notice. Parts not provided are listed.
- Page 10: Installation Securing dishwasher in cabinet opening Final installation check Product dimensions For easiest installation, see marked areas for water and electrical clearances in base of dishwasher. Please read the following installation instructions first after purchasing this dishwasher or transporting it to another location. Preparing cabinet opening This dishwasher is designed to fit a standard dishwasher opening. An opening may be needed on both sides to route plumbing and electrical connections. Leveling dishwasher
- Page 11: Installation To ensure proper drainage, install the dishwasher no more than 12 ft. (3.65 m) from the sink. The location must have sufficient space for the dishwasher door to open easily and provide at least 0.1” (2 mm) between the dishwasher and the cabinet sides. If installing the dishwasher in a corner, leave a minimum of 2” (50 mm) between the dishwasher and the adjacent wall. Installation damage is not covered by the warranty, and leaks caused by improper installation may result in property damage. The adjacent wall must be free of obstructions. For flush installations only, you may remove the cabinet brace inside the cabinet. Do not use existing holes unless they are in the target area. Failure to properly locate the hole for the water and drain lines may prevent the dishwasher from installing flush with the cabinets and could result in kinked, pinched, crushed, stressed or damaged lines. Select a location as close to the sink as possible for easy connections to water supply line, drain hose and electrical connection. Do not reuse an old hose. Use only a new hose when installing the dishwasher.
- Page 12: Installation Run the water supply line along the floor 6 1/2 – 7 3/4 from the left side of the opening and tape it in place. Do not use an extension cable or adapter with this dishwasher. Run the electrical cable along the floor 14 – 16 from the water supply line and tape it in place. The electrical outlet must be within 4 ft. of either side of the dishwasher. When connecting the dishwasher water supply line to the house water supply, sealing tape or compound should be used on pipe threads to avoid leaks. Connect the dishwasher to a hot water supply with a temperature range between 120 °F and 149 °F. Water supply pressure must be between 20 psi and 80 psi. Do not remove safety cover. Removal can result in fire, electric shock or death. There are 2 channels in the bottom of the dishwasher for routing the water and electrical connections. Turn off the house water supply and the circuit breaker or dedicated power before connecting the dishwasher.
- Page 13: Installation The rear shipping brace can be removed if additional clearance is needed when installing the dishwasher under a low countertop. Remove all packing materials from the interior of the dishwasher before installing the appliance. For countertops made of wood or other materials that will not be damaged by drilling, use the metal installation brackets provided. If you lay the dishwasher on its back, do so carefully to avoid damaging the drain hose and the tub. For countertops made of granite, marble, or other materials that could be damaged by drilling, use the wood screws to attach the dishwasher to the cabinet. Installation brackets and screws can be found in the silverware basket. Remove the screws at either side which attach the lower cover to the dishwasher. Insert the tabbed end of the installation brackets into the slots in the upper frame. Bend the tabs on the brackets to secure them to the frame using a pair of needle nose pliers.
- Page 14: Installation Open the door and grab the body frame and the top front opening of the tub to move or lift the dishwasher. Align the dishwasher with the opening. Make sure the water supply line and electrical cable are in the correct positions to slide into their channels properly. Do not pull or lift the dishwasher using the handle. Doing so can damage the door and hinges. Do not push the door of the dishwasher with knees when sliding the dishwasher into position. Doing so can damage the front cover. Smooth out or pad the edges of the hole drilled for the water supply to avoid damaging the drain hose. Make sure the drain hose is straight before feeding the end of it through the hole for the water supply. As you slide the dishwasher into the opening, slowly pull on the drain hose from inside the cabinet to take up some slack. Be careful not to kink, pinch, crush or stress the drain hose during installation to avoid leaking and water damage.
- Page 15: Installation Connecting water supply With the home water supply turned off, connect the water supply line to the inlet valve on the left front of the dishwasher. Gradually slide the dishwasher into the opening, ensuring that the water supply line and electrical cable pass freely through the channels. Tape or compound should not be used on the dishwasher inlet valve. To avoid malfunctions or leakage, it is important that the drain hose not get kinked, pinched, stressed, or crushed. Damage resulting from improper installation is not covered under the warranty. The dishwasher should have a dedicated properly grounded branch circuit to connect the 3 wire setup which includes the ground wire. Remove the tape from the water supply line and the electrical cable. If a 3-prong power supply is used, it should be in an accessible location adjacent to the dishwasher within 4 ft. of the dishwasher side.
- Page 16: Installation instructions include inserting a strain relief through the junction box and securing it with a ring nut. The best location for the electrical conduit is on the right side of the back wall. Turn off electrical power to the unit at the circuit breaker before starting. Remove the screw from the junction box cover using a Phillips screwdriver. Insert the electrical cable through the strain relief and secure it with screws. Pull the existing wires through the junction box openings and reassemble it in the appliance. Pair the white, black, and green wires with the matching colored wires from the dishwasher and secure them with wire nuts.
- Page 17: Installation For drain hose installation, use the screw style hose clamp provided with this dishwasher in the silverware basket. If connecting the dishwasher’s drain hose to the garbage disposal, be sure to follow your garbage disposal’s manual for proper installation instructions. Drain hose requirements include following local codes and ordinances. Wrap electrical tape around each connection. Do not exceed 12 ft. (3.65 m) distance to drain. Do not connect drain hoses from other appliances to the dishwasher’s drain hose. If an extension drain hose is required, use a 5/8 or 7/8 inside diameter, 2-3 ft. length hose and a coupler for connecting the two hose ends. The height of the drain hose end must be at least 12 (305 mm) and within 40 (1016 mm) from the base of the dishwasher to avoid water being siphoned from the tub. Verify that the black wire is hot (120 V). If not, or if you are unsure of the power supply, have it checked by a licensed electrician. Do not leave stripped wire exposed. Trim stripped wire to fit completely inside wire nuts.
- Page 18: Installation Remove the knockout plug from the disposal. Attach the drain hose to the waste tee with the hose clamp provided. If the knockout plug has not been removed, the dishwasher will not be able to drain properly. Connect the end of the drain hose to the air gap with the hose clamp provided. This avoids water being siphoned from the tub. The height of the drain hose end must be at least 12” (305 mm) and within 40” (1016 mm) from the base of the dishwasher to avoid water being siphoned from the tub. Check that the dishwasher is level and adjust the leveling feet if necessary. Failure to level the dishwasher may result in leakage, problems closing the door, or noise. The dishwasher must be carefully leveled and aligned where the cabinet opening is narrower than recommended.
- Page 19: Installation The dishwasher must be supported fully by the leveling feet and not hanging from the installation brackets. Failure to properly level the dishwasher can result in leaks, AE errors, difficulty in closing the door, or failure to operate. Adjusting front leveling feet can be done using a flat-blade screwdriver to turn the feet. To check that the tub is level, pour 169 oz. (5 L) of water into the bottom of the tub. The water level should be near the center of both tub lower indentations at the front. When a flat-blade screwdriver is unavailable, use a 1/4 or 3/8 square drive wrench with a 1/2 socket. To check the dishwasher is level from side to side, place a level on the inside wall of the tub. Use a Phillips screwdriver to adjust the rear leveling foot using the center screw at the base of the appliance. Ensure the gap between the tub walls and the door liner is the same on either side. Adjust the front and rear leveling feet until they are all in firm contact with the floor.
- Page 20: Installation Securing dishwasher in cabinet opening There are 2 options for securing the dishwasher. If the countertop is made of wood, secure the dishwasher to the countertop with the provided brackets. If the countertop is granite or a material that cannot be drilled into, secure the dishwasher to the cabinet frame with the provided wood screws. Ensure the dishwasher is level and all leveling feet are in firm contact with the floor before attaching. Installation brackets and screws can be found in the silverware basket. If your model shipped with a sound insulation sheet, follow the instructions provided to install it now. Use a magnetic screwdriver. Cover the filter hole with towels to prevent screws from falling into the pump. Check if the dishwasher is properly installed. Make sure that the door opens and closes smoothly.
- Page 21: Installation instructions emphasize the importance of removing all packaging materials. Error code OE indicates potential issues such as a kinked or pinched drain hose. Ensure the drain and water supply hoses are properly fed through the hole under the sink to avoid kinking. Check that the drain hose is not connected to the disposal without removing the knockout plug. Power on the dishwasher and run a 1-hour cycle to verify proper operation. Inspect for leaks at the drain hose and water supply connection. If a leak is detected, cancel the wash cycle and drain the water from the dishwasher. Only install the lower cover provided with the dishwasher to prevent noise and leakage. Turn on the water faucet to ensure proper water supply. Remove any protective film from the door to avoid discoloration or condensation.
- Page 22: Before using the appliance, read the safety instructions to reduce the risk of fire, electric shock, or injury. Connect to the hot water supply only, with a minimum water temperature of 120 °F for better washing performance. Follow the instructions for loading the dishwasher to ensure effective cleaning. Remove insoluble items such as bones and pieces of paper while loading. Select the cycle and options that best fit the load by referring to the cycle guide. Load the dishes by pulling each rack out and ensuring only dishwasher-safe items are loaded. Scrape dishes free of excess food and remove solid, burned-on scraps before loading. Press the Start button and close the door within four seconds to operate the dishwasher. Fill the detergent cup with the recommended amount of detergent and close the lid. Check the rinse aid level, as the Rinse Aid Refill LED will flash if low.
- Page 23: Operation Using the Option Setting Mode It is normal for the dishwasher to chime continuously if you open it during operation or just after the cycle ends. The dishwasher is letting you know that the interior temperatures of the unit are hot and to use caution when reaching inside. Do not open the door during operation or immediately after it has completed the wash cycle as the escaping steam may cause scalding. Empty the lower rack first and then the upper rack to avoid water dripping from the upper rack onto dishes in the lower rack. The dishwasher automatically turns off after four minutes of inactivity if paused or if no cycle is started.
- Page 24: Operation Control panel features Power on/off button Press this button to turn the washer on or off. After the cycle is complete, the power automatically turns off for safety and economy. If there is a power surge or outage, power is automatically turned off for safety. When power is connected again, the dishwasher will turn on automatically and resume the cycle. Option setting mode You can set various options by using the Option Setting Mode. While the appliance is off, press Power and Remote Start simultaneously to enter the Option Setting Mode. Display Rinse aid refill LED illuminates when the rinse aid level is low. The Machine Clean LED flashes every 30 cycles. The digital display shows the estimated cycle time and remaining estimated operating time. The estimated time shown on the display does not include delay times for heating water.
- Page 25: Operation To start a new cycle, deactivate Control Lock. If the Steam option is added to a cycle, the Sanitized indicator stays lit at the end of the cycle if the dishes were properly sanitized. When the appliance is connected to the internet through a home Wi-Fi network, this LED illuminates. Press and hold Remote Start for approximately three seconds to connect to the network. The drain pump activates and the cycle cancels. Once the dishwasher finishes draining, the power turns off. To operate the machine, either press Start and close the door within four seconds or close the door and press Start. This cycle will clean and dry lightly soiled dishes in 1 hour. This cycle senses the soil amount and soil toughness and is optimized to achieve the best cleaning. This cycle freshens up and warms dishes that have been unused for a long time. This cycle is for heavily soiled dishes and dishes with hardened on soil.
- Page 26: Operation This cycle is for cleaning the inside of the dishwasher. Use the cycle without dishes in the machine. It eliminates residual soils, odor, white spots, and other dirt. Add citric acid or another cleaning agent for more effective results. This high temperature rinse sanitizes dishes and glassware in accordance with the NSF/ANSI Standard 184 for residential dishwashers. Express (P2) quickly cleans lightly soiled dishes but does not have drying. Rinse (P3) is a quick rinse for dishes that will not be washed immediately, helping to prevent odors in the dishwasher. Using the Flexible Zone adjusts the wash intensity to target different zones inside the dishwasher. Pots & Pans (P4) cleans heavily soiled cookware without the need for hand scrubbing. Casseroles (P5) cleans greasy and heavily soiled dishes, ensuring they come out clean. Glassware (P6) safely washes delicate glassware, leaving it sparkling. Night Care (P7) quietly washes dishes overnight, ensuring they will be clean in the morning. The Steam option adds steam at the start of the cycle to improve wash performance.
- Page 27: Operation The Night Dry option is selected by default for all cycles for which it is available, except the Normal cycle. Dry Boost Low: Press the Dry Boost button once for optimal energy efficiency. Dry Boost High: Press the Dry Boost button twice for better drying results. Delay Start: This feature delays the start of a selected cycle. The delay time can be set from 1 to 12 hours, in one-hour increments. Dry Boost Off: Press the Dry Boost button three times to turn off the Dry Boost option. If the rinse aid dispenser is empty, the Dry Boost Low option is automatically added to all cycles, unless you set the rinse aid dispenser to L0. Remote Start: Use a smartphone to control your appliance remotely and monitor your cycle operation. Night Dry: This option runs the ventilation fan periodically to help vent the steam from the tub. Cycle/Option Guide: The cycle guide shows the available options for each cycle. Actual water consumption will vary depending on soil level and hardness of water.
- Page 28: Operation The actual running time and cycle time displayed may change depending on options chosen, soil level, water temperature, and hardness of water. Options are not available for Download Cycle. The Machine Clean cycle is the default Download Cycle. You can adjust the level of rinse aid from L0 to L4 using the Option Setting Mode. The default ON setting keeps the green light on (on some models) and ENd display until the door is opened. Press Power and Remote Start simultaneously to enter the Option Setting Mode. You can turn on/off the volume of the button sound or notification sound. The default ON setting selects options automatically for better washing and drying performance. The extra tall tub allows loading of dishes, pans, or other utensils up to 14 high. Remove large particles of food debris from plates including bones before loading. Machine Clean Reminder - The Machine Clean LED flashes every 30 cycles.
- Page 29: Operation Loading 12 place settings Non-dishwasher safe items may be damaged by high water temperature and dishwasher detergents. Do not wash items such as copper or anodized aluminum, hand-painted silver or gold leaf china, wood or bone handled utensils, iron or non-rustproof utensils, and plastic items not labeled dishwasher safe. Sterling silver or gold-plated flatware and fragile items like crystal glasses should also be avoided. Do not place pots or pans with plastic handles in the appliance. For best cleaning results, use the top separators in the basket when loading silverware to prevent nesting. Load sharp items, such as knives, pointing down to reduce the risk of injury. Start unloading the dishwasher with the silverware basket to prevent water droplets from falling on the silverware. The silverware basket has separators to avoid scratching and tarnishing of delicate silverware. Be careful when loading and unloading sharp items.
- Page 30: Operation Loading 12 place settings Lower rack loading tips: - Plates should be positioned upright and facing the center of the rack, and pots, pans, and large dishes must be turned upside down. - Load dinner plates, dishes, soup bowls, etc. between the tines. - Load cookie sheets, cake pans, and other large items at the sides or back of the rack. - Make sure that pot handles and other large items do not stop the rotation of the spray arms. - The lower rack should not be used for small items such as cups, wine glasses, or small plates. - Make sure that large items do not interfere with the rotation of the spray arms and do not prevent the detergent dispenser from opening. Loading pots and bowls Folding down the lower tines
- Page 31: Operation Loading the upper rack Loading dishes into the upper rack Silverware basket ships installed at the back of the bottom rack. For best performance, install it along the right side. Upper rack loading tips: Place cups and glasses in the rows between the rack tines to avoid breakage and water spots. To avoid chipping, do not let stemware touch other items. Place items so that the open end faces down for cleaning and drying. Do not stack items on top of each other. Use the upper rack for small or delicate items such as small plates, cups, saucers, glasses, and dishwasher-safe plastic items. Cups, glasses, and bowls must be positioned upside down. Make sure items do not interfere with the rotation of the spray arms above and below the upper rack.
- Page 32: Operation It is necessary to remove the cutlery rack if one is present. Locate the assembly slot on the cup rack, align the slot with the bar, and firmly pop the rack off the support bar on that side. The rack on the left pops free at the back. The rack on the right pops free at the front. Extra cups or cooking utensils can be laid on the fold down cup racks, which also provide support for long-stemmed glasses. The cup racks can be folded up out of the way for tall glasses. The left and right cup racks are interchangeable and can be removed. Follow the instructions in reverse to replace the cup rack. Slide the cup rack down into its closed position. Fold tines down to fit larger dishes; pull tines back up to fit smaller dishes.
- Page 33: Operation Loading dishes & pots Height adjustable upper rack The upper rack adjusts up and down. Raise the upper rack to allow items up to 14 tall in the lower rack. Lower the upper rack to allow dishes up to 12 tall in the upper rack. There are three available positions for adjusting the height of the upper rack. Before adjusting, ensure the rack is empty of all dishes. Raise the upper rack without pushing the buttons on each side. To set the rack to the middle position, it may be easier to lower the rack all the way down.
- Page 34: Operation Raising the rack involves lifting it at the center of each side until it locks into place in the upper position. To remove the back rack supports from the rails, hold a side rail, lift the front of the rack, and push it back to snap the support out of the hooks. To replace the rack, place the back rack supports behind the rear hooks and pull the rack forward to snap the supports into place. Removing the snap-in gliding upper rack is only applicable for some models. The cutlery rack is best suited for flatware, and the separators help keep flatware separated to avoid damage. The snap-in upper rack should only be removed for servicing, and gloves should be worn to avoid injury. For best cleaning performance, place flatware in the silverware baskets and heavily soiled items in the middle rack. To remove the front rack supports from the rails, push the front hooks open with a screwdriver while pulling the front of the rack up.
- Page 35: Operation Loading 10 place settings Removing the cutlery rack can create more space on the upper rack for larger items. Always remove the cutlery from the rack before removing the rack. Be careful when loading and unloading items with sharp edges. Do not place bowls in the center of the cutlery rack to avoid leakage. Folding down the cutlery tines allows for fitting flatware. The height adjustable tray can accommodate utensils or cutlery of different sizes. Remove dishes before adjusting the tray. The amount of detergent needed depends on the cycle, load size, and soil level of dishes.
- Page 36: Operation Put detergent into the detergent compartment before starting any cycle, except the Rinse cycle. Using liquid rinse aid improves drying performance by allowing water to drain off of dishes after the final rinse. Do not use detergent tablets for shorter wash cycles as they may not dissolve completely. Dishwasher detergent and rinse aid contain chemical components and must be kept out of the reach of children. Using a wash booster helps remove spots, residue, and the white film caused by hard water. Use only detergent intended for dishwashers to avoid excess suds and potential leaks. Add dishwashing detergent to the main wash compartment until the level is between the lines marked 15 and 25. After completion of the wash program, check whether the detergent was completely washed out. Some dishwasher detergent tablets may become stuck in the dispenser due to their excessive size. Too much detergent can leave a film on dishes and in the dishwasher, resulting in poor wash performance.
- Page 37: Operation If a prewash is desired, fill the recessed prewash compartment area on the lid with detergent. The Rinse Aid Refill LED appears in the display when more rinse aid is needed. Close the lid to lock the dispenser. Rinse aid is dispensed automatically during the final rinse cycle. The use of rinse aid is recommended to prevent water spots on dishes and to enhance drying performance. Only use liquid rinse aid in the dishwasher. Do not overfill the rinse aid dispenser. Wipe off any spilled rinse aid around the dispenser. The dispenser has five adjustment levels. The dishwasher is programmed at the factory for a rinse aid dispenser level of 2. Adjust the setting higher if you have hard water and notice calcium buildup on your dishes. Ensure the appliance is off. Press Power and Remote Start simultaneously to enter the Option Setting Mode.
- Page 38: Press Dry Boost to change the rinse aid dispenser setting. Each press of the button changes the setting one step from L0 to L4. Once the desired rinse aid dispenser setting is selected, press Start to save. How often the dispenser needs to be refilled depends on how often dishes are washed and the rinse aid setting used. The Rinse Aid Refill LED flashes when more rinse aid is needed, unless the rinse aid dispenser setting is set to L0.
- Page 39: SMART FUNCTIONS LG ThinQ application allows you to communicate with the appliance using a smartphone. If you change your wireless router, delete the connected appliance from the LG ThinQ application and connect it again. The application is subject to change for product improvement purposes without notice to users. You can download new and specialized cycles that are not included in the standard cycles on the appliance. Only one downloaded cycle can be stored on the appliance at a time. The Machine Clean cycle is the default downloaded cycle. Smart Diagnosis provides useful information for diagnosing and solving issues with the appliance. Set the Rinse Aid Dispenser Level, Machine Clean Reminder, Signal Level, and Clean Indicator Light. Turn on the Push Alerts to receive appliance status notifications. You can use the energy monitoring function to check the estimated power usage.
- Page 40: Smart functions The appliance supports 2.4 GHz Wi-Fi networks only. Make sure that the Wi-Fi is connected. Press the Remote Start button and close the dishwasher door to enable the Remote Start function. The surrounding wireless environment can make the wireless network service run slowly. Start a cycle from the LG ThinQ application on your smartphone. The door must be closed in order to activate the Remote Start mode. If the appliance cannot be connected due to problems with the wireless signal transmission, unplug the appliance and wait about a minute before trying again. The wireless network name (SSID) should be a combination of English letters and numbers. If the security protocol of the router is set to WEP, network setup may fail. Use a smartphone to control the appliance remotely or check to see how much time is left in the cycle.
- Page 41: SMART FUNCTIONS This equipment complies with IC radiation exposure limits set forth for an uncontrolled environment. This equipment should be installed and operated with a minimum distance of 20 cm (7.8 inches) between the antenna and your body. The manufacturer is not responsible for any radio or TV interference caused by unauthorized modifications to this equipment. This device complies with part 15 of the FCC Rules. Operation is subject to conditions that this device may not cause harmful interference and must accept any interference received. To obtain the source code contained in this product, please visit the specified open source website. This equipment complies with FCC radiation exposure limits set forth for an uncontrolled environment. Users must follow the specific operating instructions for satisfying RF exposure compliance. Use the Smart Diagnosis function to help diagnose and solve problems with your appliance. This device contains licence-exempt transmitter(s)/receiver(s) that comply with Canadian regulations.
- Page 42: Smart functions Using LG ThinQ to diagnose issues If you experience a problem with your Wi-Fi equipped appliance, it can transmit troubleshooting data to a smartphone using the LG ThinQ application. Launch the LG ThinQ application and select the Smart Diagnosis feature in the menu. Using audible diagnosis to diagnose issues Follow the instructions below to use the audible diagnosis method. Press the POWER button to turn on the appliance. Place the mouthpiece of your smartphone close to the logo. Press and hold the Download Cycle button for 3 seconds or longer while holding the smartphone mouthpiece to the logo until the data transfer is complete. Keep the smartphone in place until the data transfer has finished. After the data transfer is complete, the diagnosis will be displayed in the application. For best results, do not move the smartphone while the tones are being transmitted.
- Page 43: Maintenance To maintain performance and prevent trouble, it is important to check the outside and inside of the dishwasher, including filters and spray arms, at regular intervals. When cleaning the outside and inside of the dishwasher, do not use benzene or thinner. Otherwise, it may cause fire or explosion. To prevent injury during care and maintenance or cleaning, wear gloves and/or protective clothing. Do not use scrub pads or abrasive cleaners on the exterior of the dishwasher. Run the Machine Clean cycle once a month, or more often if needed, to remove detergent buildup and other residue. If cooking oil is spilled on the exterior of the product, wipe it off immediately. Clean the interior of the dishwasher periodically with a soft, damp cloth or sponge to remove food and dirt particles. To remove white spots and odor from inside the dishwasher, run an empty cycle with one cup of white vinegar. Check the drain air gap or in-sink disposal if the dishwasher is not draining well. The drain air gap and disposal are external plumbing devices that are not part of the dishwasher.
- Page 44: Maintenance The warranty provided with the dishwasher does not cover service costs directly associated with the cleaning or repair of the external drain air gap and disposal. For best wash performance, clean the filter after each load. If food debris remains in the filter, it may cause an odor. In areas with hard water, clean the filter at least once a month with a soft brush. Clean the filters using non-abrasive materials and warm running water. Cleaning the air gap involves turning off the dishwasher, removing the lower rack, and checking the sump opening for foreign materials. Clean out any debris with a toothpick or brush. To replace the assembled filters, position the spray arm so the wider vee is toward the front and secure them by turning the inner filter clockwise until it clicks into place. Be cautious of sharp edges when handling the stainless steel filter. Remove food residue caught in filters to prevent the buildup of odor-causing bacteria and possible drainage problems.
- Page 45: Maintenance Cleaning the spray arm is essential for proper water spray and effective dish cleaning. It is recommended to clean the spray arms once every two weeks. Make sure the water jet holes are not blocked by food particles. Ensure the filter is assembled correctly before starting a cycle. Remove any food residue blocking the spray arm holes with a pin or stiff wire. Recommended filter cleaning schedule varies based on the number of loads per week. To avoid breaking the rolling spray arm sections, do not pull or manually rotate them. Cleaning the upper spray arm involves pulling the upper rack forward and checking for blockages. When cleaning is necessary, remove the upper spray arm by turning the nut counter-clockwise. The cleaning frequency for the upper spray arm depends on the number of loads per week.
- Page 46: Maintenance Cleaning the heat dry blower Remove food particles by rinsing or shaking the spray arm. To prevent the possibility of odors coming from the heat vent, remove food residue caught in the gap below the cover periodically. If any food residue blocks the spray arm holes, remove it with a pin or any sharp tool. To prevent injury during cleaning, wear gloves and/or protective clothing. Wait for the blower to cool sufficiently before cleaning. When cleaning the heat dry blower, do not allow water, detergents, or other foreign substances inside the tube. After cleaning the upper spray arm, press it up into place. If the cover is not properly assembled, water leakage, electric shock, fire, or product malfunction may occur. Seasonal maintenance and storage: If you will be absent for an extended period, close the water valve and disconnect the power supply line.
- Page 47: Maintenance instructions include removing debris with a brush if needed. The cover can be cleaned under running water and should be allowed to dry before reassembling. It is important to prevent water from entering the blower tube. Do not allow water, detergents, or other foreign substances inside the tube, as this may cause the product to malfunction. To reassemble the vent cover, place it over the supply tube in the same orientation as it was removed and turn it counterclockwise until it clicks into place. Do not use the dishwasher without the cover in place, as improper assembly may lead to water leakage, electric shock, fire, or product malfunction.
- Page 48: Troubleshooting The washer is equipped with an automatic error-monitoring system to detect and diagnose problems at an early stage. Before calling for service, check the following if the washer does not function properly. Rinse aid is strongly recommended to enhance the drying performance of the dishwasher. The cloudy film on dishes is usually caused by minerals in the water reacting with the dishwasher detergent. Adding an extra rinse helps to rinse the film away. To remove white film on the tub, use citric acid powder and run a Machine Clean cycle without detergent. Drying performance is affected by the amount of heat that remains in the tub after the heated rinse. Using a rinse aid maximizes the amount of water that has been sheeted away from the dishes before the dry cycle begins. Select the Dry Boost or Night Dry option for better drying results when washing plastic items. Allow the dishwasher to completely finish the dry cycle before opening the door to prevent dishes from remaining wet.
- Page 49: Troubleshooting The dishwasher does not rely on a heating element for the drying process; it uses retained heat from the dishes and tub. Rinse aid is required to enhance the drying performance. A whistling noise can be heard when water is drawn into the dishwasher, which is normal. Ensure that the dishes placed in the dishwasher are dishwasher safe. To drain standing water, press and hold Start for three seconds until the cycle stops. The dishwasher chimes if the door is opened during a cycle or right after it has finished to indicate hot interior temperatures. Control Lock prevents changes to the controls during the cycle. If a drain hose extension is required, use a 5/8 or 7/8 inside diameter hose. The door must be closed within four seconds of pressing the Start button for the dishwasher to operate. You don't need to pre-rinse dishes before loading, especially if using the Normal and Auto cycles.
- Page 50: Troubleshooting On the LG home page, click on the Support menu tab to bring up the menu selections. Select Video Tutorials. Select a product category and then pick a topic or search a keyword. Error Messages Water inlet problem. Check for a clogged, kinked or frozen water inlet hose. Drainage Problem. Check for a clogged, kinked or frozen water drain hose. Oversudsing caused by improper detergent. Do not use hand dishwashing liquids. Failure to level dishwasher. Make sure that the appliance is properly leveled. Water leakage. Turn off the water supply to the dishwasher and call an LG Electronics Customer Information Center.
- Page 51: Troubleshooting Heater circuit failure. Water temperature sensor error. Heated air temperature sensor error. Wash motor error. Heat air dry fan motor error. Vario motor error. The Download Cycle is selected. Test mode is selected. Rinse aid level setting mode is selected. Control Lock is activated. Operation Dishwasher will not operate. Start button is not pressed. Door is not completely closed. Power supply or power supply line is not connected. Fuse is blown or circuit breaker tripped. Control Lock is activated.
- Page 52: Troubleshooting Dishwasher operates too long. Check the water supply connection or water heater setting. Water remains in tub after completion of cycle. Adjust hose or clear blockage. Noise Some level of noise is normal during operation. Lights do not illuminate. Connect power supply. Spray arms do not rotate smoothly. Clean the holes of spray arms. Dishwasher continuously chimes when the door is opened. Close the door until the dishwasher and dishes have cooled down. Door does not close completely. Push the door handle to close the door properly until it clicks. Dishwasher chimes if panel is touched during operation. Button sounds can be turned off by using Option Setting Mode. Dishwasher did not finish cycle. If the door is opened during a cycle, the Start key must be pressed within 4 minutes. Leaking in front of appliance Verify the appliance is level from side to side and from front to back.
- Page 53: Troubleshooting Odor The previous cycle was stopped before completion and residual water remains in the dishwasher. There is food in the bottom of the appliance or in the filter. Unwashed dishes are left in the appliance for a long time. After cleaning, the appliance smells like detergent. Food soil remains on dishes. Water temperature is too low. Dishwashing detergent was not used. Low inlet water pressure. Water jet holes on spray arms blocked. Improper loading of dishes.
- Page 54: Troubleshooting Spots and filming on dishes may be caused by insufficient detergent. Add the recommended amount of detergent. The rinse aid dispenser may be empty. Refill the rinse aid dispenser. Hard water buildup in the tub can occur. Remove all dishes and use citric acid powder or white vinegar to clean. Dishes not drying could be due to an empty rinse aid dispenser. Check and refill if necessary. Trouble connecting the appliance to Wi-Fi may result from an incorrectly entered password. Delete the home Wi-Fi network and reconnect. Mobile data on the smartphone should be turned off before connecting the appliance. The wireless network name (SSID) must be a combination of English letters and numbers without special characters. Only a 2.4 GHz router frequency is supported. Set the router to 2.4 GHz. If the appliance is too far from the router, the signal may be weak. Move the router closer or install a Wi-Fi repeater. During Wi-Fi setup, the app may request a password. Locate the network name starting with LG and follow the instructions for entering the password.
- Page 55: Limited warranty Terms and conditions Arbitration notice: This limited warranty contains an arbitration provision that requires you and LG Electronics to resolve disputes by binding arbitration instead of in court. Should your LG Dishwasher fail due to a defect in materials or workmanship under normal use, LG will repair or replace the product. This limited warranty is valid only to the original retail purchaser of the product and applies only when purchased lawfully and used within the United States. Warranty period: Two years from the date of original retail purchase for labor and parts. Five years from the date of original retail purchase for main control board, racks, stainless steel door liner, and tub. Ten years from the date of original retail purchase for the direct drive motor. Proof of original retail purchase specifying the product model and date of purchase is required to obtain warranty service. Any implied warranty of merchantability or fitness for a particular purpose on the product is limited in duration to the duration of the above limited warranty.
- Page 56: Limited warranty This limited warranty does not cover service trips to deliver, pick up, or install, educate how to operate, correct wiring, or correct unauthorized repairs. Damage or failure of the product to perform during power failures and interrupted or inadequate electrical service is not covered. Damage or failure caused by leaky or broken water pipes, frozen water pipes, restricted drain lines, inadequate or interrupted water supply, or inadequate supply of air is excluded. Damage or failure resulting from operating the product in a corrosive atmosphere or contrary to the product owner’s manual is not covered. Damage or failure caused by accidents, pests and vermin, lightning, wind, fire, floods, acts of nature, or any other causes beyond the control of LG is excluded. Damage or failure caused by unauthorized modification or alteration, or if the product is used for other than the intended purpose, is not covered. Costs associated with removal and reinstallation of the product for repairs are not covered. Accessories, removable components, or consumable parts are excluded from this limited warranty. The cost of repair or replacement under these excluded circumstances shall be borne by you. All disputes between you and LG arising out of or relating in any way to this limited warranty or the product shall be resolved exclusively through binding arbitration.
- Page 57: Limited warranty Notice of dispute You must notify LG in writing at least 30 days in advance of initiating arbitration. You and LG agree to engage in good faith discussions to resolve your claim. Agreement to binding arbitration and class action waiver You and LG agree to resolve any claims only by binding arbitration on an individual basis. Arbitration rules and procedures The arbitration will be administered by the American Arbitration Association. Governing law The law of the state of your residence shall govern this Limited Warranty and any disputes.
- Page 58: Limited warranty You may opt out of this dispute resolution procedure. If you opt out, neither you nor LG can require the other to participate in an arbitration proceeding. To opt out, you must send notice to LG no later than 30 calendar days from the date of the first consumer purchaser’s purchase of the product. You must include in the opt out e-mail or provide by telephone your name and address, the date on which the product was purchased, the product model name or model number, and the serial number. You may only opt out of the dispute resolution procedure in the manner described above. Opting out of this dispute resolution procedure will not affect the coverage of the Limited Warranty in any way. If you keep this product and do not opt out, then you accept all terms and conditions of the arbitration provision described above.
- Page 59: Limited warranty Arbitration notice: This limited warranty contains an arbitration provision that requires you and LG to resolve disputes by binding arbitration instead of in court. Should your LG Dishwasher fail due to a defect in materials or workmanship under normal use, LG Electronics Canada, Inc. will repair, replace, or pro rate the product upon receipt of proof of the original retail purchase. This limited warranty is valid only to the original retail purchaser of the product and applies only to a product purchased from an authorized retailer and used within Canada. Warranty period: Two years from the date of original retail purchase for the dishwasher. Replacement products and parts are warranted for the remaining portion of the original warranty period or ninety days, whichever is greater. Proof of original retail purchase specifying the product model and date of purchase is required to obtain warranty service. LGECI’s sole liability is limited to the limited warranty set out above. LGECI makes no, and hereby disclaims, all other warranties and conditions respecting the product. Under no circumstances shall LGECI be liable for any incidental, consequential, special, direct, indirect, punitive, or exemplary damages. This limited warranty gives you specific legal rights, and you may also have other rights that vary from province to province.
- Page 60: Limited warranty This limited warranty does not cover service trips to deliver, pick up, or install or educate on how to operate the product. Damage or failure of the product to perform during power failures and interrupted or inadequate electrical service is not covered. Damage or failure caused by leaky or broken water pipes, frozen water pipes, or inadequate water supply is excluded. Damage or failure resulting from operating the product in a corrosive atmosphere or contrary to the instructions is not covered. Damage or failure caused by accidents, pests, lightning, wind, fire, floods, or other causes beyond control is excluded. Damage or failure resulting from misuse, abuse, improper installation, or maintenance is not covered. Damage or failure caused by unauthorized modification or use for unintended purposes is excluded. Damage or failure caused by incorrect electrical current, voltage, or plumbing codes is not covered. Coverage for in home repairs is provided if the product is within a 150 km radius from the nearest authorized service center. All costs associated with excluded circumstances shall be borne by the consumer.
- Page 61: Limited warranty Procedure for resolving disputes All disputes between you and LG arising out of or relating to this limited warranty or the product shall be resolved exclusively through binding arbitration. You and LG both irrevocably agree to waive the right to a jury trial and to bring or participate in a class action. Definitions: References to “LG” mean LG Electronics Canada, Inc., its parents, subsidiaries and affiliates. Notice of dispute: You must notify LG in writing at least 30 days in advance of initiating arbitration. Agreement to binding arbitration and class action waiver: You and LG agree to resolve any claims only by binding arbitration on an individual basis. Arbitration rules and procedures: The arbitration will be private and confidential, conducted before a single arbitrator. Governing law: The law of the province or territory of your purchase shall govern this limited warranty. Fees/costs: You do not need to pay any fee to begin an arbitration.
- Page 62: Limited warranty If applicable law allows for an award of reasonable attorneys’ fees and expenses, an arbitrator can award them to the same extent that a court would. If your claim is for $25,000 or less, you may choose to have the arbitration conducted solely on the basis of documents submitted to the arbitrator, through a telephonic hearing, or by an in-person hearing. If any portion of this limited warranty is unenforceable, the remaining provisions will continue in full force and effect. You may opt out of this dispute resolution procedure. To opt out, you must send notice to LG no later than 30 calendar days from the date of the first consumer purchaser’s purchase of the product. The law of the province or territory of your residence shall govern this limited warranty and any disputes between you and LG. Opting out of this dispute resolution procedure will not affect the coverage of the limited warranty in any way. In the event of a conflict or inconsistency between the terms of this limited warranty and the end user license agreement regarding dispute resolution, the terms of this limited warranty shall control. Poor wash results can be caused by debris remaining in the filter.
- Page 63: Limited warranty Make certain that no dishes or utensils are in the path of the spray arms. Do not place one dish on top of another. Poor wash results caused by improper loading or over stacking. Poor drying results caused by lack of rinse aid. Water is not supplied because the water tap is not turned on. Not draining because drain hose is kinked. The knockout plug in the garbage disposal is not removed. The disposal or air gap is blocked by debris. No power due to loose connection of power supply line or electrical outlet problem.
- Page 64: Page 64

SIEMENS SN55ZS02BD Dishwasher

GAGGENAU DF481101 Dishwasher

Smeg ST292D Dishwasher

GE APPLIANCES GDT670SGV Interior Dishwasher with Hidden Controls

BOSCH SPV2HKX1DR Dishwasher

SIEMENS SR63EX24ME Dishwasher

BUFFALO DK775,DN975 Dishwasher

Electrolux KECA7400W Builtin Dishwasher

BOSCH SPS4IMW00X Dishwasher

BOSCH SMI8ZCS00X Dishwasher