
IKEA FINPUTSAD Dishwasher







en
FINPUTSAD


| General | Details |
|---|---|
| Name | IKEA FINPUTSAD Dishwasher |
| Make | Ikea |
| Language | English |
| Filetype | PDF (Download) |
| File size | 3.64 MB |
 (1 votes, average: 5.00 out of 5)
 Loading...

IKEA 404.755.53 Medelstor Dishwasher

IKEA 804.621.67 Lagan Dishwasher

IKEA RENGÖRA 204.756.05 Dishwasher

IKEA 9001774317 TORSBODA Dishwasher

IKEA 9001774318 Dishwasher

IKEA SBE8596Z0E DISKAD PROFFSIG Dishwasher

IKEA VILLBODA Dishwasher

IKEA 504.754.25 HYGIENISK Dishwasher

IKEA AA-2412057-2-1 RÅGLANDA Dishwasher

IKEA 905.681.49 OSTVEDA Dishwasher

IKEA FINPUTSAD Dishwasher Overview
Summary of Contents
- Page 1: Page 1
- Page 2: Page 2
- Page 3: Once installed, packaging waste must be stored out of reach of children - risk of suffocation. The appliance must be earthed in conformity with national electrical safety standards. Do not use extension leads, multiple sockets or adapters. The electrical components must not be accessible to the user after installation. Connect the dishwasher to the water mains using only new hose sets. All local waterboard regulations must be complied with. Water supply pressure 0.05 - 1.0 MPa. If the mains lead of this appliance is fitted with a BS 1363A 13amp fused plug, use an A.S.T.A. approved fuse to BS1362 type for replacement. Before using the appliance for the first time, check the water inlet and drain hose for leaks. The rating plate is on the edge of the dishwasher door (visible when the door is open).
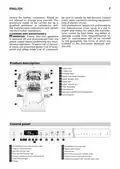
- Page 4: Service for further instruction. Please do not attempt to change plug yourself. This procedure needs to be carried out by a qualified technician in compliance with the manufacturer's instructions and current standard safety regulations. Non-professional repairs not authorized by the manufacturer could result in a risk to health and safety, for which the manufacturer cannot be held liable. Any defect or damage caused from nonprofessional repairs or maintenance will not be covered by the guarantee. Ensure that the appliance is switched off and disconnected from the power supply before performing any maintenance operation. To avoid risk of personal injury use protective gloves and safety shoes. Product description includes upper rack, cutlery rack, foldable flaps, upper rack height adjuster, upper sprayer arm, lower rack, lower sprayer arm, filter assembly, salt reservoir, detergent and rinse aid dispensers, and control panel. Control panel features include on-off/reset button with indicator light, program selection button, salt refill indicator light, rinse aid refill indicator light, program number and delay time indicator, tablet indicator light, flexible wash indicator light, flexible wash button, delay button, short time button with indicator light, extra dry button with indicator light, and start/pause button with indicator light.
- Page 5: First use Advice regarding the first time use Before installation and first usage of the appliance please read carefully Safety Instruction and Assembly Instruction available in the product literature bag. It is mandatory that the salt reservoir be never empty. The salt reservoir is located in the lower part of the dishwasher. Water softener automatically reduces water hardness, consequently preventing scale buildup on heater. Single regeneration consumes approximately 3.5 L of water. Rinse aid makes dish drying easier. The rinse aid dispenser should be filled when the rinse aid refill indicator light is lit. To allow the water softener to work perfectly, the water hardness setting must be based on the actual water hardness in your house. If you are not completely satisfied with the drying results, you can adjust the quantity of rinse aid used.
- Page 6: If the rinse aid level is set to ZERO (ECO), no rinse aid will be supplied. A maximum of 5 levels can be set according to the dishwasher model. If you see bluish streaks on the dishes, set a low number (1-2). If there are drops of water or limescale marks on the dishes, set a high number (3-4). Usage of detergent not designed for dishwashers may cause malfunction or damage to the appliance. To achieve the best washing and drying results, the combined use of detergent, rinse aid liquid and refined salt is required. Good washing results also depend on the correct amount of detergent being used. The detergent dispenser automatically opens up at the right time according to the program. The upper rack has tip-up supports which can be used in a vertical position when arranging tea/dessert saucers. Arrange the cutlery as shown in the figure for easier collection after washing and improved washing performance.
- Page 7: Foldable flaps with adjustable position The side foldable flaps can be folded or unfolded to optimize the arrangement of crockery inside the rack. Unsuitable crockery Wooden crockery and cutlery, delicate decorated glasses, and parts in synthetic material which do not withstand high temperatures are not suitable for the dishwasher. Damage to glass and crockery Only use glasses and porcelain guaranteed by the manufacturer as dishwasher safe. Hygiene To avoid odour and sediment, run a high temperature program at least once a month. Lower rack Large plates and lids should ideally be placed at the sides to avoid interferences with the spray arm. Tips on energy saving Washing tableware in a dishwasher usually consumes less energy and water than hand dishwashing. Daily use Check that the dishwasher is connected to the water supply and that the tap is open. Load the racks Follow the guidelines for loading the racks to ensure optimal cleaning performance. Choose the program and customise the cycle Select the most appropriate program based on the type of crockery and its soiling level. Modifying a running program It is possible to change the program if it has only just begun by following specific steps.
- Page 8: Adding extra crockery allows you to place dishes inside the dishwasher without switching it off. The cycle resumes from the point it was interrupted if the door is closed within 4 seconds after pressing the START/Pause button. Functions can be selected directly by pressing the corresponding button. If a function is not compatible with the selected program, the corresponding LED flashes rapidly and beeps. A LED light projected on the floor indicates that the dishwasher is working. A half loading option can save water, electricity, and detergent. NaturalDry is a convection drying system that automatically opens the door during or after the drying phase for better drying performance. The start time of the program can be delayed between 1 and 12 hours by pressing the DELAY button. To disable the NaturalDry functionality, access the Operation Indicator menu and follow the steps to change its status. The DELAY function cannot be set once a wash cycle has started. The SHORT TIME option reduces the duration of the main programs while maintaining performance. The EXTRA DRY option increases the final rinse temperature for improved drying but lengthens the wash cycle. Press the START/PAUSE button for 3 seconds to use combined detergents in tablet form.
- Page 9: Programs table Eco program is suitable to clean normally soiled tableware, being the most efficient program in terms of energy and water consumption. Auto program senses the level of soiling on the dishes and adjusts the program accordingly. Intensive program is recommended for heavily soiled crockery, especially suitable for pans and saucepans. Fast Wash 30’ program is for half load of lightly-soiled dishes with no dried food residues. Fast Wash and Dry program ensures optimal cleaning and drying performance in a shorter time. Glass program is for delicate items sensitive to high temperatures, such as glasses and cups. Silent program is suitable for night-time operation with the lowest noise emission. Sanitizing program includes an additional antibacterial wash for normally or heavily soiled crockery. Pre-Wash program is used to refresh crockery planned to be washed later without detergent. Self-Clean program is for maintenance of the dishwasher, to be performed only when the dishwasher is empty.
- Page 10: Cleaning and maintenance Always unplug the appliance when cleaning it and when performing maintenance work. At least once per month or after each 30 cycles, check the filter assembly and if necessary clean it thoroughly under running water. Inspect the trap and remove any food residues. Never remove the wash-cycle pump protection. Any marks on the inside of the appliance may be removed using a cloth dampened with water and a little vinegar. Always keep the door of the appliance ajar to avoid moisture from forming and being trapped inside the machine. Check the inlet hose regularly for brittleness and cracks. If damaged, replace it. After cleaning the filters, replace the filter assembly and fix it in position correctly. It is recommended to check the spray arms from time to time and clean them with a small non-metallic brush. If the water hoses are new or have not been used for an extended period of time, let the water run to make sure it is clear. Regularly clean the filter assembly so that the filters do not clog and that the waste water flows away correctly.
- Page 11: What to do if your dishwasher doesn’t work properly. Check if the problem can be solved by going through the following list. For other errors or issues, please contact authorized After-sales Service. Spare parts will be available for a period of either up to 7 or up to 10 years. Salt reservoir is empty; refill reservoir with salt. Rinse aid dispenser is empty; refill dispenser with rinse aid. The appliance has not been plugged in properly; insert the plug into the socket. The dishwasher won’t drain; check that the drain hose is not bent. The dishes are rattling against each other; position the crockery correctly. The dishwasher does not fill with water; make sure there is water in the supply.
- Page 12: Problems and possible causes with solutions for the dishwasher are outlined. Check if the end of the drain hose is placed at the correct height to avoid siphoning. Verify that racks are inserted completely and that the door lock is engaged. If the display shows blinking lights, check for air in the water supply or leaks. Dishes may not be dried if the selected program lacks a drying phase. Ensure rinse aid is adequately filled and dosage levels are adjusted as necessary. Check the salt level and fill the salt reservoir if it is too low. Adjust the water hardness settings if dishes show limescale or a whitish film. If issues persist, disconnect the mains plug and turn off the water tap before contacting After-Sales Service. Take note of the service code and description of the fault before reaching out for assistance.
- Page 13: Technical data includes product dimensions such as height, width, and depth. The appliance operates at a voltage of 220/240 V and a frequency of 50 Hz. Energy efficiency class is rated as C. The cleaning performance index and drying performance index are provided. Maximum and minimum water supply pressure are 10 Bar and 0.5 Bar, respectively. Energy consumption is listed as 1.13 kWh/100 cycles. The maximum inlet water temperature is 70 °C, and the number of place settings is 10. Noise level is classified as B, with a specific dB(A) rating. The packaging material is 100% recyclable and should be disposed of responsibly. The appliance should be disposed of in accordance with local waste disposal regulations.
- Page 14: Installation If the appliance must be moved at any time, keep it in an upright position. Under no circumstances should the water inlet hose be cut as it contains live electrical parts. Make sure the socket is earth and complies with current regulations. The power supply voltage must fall within the values indicated on the data plate. The water inlet and outlet hoses may be positioned towards the right or the left. The water pressure must be within the values indicated in the Technical Data table. Position the dishwasher on a level sturdy floor. Connect the outlet hose to a drain duct with a minimum diameter of 2 cm. The outlet hose connection must be at a height ranging from 40 to 80 cm from the floor. The dishwasher is equipped with a special system that blocks the water supply in the event of anomalies or leaks.
- Page 15: IKEA guarantee is valid for five years from the original date of purchase. The original sales receipt is required as proof of purchase. The guarantee covers faults caused by faulty construction or material faults from the date of purchase. It applies to domestic use only. Costs to remedy faults, such as repairs and parts, will be covered within the guarantee period. The guarantee gives specific legal rights that cover or exceed local legal demands. Normal wear and tear, deliberate damage, and damage from incorrect installation are not covered. Consumable parts and non-functional decorative parts are also excluded from the guarantee. Transportation damages during customer transport are not covered by IKEA. Spare parts will be available for a period of up to 7 or 10 years, depending on regulations.
- Page 16: BELGIË - BELGIQUE - BELGIEN NORGE Tarief: Lokaal tarief Åpningstider: Mandag - fredag 8.00 - 20.00 NEDERLAND Öffnungszeiten: Montag - Freitag 8.00 - 20.00 БЪЛГАРИЯ Tarief: Geen extra kosten. Alleen lokaal tarief. Openingstijd: Maandag t/m Vrijdag 8.00 - 21.00 ČESKÁ REPUBLIKA Telefonní číslo: 225376400 DANMARK Åbningstid: Mandag - fredag POLSKA Godziny otwarcia: Poniedziałek - Piątek 8.00 - 20.00 DEUTSCHLAND Öffnungszeiten: Montag - Freitag 8.00 - 20.00 PORTUGAL Horário: Segunda - Sexta 9.00 - 21.00 ΕΛΛΑΔΑ Τηλεφωνικός αριθμός: 2109696497 ESPAÑA Teléfono: 913754126 (España Continental) HRVATSKA Broj telefona: 0800 3636 ÍSLAND Símanúmer: 5852409 ITALIA Telefono: 0238591334 SUOMI Puhelinnumero: 0981710374 SVERIGE Telefon nummer: 0775-700 500 LUXEMBOURG Öppet tider: Måndag - Fredag 8.30 - 20.00 UNITED KINGDOM - IRELAND Heures d’ouverture: Lundi - Vendredi MAGYARORSZÁG Opening hours: Monday - Friday 8.00am - 6.00pm
- Page 17: Page 17

eta 338290000B Dishwasher

FISHER PAYKEL DD60ST4HZB9 Single Dishwasher

ZLINE 65286410 Monument Dishwasher

BOSCH SPS4EMW28E Dishwasher

PKM GSP9-6TI Dishwasher

VALBERG 14S40 B WAD929C Dishwasher

FISHER PAYKEL DD24DI9N Dishwasher

GAGGENAU DF481100F 400 Series Dishwasher

FISHER AND PAYKEL DD24DTX6PX1 Double Dishwasher

Amana ADB1400AGW Dishwasher