IKEA 905.681.49 OSTVEDA Dishwasher


en
en
ÖSTVEDA
905.681.49
105.681.48
Design and Quality
IKEA of Sweden

| General | Details |
|---|---|
| Name | IKEA 905.681.49 OSTVEDA Dishwasher |
| Make | Ikea |
| Language | English |
| Filetype | PDF (Download) |
| File size | 0.63 MB |


IKEA 404.755.53 Medelstor Dishwasher

IKEA 804.621.67 Lagan Dishwasher

IKEA RENGÖRA 204.756.05 Dishwasher

IKEA 9001774318 Dishwasher

IKEA 9001774317 TORSBODA Dishwasher

IKEA SBE8596Z0E DISKAD PROFFSIG Dishwasher

IKEA VILLBODA Dishwasher

IKEA 504.754.25 HYGIENISK Dishwasher

IKEA AA-2412057-2-1 RÅGLANDA Dishwasher

IKEA RANSBERG Dishwasher

IKEA 905.681.49 OSTVEDA Dishwasher Overview
Summary of Contents
- Page 1: Design and quality IKEA of Sweden
- Page 2: Page 2
- Page 3: The appliance can be used by those aged 8 or over and by those with limited physical, sensorial or mental capacities, only if supervised or provided with instruction. Children should be supervised to ensure that they do not play with the appliance. Children aged 3 and under should be kept away unless continuously supervised. If the supply cord is damaged, it must be replaced by a special cord or assembly available from the manufacturer or its service agent. Only use the hose-sets supplied with the appliance for the water supply connection.
- Page 4: Do not leave the appliance exposed to the elements (rain, sun, etc.). Any failure to follow the above advice may have serious consequences for the safety of the appliance. If you need to move the machine after removing the packaging, do not try to lift it by the bottom of the door. Leaning or sitting on the open door of the dishwasher could cause it to tip over. The dishwasher is designed for normal kitchen utensils. Objects that have been contaminated by petrol, paint, corrosive chemicals, acids or alkalis must not be washed in the dishwasher. If there is a water softening device installed in the home, there is no need to add salt to the water softener fitted in the dishwasher. Knives and other utensils with sharp points must be loaded in the basket with their points down or placed in a horizontal position. If the appliance breaks down or stops working properly, switch it off, turn off the water supply and do not tamper with it. Repair work should only be carried out by an approved service agent and only genuine spare parts should be fitted.
- Page 5: Safety instruction Ensure that the product is installed in a horizontal position by way of the adjustable feet. Check the horizontal position using a spirit level. Do not install or use the dishwasher if it is damaged. Follow the instructions supplied with the product. In case of breakage, the hose must be replaced with an original spare part. Do not connect the dishwasher to the mains supply until all installation operations have been performed. Do not connect the dishwasher to the mains supply until the front panel has been fully installed. To repair the appliance, contact the Authorised Service Centre. Use original spare parts only. Self-repair or nonprofessional repair can have safety consequences and might void the guarantee.
- Page 6: Water connection The dishwasher is fitted with a 3/4 threaded connector. The appliance must be connected to the water mains using new hose-sets. Connect inlet hose A to water tap B with a 3/4 attachment making sure that it has been properly tightened. For Nordic countries, there is a necessity to use an adapter. If necessary, the inlet pipe can be lengthened up to 2.5 m. The inlet and drain hoses can be directed to left or right. The dishwasher can be connected to either cold or hot water, as long as it is no hotter than 60°C. Water pressure must be between 0.08 MPa and 1 MPa. The inlet hose must be connected to a tap so that the water supply can be cut off when the machine is not in use.
- Page 7: Connecting the outlet hose The outlet hose should discharge into a standpipe, making sure that there are no kinks. The hose can be hooked over the side of the sink, but it must not be immersed in water. When installing the appliance under a worktop, the hose pipe clamp must be attached to the wall in the highest possible position under the worktop. Check that there are no kinks in the inlet and outlet hoses. The standpipe must be at least 40 cm above floor level and it must have an internal diameter of at least 4 cm. It is advisable to fit an anti-odor air trap. If necessary, the hose can be extended up to 2.5 m, provided that it is kept at a maximum height of 85 cm above floor level.
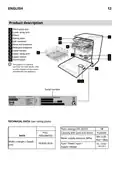
- Page 8: Product description Third spray arm Lower spray arm Filters Rating plate Salt container Rinse aid dispenser Detergent dispenser Lower basket Upper spray arm Upper basket Third basket The graphics is a general overview. For more details, refer to other chapters or documents provided with the appliance. Serial number Technical data (see rating plate) Place settings (EN 50242) Capacity with pans and dishes Water supply pressure (MPa) Width x Height x Depth (cm) Fuse / Power input / Supply voltage
- Page 9: Before first use Loading the salt During this operation a little water will overflow; but keep adding salt until the container is full. The appearance of white stains on dishes is generally a warning sign that the salt container needs filling. It is important to use only a salt that is specifically designed for dishwasher. To add salt, unscrew the cap of the container on the bottom and then refill the container. After loading the salt, you must run a complete washing cycle, or the pre-wash/programme. The salt dispenser has a capacity of between 1 kg and should be refilled from time to time. When the appliance is used for the first time, after completely filling the salt container, it is necessary to add water until the container overflows.
- Page 10: Add rinse aid up to the Max. indication. Rinse aid helps the dishes to dry quickly and prevents spots and stains forming. The rinse aid container is next to the detergent container. To open, press the tab on the lid of the rinse aid dispenser and lift it. If the rinse aid spills out, remove it from the wash tank. Spilled rinse aid can cause excessive frothing during the wash cycle. Close the lid of the rinse aid dispenser. Always use rinse additives that are suitable for automatic dishwashers.
- Page 11: Basic settings and program selection To accept the choice of language, press the START/OK button. The pre-set ECO programme will appear on the display. To adapt the wash cycle to the type of dirty dishes, choose the suitable programme by selecting the PROGRAM SELECTION buttons. Select the washing options if necessary. To turn the appliance on and off, press the ON/OFF button. Connect the machine to the power supply. The SET LANGUAGE message will appear on the display, followed by ENGLISH. By pressing the PROGRAM SELECTION button you can select the preferred language. In the event that the machine remains switched on without selecting or starting any programme, the dishwasher will switch off automatically after 5 minutes.
- Page 12: Program overview Standard and most efficient programme in terms of combined energy and water consumption for normally soiled dish. ECO: EN60436-standardized programme that automatically selects the most efficient and effective duration and temperature of the cycle depending on the load and degree of grime. AUTO WASH: A full load programme designed to wash and dry in less than an hour, maintaining high quality wash performance. UNIVERSAL: Suitable for everyday light soiled dishes, your daily reference programme. INTENSIVE: For heavily soiled pans and any other items that require a strong and effective wash. GLASS: A gentle cleaning cycle for your most precious delicate dishes and crystals, protecting the lifespan of your glassware. SILENT: The perfect programme designed to reduce dishwasher noise to the minimum. PREWASH: Short, pre-wash for dishes used during the day, when you want to wait until you have a full load. For wash programmes with prewash, it is advisable to add a second dose of detergent directly into the appropriate location. Information for test institutes: To receive the necessary information for conducting performance tests, include the product number code from the rating plate in your request.
- Page 13: Detergent for soaking (Prewash) Washing temperature °C Average (min.) wash duration HALF LOAD button AUTO DOOR OPEN button The ECO programme is suitable for cleaning normally soiled tableware and is the most efficient programme for this use in terms of combined energy and water consumption. The cycle duration may be influenced by numerous factors, such as water temperature, main water pressure, environmental temperature, the amount of detergent used and the number and distribution of dishes in the loading racks. Values are measured in a laboratory according to European Standard EN60436 (consumption may vary according to conditions of usage). With hot water, the time remaining until the end of the programme is automatically displayed while the programme is running. Except for the ECO programme, the values given for other programmes are indicative only.
- Page 14: Programme water consumption and electricity consumption are affected by various factors. The values for programmes other than ECO are indicative only. The ADDISH programme allows adding dishes after the cycle has started. An audio signal alerts if the door is opened during the drying cycle. To change a running programme, open the door carefully and press the RESET 3 SEC button. Adding dishes after the ADDISH indicator light has switched off is discouraged. Opening the door during a programme is not recommended, especially during critical phases. The machine stops automatically if the door is opened while a programme is running. Before starting a new programme, check that there is detergent in the dispenser.
- Page 15: End of the programme will be indicated by 3 signals lasting 3 seconds interspersed with a pause of 20 seconds. The dishwasher will switch off after one minute. The wash basket will appear on the display when the half load button is pressed. The END message will appear on the display for one minute. The door will open automatically during the drying phase. You will have to wait for the end-of-cycle signal before removing the dishes. You can adapt various parameters to your washing needs from the settings menu. The EXPRESS button enables average energy and time savings of 25%. Selecting the HALF LOAD option can save you time, energy, and water. Press the START/OK button to confirm the selected parameter.
- Page 16: Press the START/OK to confirm the chosen language. If the YES setting is confirmed, LANGUAGE will be displayed and a short sound will be heard. To exit the menu, press the ON/OFF key. The buzzer signal can be activated/deactivated for selecting and setting washing functions and options. This option enables optimal tablet usage and changes the set washing programme for better performance. The buzzer signal will always remain active when the machine is switched on and off or in the event of a problem. Once selected, the buzzer option remains active for subsequent washing cycles until deselected. Switch on the dishwasher with the ON/OFF button and keep the SETUP 5 SEC button pressed for about 5 seconds. The SETTINGS message appears on the display for parameter adjustments. Select the TABLETS setting and confirm your choice by pressing START/OK.
- Page 17: Floor light indicates the status of the washing program. The light stays on during the wash cycle and blinks at the end. When the SALT message appears, fill the tank as instructed. The NO RINSE AID warning light indicates the need to refill the rinse aid tank. The AUTO DOOR OPEN button activates a device that opens the door during or after the drying cycle. This feature optimizes drying and reduces energy consumption. The DELAY START button allows programming the wash cycle start time between 0:30 and 24 hours. To set the delay, press and hold the ON/OFF button, select the program, and adjust the delay. The delayed start settings will remain visible for 5 seconds or until other buttons are pressed. Do not obstruct the door when the delay start option is selected to avoid damaging the mechanism.
- Page 18: Changing the programme does not change the delay time and the LED will remain on. The dishwasher is fitted with a water softener unit which supplies softened water for washing the dishes. The degree of hardness of your water can be obtained from your water supply company. When the delay is set on a programme, the DELAY START light stays on until the end of the time. The delayed time countdown starts showing on the display START IN XX: XX. The water softener can treat water with a hardness level of up to 90 °fH or 50 °dH through 8 settings. In the event of a power failure, the dishwasher stores the time remaining at the start. To cancel the delayed start, press and hold the START/OK button for at least 3 seconds. The display will show RESET and beeps will sound when cancelling the delayed start. The softener unit is set in the factory at level 4 (S4) as this satisfies the requirements of the majority of users.
- Page 19: Regulate the setting of your water softener unit according to the degree of hardness of your water. The dishwasher must always be off before starting this procedure. Switch on the dishwasher with the ON/OFF button. Keep the SETUP 5 SEC button pressed for about 5 seconds. Select the SOFTENER setting and confirm by pressing the START/OK button. When it becomes necessary to fill the rinse aid container, the display will indicate the lack of rinse aid. This has been factory-set to level 4, as this satisfies the majority of users. To exit the menu, press the ON/OFF key. The regeneration phase is carried out at the end of a washing cycle. Approximately 3.5 litres of water are consumed in the resin phase, with an energy consumption of approximately 1Wh.
- Page 20: Press PROGRAMME SELECTION to choose the value (R1 R6). With level R0, no rinse aid is dispensed. It is important to regulate the quantity of rinse aid to achieve good washing results. If there are streaks on the dishes, decrease the amount by one position. If whitish spots occur, increase the amount by one position. Press START/OK to confirm. Press ON/OFF to confirm. Rinse aid level (multi dosage) meaning includes no multi dosage and rinse aid detection. 0 indicates no rinse aid. 1 pulse corresponds to 1 dose, and it increases up to 6 pulses for 6 doses.
- Page 21: Basket loadability and settings Adjusting the upper basket The upper basket is equipped with a height adjustment system. Lift the basket holding it by the sides. Push the lever A holding it by the sides. We recommend adjusting the basket before loading the dishes. Always accompany the basket during its descent into the stop position. Never raise or lower the basket by working on one side only.
- Page 22: Position the larger plates slightly inclined towards the front to facilitate easy insertion of the basket inside the machine. After loading the basket, make sure that the spray arm rotates freely without hitting dishes or kitchen utensils. The upper basket is equipped with movable supports that can be placed in either the open position or the lowered position for more space. A standard daily load is represented in the accompanying figure. Goblet-shaped glasses can be hung on the ends of the supports. The lower basket houses pots, pans, tureens, salad bowls, lids, serving plates, dinner plates, and soup plates. Cutlery should be placed with the handle down in the special plastic container in the lower basket. The upper basket is designed to offer maximum flexibility of use and can be loaded with dessert plates, cups, and glasses. It is advisable to lock cups and glasses to avoid them being overturned by the jets. In the lower basket, there may be adjustable combs useful for guaranteeing optimum stability for the dishes.
- Page 23: Warning: After loading the basket, make sure that the spray arm rotates freely without hitting dishes or kitchen utensils. Use the third basket to load the cutlery. Load knives with the sharp, cutting side facing downwards. If necessary, the side shelves of the third basket can be slid or removed to create additional space in the upper basket for bulky items such as wine crystals. Non-standard size or shaped dishes or plates can be raised/lowered to ensure maximum loading flexibility.
- Page 24: Power wash feature is enabled in some programmes. The third washing arm is positioned at the bottom of the dishwasher. This feature is ideal for cleaning heavily soiled tableware or cookware. Place heavily soiled items directly in the area of the basket above the power wash arm.
- Page 25: Loading the detergent It is essential to use a detergent that is specifically designed for dishwashers. Unsuitable detergents do not contain the proper ingredients for use in a dishwasher. The detergent container is inside the door. If the container door is closed, press the release button to open it. If you are using tablets, one should suffice. When loading the lower basket, ensure that the plates do not obstruct the detergent dispenser. After pouring the detergent into the container, close the door until it clicks into place. The amount of detergent to be used varies according to how dirty the dishes are. We advise using 20-30 g of detergent in the wash section of the detergent compartment.
- Page 26: Types of detergent Detergent tablets dissolve at different speeds, which may affect their effectiveness during short programmes. It is recommended to choose longer programmes to ensure complete use of the detergent. Too little detergent does not clean properly, while too much is wasteful and does not improve results. Tablets must be placed in the wash section of the detergent container, not directly in the tub. Concentrated detergents help limit environmental damage and protect dishes and the dishwasher. Using concentrated detergents with 50°C wash programmes achieves results similar to 65°C programmes at a lower temperature. In programmes with a pre-wash cycle, additional detergent must be poured into the appropriate location. Combined detergents containing rinse aid must be placed in the wash section of the detergent container. The rinse aid container must be empty when using combined detergents. For TABLETS combined detergents, read and follow the manufacturer's instructions on the packaging.
- Page 27: If you don't get satisfactory washing results, please contact the detergent manufacturer. We recommend you return to use traditional separate products (salt, detergent, and rinse aid). In certain circumstances, use of combined detergents can cause limescale deposits on dishes or in the dishwasher. Combined detergents can lead to a reduction in washing and drying performance. We recommend that you refill both the salt and rinse aid container. Run one normal washing cycle without a load. A number of cycles will be required before the system becomes fully efficient again after returning to conventional salt. Any problems arising from the use of these products are not covered by our warranty.
- Page 28: Cleaning and maintenance The filter system consists of a central container that traps larger particles, a micro filter that traps the tiniest particles, and a flat gauze that continuously filters the wash water. To achieve excellent results every time, the filters should be checked and cleaned after each wash. To remove the filter unit, simply turn the handle anti-clockwise and pull it upwards. Remove the gauze filter and wash the whole unit under a jet of water. If necessary, a small brush can be used. For ease of cleaning, the central container is removable by pressing the two buttons on the sides and pulling it upwards.
- Page 29: Re-assemble the plate and filter unit by following the previous operations in reverse order. Make sure that the gauze filter is properly positioned at the bottom of the dishwasher. Never use the dishwasher without the filters. Looking after your appliance correctly can extend its lifespan. To clean the dishwasher outside, do not use solvents or abrasives, but only a cloth soaked with water. The dishwasher does not require special maintenance, because the tank is self-cleaning. Regularly wipe the door gasket with a damp cloth to remove any food remains or rinse aid. Dishwasher cleaning is recommended to remove limestone deposits or dirt. If dishes or pans are not properly washed or rinsed, check that all the spray heads on the rotor arms are clear. Do not use tools that can deform the spray heads.
- Page 30: When you have finished, refit the rotor. After every wash it is essential to turn off water supply and to switch off the machine. If the machine is not going to be used for some time, it is advisable to follow these rules: Do an empty wash with detergent to clean the machine of any deposits. Pull out the electric plug. Turn off the water tap. Fill the rinse aid container. Leave the door ajar. Keep the inside of the machine clean. If the machine is left in places where the temperature is below 0°C, any water left inside the pipes may freeze. If you believe the dishwasher is not working correctly, consult the quick guide provided below.
- Page 31: Error displayed Meaning and solutions NO WATER with a short audio signal The dishwasher does not fill with water ERROR E2 with a short audio signal Make sure the water supply is open. Make sure the water supply hose is not bent or crushed. Make sure the drain pipe is at the proper height. Close the water supply, unscrew the drain pipe from the back of the dishwasher and check that the sand filter is not clogged. ERROR E3 with a short audio signal The dishwasher does not drain water Make sure the drain pipe isn't bent, trapped or blocked, and the filter is not clogged. Make sure the siphon is not clogged. ERROR E4 with a short audio signal Water leak ERROR E8 with a short audio signal The water heating element is not working correctly or the filter plate is clogged Clean the filter plate. ERROR E18 with a short audio signal Water level problems Check clogged filter plate Clean the filter plate. ERROR E21 with a short audio signal Uncontrolled water supply with open solenoid valve. Close the water tap immediately and disconnect the appliance from the power supply. Any other code Turn off and unplug the dishwasher, wait a minute. Turn on the machine and restart a program. If the error occurs again contact an Authorized Customer Service Centre directly. Other faults FAULTS CAUSE SOLUTION 1. No programme works Plug not connected to wall socket Connect electric plug
- Page 32: Dishwasher does not fill with water The water tap is closed. The water supply hose is bent. The filter of the water supply hose is clogged. Dishwasher does not discharge water Filter is dirty. Drain pipe is bent. The outlet connection on the wall is pointing downwards not upwards. Dishwasher discharges water continuously Position of the drain pipe is too low above floor level. Spray arms are not heard to rotate Excessive amount of detergent. Item prevents arms from rotating. Filtering plate and filter very dirty. Dishes only partially washed Bottom of saucepans have not been washed well. The dishes have not been loaded properly. The end of the drain pipe must not come into contact with the outflow water. An incorrect amount of detergent has been measured out.
- Page 33: The cap of the salt container is not closed properly. Choose a more vigorous programme. The wash programme is not thorough enough. Detergent not dispensed or partially dispensed. Position dishes so as not to obstruct the dispenser opening. Mains water is too hard. Check salt and rinse aid level and regulate. The dishes are not completely dry. Leave the dishwasher door ajar at the end of the wash program to allow the dishes to dry naturally. If the malfunction continues, contact the Authorized Service Centre, quoting the model of the dishwasher.
- Page 34: Environmental concerns WEEE should not be treated as household waste. WEEE should be handed over to relevant collection points managed by the municipality or registered companies. Equipment contains both polluting substances and basic components that can be re-used. When buying a new appliance, the old one may be returned to the retailer free of charge. It is important to have WEEE subjected to specific treatments to remove pollutants and recycle materials. IKEA guarantee This guarantee applies to domestic use only. The guarantee is valid for five years from the original date of purchase. The original sales receipt is required as proof of purchase. The guarantee covers faults caused by faulty construction or material faults from the date of purchase.
- Page 35: Transportation damages are not covered by IKEA if the customer transports the product. Damage during delivery by IKEA is covered. Initial installation costs are not covered, but re-installation is provided if repairs or replacements are made under the guarantee. IKEA is not responsible for plumbing and electrical installations; customers must complete these before service work. Normal wear and tear is not covered under the guarantee. Deliberate or negligent damage, incorrect installation, and damage from chemical reactions are excluded from coverage. Consumable parts like batteries and lamps are not covered. Non-functional decorative parts and accidental damage from foreign objects are also excluded. Damage to specific parts such as ceramic glass and accessories is not covered unless caused by production faults. The IKEA guarantee provides specific legal rights that do not limit local consumer rights. The warranty is valid only in the country of purchase and services are provided within the guarantee conditions.
- Page 36: UNITED ARAB EMIRATES & OMAN QATAR EGYPT STATE OF KUWAIT JORDAN KINGDOM OF SAUDI ARABIA BAHRAIN Contact centre information is provided for each region. Phone lines have specific operating hours. Toll-free numbers are available for customer service.
- Page 37: Page 37

epoq EDW60A42W23 Dishwasher

BOSCH SPV6HMX5MR Dishwasher

InDesiT D2I HL326 UK Dishwasher

FISHER PAYKEL DD60SDFHTX9 Dishwasher
IKEA RANSBERG Dishwasher

NEFF S257ECX21E Dishwasher

SAMSUNG DW90F89 Dishwasher

CMA DISHMACHINES CMA-180VL Dishwasher

Haier HDW13V1S1 Dishwasher

HOMCOM 800-190V70 Tabletop Dishwasher