INSIGNIA NS-DWH1SS9 Dishwasher


USER GUIDE
Top Control
Dishwasher
NS-DWH1SS9/NS-DWH1WH9
Before using your new product, please read these instructions to prevent any damage.

| General | Details |
|---|---|
| Name | INSIGNIA NS-DWH1SS9 Dishwasher |
| Make | Insignia |
| Language | English |
| Filetype | PDF (Download) |
| File size | 0.61 MB |


INSIGNIA NS-DWF2SS3 Dishwasher

INSIGNIA NS-DWH2SS8 Dishwasher

INSIGNIA NS-DWRF2SS3 Front Dishwasher

INSIGNIA NS-DWR3SS1 Dishwasher

INSIGNIA NS-DWH1SS9 Dishwasher Overview
Summary of Contents
- Page 1: User guide for the top control dishwasher NS-DWH1SS9/NS-DWH1WH9. Read these instructions before using the product to prevent any damage.
- Page 2: Introduction Important safety instructions Basic precautions before use Features Package contents Interior Control panel Setting up your dishwasher Finding a suitable location Before using your dishwasher
- Page 3: Top Control Dishwasher Introduction Congratulations on your purchase of a high-quality Insignia product. Your NS-DWH1SS9/NS-DWH1WH9 represents the state of the art in dishwasher design and is designed for reliable and trouble-free performance. Important safety instructions Caution Risk of electric shock. Do not open. This symbol indicates that dangerous voltage constituting a risk of electric shock is present within your dishwasher. Warning When using your dishwasher, follow basic safety precautions, including the following: Read these instructions. Keep these instructions. Heed all warnings. Follow all instructions. Clean only with a damp cloth. Do not block any ventilation openings. Install in accordance with the manufacturer's instructions. Make sure that the available AC power matches the voltage requirements of this appliance. Refer all servicing to qualified service personnel. Electric shock hazard. Failure to follow these instructions can result in electric shock, fire, or death. Never allow children to play with, operate, or crawl inside the dishwasher. Turn off the dishwasher before carrying out user maintenance on it. If a component part is damaged, it must be replaced by the manufacturer, its service agent, or similar qualified persons in order to avoid a hazard.
- Page 4: Do not touch the heating element during or immediately after use, especially if the sanitize option has been selected. Do not let children abuse, sit, or stand on the door or the racks of the dishwasher. Under certain conditions, hydrogen gas may be produced in a hot water system that has not been used for two weeks or more. Do not store or use combustible materials, gasoline, or other flammable vapors and liquids in the vicinity of this or any other appliance. Use only detergents or rinse agents recommended for use in a dishwasher and keep them out of the reach of children. Keep young children and infants away from the dishwasher when it is operating. Do not use the dishwasher if it has a damaged power cord or plug. The dishwasher fills with water, covering the filter area at the bottom. Your dishwasher has a multiple filter system which includes four separate filter meshes. Your dishwasher has a smart wash system under the normal wash program which selects the wash cycle based on how large and how soiled the load is.
- Page 5: Top Control Dishwasher Package contents • Dishwasher • Hose • Hose clamp • Top mounting clips (2) • Wood screws (4) • User Guide • Installation Guide Note: You need to purchase the installation kit in order to install your dishwasher. Interior • Upper spray arm • Top rack • Cup shelf • Tub gasket • Middle spray arm • Silverware basket • Cleanable filters • Lower spray arm • Bottom rack • Heating element • Detergent dispenser • Rinse aid dispenser • Control panel Select a cycle based on the type of dishes and how dirty they are. See Cycles on page 7 for more information. Options add enhancements to your selected cycle. See Options on page 7 for more information. Start or stop your wash cycle and check its status. See Controls and indicators on page 7 for more information.
- Page 6: Setting up your dishwasher For complete instructions on installing and setting up your dishwasher, see the included Installation Guide. Finding a suitable location The dishwasher must be installed so that the drain hose is no more than 10 feet (3.01 m) in length, for proper drainage. This dishwasher is designed to be enclosed on the top and on both sides by a standard residential kitchen cabinet unit. The installation enclosure must be clean and free of any obstructions. The enclosure must be at least 24 inches (61 cm) wide, 24 inches (61 cm) deep, and 34 inches (86.4 cm) high. For the front door of the dishwasher to be flush with the front edge of the countertop, the countertop must be 25 inches (63.5 cm) deep. If installing into a corner, allow 2 in. (5.08 cm) min. clearance between dishwasher and adjacent cabinet, wall, or other appliances. Before using your dishwasher Remove the interior packing. Clean the interior surface with lukewarm water using a soft cloth. Make sure that the water supply temperature is between 120° F and 149° F (49° C and 65° C). Make sure that your dishwasher is connected to a grounded 120V, 60Hz power supply.
- Page 7: Top Control Dishwasher Using your dishwasher Your dishwasher’s control panel is located on the top edge of the door. The door must be opened to make settings and operate the dishwasher. Cycles Select a cycle based on the type of dishes to be washed and the level of soil on the dishes. Cycle times are approximate and will vary with options selected. Options Options can add enhancements to the cycle selected. Heating Dry is used to heat-dry your dishes. Sanitize Rinse is used to sanitize your dishes and glassware. Notes Certified residential dishwashers are not intended for licensed food establishments. The sanitize cycle is NSF certified. Controls and indicators Delay allows you to delay the start of the selected wash cycle until the desired time is shown on the display.
- Page 8: Display shows the remaining hours and minutes of the current cycle, delay hours remaining, and error codes. If the remaining time on the display suddenly increases or decreases, it means that the Smart Sensor has checked the soil level or the water needs to be heated. Press START/Cancel to start the dishwasher after selecting a cycle and function. To cancel a running cycle, open the door, then press and hold START/Cancel for three seconds. You can add more dishes before the main wash cycle has started if the detergent dispenser is still closed. Rinse Aid turns on when you need to add rinse aid. Sanitized indicator turns on when a sanitized cycle is finished. Clean indicator turns on after a cycle is finished. Use the child lock to prevent children from accidentally changing the dishwasher cycle. Scrape away large pieces of food before loading the dishwasher.
- Page 9: Top control dishwasher Loading the upper rack is designed for cups, glasses, small plates, bowls, and plastic items marked dishwasher-safe. For best results, place the items with the soiled surface facing down or toward the center. Make sure that the loaded dishes do not interfere with the rotation of the middle spray arm. The bottom rack is designed to accommodate plates, bowls, saucers, and cookware. Large items should be placed along the edge, with the inside facing down. The silverware basket is divided into three separate sections, which can be placed in either the upper or lower racks. Make sure that nothing protrudes through the bottom of the silverware basket to block the lower spray arm.
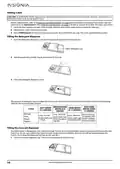
- Page 10: Adding a dish To avoid burn injury, open the door slowly and wait until the spray arms and wash action stop. Before adding dishes, refer to Preparing and loading dishes for instructions on loading more dishes. To add or remove items after the wash cycle starts, open the door slightly and wait until the wash action stops before completely opening. Press START/Cancel on the control pad and close the door within four seconds to resume the cycle. Filling the detergent dispenser Push the detergent dispenser cover latch downwards to open the detergent cup. The amount of detergent required depends on the cycle selected and the soil level on the dishes. Your dishwasher is designed to use a liquid rinse aid, which greatly improves drying performance after the final rinse. Under normal conditions, the rinse aid will last approximately one month. Try to keep the dispenser full, but do not overfill it.
- Page 11: Add rinse aid until the liquid touches the indicated fill level. Do not overfill since this can cause over-sudsing. Rinse aid greatly improves drying and reduces water spots and filming. Without rinse aid, your dishes and dishwasher interior will have excessive moisture. The rinse aid dispenser automatically releases a measured amount of rinse aid during the last rinse. If spotting and poor drying is a problem, increase the amount of rinse aid dispensed by rotating the dial to a higher number. Hot water is required for optimum dish washing and drying results. Water entering the dishwasher should be at least 120° F (49° C) to achieve satisfactory results. To make sure that the water entering the dishwasher is hot, run hot water from the nearest hot water faucet before starting the cycle. The heat dry function enhances drying performance when used with a rinse aid. For optimum performance, the hot water supply line must provide water pressure of at least 20 psi and not more than 120 psi.
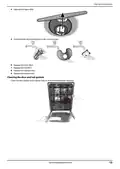
- Page 12: Maintaining your dishwasher To avoid burn injury, allow the heating element to cool before attempting to clean the interior of your dishwasher. Clean the stainless steel door and handle regularly with a soft cloth and standard household cleaner to remove debris. Do not use appliance wax, polish, bleach, or products containing chlorine to clean the stainless steel door. Clean the control panel gently with a soft, lightly dampened cloth. The tub is made of stainless steel and will not rust or corrode, even if scratched or dented. Clean the spots on the steel inner door and tub with a damp non-abrasive cloth. The filters are designed to collect debris and need to be cleaned monthly to maximize wash performance. Remove the bottom rack. Rotate the cylinder filter, then lift it out. Lift the fine filter from the bottom of the tub.
- Page 13: Top control dishwasher Take out the fabric filter. Flush the filters by holding them under running water. Replace the fabric filter. Replace the fine filter. Replace the cylinder filter. Replace the bottom rack. Cleaning the door and tub gaskets. Clean the door gasket with a damp cloth to remove food particles regularly.
- Page 14: The inside of the dishwasher is self-cleaning under normal use. If needed, the tub gasket can be cleaned with a damp cloth. Use a brush to clean the opening in the end of the gasket. If there is an air gap installed with your dishwasher, make sure that it is clean so the dishwasher will drain properly. Before you clean the air gap, turn off the dishwasher, then remove the plastic air gap cover and clean with a toothpick. Your dishwasher should be protected from freezing if you plan to leave it for extended periods in an unheated place. Turn off the electrical power to the dishwasher at the supply source by removing fuses or tripping the circuit breaker. Turn off the water supply. Reconnect the water, drain, and electrical power. Check all connections to make sure that they do not leak.
- Page 15: Top Control Dishwasher Troubleshooting Refer to this table to correct minor issues before calling for service. Error codes Make sure that your dishwasher is on and working. Make sure that the water pressure is 20~100 psi. Check the drain hose. Contact Customer Service. The water temperature did not reach the required level after 90 minutes. Turn off water to the dishwasher, then check the filter system for blockage. If this does not resolve the issue, contact customer service. CAUTION: If an overflow occurs, turn off the main water supply before calling for service. Make sure that the door is closed and latched.
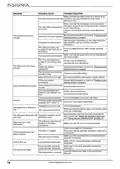
- Page 16: Problem: The water pressure is too low. Possible cause: The inlet water temperature is too low. Possible solution: Make sure that the water pressure is above 20 psi. Problem: The dishes are not clean enough. Possible cause: Improper use of detergent. Possible solution: Add detergent depending on the water hardness and washing cycle you choose. Problem: The spray arms are blocked. Possible solution: Make sure that the spray arms are not blocked and are free to rotate. Problem: The rinse aid dispenser is empty or the setting is too low. Possible solution: Fill the rinse aid dispenser and increase the rinse aid setting. Problem: The dishes are not drying enough. Possible cause: Dishes are loaded improperly. Possible solution: Reload the dishwasher as shown in Preparing and loading dishes. Problem: Water hardness is too high. Possible solution: For extremely hard water, install a water softener. Problem: Spots and filming on dishes. Possible cause: Old or damp rinse aid power is used. Possible solution: Use fresh, liquid rinse aid. Problem: The detergent dispenser will not close. Possible cause: The previous cycle has not finished or has been interrupted. Possible solution: Make sure that the current cycle is finished. Problem: The drain is clogged. Possible solution: Make sure that the drain hose is not kinked and is properly connected. Problem: Excessive suds caused by using improper detergent. Possible solution: Make sure to use only automatic dishwasher detergent.
- Page 17: Top Control Dishwasher There are black or gray marks on the dishes. Make sure that the water inlet temperature is not less than 120° F (49° C). Use a spot cleaner to remove coffee or tea stains. Rinse your dishes before loading to help prevent reddish stains. This is normal for the detergent cup opening/drain pump. If the noise continues after the cycle is complete, call for service. Turn on the water valve if the dishwasher won’t fill. Make sure that the door is closed and latched. Max capacity is 14 place settings. Dimensions are 23 15/16 × 26 1/2 × 33 3/4 in. (606 × 674 × 857 mm).
- Page 18: One-year limited warranty The Distributor of Insignia branded products warrants to you, the original purchaser, that the Product shall be free of defects in material or workmanship for a period of one year from the date of purchase. The Warranty Period lasts for 1 year (365 days) from the date you purchased the Product. During the Warranty Period, if the Product is determined to be defective, Insignia will repair or replace the Product at no charge. This warranty is valid only in the United States and Canada at Best Buy branded retail stores or websites. This warranty does not cover food, beverage, and/or medicine loss/spoilage, customer instruction, installation, cosmetic damage, and other specified damages. Repair or replacement under this warranty is your exclusive remedy for breach of warranty. Insignia shall not be liable for any incidental or consequential damages for the breach of any express or implied warranty on this product. All express and implied warranties for the Product are limited in duration to the Warranty Period. This warranty gives you specific legal rights, and you may also have other rights that vary by state or province.
- Page 19: Page 19

KitchenAid w11323304 Dishwasher

BOSCH SM Mega Power Silver Dishwasher

BOSCH SMU2ITS01A Series 2 Built Under Dishwasher

SIEMENS SN63HX01AE Dishwasher

BOSCH SMS4HDW52G Dishwasher

FISHER PAYKEL DD24SDFTX9N Dishwasher

FISHER PAYKEL DD60STX6I1 FP AA Integrated Single DishDrawer Dishwasher

FISHER AND PAYKEL DW60UC6B Contemporary Built Under Dishwasher

BOSCH SMS6ECI15E Dishwasher

Electronic LG DFB512FP Dishwasher