VIKING VDWU724SS Dishwasher


Use & Care
MANUAL
7 SERIES
VDWU724
FDWU724

| General | Details |
|---|---|
| Name | VIKING VDWU724SS Dishwasher |
| Make | VIKING |
| Language | English |
| Filetype | PDF (Download) |
| File size | 3.26 MB |


VIKING FDW102WS Dishwasher

VIKING 3 Series Dishwasher

VIKING VDWU324SS Dishwasher

VIKING VDWU724SS Dishwasher Overview
Summary of Contents
- Page 1: Use & care manual for 7 series VDWU724 and FDWU724.
- Page 2: To prevent accidents, which could cause serious injury or death, as well as machine damage, read these instructions before installation and/or use. Please read this user manual and particularly the safety instructions completely and carefully. They will save you time and effort and help to ensure optimum dishwasher performance. Contents IMPORTANT SAFETY INSTRUCTIONS RECYCLING GETTING TO KNOW YOUR DISHWASHER LOADING THE DISHWASHER WHAT SHOULD NOT BE WASHED IN YOUR DISHWASHER OPERATING THE PRODUCT DETERGENT CARE AND MAINTENANCE TROUBLESHOOTING WARRANTY Be sure to observe all listed warnings and cautions. Look particularly for the icons with exclamation marks inside. The information icon will also provide important references. WARNING: Indicates a potentially hazardous situation which, if not avoided, could result in death or serious injury. CAUTION: Indicates a potentially hazardous situation which, if not avoided, may result in injury. NOTICE: Indicates a potentially hazardous situation which, if not avoided, may result in damage to the dishwasher, the tableware, the equipment or the environment.
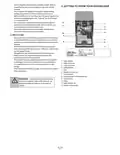
- Page 3: IMPORTANT SAFETY INSTRUCTIONS Read all instructions before using the dishwasher and save these operating instructions for future users. Repairs and technical modifications must be carried out exclusively by an authorized technician. Use the dishwasher only for its intended purpose as described in this user manual. The manufacturer disclaims responsibility for damage or injury caused by improper use of this appliance. Improper connection of the equipment-grounding conductor can result in a risk of electric shock. Do not operate your dishwasher unless all the enclosure panels are properly in place. This appliance produces ozone during normal operation, which may cause respiratory problems with long-term exposure. Children should not operate this machine without adult supervision. Dishwasher detergents contain chemicals that can cause sickness if inhaled or swallowed. Do not store or use flammable liquids or vapors in the area of the dishwasher.
- Page 4: Service should be performed by a qualified installer. Work by unqualified persons could be dangerous and may void the warranty. Do not operate the appliance if damaged, malfunctioning, partially disassembled or if it has missing or broken parts. For safety reasons, the dishwasher must be secured to adjacent cabinetry using the brackets provided. Do not use any extension cord or portable outlet device to connect the dishwasher to a power supply. Remove the door to the washing compartment when removing an old dishwasher from service or discarding it. Remove the door lock or door of the washing compartment before disposing of the dishwasher so that children or small animals cannot be trapped inside. Old appliances may contain materials that can be recycled. Please check the water supply line periodically. It is susceptible to breakage. Please keep the dishwasher package out of the reach of children after unpacking it. Ensure that any plastic wrappings, bags, small pieces etc. are disposed of safely and kept out of the reach of children.
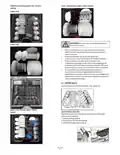
- Page 5: Cutlery basket Loading the dishwasher Pull the handle to open the door. If the door is opened during operation, the dishwasher will stop running. Remove coarse food leftovers from tableware. Now you can load the dishwasher. 12 place setting loading pattern for daily, regular or typical use. Caution: Large knives and other utensils with sharp tips and edges must be placed horizontally into the upper rack due to risk of injury. Caution: Use extreme caution when removing knives and other sharp utensils from the dishwasher.
- Page 6: Additional loading pattern for 10 place setting. Lower rack without upper cutlery basket. Hot steam can escape, posing a danger of serious burns or other injury. Place all containers such as cups, glasses, and pots into the dishwasher with the opening facing downwards. Small and light items can go into the upper rack. Long and narrow items are placed in the middle of the racks. Load dishes accordingly and be careful when loading glasses to avoid contact during the wash cycle. Do not overload your dishwasher and pay attention to manufacturer instructions regarding suitable dishes. Load the upper rack with dessert plates, cups, glasses, etc. Depending on the size of the glasses and cups, the shelf height setting may be adjusted.
- Page 7: Collapsible upper basket wires can be used for larger space for dishes. To position the collapsible wires horizontally, grab from the middle and push in the direction of the arrow. To lower the basket, hold the upper basket wires, lift slightly, and push the latches. Ensure to hold the wires from their stems to avoid bending. The movement mechanism may not function properly if the upper basket is overloaded. The upper basket height adjustment allows for creating large spaces in the machine. You can use the basket in three different positions: lower, middle, and upper. Foldable tines in the lower basket facilitate the placement of large items. Collapsible tines can be adjusted individually or all at once for larger spaces. To adjust tines, grab from the mid position and push in the direction of the arrows.
- Page 8: Silverware basket is designed to wash your dishes such as knife, fork, spoon, etc. in a cleaner manner. The cutlery basket can be moved to create a wider space while placing your dishes in the lower basket. The lower basket multipurpose/height adjustable service rack allows you to easily wash pieces such as extra glasses, long ladles, and bread knives. When finished, test to ensure that the spray arm can still move freely. The lower basket glass holder enables safe washing for oversized and tall glasses. You may use the racks as required by moving them to lower or upper positions. Make sure that the impeller does not touch the dishes you placed on the racks. Ceiling cutlery basket is designed to wash your cutlery items by placing them between the bars on the basket. Use the supports to wash trays in the bottom basket. Refer to the Auxiliary functions section for appropriate program and function selection.
- Page 9: What should not be washed in your dishwasher Proper and improper loading of dishware Rust-sensitive steel parts like iron and cast iron can rust and stain other utensils and damage the interior stainless steel liner of the dishwasher. Do not wash copper, brass, pewter, bronze, or tin. Place all containers such as cups, glasses, and pots into the dishwasher with the opening facing downwards. The movement of the spray arms must not be hindered. Do not overload your dishwasher. Cutlery with wooden or horn handles will deteriorate over time if put in the dishwasher. Glued dishes or cutlery are not suitable for machine washing. Sterling silver articles should not be washed in the dishwasher because they tend to discolor and become dull. Do not wash sponges or dish cloths in the dishwasher.
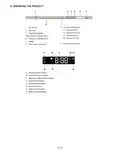
- Page 10: Operating the product includes various function selection keys. The on/off key is essential for powering the device. Express, high gloss, and sanitize functions are available for specific needs. Menu key allows access to different settings. Time delay selection and menu direction selection keys facilitate programming. The selection/confirmation key is used to finalize choices. Display indicators include half load, auto door open, and ion guard functions. Delayed start and end of program indicators provide status updates. Rinse aid, water cut-off, and tablet detergent indicators are also present.
- Page 11: Auxiliary functions allow you to save time, water, and power. Washing programs are designed to obtain the best cleaning effect based on the type of soiling and properties of the dishes. The On/Off key illuminates the indicator lights for the ON position. To cancel the running program, open the door and press and hold the Program Start/Pause/Cancel key for 3 seconds. The Half Load function operates the machine without loading it completely. The Express Function shortens the washing cycle and decreases water consumption. The HighGloss Function provides superior drying performance by increasing rinsing temperature and drying time. The Sanitize Function raises water temperature in the final rinse to meet NSF/ANSI STANDARD 184 requirements. Selected programs will start when you close the door of the machine. Only sanitizing cycles are designed to meet NSF/ANSI Standard 184 for soil removal and sanitization efficacy.
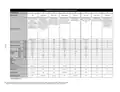
- Page 12: Program data and average consumption values table Program number Program name Determines the soiling degree of the dishes and sets the temperature and amount of the washing items. It is the most suitable washing program for mixed types of dishes including plastic. Suitable for very heavily soiled dishes, pots and pans. Suitable for regular, daily, or typical use to completely wash and dry a full load of normally soiled dishes. Special program for gentle cleaning of delicate glassware. Suitable for cleaning lightly and freshly soiled dishes while saving time. Suitable for removing the remnants on the scraped or pre-cleaned soiled dishes. The consumption values shown in the table were determined under standard conditions. Energy-usage labeling is based on the ‘Normal’ cycle.
- Page 13: Functions under the settings menu provide additional options depending on the model. To access these functions, press and hold the Menu key for 3 seconds. The tablet detergent function improves drying performance with multi-purpose detergents based on water hardness. If the tablet feature was used in the last wash, it remains active in the next program unless turned off. Interior lighting illuminates when the door is opened and can be adjusted through the settings menu. Changing the warning sound volume is possible through the settings menu, with options for off, medium, and high. Floor illumination indicates that the program is still running and cannot be canceled by the user. Pressing the Menu key allows entry into the settings menu, with some models requiring only a single press. Settings are saved automatically after adjustments are made. The tablet detergent function may alter the program duration.
- Page 14: Scheduling the washing time allows you to use the Time Delay function to wash dishes during economical electricity tariff hours. You can delay the start of the selected program for up to 24 hours by pressing the Time Delay function key after selecting the washing program. To cancel the program, open the door and hold the Program Selection / Program Cancel keys for 3 seconds, then close the door to complete the draining process. The rinse aid indicator shows whether there is an adequate amount of rinse aid in the dishwasher. You need to refill the rinse aid reservoir whenever the rinse aid indicator appears on the display. While the Time Delay function is active, changes to the washing program or delay time cannot be made. To cancel the Time Delay function, open the door and hold the Program Selection / Program Cancel keys for 3 seconds. Adjusting the amount of rinse aid can be done by entering the Settings menu after switching on the machine. The machine dispenses different doses of rinse aid based on the selected wash position. Pay attention not to open the door while the machine is running, as steam may escape.
- Page 15: End of Program indicator will light up when the washing program is over. You can use powder, liquid/gel or tablet detergents in the machine. Only use detergents produced particularly for use with dishwashers. Do not use detergents that contain chlorine and phosphate as they are harmful for the environment. Pay attention to the warnings on the detergent packaging to get better washing and drying results. Leave your dishes in the machine for about 15 minutes to allow them to cool down after they are washed. Do not put solvents into the detergent dispenser. If mains water is cut or water inlet tap is turned off, the machine cannot take water in. If the machine intakes too much water or there is leakage, the machine will detect this and activate safety algorithms. Inside the detergent dispenser, there are level markings that help you use the appropriate amount of powder detergent.
- Page 16: Push the lid of the detergent dispenser to close it. A click will be heard when the lid is closed. Make sure rinse aid reservoir is full. The rinse aid used in dishwashers is a special combination that aims to increase drying efficiency and prevent water or lime stains on the washed items. Care must be paid to have rinse aid in the rinse aid reservoir and to use rinse aids produced specially for dishwashers only. Open the lid of the rinse aid reservoir with the help of the latch. Fill the reservoir until “MAX” level. Use powder or liquid/gel detergent in short programs without prewash since the solubility of the tablet detergent changes depending on the temperature and time. The best washing performance in dishwashers is obtained by using detergent, rinse aid, and water softening salt individually. If there are stains on tableware items after washing, level must be increased. Wipe clean any spilled rinse aid outside the reservoir to prevent foaming and decreased washing performance.
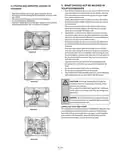
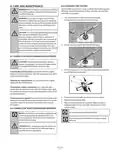
- Page 17: 8.3 Cleaning the filters Clean the filters at least once a week for efficient operation. If there is food residue on filters, take them out and clean well under running water. WARNING: Before cleaning or carrying out maintenance, switch off the appliance, disconnect the main plug, and turn off the water tap. Do not repair or replace any part of the dishwasher or attempt any servicing unless specifically recommended by this manual. We recommend that the dishwasher only be repaired by an authorized service agent. CAUTION: To avoid the possibility of slipping, keep the floor around the dishwasher clean and dry. If the dishwasher is not in use for an extended period, check that the baskets are empty, leave the inside clean, and turn off both the power and water supply. 8.1 Caring for your dishwasher exterior CAUTION: Abrasive cleaners and scouring pads can damage the dishwasher decorative door. Cleaning the control panel: Use only a soft cloth that is lightly dampened with mild detergent. Cleaning the stainless steel doors: Use a soft cloth with a cleaner made for cleaning stainless steel. Cleaning the door gasket: Regularly clean the door gasket with a damp cloth to remove food particles and other debris. 8.2 Caring for your dishwasher interior Do not use the dishwasher without a filter. NOTICE: Cleaning your dishwasher at regular intervals ensures longer product life and reduces the risk of recurring problems. Always disconnect the power to the machine before cleaning.
- Page 18: Cleaning the wash arms is essential for efficient operation. Lower wash arms should be checked for clogged holes. Remove and clean the lower wash arm if clogged. Upper wash arms also need to be checked for clogs. Remove the upper wash arm by turning the nut to the left. Ensure the nut is tightened well when reinstalling the upper wash arm. Clean the impellers at least once a week.
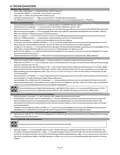
- Page 19: Troubleshooting Machine does not start. Check if the power cable is plugged in. Check the circuit breaker in your house. Make sure that the water inlet tap is open. Make sure that you have closed the door of the machine. Make sure that you have turned on the machine by pressing the On / Off button. Dishes are not washed clean Load the dishes as described in the user manual. Select a program with a higher temperature and cycle time. Prior to starting the program, turn the lower and upper wash arms by hand to make sure that they rotate freely. Clean the wash arms regularly as illustrated in section “Cleaning and Care.” Check if the filter system is clean. Dishes are not dry at the end of cycle Place your dishes in a way that no water will accumulate in them. Do not unload your machine right after washing process is completed. Select program with longer duration for a higher drying performance. Surface quality of the kitchen utensils is deteriorated. Desired washing performance cannot be obtained at kitchen utensils with deteriorated surfaces. It is not recommended to wash such kitchen utensils in the dishwasher. Stains remaining on dishes when cycle has completed. Select a program with a higher temperature and cycle time. Tea and coffee stains or other dye spots may not be cleaned in the dishwasher when they have penetrated in deteriorated surfaces. Lime traces remain on dishes and glassware gains a misty appearance. Check the rinse aid indicator and add rinse aid if necessary. There is a different odor in the machine. A new machine has a peculiar odor that will fade out after a couple of washings. Dirty dishes are kept in dishwasher for 2-3 days. Remove the remnants on the dishes and run the Prewash program without detergent every 2 days.
- Page 20: Rust, discoloration or surface deterioration occurs on dishes. Salty food remnants have remained on dishes for a long time. If silverware soiled with such foods will be kept waiting in the machine, dirt must be removed by prewash or dishes must be washed without being kept waiting. Electric installation is not grounded. Check if your machine is connected to the actual grounding line. Intensive cleansers such as bleaches are used. Do not wash your dishes with bleach. Metal items particularly such as knives are used for purposes other than their intended uses. Silverware made of low quality stainless steel should not be washed in dishwashers. Detergent remains in detergent dispenser. Make sure that the detergent dispenser is dried well prior to filling it with detergent. Wash arm holes may be clogged with food remnants. Clean the wash arm regularly. Decorated glasses and decorated luster porcelains are not suitable for washing in the dishwasher.
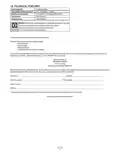
- Page 21: Technical features Load capacity: 16 place settings Permissible water pressure: 4.35 - 145 psi (0.3 - 10 bars) Electrical connection: 120 V (volts), 12 A (amps), 60Hz (hertz) Total power: 1400 W (watts) Heater power: 1100 W (watts) Notice: Specifications and design may change without prior notice. This device corresponds to the UL 749 Household Dishwasher directive. Have the following information readily available for service: model number, serial number, date purchased, name of dealer. Record the information indicated below for future service needs. If service requires installation of parts, use only authorized parts to ensure protection under the warranty.
- Page 22: Built-in dishwashers warranty Two year full warranty Built-in dishwashers and all of their component parts are warranted to be free from defective materials or workmanship in normal residential use for a period of two years from the date of original retail purchase. Viking Range, LLC agrees to repair or replace any part which fails or is found to be defective during the warranty period. 90 day cosmetic warranty: Product is warranted to be free from cosmetic defects in materials or workmanship for a period of ninety days from the date of original retail purchase. Viking products are designed and certified for residential use only and are not intended for use in commercial applications. Five year limited warranty on nylon racks, electronic controls, motor/pump assembly, and water distribution system components. Lifetime limited warranty on stainless steel tank and liner. Warranty terms extend to the original retail purchaser and are transferable under specific conditions. Warranty service must be performed by a Viking Range LLC authorized service agency or representative.
- Page 23: Page 23

KitchenAid KDFE104KBL Front Dishwasher

FISHER AND PAYKEL DD24SDFTX9 N Tall Dish Drawer Dishwasher

MDW 14-BS10TFT Dishwasher

BOSCH SMS6EMI65Q Dishwasher

FISHER PAYKEL DD60D2NB9 Dishwasher

LG DFB425** Steam Dishwasher

Wexiodisk WD-ACS 47D Cutlery Dishwasher

FISHER PAYKEL DW60FC6X1 Dishwasher

FISHER PAYKEL DD24STX6PX1 Tall Sanitize Dishwasher

ATAG VA7214LR 60 cm Dishwasher