AEG FFE73600PM Built Under Dishwasher


EN User Manual
FFE73600PM
Dishwasher
USER
MANUAL

| General | Details |
|---|---|
| Name | AEG FFE73600PM Built Under Dishwasher |
| Make | AEG |
| Language | English |
| Filetype | PDF (Download) |
| File size | 1 MB |


AEG FSK76748P Dishwasher

AEG FSK53617Za Dishwasher

AEG FSK74747P Dishwasher

AEG FSE73507P Dishwasher

AEG GS60AIM Dishwasher

AEG FSB73427Z Dishwasher

AEG FSE74737P Quickselect Dishwasher

AEG FFB73727PM Dishwasher

AEG F8642FI Tall Tub Dishwasher

AEG FFE83800PM Dishwasher

AEG FFE73600PM Built Under Dishwasher Overview
Summary of Contents
- Page 1: User manual for the FFE73600PM dishwasher.
- Page 2: SAFETY INFORMATION SAFETY INSTRUCTIONS PRODUCT DESCRIPTION CONTROL PANEL PROGRAMMES OPTIONS SETTINGS BEFORE FIRST USE DAILY USE HINTS AND TIPS Adherence to the directions for use in this manual is extremely important for health and safety. Failure to strictly adhere to the requirements in this manual may result in personal injury, property damage and affect your ability to make a claim under the AEG manufacturer’s warranty. Products must be used, installed and operated in accordance with this manual. Thank you for choosing this AEG product. We have created it to give you impeccable performance for many years, with innovative technologies. Please spend a few minutes reading to get the very best from it. Always use original spare parts. When contacting our Authorised Service Centre, ensure that you have the following data available: Model, PNC, Serial Number.
- Page 3: The information can be found on the rating plate. Warning / Caution - Safety information General information and tips Environmental information Subject to change without notice. Before the installation and use of the appliance, carefully read the supplied instructions. The manufacturer is not responsible for any injuries or damage that are the result of incorrect installation or usage. Always keep the instructions in a safe and accessible location for future reference. This appliance can be used by children aged from 8 years and above and persons with reduced physical, sensory or mental capabilities if they have been given supervision or instruction. Children between 3 and 8 years of age and persons with very extensive and complex disabilities shall be kept away from the appliance unless continuously supervised.
- Page 4: General safety This appliance is intended to be used in household and similar applications. Do not change the specification of this appliance. The operating water pressure must be between 0.5 and 10 bar. Obey the maximum number of 15 place settings. If the supply cord is damaged, it must be replaced by qualified persons. Put knives and cutlery with sharp points in the cutlery basket with the points down. Do not leave the appliance with the door open to avoid a tripping hazard. Before any maintenance operation, deactivate the appliance and disconnect the mains plug. Do not use high pressure water sprays and/or steam to clean the appliance. Some dishwasher detergents are strongly alkaline and can be dangerous if swallowed.
- Page 5: The appliance can release hot steam. To repair the appliance contact the Authorised Service Centre. Use original spare parts only. Self-repair or non-professional repair can have safety consequences and might void the guarantee. These lamps are intended to withstand extreme physical conditions in household appliances. Disconnect the appliance from the mains supply before disposal. Cut off the mains cable and discard it. Remove the door catch to prevent children and pets from getting closed in the appliance. Ceiling spray arm. Upper spray arm.
- Page 6: Control panel includes various buttons and indicators for operation. The on/off button is used to power the device. The option touch button allows for additional settings. Indicators provide information about the machine's status. The start touch button initiates the selected program. Program touch button selects different washing programs. The display shows relevant information during operation. The delay touch button sets a delayed start for the program. The rinse aid indicator signals when the rinse aid needs refilling. Phase indicators show the current stage of the washing process.
- Page 7: 5. Programmes The order of the programmes in the table may not reflect their sequence on the control panel. Dishwasher degree of programme phases. Options include ExtraPower, GlassCare, and SprayZone. Different programmes are available for various types of crockery and soil levels. Dishwashing temperatures range from 50 °C to 70 °C. Intermediate rinse and final rinse are standard phases in the programmes. AirDry is an option available in multiple programmes. Cleaning the appliance interior is a specific programme. The programmes cater to lightly dried-on and heavily soiled items. Prewash is included in some programmes for better cleaning results.
- Page 8: Programme dishwasher degree of programme phases includes options for load and soil. This programme offers the most efficient use of water and energy consumption for crockery and cutlery with normal soil. Automatic door opening during the drying phase is available. The appliance senses the degree of soil and the quantity of items in the baskets, adjusting temperature, water quantity, energy consumption, and programme duration automatically. A specific programme is designed to clean the inside of the appliance effectively, removing limescale and grease buildup. This is the most silent programme, with a long duration due to low-speed wash pump operation. Consumption values include water usage of 12.2 liters and energy consumption of 0.665 kWh for certain programmes. The pressure and temperature of the water, mains supply variations, options, quantity of dishes, and degree of soil can affect consumption values. Values for programmes other than ECO are indicative only. Information for test institutes can be requested via email, including the product number code from the rating plate.
- Page 9: For any other questions regarding your dishwasher, refer to the service book provided with your appliance. The display shows the updated programme duration. Desired options must be activated every time before you start a programme. It is not possible to activate or deactivate options while a programme is running. This option improves the dishwashing results of the selected programme. It increases the wash temperature and duration. Not all options are compatible with each other. This option improves the dishwashing results by increasing the pressure and temperature of the water as well as wash time. SprayZone is suitable for dishwashing items with stubborn soil, e.g. pots, pans and casserole dishes. Activating options can affect the water and energy consumption as well as the programme duration. This option protects a delicate load, glassware in particular, from damaging.
- Page 10: Settings The rinse aid indicator is on when the rinse aid chamber is empty, notifying to refill rinse aid. For the best drying performance, always use rinse aid and keep the rinse aid indicator active. Programme selection mode and user mode When the appliance is in programme selection mode, you can set a programme and enter user mode. Settings available in user mode include the level of rinse aid according to the required dosage and activation or deactivation of the AirDry. How to set the rinse aid level Make sure the appliance is in user mode. The appliance stores the saved settings, so there is no need to configure it before every cycle. How to set the programme selection mode The appliance is in programme selection mode when the programme indicator flashes and the display shows the programme duration. AirDry AirDry improves the drying results with less energy consumption. The appliance door opens automatically during the drying phase and remains ajar. How to enter user mode To enter user mode, press and hold simultaneously Delay and Option until the indicators flash and the display is blank. The rinse aid level The rinse aid helps to dry the dishes without streaks and stains. It is automatically released during the hot rinse phase. You can set the released quantity of rinse aid between level 1 (minimum quantity) and level 6 (maximum quantity). Factory setting: level 4.
- Page 11: When AirDry opens the door, the display shows the remaining time of the running programme. Make sure the appliance is in user mode. Do not try to close the appliance door within 2 minutes after automatic opening. This can cause damage to the appliance. If children have access to the appliance, we advise to deactivate AirDry. The automatic opening of the door may pose a danger. Fill the rinse aid dispenser. The compartment is for rinse aid only. Do not fill it with detergent. Only use rinse aid designed specifically for dishwashers. Fill the dispenser until the rinse aid reaches the marking MAX. Remove the spilled rinse aid with an absorbent cloth to prevent excessive foam formation. Press the on/off button to activate the appliance.
- Page 12: Make sure that the appliance is in programme selection mode. The upper ends of the two vertical ribs inside the compartment indicate the maximum level for filling the dispenser with gel. If the rinse aid indicator is on, fill the rinse aid dispenser. Load the baskets. Add the detergent. Set and start a programme suitable for the type of load and the degree of soil. Press the on/off button to activate the appliance. The display shows the programme duration. Only use detergent specifically designed for dishwashers. Opening the door while a programme is running stops the appliance.
- Page 13: Cancelling the programme requires pressing and holding Delay and Option until the appliance is in programme selection mode. Ensure there is detergent in the dispenser before starting a new programme. If the door is opened for more than 30 seconds during the drying phase, the running programme ends. The Auto Off function switches the appliance off automatically when the programme is complete. Do not close the appliance door within 2 minutes after AirDry opens it to avoid damage. Close the water tap after the programme ends. Select a programme based on the type of load and degree of soil for optimal cleaning. Remove larger food residues from dishes before loading into the dishwasher. Only use rinse aid and detergent designed for dishwashers to prevent damage. Ensure items in the baskets do not touch or cover each other for effective washing.
- Page 14: Instructions on the detergent packaging. The filters are clean and correctly installed. The spray arms are not clogged. There is dishwasher rinse aid. The position of the items in the baskets is correct. The programme is applicable to the type of load and for the degree of soil. Always use the whole space of the baskets. Use the appliance to wash dishwasher-safe items only. Do not wash in the appliance items made of wood, horn, aluminium, pewter and copper. Before maintenance, deactivate the appliance and disconnect the mains plug from the main socket.
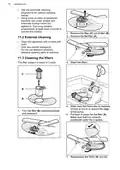
- Page 15: Use the automatic cleaning programme for optimal cleaning results. Using short-duration programmes regularly can cause grease and limescale buildup inside the appliance. Run long-duration programmes at least twice a month to prevent the buildup. Clean the appliance with a moist soft cloth. Only use neutral detergents. Do not use abrasive products, abrasive cleaning pads or solvents. The filter system is made of 3 parts. Make sure that there are no residues of food or soil in or around the edge of the sump. Put back in place the flat filter (A). Reassemble the filters (B) and (C).
- Page 16: Put back the filter in the flat filter. Turn it clockwise until it locks. An incorrect position of the filters can cause bad washing results and damage to the appliance. We recommend to clean the lower spray arm regularly to prevent soil from clogging the holes. Clogged holes can cause unsatisfactory washing results. We recommend to clean the upper spray arm regularly to prevent soil from clogging the holes. To remove the lower spray arm, pull it upwards. Pull out the upper basket. To detach the spray arm from the basket, press the spray arm upwards and simultaneously turn it clockwise. Wash the spray arm under running water. Use a thin pointed tool to remove particles of soil from the holes.
- Page 17: Release the stoppers on the sides of the sliding rails of the cutlery drawer and pull the drawer out. To install the spray arm back, press the spray arm upwards and simultaneously turn it counterclockwise until it locks into place. Move the upper basket to the lowest level to reach the spray arm more easily. To detach the spray arm from the delivery tube, turn the mounting element counterclockwise and pull the spray arm downwards. Wash the spray arm under running water. Use a thin pointed tool, e.g. a toothpick, to remove particles of soil from the holes. Run the water through the holes to wash soil particles away from the inside. We recommend cleaning the ceiling spray arm regularly to prevent soil from clogging the holes. Clogged holes can cause unsatisfactory washing results. The ceiling spray arm is placed on the ceiling of the appliance.
- Page 18: To install the spray arm back, insert the mounting element in the spray arm and fix it in the delivery tube by turning it clockwise. Make sure that the mounting element locks into place. Install the cutlery drawer on the sliding rails and block the stoppers. Improper repair of the appliance may pose a danger to the safety of the user. Any repairs must be performed by qualified personnel. Refer to the below table for information on possible problems. With some problems, the display shows an alarm code. The majority of problems that may occur can be solved without the need for service. Make sure that the mains plug is connected to the mains socket. Make sure that the appliance door is closed. Make sure that the water tap is open. Make sure that the sink spigot is not clogged.
- Page 19: Problem and alarm code The anti-flood device is on. Possible solution: Close the water tap. Make sure that the appliance is correctly installed. The appliance stops and starts more times during operation. It is normal. It provides optimal cleaning results and energy savings. The program lasts too long. Activating options can increase the programme duration. The remaining time in the display increases and skips nearly to the end of program time. Small leak from the appliance door. The appliance door is difficult to close.
- Page 20: WARNING! We do not recommend using the appliance until the problem has been completely fixed. Unplug the appliance and do not plug it in again until you are certain that it operates correctly. The dishwashing and drying results are not satisfactory. Poor washing results may be due to improper loading or insufficient program intensity. Activate the SprayZone option to wash items with heavy or stubborn soil. Activate the ExtraPower option to improve the washing results of a selected programme. Clean spray arm jets and filter. Make sure that the spray arms are correctly positioned. Poor drying results can occur if tableware is left for too long inside the closed appliance. Activate AirDry to set the automatic opening of the door and to improve the drying performance. Fill the rinse aid dispenser or set the level of rinse aid to a higher level. The quality of the rinse aid can affect results; it is recommended to use rinse aid always, even with multi-tablets.
- Page 21: Traces of rust on cutlery. Do not put silver and stainless steel items close together. There are residues of detergent in the dispenser at the end of the programme. Make sure that the spray arms are not blocked or clogged. Make sure that items in the baskets do not impede the lid of the detergent dispenser from opening. Odours inside the appliance. Start the programme with a descaler or a cleaning product designed for dishwashers. Limescale deposits on the tableware, on the tub and on the inside of the door. Start the programme with a descaler designed for dishwashers. Dull, discoloured or chipped tableware. Make sure that only dishwasher-safe items are washed in the appliance. Dimensions: Width / height / depth (mm) 597 / 818 - 878 / 576. Electrical connection: Voltage (V) 200 - 240, Frequency (Hz) 50 - 60, Wattage (W) 1550-2200.
- Page 22: Water supply capacity should be a minimum of 5 °C. Cold water connection is recommended for best washing performance. Refer to the rating plate for other values. Tools and equipment needed for installation include an installation kit. There should be a minimum 2mm gap between the top of the dishwasher and the underside of the bench top. The hose should not be extended by more than 2 metres. Secure the dishwasher with brackets or screws provided. Gap on both sides should be equal, and no greater than 5 mm per side. If the floor is not level, adjust levelling legs to suit. Install the appliance under a kitchen counter adjacent to a water tap and a water drain.
- Page 23: To adjust the rear height, turn the middle screw counterclockwise to raise the appliance. Clean the bottom part of the kitchen worktop and apply the adhesive plastic film along the entire width. Correct levelling of the appliance allows the door to close and seal properly. If the door does not close correctly, raise or lower the adjustable feet to level the appliance. After adjusting the level of the appliance, assemble the adjustable plinth on the appliance. Remove the adjustable plinth. Once the installation is completed, make sure that the bottom of the adjustable plinth is aligned with the floor. The appliance has 6 fixing points: 2 external fixing points (2 brackets + screws) and 4 internal fixing points (4 spacers + screws). Use the 2 external fixing points when installing the appliance under a kitchen counter or to adjacent units or if the opening for the appliance is greater than 600 mm.
- Page 24: Use the 4 internal fixing points if the opening is 600 mm. Fix the appliance laterally with the spacers and the screws supplied. A combination of both fixing methods can be used if required. Install the brackets in the slots on the top of the appliance before positioning it under the counter. Connect the inlet hose to a water tap with an external BSP thread spout of 3/4''. For best washing performance, it is recommended to connect the appliance to a cold water supply. Energy savings can be made by connecting the appliance to a solar water system and using economy options, however, the water temperature must not exceed 60° C. Water pressure: 1000 kPa max - 50 kPa min. If water pressure exceeds 1000 kPa, a pressure reducing valve should be used. Always use new hoses when connecting the appliance to the water mains.
- Page 25: In order to pass the safety valve through the kitchen cabinets, an opening of at least 45 mm x 90 mm is needed. Remove the sink plug when the appliance drains the water to prevent that the water goes back into the appliance. The appliance has a security feature to prevent dirty water going back into the appliance. If the spigot of the sink has a non-return valve, this valve can cause the appliance to drain incorrectly. Remove the non-return valve. The highest point of the drain hose must be no more than 600 mm from the floor and must have a continuous fall to the plumbing connection. The drain hose can be lengthened using additional lengths and connectors. These must be purchased from Electrolux Spare Parts. This document sets out the terms and conditions of the product warranties for AEG Appliances. Please keep it with your proof of purchase documents in a safe place for future reference should there be a manufacturing defect in your Appliance.
- Page 26: Warranty period means the period specified in clause 3 of this warranty. This warranty does not cover light globes, batteries, filters, or similar perishable parts. This warranty only applies to new appliances purchased and used in Australia or New Zealand. The warranty continues for a period of 60 months following the date of original purchase of the appliance. During the warranty period, Electrolux will repair or replace any parts considered to be defective at no extra charge. Electrolux is not liable under this warranty if the appliance has been used for purposes other than intended. Travel and transportation costs will be borne by Electrolux for valid warranty claims. Proof of purchase is required before making a claim under this warranty. You may not make a claim under this warranty unless the appliance's serial number or warranty seal has not been removed or defaced.
- Page 27: Environmental concerns Appliances marked with the symbol should not be disposed of with household waste. Return the product to your local recycling facility or contact your municipal office. Recycle materials with the symbol. Put the packaging in relevant containers to recycle it. Help protect the environment and human health by recycling waste of electrical and electronic appliances. Do not dispose of.
- Page 28: Page 28

KKT KOLBE DW4505FS Dishwasher

BOSCH SMV4HCX48E Dishwasher

BOSCH SPV6YMX11E Dishwasher

FISHER PAYKEL DD24SCTW9 N Dishwasher

BOSCH SHX9PCM5N Benchmark Series Dishwasher

SIEMENS SN23EI26CE Dishwasher

Miele 11 836 740 Dishwasher
AEG FSK76748P Dishwasher

maxima 09240000 Dishwasher

BOSCH SMV4EDX17E Dishwasher