BOSCH 9001164801 Dishwasher


Dishwasher
Lave-Vaisselle
en
fr
Operating instructions
Guide d’Utilisation

| General | Details |
|---|---|
| Name | BOSCH 9001164801 Dishwasher |
| Make | Bosch |
| Language | English |
| Filetype | PDF (Download) |
| File size | 0.93 MB |
 (1 votes, average: 5.00 out of 5)

BOSCH SMV6ZCX49E-39 Dishwasher

BOSCH SMI4HVS33E Dishwasher

BOSCH SRV2HKX39G Dishwasher

BOSCH SGS4HAW40G Dishwasher

BOSCH SGH4HVX32G Dishwasher

BOSCH SMS4ECI26E Dishwasher

BOSCH SMS6EDI02G Free-Standing Dishwasher

BOSCH SMS6EDW02G Free-Standing Dishwasher

BOSCH SMV4HTX27G Dishwasher

BOSCH SMV4HCX48E Dishwasher

BOSCH 9001164801 Dishwasher Overview
Summary of Contents
- Page 1: Operating instructions Guide d’Utilisation
- Page 2: Dear valued customer, welcome and congratulations on your new Bosch dishwasher purchase. Our German engineers work tirelessly to craft machines with virtually silent operation, resource-saving efficiency, and optimum quality. For other premium Bosch appliances, visit us online. While there, don’t forget to register your new dishwasher. If you have any questions or comments, please contact us. Table of contents includes safety definitions, important safety instructions, dishwasher components, dishwasher setup, dishware materials, loading the dishwasher, rack features, dishwasher cycles and options, wash cycle information, operating the dishwasher, care and maintenance, troubleshooting guide, customer service, and statement of limited product warranty. Safety definitions include warnings indicating potential death or serious injuries, cautions for minor or moderate injuries, notices for potential damage to the appliance or property, and notes for important information and tips.
- Page 3: Important safety instructions should be read and saved. Misuse of the dishwasher can result in serious injury or death. Repairs must be performed by an authorized service technician using original equipment factory replacement parts. Electrical shock or fire could result from incorrect installation or improper grounding. Harsh chemicals should never be used to clean the dishwasher. Steam cleaning products can cause damage, and the manufacturer is not responsible for consequences. Users should familiarize themselves with shutting off the incoming water and power supply. Harsh chemicals, abrasive cleaners, and certain cleaning materials can damage the dishwasher's exterior door panel. NSF/ANSI 184 certified residential dishwashers are not intended for licensed food establishments.
- Page 4: WARNING: To reduce the risk of fire, electrical shock, or serious injury, observe the following. This dishwasher is provided with Installation Instructions and this Use and Care Manual. Read and understand all instructions before using the dishwasher. This appliance must be grounded to a metal, permanent wiring system. Use this dishwasher only for its intended function, which is the washing of household dishware and kitchenware rated as dishwasher safe. Use only detergents or rinsing agents recommended for use in a dishwasher. Do not operate your dishwasher unless all enclosure panels are in place. Do not tamper with or override controls and interlocks. Under certain conditions, hydrogen gas may be produced in a hot water system that has not been used for two weeks or more. This appliance must be grounded. In the event of a malfunction or breakdown, grounding will reduce the risk of electric shock.
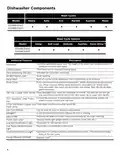
- Page 5: Dishwasher components include various wash cycles such as Eco Normal, Heavy, Auto, Express, and Rinse. The wash cycle options feature Half Load, Delicate Sanitize, Extra Shine, and Delay. The dishwasher has a 3 position adjustable upper rack to create more space and a third level rack to maximize loading space. A time remaining indicator shows the cycle time left, and the dishwasher operates at a sound level of 44 dBA for quiet washing. The delay start feature allows the start of a cycle to be delayed in 1-hour increments up to 24 hours. The rinse cycle uses less water than hand rinsing and does not require detergent. The tab tray serves as both a detergent dispenser and an upper rack handle. The AquaStop leak protection system shuts down operation and pumps out water in case of a leak. Two cup shelves can be used for cups or larger serving utensils, and the Infolight illuminates the floor to indicate the unit is running. The dishwasher includes notifications for low salt and low rinse aid, as well as a sanitized notification light for cycle completion.
- Page 6: Upper rack spray arm Cutlery drawer Upper rack Flip tines Tab tray / Rack handle Vent hole Lower rack spray arm Filter system Salt container Rinse aid dispenser
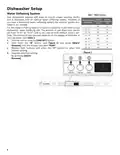
- Page 7: Dishwasher setup Your dishwasher requires soft water to ensure proper washing results and is equipped with an internal water softening system. If you have a household water softening system, the internal system provided is not needed. For the water softening system to function properly, it will need to use dishwasher water softening salt. The amount of salt dispensed can be set from “H:00” to “H:07”. Salt is not used at H:00 (default factory setting). The amount of salt required depends on the degree of hardness of your tap water. Turn the unit on using the [ON/OFF] button. Hold down the “A” button and press [Start/Resume] until the display indicates “H:00”. Release both buttons and press the “C” button to select the desired setting. Save the selected setting by pressing [Start/Resume].
- Page 8: Salt Only refill the salt container right before turning on the unit to prevent corrosion. Open the screw cap of the salt container and fill it with water when turning on the unit for the first time. Add dishwasher salt until the water is displaced and runs out. Refill with salt as soon as the “Refill Salt” LED is lit. Never fill the salt dispenser with detergent as it will destroy the water softening system. Do not use salt tablets or any salt other than dishwasher water softening salt. Detergent Use only detergent specifically designed for dishwashers. To avoid dishwasher damage, do not use hand dishwashing products. Using too much detergent with soft water may cause etching in glassware. The detergent dispenser cup has lines that measure detergent to 1 tablespoon (15 ml) and 1.75 tablespoons (25 ml).
- Page 9: To close: Place finger as shown in Figure 4. Slide door closed and press down firmly until it clicks. To open: To open the cover, push the button as shown in Figure 5. Cover will slide open. Rinse aid: To achieve proper drying, always use a liquid rinse aid, even if your detergent contains a rinse aid or drying additive. The dishwasher indicates low rinse aid by turning on the “Refill Rinse Aid” LED in the display. Adding rinse aid: To avoid oversudsing or clogging, do not overfill the rinse aid dispenser. Wipe up any spills with a damp cloth. Add liquid rinse aid to the dispenser until it is full (see Figure 6). Do not overfill. Close the lid. Lid must be fully closed until it clicks in order to seal. Wipe up any excess rinse aid that may have puddled when the dispenser reservoir is full. The indicator light will go out a few moments after the dishwasher door is shut. See page 16 for instructions on how to adjust the amount of rinse aid dispensed.
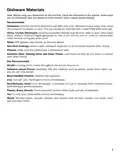
- Page 10: Dishware materials Before using your dishwasher for the first time, check the information in this section. Some items are not dishwasher safe and should be hand washed; others require special loading. Recommended materials include aluminum, china, crystal, stoneware, glass, non-stick coatings, plastics, stainless steel, sterling silver, and silver plates. Not recommended materials include acrylic, adhesive-joined pieces, bone-handled utensils, iron, pewter, brass, bronze, tin, and wood. Your dishwasher is intended for use in cleaning only standard household dishware and kitchenware.
- Page 11: Suggested loading pattern for upper rack, lower rack, and cutlery drawer. Additional loading pattern for upper rack, lower rack, and cutlery drawer.
- Page 12: Rack features include flip tines that can be folded down depending on loading needs. The upper and lower racks consist of tines that can be adjusted for different items. RackMatic® allows the height of the upper rack to be adjusted in three positions for more space. To lower the upper rack, push the lever inward then upward. To raise the upper rack, hold it by the sides and lift up. The cutlery drawer positions knives and oversized tools for improved cleaning and easier loading. Light-weight plastic items can be secured by plastic item clips. Cup shelves can be used for cups or larger serving utensils.
- Page 13: Dishwasher cycles and options Wash cycles Heavy: Best for cleaning items with baked-on food or grease. Auto: This is the most flexible cycle, perfect for mixed loads of dishware with varying amounts of food soil. Eco: Best for delicate dishes and glasses, lowering temperature and cycle length to decrease energy usage. Normal: Recommended for daily use to completely wash a full load of normally soiled dishes. Express: Cleans lightly soiled dishes and reduces overall wash time. Rinse: Allows you to rinse food soil off of a partial load until ready to run a full load. Wash cycle options Delay Start: Allows you to delay the start time of your dishwasher in one hour increments up to 24 hours. Half Load: Can reduce water consumption when washing small, lightly soiled loads. Sanitize: Available only in the Heavy, Auto, and Normal cycles, improves drying results. Extra Shine®: Used in combination with a wash cycle to enhance drying results and provide a brilliant shine.
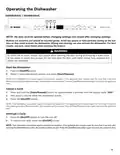
- Page 14: Operating the dishwasher requires the door to be opened before changing settings and closed afterward. Buttons are sensitive and should be touched gently to avoid unintentional activation. Always use caution when opening the door during or after a wash cycle due to potential steam or hot water escape. To start the dishwasher, press the On/Off button, select a cycle, and press Start/Resume. If the door remains open for more than 4 seconds after pressing Start/Resume, the operation will pause. To cancel a cycle, press and hold the Start/Resume button for about 3 seconds until the display reads 0:01. Wait approximately 1 minute for the dishwasher to drain after canceling a cycle. To interrupt a cycle, press the On/Off button to turn the unit off. To resume the cycle, press the On/Off button again. The dishwasher is designed to prevent unintentional operation if the door is left open after pressing Start/Resume.
- Page 15: Setting the amount of rinse aid can be adjusted from “r:00” to “r:06”. To change the setting, press the [On/Off] button and hold down the “A” button while pressing [Start/Resume] until the display indicates “H:0x”. Press the “A” button until the display shows “r:05” and then use the “C” button to select the desired setting. “r:00” means the dispenser is OFF, while “r:06” indicates the highest setting. Press [Start/Resume] to save the setting. You can delay the start of the cycle in one-hour increments up to 24 hours. To set the delay start, press the [On/Off] button and then the [+] button until the display shows “h:01”. Press the [+] or [-] button to adjust the delay time. To cancel the delay start, adjust until “h:00” is displayed and hold [Start/Resume] for 3 seconds. The dishwasher is protected against unintentional operation if the door remains open for more than 4 seconds after pressing [Start/Resume].
- Page 16: Waste water pump Large food remnants in the rinsing water not retained by the filters may block the waste water pump. In this case, disconnect the appliance from the power supply. Remove the filters. Scoop out standing water - use a sponge if necessary. Check inner compartment and remove any foreign objects. Preparing your dishwasher for vacation. Before leaving for vacation during warmer weather, turn off the water supply at the nearest point to the dishwasher. Winterizing your dishwasher. If your dishwasher will be unused for an extended period in freezing temperatures, have it winterized by a professional servicer.
- Page 17: Troubleshooting guide provides information to help with dishwasher problems without involving a repair professional. Cycle does not resume after door is opened and closed due to various causes such as the door being opened too long or not being properly latched. To resume the cycle, press the [START / RESUME] button and close the door within 4 seconds. If the dishwasher does not start, ensure a cycle is selected and the water supply is turned on. The default factory settings alert the customer with a beeping signal when the cycle is complete, which can be deactivated. If the display does not illuminate, check for a blown fuse or tripped circuit breaker and ensure the door is properly closed. Incoming water may not be warm enough, affecting cycle time due to soil and water conditions. To improve cleaning, ensure spray arm movement is not obstructed and that spray arm nozzles are clean. Improper use of detergents and clogged filters can also lead to dishes not getting clean. Refer to the manual sections for care, maintenance, and wash cycle information for optimal performance.
- Page 18: Problem: Dishes are not getting dry enough Cause: Rinse aid dispenser is empty, improper loading of dishes, selected cycle does not include drying Action: Add rinse aid to improve drying, rearrange load to prevent nesting, note that Rinse and Hold setting does not include drying Problem: Odor Cause: Food debris at the bottom, food particles near door seal, dishes left too long, residual water present, drain hose obstructed Action: Clean filters, run a rinse cycle if not washing immediately, ensure complete drainage, remove obstructions from drain hose Problem: Dishwasher not filling with water Cause: Restriction in water supply system, previous wash cycle not completed, delay start is active Action: Ensure water supply valve is open, refer to operating section, cancel delay start Problem: Water leaks Cause: Suds, door seal pulled away, condensation vent blocked, improper installation Action: Use only dishwasher detergents, ensure door seal is in track, verify proper installation Problem: Tub stains Cause: Water hardness, silverware in contact with tub Action: Use concentrated lemon juice to reduce hard water stains, ensure silverware does not touch tub during cycles
- Page 19: Problem: Streaks on glassware or residue on the dishes Cause: Incorrect rinse agent setting Action: Adjust the rinse agent dispenser based on water hardness. Refer to the “Dishwasher Setup” section in the manual. Problem: Discolored or marked fascia panel Cause: Abrasive cleaner used Action: Use mild detergents with a soft damp cloth. Problem: Noise during wash cycle Cause: Dishes may not be arranged properly Action: Refer to the “Loading the Dishwasher” section for optimal arrangement. Problem: Detergent dispenser cover will not shut Cause: Improper operation of detergent cover Action: Refer to the “Detergent” section for instructions on opening and closing the dispenser. Problem: Previous cycle has not finished Action: Refer to the “Operating the Dishwasher” section for guidance. Problem: Unable to select desired cycle Cause: Previous cycle has not finished Action: Refer to the “Operating the Dishwasher” section of the manual.
- Page 20: Customer service for your Bosch dishwasher requires no special care beyond the maintenance described in the manual. Refer to the troubleshooting guide before calling for service. Contact your dealer, installer, or an authorized service center if service is necessary. Do not attempt to repair the appliance yourself, as unauthorized repairs may void the warranty. If you are unsatisfied with service, follow specific steps to resolve the issue. Include model information and a description of the problem when contacting customer service. The model and serial number can be found on the label on the edge of the dishwasher door. Keep a copy of your invoice with the manual for warranty verification.
- Page 21: Statement of limited product warranty What this warranty covers & who it applies to The limited warranty applies only to Bosch dishwashers sold for normal household use. The dishwasher must have been purchased new at retail and not for resale. This warranty does not cover commercial or industrial use. The product must have been purchased within the United States or Canada. The warranty applies to the original purchaser and each succeeding owner for ordinary home use. How long the warranty lasts Bosch warrants the product is free from defects in materials and workmanship for 365 days from the original purchase date. The product is also warranted against cosmetic defects for 30 days from the date of purchase. Extended limited warranty BSH provides additional limited warranties for electronics, dish racks, and against stainless steel rust through. Repair/replace as your exclusive remedy Bosch will repair or replace the product if it proves to have been manufactured with a defect. Warranty exclusions The warranty excludes defects or damage not directly caused by Bosch, including misuse, negligence, and failure to follow operating instructions.

BOSCH SMH4ECX21E Dishwasher

KitchenAid W10242569C Compactor Dishwasher

Whirlpool WIE 2B19 N Dishwasher

FISHER PAYKEL DD60D2NX9 Dishwasher

BOSCH SMH4ECX10E/01 Fully Dishwasher

SAMSUNG DW80R9950 Dishwasher

BLAUPUNKT 5VF4X00BKD Dishwasher

Electrolux ESZ69300SX UltimateCare 700 Dishwasher

CMA UC65e M3 Undercounter Dishwasher

FISHER AND PAYKEL DD24SHTI9 N Dish Drawer Dishwasher