Comfee CDC17P0ABB Mini lite Dishwasher


MODEL NUMBER CDC17P0ABB
)UHHꢀꢁꢀPRQWKVꢀꢀ
HxWHQVLRQꢀRIꢀWKHꢀꢀ
RULJLQDOꢀOLPLWHGꢀZDUUDQW\ꢀꢀ
SHULRGꢁꢂꢀ6LPSO\ꢀWH[WꢀDꢀꢀ
SLFWXUHꢀRIꢀ\RXUꢀSURRIꢀRIꢀꢀ
SXUFKDVHꢀWRꢃ
ꢂꢃꢄꢅꢅꢃꢆꢆꢅꢃꢂꢇꢂꢅ
ꢂ7KHꢀZDUUDQW\ꢀH[WHQVLRQꢀLVꢀIRUꢀWKHꢀ
WKUHHꢀPRQWKVꢀLPPHGLDWHO\ꢀIROORZLQJ
WKHꢀFRPSOHWLRQꢀRIꢀWKHꢀSURGXFW¶Vꢀꢀ
RULJLQDOꢀZDUUDQW\ꢀSHULRGꢄ
Please keep the manual
for future reference.

| General | Details |
|---|---|
| Name | Comfee CDC17P0ABB Mini lite Dishwasher |
| Make | comfee |
| Language | English |
| Filetype | PDF (Download) |
| File size | 1.26 MB |


COMFEE CDC22P1ABB Dishwasher

COMFEE CDC22P Mini Dishwasher

comfee CDC22P4AWW Dishwasher

comfee CDC22P1AWW Compact Dishwasher

COMFEE KWH-TD602E-S Compact Dishwasher

comfee FD1201P-W Dishwasher

COMFEE TD802 Table Top Dishwasher

Comfee CDC22P2AWW Dishwasher

comfee CDC22P Dishwasher

COMFEE FD1435E-W Slimline Dishwasher

Comfee CDC17P0ABB Mini lite Dishwasher Overview
Summary of Contents
- Page 1: Model number CDC17P0ABB The warranty extension is for the three months immediately following the completion of the product's original warranty period. Please keep the manual for future reference.
- Page 2: Quick start guide Please read the entire manual for detailed operating instructions. The power required is 120VAC 60Hz, 10Amp circuit. Place the end of the drain hose into a sink or bucket. The clamp must be tightened by a screwdriver. Before adding water, you need to press the power button to turn on the dishwasher. There are two ways to add water into the tank. The water tap symbol will be on if there is not enough water in the tank.
- Page 3: Prep the dishware by removing large residue before placing it into the dishwasher. Place dishes in order by size, starting from the two ends and then loading into the middle. All dishes should be tilted to improve cleaning performance. Improperly placed dishes can block the top arm and reduce cleaning effectiveness. Do not place dishes in an upright direction as it may affect cleaning performance. Try to leave the dirty side facing towards the spray arm. Do not use detergent when running the FRUIT program. Close the front door, choose the program, and press START.
- Page 4: Please carefully read this manual before using the dishwasher, it will help you use and maintain the dishwasher properly. Important safety instructions. Getting to know your appliance. Installation preparation. About power connection. Water connection. Using your dishwasher. Loading the dishwasher baskets. Maintenance and cleaning. Troubleshooting tips.
- Page 5: Important safety instructions When using your dishwasher, follow the precautions listed below. Do not allow children to play with the appliance. Cleaning and user maintenance shall be made by children without supervision. This appliance is not intended for use by children or persons with reduced physical, sensory or mental capabilities. This appliance is for indoor use only, for household use only. To protect against the risk of electrical shock, do not immerse the unit, cord or plug in water or other liquid. Please unplug before cleaning and maintaining the appliance. This appliance must be grounded. Improper connection of the equipment-earthing conductor can result in the risk of an electric shock.
- Page 6: General use Do not abuse, sit on, or stand on the door or dish rack of the dishwasher. Do not operate your dishwasher unless all enclosure panels are properly in place. Open the door very carefully if the dishwasher is operating, there is a risk of water squirting out. Do not place any heavy objects on or stand on the door when it is open. When loading items to be washed, locate sharp items so that they are not likely to damage the door seal. Knives and other utensils with sharp points must be loaded in the basket with their points down or placed in a horizontal position. Do not wash plastic items unless they are marked dishwasher safe or the equivalent. Use only detergent additives designed for an automatic dishwasher. Never use soap, laundry detergent, or hand washing detergent in your dishwasher. Under certain conditions, hydrogen gas might be produced in a hot-water system that has not been used for two weeks or more.
- Page 7: Disposal For disposing of the package and the appliance, please go to a recycling centre. Cut off the power supply cable and make the door closing device unusable. Cardboard packaging is manufactured from recycled paper and should be disposed of in the waste paper collection for recycling. By ensuring this product is disposed of correctly, you will help prevent potential negative consequences for the environment and human health. For more detailed information about recycling of this product, please contact your local city office and your household waste disposal service. Do not dispose of this product as unsorted municipal waste. Collection of such waste separately for special treatment is necessary.
- Page 8: Getting to know your appliance Important: Before using this dishwasher for the first time and to get the best performance, read these instructions. Dishwasher features Handle Control panel Upper spray arm Water tank cap Lower spray arm Filter Detergent dispenser Tableware basket Water filling guide
- Page 9: Control panel To turn on and off. Program button: Press the button to select wash cycles. Hygiene: Use to remove bacteria from your dishes and glassware. Glass: Suitable for washing delicate ware with light soil. Fruit: Suitable for washing hard surface fruit. Air Refresh function helps to improve dry performance or prevent odors. The Delay Time feature allows you to program the dishwasher to begin the selected wash cycle between 1 to 24 hours later. Display the program time, error code, etc. If the water level indicator is lit, the water level in the internal tank is low and needs to be refilled. Press and hold START for 3 seconds to cancel a cycle when the dishwasher is running.
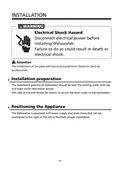
- Page 10: Installation involves a warning about electrical shock hazards. Disconnect electrical power before installing the dishwasher to avoid potential death or electrical shock. Professional installation of pipes and electrical equipment is recommended. The dishwasher should be positioned near the existing water inlet tap, drain outlet, and power socket. One side of the sink should be chosen to secure the drain hoses. The dishwasher comes with water supply and drain hoses that can be positioned to the right or left for proper installation.
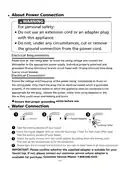
- Page 11: About power connection For personal safety: Do not use an extension cord or an adapter plug with this appliance. Do not, under any circumstances, cut or remove the ground connection from the power cord. Please look at the rating label to know the rating voltage and connect the dishwasher to the appropriate power supply. Ensure the voltage and frequency of the power being corresponds to those on the rating plate. Only insert the plug into an electrical socket which is grounded properly. Take the existing aerator off your faucet. Screw the faucet adapter onto (or into) the faucet tap. Check for leaks. Attach the quick connect onto the faucet adapter by pulling down the locking collar. Slowly open the hot water line and check for any sign of water leaks at all hose connections.
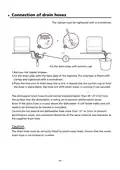
- Page 12: Connection of drain hoses The clamps must be tightened with a screwdriver. Remove the rubber stopper. Fix the drain pipe with the back pipe of the machine. Place the free end of the drain hose into a sink or bucket. The dishwasher drain hose should not be installed higher than 39 1/4 (1m) from the surface that the dishwasher is sitting on. If the drain hose is routed above the dishwasher, it will hold water and will need to be drained to be moved or relocated. Do not extend the dishwasher hose more than 13 or 33cm to prevent performance issues. Any extension should be of the same material and diameter as the supplied drain hose. The drain hose must be correctly fitted to avoid water leaks. Ensure that the water drain hose is not kinked or crushed.
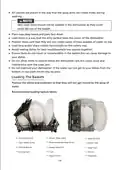
- Page 13: Using your dishwasher Loading the dishwasher All items to be washed should be marked dishwasher safe. Use only dish detergent designed for automatic dishwashers. For delicate items, select a program with lower temperatures. Do not take glass and cutlery out of the dishwasher immediately after the program has ended. Some glasses can become dull after a large number of washes. Silver and aluminium have a tendency to discolour during washing. Not suitable for use: cutlery with wooden, horn, china or mother-of-pearl handles. Scrape off any large food particles before loading. Items such as cups, glasses, pots/pans, etc. should be loaded face downwards.
- Page 14: All utensils are placed in a way that the spray arms can rotate freely during washing. Very small items should not be washed in the dishwasher as they could easily fall out of the basket. Place cups, deep bowls, and pans face down. Load items so that the dirty surface faces the center of the dishwasher. Position items such that they will not collect water or have puddles of water on top. Load long and/or sharp cutlery horizontally on the cutlery tray. Avoid nesting dishes for best results. Ensure items do not touch or move/wobble in the basket, as this can cause damage to your dishes. Do not allow items to extend below the dishwasher rack, as this could interfere with the wash arm. Do not overload your dishwasher; if water cannot reach your dishes, wash results may be poor.
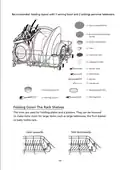
- Page 15: Recommended loading layout with 1 serving bowl and 2 settings personal tableware. Dinner plates (10in), bread and butter plates (6.7in), dessert bowls (5in), cups, saucers (5.5in), glasses (12.5OZ), dinner forks, salad forks, knives, tea spoons, 1 serving bowl (1L), oval platter (9.5in), serving forks, serving spoons. The tines are used for holding plates and platters. They can be lowered to make more room for large items, such as large tableware, the fruit basket, or baby bottle rack.
- Page 16: Loading the detergent This product does not support rinse aid. Only add detergent. Only use detergent specifically for dishwashers. Never use any other rinse aid and detergents. Dishwasher detergent is corrosive. Keep dishwasher detergent out of the reach of children. Detergent tablets of different brands dissolve at different speeds. Use long programs when using detergent tablets to ensure complete dissolution. The detergent must be refilled before the start of each wash cycle. Your dishwasher uses less detergent than conventional dishwashers. Generally, only one tablespoon of detergent is needed for a normal wash load.
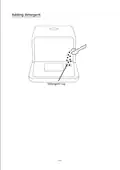
- Page 17: Adding detergent is an important step in the washing process. The detergent cup is where the detergent is placed for optimal cleaning.
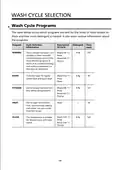
- Page 18: Wash cycle selection The table below shows which programs are best for the levels of food residue on them and how much detergent is needed. Normal program is suitable to clean normally soiled tableware and is the most efficient program in terms of its combined energy and water consumption. Rapid program is a shorter wash for lightly soiled loads and quick wash. Hygiene program is used to remove bacteria from dishes and glassware. Fruit program is used to wash hard surface fruit, only manually adding cold water. Glass program is suitable for delicate ware with light soil.
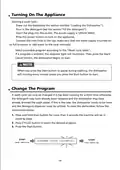
- Page 19: Turning on the appliance involves several steps including connecting the inlet hose and selecting a suitable program. To start a wash cycle, draw out the basket and pour in the detergent. Insert the plug into the socket and press the power button to turn on the appliance. Ensure the water supply is turned on to full pressure or add water manually. If a program is selected, the response light will illuminate. Press the Start/Cancel button to begin the wash cycle. A wash cycle can only be changed if it has been running for a short time. To reset the dishwasher, press and hold the Start button for more than 3 seconds. Select the desired program by pressing the CYCLES button. Press the Start button to resume the cycle.
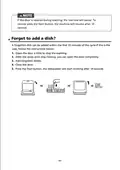
- Page 20: If the door is opened during washing, the machine will pause. A forgotten dish can be added within the first 10 minutes of the cycle. Open the door a little to stop the washing. After the spray arms stop moving, you can open the door completely. Add forgotten dishes. Close the door. Press the start button, the dishwasher will start working after 10 seconds.
- Page 21: End of wash cycle When the cycle has finished, the buzzer of the dishwasher will sound for 8 seconds, then stop. Turn off the appliance using the ON/OFF button, shut off the water supply, and open the door of the dishwasher. Wait a few minutes before unloading the dishwasher to avoid scald. The dishes and utensils are still hot and more susceptible to breakage. Switch off the dishwasher Switch off the dishwasher by pressing the ON/OFF button. Turn off the water tap. Open the door carefully Open the dishwasher's door, leave it ajar. The dishes should be allowed to cool down for around 15 minutes before removing them from the appliance. Warning Open the door carefully when the dishwasher is washing. Only open the door slightly and wait for the wash water to settle before fully opening. Forced tank draining operation In standby mode, you can press and hold the NORMAL button + RAPID button for 3 seconds simultaneously to drain the water tank.
- Page 22: Maintenance and cleaning are essential for optimal performance. Never use the dishwasher without filters. Ensure the filter is properly assembled to avoid damage to dishes and utensils. The filter efficiently removes food particles from the wash water for recycling. Regular cleaning of the filter assembly is necessary for best results. Remove larger food particles from the filter after each wash cycle. The fine filter traps small soil particles for effective cleaning. The main filter captures food and soil particles for drainage. Steps for cleaning the filter include turning it clockwise and lifting it up. Clean all filter elements under running water to remove food soils.
- Page 23: To re-install the filter system, complete Step 2 to Step 1. The entire filter assembly should be cleaned once a week. Inspect the filters for blockages every time the dishwasher has been used. By unscrewing the coarse filter, you can remove the filter system. When cleaning the filters, don't knock on them. The control panel and exterior can be cleaned by using a lightly dampened cloth. After cleaning, make sure to dry it thoroughly. To clean the edge around the door, you should use only a soft warm, damp cloth. Never use a spray cleaner to clean the door panel as it may damage the door lock and electrical components. Abrasive agents or rough paper towels should not be used because of the risk of scratching or leaving spots on the stainless steel surface.
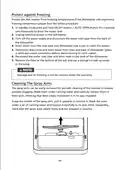
- Page 24: Protect against freezing Protect the dishwasher from freezing temperatures. If the dishwasher will experience freezing temperature please follow the below procedure: In standby mode, press and hold DELAY button + AUTO OPEN button for 3 seconds simultaneously to drain the water tank. Unplug electrical power to the dishwasher. Turn off the water supply and disconnect the water inlet pipe from the back of the dishwasher. Drain water from the inlet pipe and dishwasher (use a pan to catch the water). Disconnect drain hose, and drain water from hose and back of dishwasher (place a catch pan under connection before disconnecting to catch water). Reconnect the water inlet pipe and drain hose to the back of the dishwasher. Remove the filter at the bottom of the tub and use a sponge to soak up water in the sump. Damage due to freezing is not covered under the warranty. Cleaning the spray arms The spray arms can be easily removed for periodic cleaning of the nozzles to remove possible clogging.
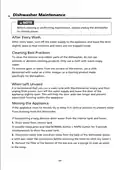
- Page 25: Dishwasher maintenance involves several key practices to ensure optimal performance and longevity. Before cleaning or performing maintenance, always unplug the dishwasher to remove power. After every wash, turn off the water supply and leave the door slightly open to prevent moisture and odors. Use a cloth with warm soapy water for cleaning the exterior and rubber parts; avoid solvents or abrasive products. For spots or stains in the interior, use a cloth dampened with water and a little vinegar or a dishwasher-specific cleaning product. When the dishwasher is left unused, run a wash cycle with it empty, then unplug, turn off the water supply, and leave the door slightly open. If moving the appliance, keep it in a vertical position to prevent water drainage. For long-distance transport, drain water from the interior tank and hoses. To drain the water tank, press and hold the NORMAL and RAPID buttons for 3 seconds in standby mode. Disconnect water inlet and drain hoses carefully to catch any water. Remove the filter at the bottom of the tub and use a sponge to soak up water in the sump.
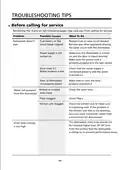
- Page 26: Troubleshooting tips Before calling for service, reviewing the charts may save you from calling for service. Possible causes for the dishwasher not starting include a blown fuse or tripped circuit breaker. Make sure the dishwasher is turned on and the door is closed securely. Check that the water supply is connected properly and the water is turned on. Ensure the door of the dishwasher is properly closed and latched. Check the drain hose for kinks or crushes. If water is not pumped from the dishwasher, check the filters. Make sure the kitchen sink is draining well. If the kitchen sink is clogged, you may need a plumber rather than a serviceman for dishwashers. The dishwasher drain hose should not be installed higher than 39 1/4 from the surface that the dishwasher is sitting on to prevent performance issues.
- Page 27: Problem: Suds in the tub Possible Causes: Incorrect detergent/soap, spilled rinse-aid What to do: Remove all dishes, scoop out suds, add olive oil or vinegar, run normal wash, force a drain, repeat as necessary. Problem: Stained tub interior Possible Causes: Detergent with colorant may have been used. What to do: Ensure detergent has no colorant. Problem: White film on inside surface Possible Causes: Hard water minerals. What to do: Clean interior with damp sponge and dishwasher detergent, wear rubber gloves. Problem: Rust stains on cutlery Possible Causes: Affected items are not corrosion resistant. What to do: Avoid washing non-corrosion resistant items in the dishwasher. Problem: Knocking noise in the dishwasher Possible Causes: Spray arm obstructed by items. What to do: Interrupt program and rearrange obstructing items. Problem: Rattling noise in the dishwasher Possible Causes: Loose crockery. What to do: Interrupt program and rearrange dishware. Problem: Knocking noise in the water pipes Possible Causes: Water hammer in household piping. What to do: This has no influence on dishwasher function; contact a qualified plumber if in doubt. Problem: Dishes are not clean Possible Causes: Incorrect loading, program not powerful enough. What to do: Refer to loading instructions and select a more intensive program.
- Page 28: Problem: The dishes are not clean. Possible Causes: Detergent, items blocking the movement of the spray arms, unclean or incorrectly fitted filter combination, combination of soft water and too much detergent. What to Do: Use more detergent or try a different brand, rearrange items for spray arm movement, clean and fit the filter correctly, use less detergent with soft water and select a shorter cycle. Cloudiness on glassware: Hard water can cause limescale deposits. What to Do: Add more detergent. White spots appear on dishes and glasses: Aluminium utensils have rubbed against dishes. What to Do: Use a mild abrasive cleaner to remove marks. Black or grey marks on dishes: Dishes block detergent dispenser. What to Do: Adjust the way dishes are loaded. The dishes are not drying: Dishes are removed too soon. What to Do: Do not empty the dishwasher immediately; open the door slightly to release steam and wait until the inside temperature is safe to touch.
- Page 29: Error codes The dishwasher will display error codes when it detects a malfunction. Possible causes include: Unit not receiving enough water. Check that the water supply is connected properly and the water is turned on. Not reaching required temperature. Contact Customer Service to have a qualified technician repair your dishwasher. Overflow. If overflow occurs, turn off the main water supply before calling a service. If there is water in the base pan due to an overfill or small leak, it should be removed before restarting the dishwasher.
- Page 30: Technical information Height: 18 5/16 (465mm) Width: 16 9/16 (420mm) Depth: 17 1/8 (435mm) Water pressure: 0.04 - 1.0MPa Power supply: see rating label Capacity: 2 place setting (AHAM)
- Page 31: Year limited warranty This is the only express warranty for the product and in lieu of any other warranty or condition. This product is warranted to be free from defects in material and workmanship for a period of one year from the date of original purchase. During this period, your exclusive remedy is repair or replacement of this product or any component found to be defective. You are responsible for all costs associated with returning the product to us. This warranty does not cover wear from use, and operation doesn’t conform with the instruction manual. Keep the original sales receipt, as proof of purchase is required to make a warranty claim. This warranty is void if the product is used for other than single-family household use. We exclude all claims for special, incidental, and consequential damages by breach of express or implied warranty. Every implied warranty is disclaimed except to the extent prohibited by law. This warranty gives you specific legal rights.

CMA DISHMACHINES UC65e M3 Dishwasher

ZANUSSI ZSFN121W3 Slimline Dishwasher

ARDESTO DWMB-V6073 Dishwasher

BOSCH SPI6EMS17E Dishwasher

BOSCH SBD6YCX02E-46 Fully Integrated Dishwasher

Electrolux ESF97400RKX Built Under Dishwasher

Indesit I0F D641A Dishwasher

BOSCH SGS2HVW66G Free-Standing Dishwasher

Midea MDC17P0ABB Dishwasher

FISHER PAYKEL DD24SCTW9N Dishwasher