Home > CMA Dishmachines > CMA DISHMACHINES UC65e M3 Dishwasher
CMA DISHMACHINES UC65e M3 Dishwasher


MODEL UC65e
M3
Installation Operation Manual
Rev 1.00 11-01-22
C M A D I S H M A C H I N E S
17707 VALLEY VIEW A V E N U E
CERRITOS, CALIFORNIA 90703
8 0 0 - 8 5 4 - 6 4 1 7
FAX 714-895-2141

| General | Details |
|---|---|
| Name | CMA DISHMACHINES UC65e M3 Dishwasher |
| Make | CMA Dishmachines |
| Language | English |
| Filetype | PDF (Download) |
| File size | 1.49 MB |


CMA DISHMACHINES EST-44 Conveyor Dishwasher

CMA DISHMACHINES CMA-180UC Under Counter Dishwasher

CMA DISHMACHINES EST-AH Door Type Rack Low Dishwasher

CMA DISHMACHINES CMA-180VL Dishwasher

CMA DISHMACHINES UC50e Dishwasher

CMA DISHMACHINES CMA-180 Dishwasher

CMA DISHMACHINES CMA-180UC Dishwasher

CMA DISHMACHINES H-1X Undercounter Dishwasher

CMA DISHMACHINES 180UC-3 Under Counter Dishwasher

CMA DISHMACHINES AH Straight Thru Design Dishwasher

CMA DISHMACHINES UC65e M3 Dishwasher Overview
Summary of Contents
- Page 1: Model UC65e Installation operation manual Rev 1.00 C M A Dish Machines
- Page 2: Product registration is available online. Connect to the internet to register your machine. Enter the provided URL to complete the registration.
- Page 3: For future reference, record your dishwasher information in the box below. The model no., serial no., voltage, Hz and phase are needed to identify your machine and to answer questions. The machine data plate is located on the lower front panel. Please have this information ready if you call for service assistance.
- Page 4: Installation Receiving and Placement Installation Codes Water Connection Drain Connection Electrical Connection Detergent Set-up Rinse-Aid Set-up Operation Control Panel Description
- Page 5: Receiving Inspect the outside of the dishwasher carton for signs of damage. Remove the carton and inspect the dishwasher for damage. Check for any options or accessories that may have shipped with your dishwasher. Be careful when lifting and moving the machine to avoid damage. Placement Compare the installation site utility connections with the dishwasher utility connections and make sure they are the same. Level the machine using the four leveling feet. Plumbing connections must be made before the electrical installation begins. The dishwasher can be installed as a free-standing unit or under a counter-top. It is highly recommended that the underside of the counter-top be clad in metal. Under counter installations should provide storage space for the dishwasher chemical supply containers. Chemical supply containers should be placed as close to the machine as possible. Remove the lower front panel in preparation for utility installations.
- Page 6: Installation must comply with all local electrical, plumbing, health, and safety codes. In the absence of local codes, installation should follow the National Electrical Code and Canadian Electrical Code. The installation must be performed by qualified service personnel familiar with food service equipment. All plumbing connections must be made before the electrical installation. Damage to the water heaters will occur if power is turned on without an adequate water supply. Problems due to improper installation are not covered by the Limited Warranty. Compliance with local health codes is necessary during installation. Improper installation may lead to warranty issues. Installation codes are crucial for safe operation. Qualified personnel are essential for proper installation.
- Page 7: Installation Water connection Connect the plumbing in accordance with the specifications below. Caution: To prevent damage to the dishwasher supply valves, the installing plumber must thoroughly flush debris from the water supply line before connecting it to the dishwasher. Damage caused by improper installation is not covered by the limited warranty. Note: All plumbing connections must be positioned to allow the machine to be moved for service and cleaning. Minimum incoming temperature: 140°F/60°C The dishwasher is equipped with a 6 ft / 1.8 m flexible fill hose with a 3/4 FNPT fitting. Install a 1/2 or larger shut-off valve in the water supply line as close to the dishwasher as possible for servicing.
- Page 8: Installation Connect the drain in accordance with the specifications below. The dishwasher drain connection must comply with all local plumbing, health and safety codes. Damage caused by improper installation is not covered by the limited warranty. The dishwasher is equipped with a 4ft / 1.2 m clear braided drain hose and a 3/4 MNPT x 5/8 hose barb adapter. Connect the drain hose to a 1-1/2 wye fitting. The drain hose must be vented to prevent siphoning. A drain connection with a dedicated waste line is strongly recommended. The limited warranty is void if an extension is added to the drain hose. The syphon loop is modified or removed. The supplied drain hose fitting is not used.
- Page 9: Installation Drain connection Drain must be vented to prevent syphoning Drain hose 3/4 in. MNPT hose adapter Optimum 1-1/2 in. wye fitting 3 ft. max off floor level Configuring the drain line Do not reposition the drain hose Do not add an extension to the drain hose Do not void the limited warranty
- Page 10: Installation must comply with local electrical, plumbing, health, and safety codes or applicable national standards. Inspect the shipping carton for damage and report immediately. Inspect the shipment for accessories and items shipped with the machine. Compare the installation site utilities to ensure they are the correct size and location. Be careful when moving the dishwasher to prevent damage. The dishwasher can be installed as a free-standing unit or under a counter-top. It is recommended that the underside of the counter-top be clad in metal. Under counter installations should provide storage space for the dishwasher chemical supply containers. Chemical supply containers should be placed as close to the machine as possible. The dishwasher has 4 adjustable feet for leveling.
- Page 11: Installation Electrical connection WARNING: Electrocution may occur when working on energized circuits. Disconnect power at the main breaker or service disconnect switch, then lock out and tag it to indicate that work is being performed on the circuit. CAUTION: Electrical connections must be made after the plumbing installation. Damage to the water heaters will occur if the power is turned on without an adequate water supply. Check the electrical specifications on the machine data plate. Refer to the breaker size table below and ensure the building breaker size matches. Remove dishwasher lower front panel to access internal components for installation.
- Page 12: Installation Electrical connection Remove the left screw on the front lip of the terminal box. Lift and remove the cover to access the terminal block. A 30 / 76 cm service loop must be provided behind the unit for servicing. Thread the power cable through the middle slot in the rear panel. Secure the cable to the terminal box using the proper strain relief. Connect the incoming power as shown in the provided diagram. 208-240V / 60Hz / 1. Single phase - three wire plus ground which includes a current carrying neutral wire rated min 190 °F (88 °C).
- Page 13: Initial start-up Contact a local chemical supplier for detergent and rinse-aid chemicals. The detergent should be a non-chlorinated liquid detergent. The dishwasher is equipped with a built-in detergent dispensing pump and rinse-aid dispensing pump. The pumps are located on the lower panel behind the lower-front access panel. Each pump is equipped with 6 feet of pick-up supply tubing, a stiffener tube, and a strainer. A red label marked detergent is attached to the detergent pump inlet tubing. A blue label marked rinse-aid is attached to the rinse-aid pump inlet tubing. The detergent supply should be a non-chlorinated liquid detergent. The dispensing pumps are located behind the front panel.
- Page 14: Parameter setting instructions provide essential guidelines for making adjustments. Caution: Parameter changes must be made by qualified personnel only. Locate the control board and open the door to access settings. Washing temperature adjustment is available during the cycle. The following parameters may be changed depending on the model: detergent concentration, rinse temperature, wash temperature, fill time, units (F-C), and language (English - French). Board settings are accessed from the rear of the control panel. To change parameters, push and hold the Menu button. Scroll through the parameters until the desired one is reached. Push the Change button until the desired setting is reached. Release the button and control will return to normal operation after approximately 3 seconds.
- Page 15: Installation Prime the detergent and rinse additive pump. Place each chemical pick-up tube in a full container of detergent and rinse additive. Push the dishwasher power switch ON. The dishwasher will automatically fill with water. Press and hold the PRIME SWITCH for detergent and then rinse additive for 30-60 seconds. Wait twenty minutes or until the temperature display indicates a minimum of 150°F/66°C.
- Page 16: Operation Control panel description ON-OFF/Drain power switch turns on and the automatic drain cycle. LCD screen displays machine status, including temperatures and operation functions. Minimum wash water temperature is 150°F/66°C. Minimum/maximum final rinse temperature is 180-195°F/82-91°C. Wait indicator light illuminates during the initial fill and as the booster heats. Chemical prime switch runs the detergent dispensing pump during initial setup. Pressing the start button initiates an automatic timed cycle. Pressure gauge indicates the final rinse water flowing pressure during cycles.
- Page 17: Operation - Loading Wares Remove large food particles and debris before loading wares. Load plates in a peg rack. Bowls and glasses in a flat-bottom rack. Load silverware in a single layer in a flat-bottom rack. Load pots, pans, and utensils upside down in a flat-bottom rack. Do not overload rack and only wash one rack at a time. Never wash foreign objects such as dish rags or mops. Caution: Ferrous metals in the form of metal scrub pads must not be used to clean wares or dishwasher surfaces. Avoid putting any type of ferrous metal in the machine.
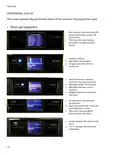
- Page 18: Operation The screen displays the operational status of the machine throughout the cycle. Start-up sequence When the power switch is turned ON, the system information screen will show briefly. This shows firmware version, parameter settings, and cycle counts. Machine is filling. Wait light is illuminated. Progress bar shows fill time remaining. Red thermometer indicator shows booster tank is heating. Wait light indicates cycle is pending. Progress bar shows remaining heat time. Ready indicates the machine will wash.
- Page 19: Operation Operational display Wash cycle The status indicator shows cycle progress. In-cycle light is illuminated. When the wash cycle is complete, the machine will drain all of the water and refill with fresh hot water. Display changes to red and indicates rinse temperature.
- Page 20: Operation - Rinse Sentry, Auto-Clean, Drain Mode Rinse Sentry Autoclean Drain When the machine is turned on, a green status indicator is shown. This takes approximately 2-1/2 minutes. When complete, open the door to allow the machine interior to air dry.
- Page 21: Cleaning the machine is essential at the end of each meal period, every 2 hours of continuous operation, and at the end of the day. Dishwasher surfaces may be hot, and cleaning chemicals can be caustic to the skin and eyes. Wear protective clothing and eye protection when handling chemicals and cleaning the machine. Never use a metallic scrub pad to clean the dishwasher; use a soft cloth and mild detergent instead. Never spray the exterior of the machine with water; use a soft cloth and mild detergent. Push the power button off; the light will go out. The machine will enter the auto-clean mode and then drain. Remove the upper and lower wash and rinse spray arms and flush with clean water. Check the rinse spray arm nozzles and clean them if necessary. Wipe the exterior of the machine with a soft cloth and mild detergent, then leave the door open to aid overnight drying.
- Page 22: Cleaning Deliming WARNING: Death or serious injury may result when deliming solution is mixed with sodium hypochlorite. Mixing may cause hazardous gases to form. Deliming solution and other acids must never be mixed with chlorine, iodine, bromine, or fluorine. Deliming solutions can cause severe irritation and possible chemical burns. Always wear protective clothing and goggles when handling chemicals. Follow the steps below to delime the dishwasher. Always wear eye protection, rubber gloves, and protective clothing when handling chemicals. Be careful to avoid splashing. Deliming is complete.
- Page 23: Maintenance schedules outline daily, weekly, semi-annual, and yearly tasks. Daily maintenance includes checking wash arm and rinse arm spray jets and cleaning as necessary. Ensure the water supply is on and the drain is not clogged. Check the temperature display for proper operation. Inspect dish racks for good condition. Monitor chemical containers and refill as required. Follow the cleaning procedures outlined in the manual. Weekly maintenance involves performing daily tasks and inspecting water lines for leaks. Check for leaks underneath the dishwasher and ensure the floor drain is unobstructed. Semi-annual maintenance includes inspecting chemical dispensing pump tubing for damage and flushing the lines. Yearly maintenance requires contacting an authorized service agent for a preventive inspection. There are no lubrication points for this dishwasher.
- Page 24: Page 24
- Page 25: Page 25

Joy Pebble WQP4-6206 Dishwasher

FISHER PAYKEL DD24DCTX9 N Double Dishwasher

IKEA ÖSTVEDA Integrated Dishwasher

Domain DW60ET Dishwasher

BOSCH SPS2IKW01G Dishwasher

BOSH SBH4HVX00E Dishwasher

FISHER PAYKEL DD60DHI9 Dishwasher

BOSCH SHE3AEE5N 100 Series Full Console Dishwasher

BOSCH SMV6HCX3FR Dishwasher

Miele PFD 100 SmartBiz Free-Standing Dishwasher