FORTE F18DWS250SS 18 Inch Dishwasher


Installation Manual
18 Inch Stainless Steel Dishwasher
F18DWS250SS

| General | Details |
|---|---|
| Name | FORTE F18DWS250SS 18 Inch Dishwasher |
| Make | FORTE |
| Language | English |
| Filetype | PDF (Download) |
| File size | 0.71 MB |


Forte F24DWS650PR Dishwasher

FORTE F18DWS450PR Dishwasher

FORTE F24DWS450PR Dishwasher

FORTE F18DWS250SS 18 Inch Dishwasher Overview
Summary of Contents
- Page 1: Installation manual for the 18 inch stainless steel dishwasher F18DWS250SS.
- Page 2: Important safety instructions Installation requirements Installation preparation Prepare dishwasher Prepare and route the electrical supply Prepare hot water line and power cord hole Installation Step 1 - Handlebar assembly Step 2 – Check door balance Step 3 – Insert drain hose and power cord through cabinet
- Page 3: Important safety instructions should be read completely and carefully. Observe all governing codes and ordinances. Leave these instructions for the consumer and local inspector's use. Keep these instructions with your owner's manual for future reference. Ensure the dishwasher is completely enclosed at the time of installation to reduce the risk of electrical shock, fire, or injury. Installation requires basic mechanical and electrical skills. Improper installation is not covered under the appliance warranty. The dishwasher must be installed to allow for future removal if service is required. Contact your dealer or builder if you received a damaged dishwasher. Wear gloves, safety glasses, or goggles while performing installations.
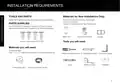
- Page 4: Installation requirements Gather the required tools and parts before starting installation. Waste tee for house plumbing, if applicable. Hand shut-off valve. Coupler for extending drain line, if applicable. Four #8 Phillips flat head wood screws, 5/8” long to secure dishwasher to underside of countertop. Tools you will need. Materials you will need. Thread seal tape. One 1-1/2” – 2” screw type clamp for connecting to waste-tee.
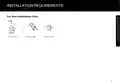
- Page 5: Installation requirements for new installations include a tubing cutter, hole saw set, and drills and bits.
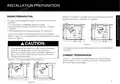
- Page 6: Installation preparation is essential for proper dishwasher setup. The minimum required space when the door is open is specified. The rough cabinet opening must be at least 23” deep and 17.7” wide. The height of the opening should be between 32.5” and 34.5”. The dishwasher must be installed with a drain hose no longer than 10 feet. Drain requirements must follow local codes and ordinances. An air gap or a minimum 32” high drain loop is necessary to prevent backflow. The dishwasher must be fully enclosed on the top, sides, and back. Do not connect drain lines from other devices to the dishwasher drain hose. An air gap is required if the waste tee or disposer connection is less than 18” above the floor.
- Page 7: Installation preparation involves ensuring proper drain setup. The type of drain installation depends on local codes and ordinances. An air gap may be required based on specific installation conditions. If the waste tee or disposer connection is less than 18 inches above the floor, Method 1 must be used. A drain loop must be at least 32 inches above the floor for proper installation. Failure to meet drain connection height requirements can lead to improper draining of the dishwasher. Cabinet preparation requires drilling a hole for the drain hose connection. The hole should be smooth and free of sharp edges. Follow manufacturer instructions for installing waste tee or disposer and air gap. Ensure compliance with all local regulations during installation.
- Page 8: Installation preparation A grounded 3 prong outlet is required inside a cabinet next to the dishwasher cabinet opening. You must have a 120-volt, 60Hz, AC-only, 12-amp, fused electrical supply. We recommend a time-delay fuse or circuit breaker and a separate circuit. Power cord must plug into a grounded 3 prong outlet, located in the cabinet next to the dishwasher opening. Electrical connection is on the right front of the dishwasher. For power cord connections, install a 3-prong grounding type receptacle. The power-supply receptacle for the appliance shall be installed in a cabinet or on a wall adjacent to the undercounter space. The improper connection of the equipment grounding conductor can result in a risk of electric shock. Check with a qualified electrician or service representative if you are in doubt that the appliance is properly grounded.
- Page 9: Installation preparation involves several key steps. Turn off the water supply before beginning the installation. Install a hand shut-off valve in an accessible location, such as under the sink. The water line may enter from either side, rear, or floor within the designated area. Cut an additional 1-4/5” diameter hole to accommodate the water line and power cord. Connect one end of the inlet line to the 3/4-inch FHT and the other end through the hole in the cabinet. Adjust the water heater to a temperature between 120°F and 150°F. Flush the water line to clean out any debris. Ensure the hot water supply line pressure is between 6-145 PSI. Opening the door will cause the dishwasher to tip forward; hold it securely if necessary.
- Page 10: Installation Before you begin Step 2 – Check door balance Step 1 – Handlebar assembly Use a hex wrench to install the outside door handle. This step is only applicable to the F18DWS250SS model. After placing the panel on the dishwasher, please try to open and close the door to test the balance. If not balanced, please adjust the screw in the direction of clockwise or counterclockwise.
- Page 11: Installation Step 3 – Insert drain hose and power cord through cabinet Step 4 – Slide dishwasher partially into cabinet Do not push against front panel with knees. Damage will occur. Slide dishwasher into the opening a few inches at a time. Maximum drain hose length 10' Make sure drain hose is not kinked under the dishwasher. Insert drain hose into cabinet wall hole. Insert the power cord into another cabinet wall hole. Position water line and house wiring on the floor to avoid interference with base of dishwasher.
- Page 12: Installation steps include positioning the dishwasher under the countertop and leveling it. Ensure that wires are secure and not pinched or in contact with other components. The dishwasher must be level for proper dish rack operation and wash performance. Push the dishwasher into the cabinet, ensuring the front corners of the door are flush with cabinet doors. Be cautious not to dent front panels or damage the countertop or cabinets. Use a level on the door and rack track inside the tub to check that the dishwasher is level. Check the level from front to back and side to side. Reposition the dishwasher by grasping both sides.
- Page 13: Installation instructions for the dishwasher include adjusting the height by turning the feet to ensure it is level. Fix the dishwasher to the cabinet by turning the screws. Plug the four hole plugs into the designated holes. Adjust the front and back feet as necessary. Check that the lower rack does not roll forward or back into the dishwasher when pulled out halfway. If the rack rolls in either direction, the dishwasher must be leveled again. Use screws ST4*26 to fix the dishwasher on the cabinet. Self-tapping screws are recommended for installation.
- Page 14: Installation Water line connection Connect drain line to air gap, waste tee or disposer using either previously determined method. Follow all local codes and ordinances. The drain hose molded end will fit 5/8”, 3/4” or 1” diameter connections on the air gap, waste tee or disposer. Important: Do not cut corrugated portion of hose. If a longer drain hose is required, add up to 42” of length for a total of 10 ft. to the factory installed hose. Secure the connection with hose clamps. Total drain hose length must not exceed 10 feet for proper drain operation.
- Page 15: Installation Important Step 9 – Connect power supply When connecting drain line to disposer, check to be sure that drain plug has been removed. Dishwasher will not drain if plug is left in place. Power supply cord - Plug into a grounded 3 prong outlet. Tip: Avoid unnecessary service call charges. Always be sure disposer drain plug has been removed before attaching dishwasher drain hose to the disposer. Warning Electrical shock hazard Do not remove ground prong. Do not use an adapter. Do not use an extension cord. Failure to follow these instructions can result in death, fire, or electrical shock.
- Page 16: Installation of kick plate involves adjusting its height. If the adjustment distance does not meet requirements, a sharp knife can be used to cut along the groove. Each piece cut can be 10 mm high, and this should be done by professionals. The required height of the kick plate should ensure aesthetic appeal and smooth door operation. Refer to the suggested chart for height dimensions.
- Page 17: Installation Pretest checklist Dishwasher wet test Review this list after installing your dishwasher to avoid charges for a service call that is not covered by your warranty. Check to be sure power is off. Check to be sure that water enters the dishwasher. Check for leaks under the dishwasher. Check door opening and closing. Verify water supply and drain lines are not kinked or in contact with other components. Incoming water temperature must be between 120 °F and 150 °F.

smeg STX23CLLO Classica Undercounter dishwasher

BOSCH SPS4EMW61E Dishwasher

Electrolux ESF97400RKX Built Under Dishwasher

INVENTUM VVW6035AW Dishwasher

Kenmore W10898468B Ultra WashTMHE Dishwasher

IKEA AA-2412057-2-1 RÅGLANDA Integrated Dishwasher

FISHER and PAYKEL DD60SCHX9 FP BI DishDrawer Dishwasher

FRIGIDAIRE FDSP4401SS Dishwasher

Westinghouse WSF6604WA Dishwasher

gorenje GI52040X Dishwasher